MFC+OPenCv 图像实时处理 绘制轮廓 遇到一点问题

qq_38242442 2017-12-27 08:20:36
我要完成的是显示摄像头捕捉的画面并实时识别边缘,描绘轮廓。参考了各路大神的博客自己照着改了改。
功能
1.点击open按钮打开摄像头采集图像信息,点击close关闭摄像头
2.点击处理进行canny算子的边缘识别,点击停止停止处理
3.点击轮廓开始查找轮廓并绘制轮廓,点击停止停止绘制
基本框架是这样的:

代码

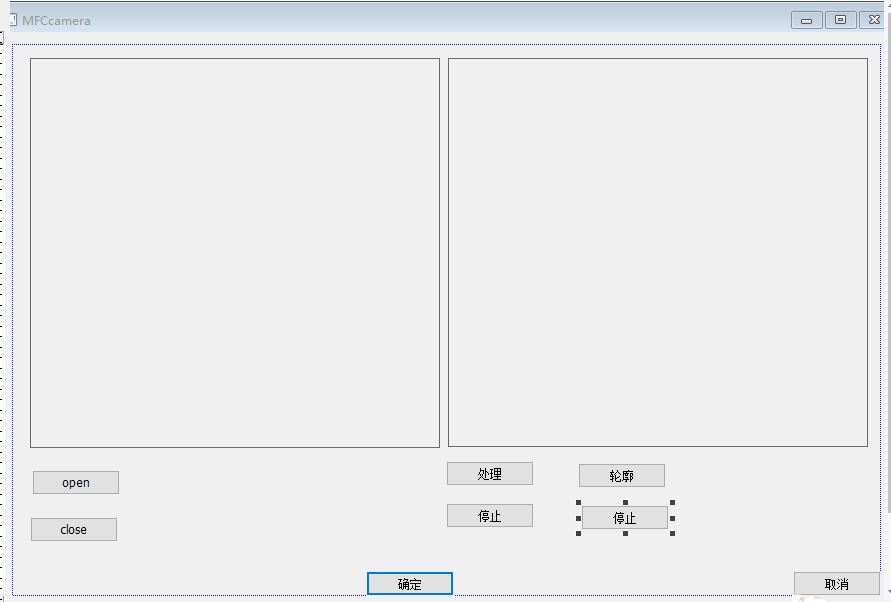
void CMFCcameraDlg::OnBnClickedButton1()
{
cap.open(0);
SetTimer(1, 10, NULL);
}
void CMFCcameraDlg::OnBnClickedButton2()
{
// TODO: 在此添加控件通知处理程序代码
KillTimer(1);
cap.release();
}

其他按钮事件都差不多就不贴上来了,总之就是在ontimer里完成。见下:
2.

void CMFCcameraDlg::OnTimer(UINT_PTR nIDEvent)
{
cap >> frame;
switch (nIDEvent)
{
case 1:
{
pDC = GetDlgItem(IDC_STATIC)->GetDC();// 获得显示控件的 DC
hDC = pDC->GetSafeHdc();

IplImage img = frame;
CvvImage cimg;
cimg.CopyOf(&img);//复制图片

CRect rect;
GetDlgItem(IDC_STATIC)->GetClientRect(&rect);
cimg.DrawToHDC(hDC, &rect);// 将图片绘制到显示控件的指定区域内
ReleaseDC(pDC);
break;
}
case 2:
{
pDC = GetDlgItem(IDC_STATIC2)->GetDC();// 获得显示控件的 DC
hDC = pDC->GetSafeHdc();// 获取 HDC(设备句柄) 来进行绘图操作

cvtColor(frame, edges, COLOR_BGR2GRAY);//转为灰度图
GaussianBlur(edges, edges, Size(7, 7), 1.5, 1.5);//高斯滤波 降噪用
Canny(edges, edges, 0,300, 3);//边缘检测 详见opencv书p250
IplImage img = edges;
CvvImage cimg;
cimg.CopyOf(&img);//复制图片

CRect rect;
GetDlgItem(IDC_STATIC2)->GetClientRect(&rect);
cimg.DrawToHDC(hDC, &rect);// 将图片绘制到显示控件的指定区域内
ReleaseDC(pDC);
break;
}
case 3:
{
pDC = GetDlgItem(IDC_STATIC2)->GetDC();// 获得显示控件的 DC
hDC = pDC->GetSafeHdc();// 获取 HDC(设备句柄) 来进行绘图操作

cvtColor(frame, edges, COLOR_BGR2GRAY);//转为灰度图
//GaussianBlur(edges, edges, Size(7, 7), 1.5, 1.5);//高斯滤波 降噪用
//Canny(edges, edges, 0, 300, 3);//边缘检测 详见opencv书p250

findContours(edges, contours, hierarchy, RETR_CCOMP, CHAIN_APPROX_NONE);
for (; index >= 0; index = hierarchy[index][0])
{
Scalar color(rand()&255,rand()&255,rand()&255);
drawContours(edges, contours, index, color, FILLED, 8, hierarchy);
}
IplImage img = edges;
CvvImage cimg;
cimg.CopyOf(&img);//复制图片

CRect rect;
GetDlgItem(IDC_STATIC2)->GetClientRect(&rect);
cimg.DrawToHDC(hDC, &rect);// 将图片绘制到显示控件的指定区域内
ReleaseDC(pDC);
break;
}
}
CDialogEx::OnTimer(nIDEvent);
}


问题
前两个功能是可以实现的。但是绘制轮廓的功能实现不了。应该是路径的问题。在之前编写的图像处理程序里,我是把图片放在工程目录里的。但是这个实时采集的动态图我也不知道它的路径啊。请问下有什么解决办法吗。或者是我用法不对?有其他的办法吗?
运行结果是这样的,因为第三个功能出错了我就注释掉了。
...全文
872 3 打赏 收藏 转发到动态 举报
AI 作业
写回复
用AI写文章
3 条回复
切换为时间正序
请发表友善的回复…
发表回复
赵4老师 2017-12-29
  • 打赏
  • 举报
回复
建议先编译链接调试OpenCV自带的相关例子代码。
qq_38242442 2017-12-29
  • 打赏
  • 举报
回复
引用 1 楼 zhao4zhong1 的回复:
仅供参考:
#include "opencv2/highgui/highgui.hpp"
#include "opencv2/imgproc/imgproc.hpp"
#include "opencv2/imgproc/imgproc_c.h"
using namespace std;
using namespace cv;
Mat img,smallImg,gray,bw;
vector<Vec4i> hierarchy;
vector<vector<Point> > contours;
int threshval=128;
Rect r;
Rect maxrect,brect;
int idx,n;
const static Scalar colors[15]={
    CV_RGB(  0,  0,128),
    CV_RGB(  0,128,  0),
    CV_RGB(  0,128,128),
    CV_RGB(128,  0,  0),
    CV_RGB(128,  0,128),
    CV_RGB(128,128,  0),
    CV_RGB(128,128,128),
    CV_RGB(160,160,160),
    CV_RGB(  0,  0,255),
    CV_RGB(  0,255,  0),
    CV_RGB(  0,255,255),
    CV_RGB(255,  0,  0),
    CV_RGB(255,  0,255),
    CV_RGB(255,255,  0),
    CV_RGB(255,255,255),
};
Scalar color;
void gamma_correct(Mat& img, Mat& dst, double gamma) {
	Mat	temp;
	CvMat tmp;

	img.convertTo(temp,	CV_32FC1, 1.0/255.0, 0.0);
	tmp=temp;
	cvPow(&tmp,	&tmp, gamma);
	temp.convertTo(dst , CV_8UC1 , 255.0	, 0.0);
}
int main() {
    cvNamedWindow("display",1);
    img=imread("image.jpg",1);
    r.x=img.cols/10;
    r.y=img.rows/3;
    r.width=img.cols*8/10;
    r.height=img.rows*2/3;
    smallImg=img(r);
    cvtColor(smallImg,gray,CV_BGR2GRAY);
//  medianBlur(gray,gray,5);
    equalizeHist(gray,gray);
    gamma_correct(gray,gray,4.0);
    imshow("display",gray);
    waitKey(0);

	bw=(gray>threshval);
    imshow("display",bw);
    waitKey(0);

	Mat	Structure0=getStructuringElement(MORPH_RECT,Size(3,3));
    erode(bw,bw,Structure0,Point(-1,-1));
	Mat	Structure1=getStructuringElement(MORPH_RECT,Size(6,6));
    dilate(bw,bw,Structure1, Point(-1,-1));
    imshow("display",bw);
    waitKey(0);

    findContours(bw,contours,hierarchy,RETR_EXTERNAL,CHAIN_APPROX_SIMPLE);
    if (!contours.empty()&&!hierarchy.empty()) {
        idx=0;
        n=0;
        vector<Point> approx;
        for (;idx>=0;idx=hierarchy[idx][0]) {
            color=colors[idx%15];
//          drawContours(smallImg,contours,idx,color,1,8,hierarchy);
            approxPolyDP(Mat(contours[idx]), approx, arcLength(Mat(contours[idx]), true)*0.005, true);//0.005为将毛边拉直的系数
            const Point* p = &approx[0];
            int m=(int)approx.size();
            polylines(smallImg, &p, &m, 1, true, color);
            circle(smallImg,Point(p[0].x,p[0].y),3,color);
            circle(smallImg,Point(p[1].x,p[1].y),2,color);
			for	(int i=2;i<m;i++) circle(smallImg,Point(p[i].x,p[i].y),1,color);
            n++;
            if (1==n) {
                maxrect=boundingRect(Mat(contours[idx]));
            } else {
                brect=boundingRect(Mat(contours[idx]));
                CvRect mr(maxrect),br(brect);
                maxrect=cvMaxRect(&mr,&br);
            }
        }
        circle(smallImg,Point(maxrect.x+maxrect.width/2,maxrect.y+maxrect.height/2),2,CV_RGB(255,0,0));
    }
    imshow("display",smallImg);
    waitKey(0);
    cvDestroyWindow("display");
    return 0;
}
谢谢 我想请问一下如果不是事先放在工程目录而是摄像头实时采集的图片要怎么办呢
赵4老师 2017-12-28
  • 打赏
  • 举报
回复
仅供参考:
#include "opencv2/highgui/highgui.hpp"
#include "opencv2/imgproc/imgproc.hpp"
#include "opencv2/imgproc/imgproc_c.h"
using namespace std;
using namespace cv;
Mat img,smallImg,gray,bw;
vector<Vec4i> hierarchy;
vector<vector<Point> > contours;
int threshval=128;
Rect r;
Rect maxrect,brect;
int idx,n;
const static Scalar colors[15]={
    CV_RGB(  0,  0,128),
    CV_RGB(  0,128,  0),
    CV_RGB(  0,128,128),
    CV_RGB(128,  0,  0),
    CV_RGB(128,  0,128),
    CV_RGB(128,128,  0),
    CV_RGB(128,128,128),
    CV_RGB(160,160,160),
    CV_RGB(  0,  0,255),
    CV_RGB(  0,255,  0),
    CV_RGB(  0,255,255),
    CV_RGB(255,  0,  0),
    CV_RGB(255,  0,255),
    CV_RGB(255,255,  0),
    CV_RGB(255,255,255),
};
Scalar color;
void gamma_correct(Mat& img, Mat& dst, double gamma) {
	Mat	temp;
	CvMat tmp;

	img.convertTo(temp,	CV_32FC1, 1.0/255.0, 0.0);
	tmp=temp;
	cvPow(&tmp,	&tmp, gamma);
	temp.convertTo(dst , CV_8UC1 , 255.0	, 0.0);
}
int main() {
    cvNamedWindow("display",1);
    img=imread("image.jpg",1);
    r.x=img.cols/10;
    r.y=img.rows/3;
    r.width=img.cols*8/10;
    r.height=img.rows*2/3;
    smallImg=img(r);
    cvtColor(smallImg,gray,CV_BGR2GRAY);
//  medianBlur(gray,gray,5);
    equalizeHist(gray,gray);
    gamma_correct(gray,gray,4.0);
    imshow("display",gray);
    waitKey(0);

	bw=(gray>threshval);
    imshow("display",bw);
    waitKey(0);

	Mat	Structure0=getStructuringElement(MORPH_RECT,Size(3,3));
    erode(bw,bw,Structure0,Point(-1,-1));
	Mat	Structure1=getStructuringElement(MORPH_RECT,Size(6,6));
    dilate(bw,bw,Structure1, Point(-1,-1));
    imshow("display",bw);
    waitKey(0);

    findContours(bw,contours,hierarchy,RETR_EXTERNAL,CHAIN_APPROX_SIMPLE);
    if (!contours.empty()&&!hierarchy.empty()) {
        idx=0;
        n=0;
        vector<Point> approx;
        for (;idx>=0;idx=hierarchy[idx][0]) {
            color=colors[idx%15];
//          drawContours(smallImg,contours,idx,color,1,8,hierarchy);
            approxPolyDP(Mat(contours[idx]), approx, arcLength(Mat(contours[idx]), true)*0.005, true);//0.005为将毛边拉直的系数
            const Point* p = &approx[0];
            int m=(int)approx.size();
            polylines(smallImg, &p, &m, 1, true, color);
            circle(smallImg,Point(p[0].x,p[0].y),3,color);
            circle(smallImg,Point(p[1].x,p[1].y),2,color);
			for	(int i=2;i<m;i++) circle(smallImg,Point(p[i].x,p[i].y),1,color);
            n++;
            if (1==n) {
                maxrect=boundingRect(Mat(contours[idx]));
            } else {
                brect=boundingRect(Mat(contours[idx]));
                CvRect mr(maxrect),br(brect);
                maxrect=cvMaxRect(&mr,&br);
            }
        }
        circle(smallImg,Point(maxrect.x+maxrect.width/2,maxrect.y+maxrect.height/2),2,CV_RGB(255,0,0));
    }
    imshow("display",smallImg);
    waitKey(0);
    cvDestroyWindow("display");
    return 0;
}
资源下载链接为: https://pan.quark.cn/s/3d8e22c21839 在本文中,我们将详细介绍如何结合OpenCV库、MFC框架以及Visual Studio 2017来处理图像,涵盖读取图片、添加噪声、绘制轮廓和执行像素过滤等操作。OpenCV是一个功能强大的计算机视觉库,广泛应用于图像处理和计算机视觉领域;而MFC(Microsoft Foundation Classes)是微软提供的一个C++类库,用于开发Windows应用程序。首先需要设置开发环境,在Visual Studio 2017中创建一个MFC应用程序项目,并添加OpenCV库的引用,这通常包括将OpenCV的头文件和库文件路径添加到项目设置中,确保OpenCV版本与系统兼容,例如文中提到的opencv_3可能指的是OpenCV 3.x系列。 读取图片是图像处理的基础。在MFC中,可以使用OpenCV的imread函数读取BMP格式的图片文件,例如: 接下来,可以在图片上添加噪声,噪声用于模拟真实世界中的图像干扰,常见的有高斯噪声、椒盐噪声等。以添加高斯噪声为例: 之后,可以通过边缘检测算法(如Canny、Sobel或Hough变换)找到图像轮廓。以Canny边缘检测为例: 得到边缘信息后,可以进一步在原始图像绘制这些轮廓。需要先找到轮廓,然后使用drawContours函数: 此外,还可以对图像进行像素过滤,例如使用模糊滤波器平滑图像: 以上内容展示了如何利用OpenCVMFC和Visual Studio 2017完成基本的图像处理操作。在实际应用中,可以根据具体需求调整参数,实现更复杂的图像增强、识别或分析功能。同时,理解每个函数的作用和参数含义对于优化代码和解决问题非常重要。在调试和测试过程中,可以利用MFC的界面元素(如按钮和文本框)交互式地展示处理结果,从而提升用户体验。

19,472

社区成员

发帖
与我相关
我的任务
社区描述
VC/MFC 图形处理/算法
社区管理员
  • 图形处理/算法社区
加入社区
  • 近7日
  • 近30日
  • 至今
社区公告
暂无公告

试试用AI创作助手写篇文章吧