C H A P T E R 3
Your First MVC Application
第一个MVC应用程序
The best way to appreciate a software development framework is to jump right in and use it. In this chapter, you’ll create a simple data-entry application using the ASP.NET MVC Framework. We’ll take things a step at a time so you can see how an ASP.NET MVC application is constructed. To keep things simple, we’ll skip over some of the technical details for the moment; but don’t worry—if you are new to MVC, you’ll find plenty to keep you interested. Where we use something without explaining it, we provide a reference to the chapter where you can find all the details.
鉴赏一个软件开发框架最好的方法是投入其中并使用它。本章中,你将用ASP.NET MVC框架生成一个简单的“数据-实体”应用程序。我们将把事情分为一个个步骤,以使你能明白ASP.NET MVC应用程序是如何构造的。为简化起见,这里我们将跳过某些技术细节,但是不必着急 — 如果你是MVC新手,你将会发现大量让你感兴趣的东西。在我们不加解释地使用某些东西的地方,我们会提供参考章节,在那里,你会找到所有细节。
Creating a New ASP.NET MVC Project
生成一个新ASP.NET MVC项目
We are going to start by creating a new MVC project in Visual Studio. Select New Project from the File menu to open the New Project dialog. If you select the Web templates, you’ll see that the MVC 3 installer has created a new item called ASP.NET MVC 3 Web Application, as shown in Figure 3-1.
我们打算从生成一个新的MVC项目开始。在Visual Studio的“文件”菜单中选择“新建项目”,以打开新项目对话框。如果你选择“Web”模板,你会看到MVC 3安装程序已经生成了一个新条目,叫做“ASP.NET MVC 3 Web应用程序”,如图3-1所示。
http://hi.csdn.net/attachment/201108/31/1430687_1314790781gmQW.png
Figure 3-1. The Visual Studio MVC 3 project template
图3-1. Viusal Studio MVC 3项目模板
n Caution The MVC 3 installer doesn’t remove MVC version 2, so you’ll also see the old templates available alongside the new. When creating a new project, be careful to select the right one.
小心:MVC 3安装程序并未删除MVC 2版本,因此你也会在这个新模板的旁边看到老版本的模板。在生成一个新项目时,要小心选择正确的模板。
Set the name of the new project to PartyInvites and click the OK button to continue. You will see another dialog box, shown in Figure 3-2, which asks you to choose between three different types of MVC project templates.
将这个新项目的名字设置为PartyInvites,并点击OK按钮。你将看到另一个对话框。如图3-2所示,它让你在三个不同的MVC项目模板之间进行选择。
http://hi.csdn.net/attachment/201108/31/1430687_1314790797YmZM.png
Figure 3-2. Selecting a type of MVC 3 project
图3-2. 选择MVC 3项目的类型
The Empty option creates a project with only the minimum files and folders required for an MVC 3 application. The Internet Application option creates a small example application that you can modify and build on. It includes user registration and authentication, navigation, and a consistent visual style. The Intranet Application option is similar to Internet Application, but is designed for use in environments that authenticate users through a domain/Active Directory infrastructure. For this chapter, we are going to keep things simple. Select the Empty option, leave the Use HTML5 semantic markup option unchecked, and click OK to create the new project.
“空模板(Empty)”选项只生成一个MVC 3应用程序所需要的最少文件和文件夹。“Internet应用程序”选项生成一个小型的例子应用程序,你可以在它上面进行修改,并建立其它功能。它包括了用户注册与认证、导航,以及一个和谐的可视化样式。Intranet应用程序选项比Internet应用程序更小些,但它是设计用于通过一个域/活动目录(domain/Active Directory)体系结构进行用户认证的环境。现在选择“空模板”选项,让“使用HTML 5语义标记”复选框为不选,点击OK以生成这个新项目。
n Note Under the template options in Figure 3-2, you can see a drop-down menu that lets you specify the view engine for the project. As we mentioned in Chapter 1, MVC 3 includes a new and improved view engine called Razor, which we’ll be using Razor throughout this book. We recommend that you do the same. But if you want to use the regular ASP.NET view engine (known as the ASPX engine), this is where you select it.
注:在图3-2的模板选项下,你可以看到一个下拉菜单,它让你指定项目的视图引擎。正如我们在第1章所提到的,MVC包括了一个新的、叫做Razor的改善了的视图引擎,我们在本书中都使用这个Razor。我们建议你也这样做。但如果你想使用老式的ASP.NET视图引擎(称为ASPX引擎),你可以在这里选择。
Once Visual Studio creates the project, you’ll see a number of files and folders displayed in the Solution Explorer window. This is the default structure for an MVC 3 project. You can try to run the application now by selecting Start Debugging from the Debug menu (if it prompts you to enable debugging, just click the OK button). You can see the result in Figure 3-3. Since we started with the empty project template, the application doesn’t contain anything to run, so we see a 404 Not Found Error.
一旦Visual Studio生成了这个项目,你将在“解决方案浏览器”窗口中看到一些文件和文件夹。这是MVC 3项目默认的结构。现在,通过选择“调试”菜单中的“启动调试”,你可以试着运行一下这个应用程序(如果出现 “能够调试”提示,点一下OK按钮)。你会看到图3-3所示的结果。因为我们是从空项目模板开始的,此应用程序尚未含有任何可以运行的东西,因此我们会看到“404未找到错误”的提示屏幕。
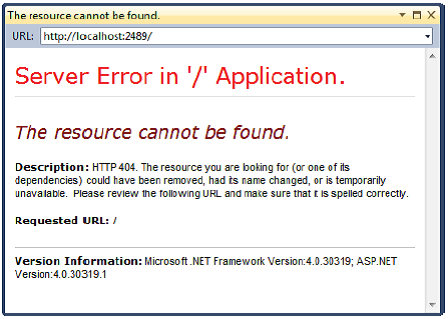
Figure 3-3. Trying to run an empty project
图3-3. 试运行一个空项目
When you’re finished, be sure to stop debugging by closing the browser window that shows the error, or by going back to Visual Studio and selecting Stop Debugging from the Debug menu.
做完上述事情之后,要确保停止调试,这可以通过关闭显示错误消息的浏览器窗口,或返回Visual Studio,在调试菜单上选择“停止调试”。
Adding the First Controller
添加第一个控制器
In MVC architecture, incoming requests are handled by controllers. In ASP.NET MVC, controllers are just simple C# classes (usually inheriting from System.Web.Mvc.Controller, the framework’s built-in controller base class). Each public method in a controller is known as an action method, meaning you can invoke it from the Web via some URL to perform an action. The MVC convention is to put controllers in a folder called Controllers, which Visual Studio created for us when it set up the project. You don’t need to follow this or most other MVC conventions, but we recommend that you do—not least because it will help you make sense of the examples in this book.
在MVC体系结构中,传入的请求是由控制器处理的。在ASP.NET MVC中,控制器只是简单的C#类(通常继承于System.Web.Mvc.Controller,这是.NET框架内建的基类)。在控制器中的每一个public方法称为一个动作方法,意即,你可以通过某个URL从Web来调用它,以执行一个动作。MVC约定,把控制器放在一个名为Controllers的文件夹中,这是Visual Studio在建立项目时为我们自动生成的。你不一定要遵循这一约定以及其它大多数MVC约定,但我们建议你还是遵循它 — 至少因为它有助于你搞清本书例子的意思。
To add a controller to our project, right-click the Controllers folder in the Visual Studio Solution Explorer window and choose Add and then Controller from the pop-up menus, as shown in Figure 3-4.
要把一个控制器添加到我们的项目,右击Controllers文件夹,并从弹出菜单中选择“添加” — “控制器”,如图3-4所示。
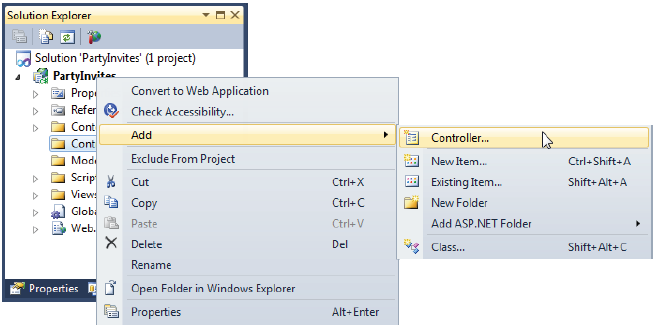
Figure 3-4. Adding a controller to the MVC project
图3-4. 在MVC项目上添加控制器
When the Add Controller dialog appears, set the name to HomeController, as shown in Figure 3-5. This is another convention: the names we give to controllers should be descriptive and end with Controller.
当“添加控制器”对话框出现时,将其命名为HomeController,如图3-5所示。这是另一个约定:我们给控制器的命名应该是描述性的,并以Controller结尾。
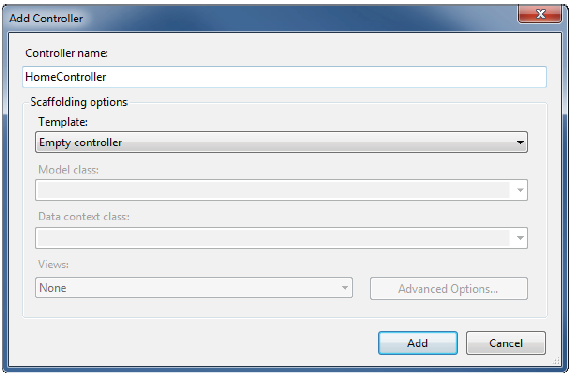
Figure 3-5. Setting the name for the controller
图3-5. 设置控制器的名字
The Scaffolding options section of the dialog allows us to create a controller using a template with common functions. We aren’t going to use this feature, so ensure that the Empty controller item is selected in the Template menu, as shown in the figure.
这个对话框的辅助选项(Scaffolding Options)部分允许我们用一个带有常规功能的模板生成一个控制器。我们暂不打算使用这一特性,因此,确保在“模板(Template)”菜单中选择了“空(Empty)”条目,如图3-5所示。
n Note If you don’t see the Add Controller dialog as it is shown in Figure 3-5, you have probably forgotten to install the MVC 3 Tools Update. See Chapter 2 for details.
注:如果你没看到如图3-5所示的添加控制器对话框,你可能忘记了安装MVC 3工具更新。详见第2章。
Click the Add button to create the controller. Visual Studio will create a new C# code file in the Controller folder called HomeController.cs and open it for editing. You can see that the class is called HomeController and it is derived from System.Web.Mvc.Controller. Edit the code in this file so that it matches Listing 3-1.
点击添加按钮以生成这个控制器。Visual Studio将在Controller文件夹中生成一个名为HomeController.cs的新的C#代码文件,并打开它进行编辑。你可以看到这个类的名字为HomeController,而且它派生于System.Web.Mvc.Controller。编辑这个文件中的代码,使其内容如清单 3-1。
Listing 3-1. Modifying the HomeController Class
using System.Web.Mvc;

namespace PartyInvites.Controllers {

    public class HomeController : Controller {

        public string Index() {

            return "Hello, world";

        }

    }

}
We haven’t created anything exciting, but this is a good way of getting started with MVC. We’ve created an action method called Index, which returns the string “Hello, world”. Run the project again by selecting Start Debugging from the Visual Studio Debug menu. The browser will display the result of the Index action method, as shown in Figure 3-6.
我们还没有生成任何让人兴奋的东西,但这是MVC的一个良好的开端。我们已经生成了一个名为Index的动作方法,它返回字符串“Hello, world”。再次运行这个项目,浏览器将显示Index动作方法的结果,如图3-6所示。
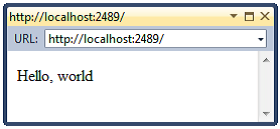
Figure 3-6. The output form of our controller action method
图3-6. 控制器动作方法的输出


 发帖
发帖 与我相关
与我相关 我的任务
我的任务
 分享
分享