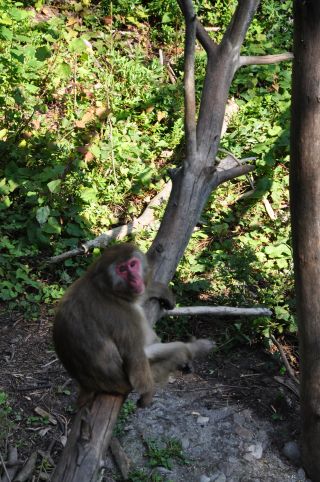
小弟正在学习opencv2,我在看《OpenCV 2 Computer Vision Application Programming Cookbook》中的meanshift算法时,尝试了下其中的示例代码,这个代码的目的是跟踪下图中红框的猩猩的脸庞,
其示例代码运行结果如下:

,
可以看到示例代码的效果很不错。
但是当我稍微修改代码中(如代码红色部分),meanshift算法的红框的初始搜索位置后,就无法实现跟踪了,
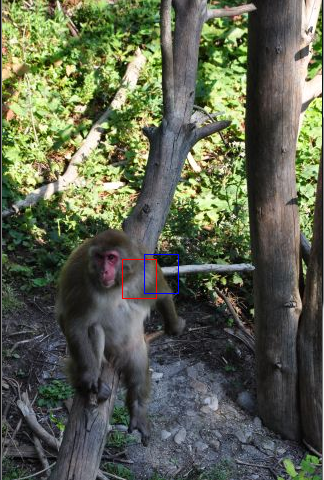
请问这是为什么呢?泛化能力如此差,meanshift算法还有用啊?
源代码如下:#include <iostream>
#include <vector>
using namespace std;
#include <opencv2\core\core.hpp>
#include <opencv2\highgui\highgui.hpp>
#include <opencv2\imgproc\imgproc.hpp>
#include <opencv2\video\tracking.hpp>
#include "objectFinder.h"
#include "colorhistogram.h"
int main()
{
// Read reference image
cv::Mat image= cv::imread("../baboon1.jpg");
if (!image.data)
return 0;
// Define ROI
cv::Mat imageROI= image(cv::Rect(110,260,35,40));
cv::rectangle(image, cv::Rect(110,260,35,40),cv::Scalar(0,0,255));
// Display image
cv::namedWindow("Image");
cv::imshow("Image",image);
// Get the Hue histogram
int minSat=65;
ColorHistogram hc;
cv::MatND colorhist= hc.getHueHistogram(imageROI);
ObjectFinder finder;
finder.setHistogram(colorhist);
finder.setThreshold(0.2f);
// Convert to HSV space
cv::Mat hsv;
cv::cvtColor(image, hsv, CV_BGR2HSV);
// Split the image
vector<cv::Mat> v;
cv::split(hsv,v);
// Eliminate pixels with low saturation
cv::threshold(v[1],v[1],minSat,255,cv::THRESH_BINARY);
cv::namedWindow("Saturation");
cv::imshow("Saturation",v[1]);
// Get back-projection of hue histogram
int ch[1]={0};
cv::Mat result= finder.find(hsv,0.0f,180.0f,ch,1);
cv::namedWindow("Result Hue");
cv::imshow("Result Hue",result);
cv::bitwise_and(result,v[1],result);
cv::namedWindow("Result Hue and");
cv::imshow("Result Hue and",result);
// Second image
image= cv::imread("../baboon3.jpg");
// Display image
cv::namedWindow("Image 2");
cv::imshow("Image 2",image);
// Convert to HSV space
cv::cvtColor(image, hsv, CV_BGR2HSV);
// Split the image
cv::split(hsv,v);
// Eliminate pixels with low saturation
cv::threshold(v[1],v[1],minSat,255,cv::THRESH_BINARY);
cv::namedWindow("Saturation");
cv::imshow("Saturation",v[1]);
// Get back-projection of hue histogram
result= finder.find(hsv,0.0f,180.0f,ch,1);
cv::namedWindow("Result Hue");
cv::imshow("Result Hue",result);
// Eliminate low stauration pixels
cv::bitwise_and(result,v[1],result);
cv::namedWindow("Result Hue and");
cv::imshow("Result Hue and",result);
// Get back-projection of hue histogram
finder.setThreshold(-1.0f);
result= finder.find(hsv,0.0f,180.0f,ch,1);
cv::bitwise_and(result,v[1],result);
cv::namedWindow("Result Hue and raw");
cv::imshow("Result Hue and raw",result);
cv::Rect rect(110,260,35,40);
//cv::Rect rect(120,260,35,40);如果我把此处修改为120,260....就会出现无法准确跟踪区域的情况
cv::rectangle(image, rect, cv::Scalar(0,0,255));
cv::TermCriteria criteria(cv::TermCriteria::MAX_ITER,10,0.01);
cout << "meanshift= " << cv::meanShift(result,rect,criteria) << endl;
cv::rectangle(image, rect, cv::Scalar(0,255,0));
// Display image
cv::namedWindow("Image 2 result");
cv::imshow("Image 2 result",image);
cv::waitKey();
return 0;
}


 发帖
发帖 与我相关
与我相关 我的任务
我的任务
 分享
分享

