社区
Eclipse
帖子详情
idea build project每次报错但一rebuild project就不报错了
乾李
2018-04-12 05:19:13
idea build project每次报错但一rebuild project就不报错了,求大神解答一下是为什么
这是大概的错误码
Error:(7, 8) java: The import com.test.util cannot be resolved
...全文
8771
7
打赏
收藏
idea build project每次报错但一rebuild project就不报错了
idea build project每次报错但一rebuild project就不报错了,求大神解答一下是为什么 这是大概的错误码 Error:(7, 8) java: The import com.test.util cannot be resolved
复制链接
扫一扫
分享
转发到动态
举报
写回复
配置赞助广告
用AI写文章
7 条
回复
切换为时间正序
请发表友善的回复…
发表回复
打赏红包
顺天哥
2021-02-04
打赏
举报
回复
应该是换了idea版本打开就不行了,我用新的版本打开然后清理缓存之后重编,然后recompile可以了,就没报错了。
sxz13145
2021-01-06
打赏
举报
回复
怎么解决啊,我必须用eclipse的编译方式,否则项目编译不过去
liu252439422
2020-05-08
打赏
举报
回复
javac 编译器 一样的问题
RebornLwq
2020-01-21
打赏
举报
回复
我也遇到。。一直找不到解决办法
A827744511A
2019-08-05
打赏
举报
回复
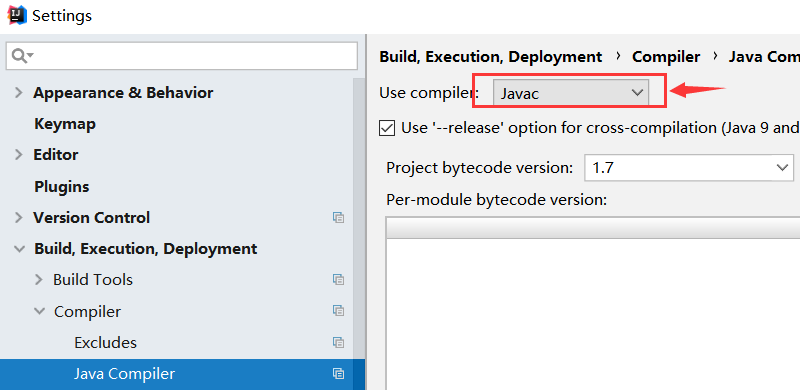
这个问题解决了吗,我也遇到了,在使用Eclipse编译器时就这样,使用JavaC编译器没事
轻度愉悦
2018-05-08
打赏
举报
回复
1
我把use compiler从eclipse改成javac就好了
尚筹网项目中遇到的错误,问题.docx
目录: 1.无法添加依赖 2.执行逆向生成操作的 Maven 命令 命令:mybatis-generator:generate。
报错
执行不了 3. The import org.springframework.test cannot be resolved 无法导包 4. 运行Junit测试
报错
java.io.FileNotFoundException: class path resource [mybatis-config.xml] cannot be opened because it:java.io.FileNotFoundException: class path resource [mybatis-config.xml] cannot be opened because it 5.B站看视频如果声音嘈杂,不清楚,小。右键,点击清澈人声。有时候弹幕真牛逼。 6. 看视频第30集,日志系统操作,测试日志时候添加类
报错
:LoggerFactory cannot be resolved 7,查错需要看控制台的Caused by:后边的内容。 8,测试testTx()
报错
3,是因为,缺少1这句话。 9. Eclipse如何还原和重置窗口布局复位是reset 10.
idea
缺少maven导航条 11.
idea
运行项目,
报错
404,基本都是Tomcat配置那里两个路劲配置不一致导致的。 12.问题未解决!!!45集测试ssm环境整合,跑不起来
报错
: 13 将项目转移到
idea
中运行,并且进行一些配置修改,将以上12问题解决! 14.更改配置文件,或者有其他更改,最好要在
build
那里
re
build
一下,要不然可能会出一些莫名其妙的错误,这是在用renrenfast框架时候,增加学生,教师等模块,界面一致装,不能正常显示,梦圆教我的。
Re
build
后,再重启,即可解决问题。 15.
idea
加载一个新项目,第一需要调出右侧maven导航条,更新下maven,第二需要在artifact那边的lib里增加maven依赖。这样才能保证依赖和包齐全,项目才能正常运行。这是狂神教的 16.eclipse里边的
project
相当于
idea
里边的module。 17.
idea
光标变粗如何恢复 18.出现问题:视频63集,无法做出和他一样的页面,HTML变红
报错
,网页没有按钮 19. 69集管理员登录测试,报400错误 20 问题19的启发,看视频遇到问题的话,那就载看一遍,很有可能是哪里敲错了,导致了问题的出现,好好再检查一遍流程,很多问题基本能够解决。 21
IDEa
中Ctrl+f 是在当前这个页面搜索任何想找的代码 22. 70集管理员登录,重定向,
报错
404 23.最开始这边的弹框弹不出来 24.视频82集,页面显示主体数据,运行项目后,等录出错,出现空白页,控制台也有
报错
25.点击用户维护,不想老师那样,出现tom相关信息,button按钮也有问题 26.第87集分页导航条查询有问题 27,95集新增功能,点击页面的新增报404错误 28.视频132,单条删除,无法删除,查看前端代码有
报错
29.报500错误,说utf-8啥的, 30.给管理员添角色,左侧未添加列表为空,然而,视频中的却不为空 31. 177集admin分配role,点击向右添加,保存后
报错
: 32.jsp文件明明定义了某个函数,但是页面显示不出来,查看console,
报错
说没有这个函数,这是因为浏览器有缓存的原因,按ctrl+f5强制刷新,然以后在重启服务器即可解决问题。 33.感觉debug自己还不会,这是一项必备的技能,后边有必要在B站上搜索下debug教程看看。 34.在pom中加入依赖,在web.xml中增加配置后,需要在右侧maven导航条刷新,在上方artifact那边添加library,类里边如果导包不成功,那么重启
idea
就好了 35. p247运行项目直接
报错
: 36.老师讲要会看异常,后台框架里的异常,一般是后一个异常导致了前一个异常,所以看异常要最先看最后一个causeby:往往最后这个能解决99%问题。还有1%是xml文件写错了。 37. 252集测试2,我的roleOperator无法显示内容 38. 285集yml文件读取,测试test遇到找不到类异常 以下为解决办法: 39 288集spring整合mybaitis
报错
40.项目看到290集,需要用到Redis,所以暂停项目学习,转入Redis学习。 41.
Idea
如何同时运行多个项目:点击edit configuration,然后如下图,
报错
即可,只要端口号不重复,就可以运行多个项目。 42. 重要错误parent的版本号对不上
报错
:Cann
learning-RxJava:一组来自Web的RxJava源和示例,已扩展
学习-RxJava 扩展了Web上的一组RxJava源和示例。 安装 打开以加载项目。 我在Java 8中使用Intellij
Idea
社区版本。 注意:如果遇到@Override表示法错误和不受支持的Lambda,请确保在File-> Settings-> Compiler(使用搜索栏)中将目标SDK保留为空。 另外,转到用于导入项目的.iml,将组件的属性LANGUAGE_LEVEL修改为JDK_1_8 。 重新生成项目(
Build
->
Re
build
Project
)。 资源 -示例1-6 在本系列中,作者提供了方法名称,这些方法名称是与网络相关的操作,它们返回一个Observable。 此存储库用循环和基本对象操作替换了所有这些调用-示例7-11 -示例12-13 示例1-7 阅读/教程 (仔细阅读!) Rx Android示例 此仓库将包括本节中的大多数列表,甚至侧
jsonplaceholder-api-testing
一些测试 通过用户名搜索用户(用户名在src/test/resources/test.properties )。 提取用户撰写的所有帖子(如果没有任何帖子,则将其记录)。 检查评论的电子邮件地址格式(如果没有评论,则记录下来)。 如何运行服务器: npm install -g json-server json-server --watch src/test/resources/db.json 如何运行测试: ./gradlew clean test 将Lombok与IntelliJ
IDEA
结合使用: 启用注释处理 转到“首选项...”>“构建,执行,部署”>“编译器”>“注释处理器”。 设置复选框: 启用注释处理 启用后,运行
Build
->
Re
build
Project
javacv-platform-1.3.3-src
视频人脸识别,取代jmf。。。 Introduction JavaCV uses wrappers from the JavaCPP Presets of commonly used libraries by researchers in the field of computer vision (OpenCV, FFmpeg, libdc1394, PGR FlyCapture, OpenKinect, librealsense, CL PS3 Eye Driver, videoInput, ARToolKitPlus, and flandmark), and provides utility classes to make their functionality easier to use on the Java platform, including Android. JavaCV also comes with hardware accelerated full-screen image display (CanvasFrame and GLCanvasFrame), easy-to-use methods to execute code in parallel on multiple cores (Parallel), user-friendly geometric and color calibration of cameras and
project
ors (GeometricCalibrator, ProCamGeometricCalibrator, ProCamColorCalibrator), detection and matching of feature points (ObjectFinder), a set of classes that implement direct image alignment of
project
or-camera systems (mainly GNImageAligner,
Project
iveTransformer,
Project
iveColorTransformer, ProCamTransformer, and ReflectanceInitializer), a blob analysis package (Blobs), as well as miscellaneous functionality in the JavaCV class. Some of these classes also have an OpenCL and OpenGL counterpart, their names ending with CL or starting with GL, i.e.: JavaCVCL, GLCanvasFrame, etc. To learn how to use the API, since documentation currently lacks, please refer to the Sample Usage section below as well as the sample programs, including two for Android (FacePreview.java and RecordActivity.java), also found in the samples directory. You may also find it useful to refer to the source code of ProCamCalib and ProCamTracker as well as examples ported from OpenCV2 Cookbook and the associated wiki pages. Please keep me informed of any updates or fixes you make to the code so that I may integrate them into the next release. Thank you! And feel free to ask questions on the mailing list if you encounter any problems with the software! I am sure it is far from perfect... Downloads To install manually the JAR files, obtain the following archives and follow the instructions in the Manual Installation section below. JavaCV 1.3.3 binary archive javacv-platform-1.3.3-bin.zip (212 MB) JavaCV 1.3.3 source archive javacv-platform-1.3.3-src.zip (456 KB) The binary archive contains
build
s for Android, Linux, Mac OS X, and Windows. The JAR files for specific child modules or platforms can also be obtained individually from the Maven Central Repository. We can also have everything downloaded and installed automatically with: Maven (inside the pom.xml file)
org.bytedeco
javacv-platform
1.3.3
Gradle (inside the
build
.gradle file) dependencies { compile group: 'org.bytedeco', name: 'javacv-platform', version: '1.3.3' } sbt (inside the
build
.sbt file) libraryDependencies += "org.bytedeco" % "javacv-platform" % "1.3.3" This downloads binaries for all platforms, but to get binaries for only one platform we can set the javacpp.platform system property (via the -D command line option) to something like android-arm, linux-x86_64, macosx-x86_64, windows-x86_64, etc. Please refer to the README.md file of the JavaCPP Presets for details. Another option available for Scala users is sbt-javacv. Required Software To use JavaCV, you will first need to download and install the following software: An implementation of Java SE 7 or newer: OpenJDK http://openjdk.java.net/install/ or Sun JDK http://www.oracle.com/technetwork/java/javase/downloads/ or IBM JDK http://www.ibm.com/developerworks/java/jdk/ Further, although not always required, some functionality of JavaCV also relies on: CL Eye Platform SDK (Windows only) http://codelaboratories.com/downloads/ Android SDK API 14 or newer http://developer.android.com/sdk/ JOCL and JOGL from JogAmp http://jogamp.org/ Finally, please make sure everything has the same bitness: 32-bit and 64-bit modules do not mix under any circumstances. Manual Installation Simply put all the desired JAR files (opencv*.jar, ffmpeg*.jar, etc.), in addition to javacpp.jar and javacv.jar, somewhere in your class path. Here are some more specific instructions for common cases: NetBeans (Java SE 7 or newer): In the
Project
s window, right-click the Libraries node of your
project
, and select "Add JAR/Folder...". Locate the JAR files, select them, and click OK. Eclipse (Java SE 7 or newer): Navigate to
Project
> Properties > Java
Build
Path > Libraries and click "Add External JARs...". Locate the JAR files, select them, and click OK. IntelliJ
IDEA
(Android 4.0 or newer): Follow the instructions on this page: http://developer.android.com/training/basics/firstapp/ Copy all the JAR files into the app/libs subdirectory. Navigate to File >
Project
Structure > app > Dependencies, click +, and select "2 File dependency". Select all the JAR files from the libs subdirectory. After that, the wrapper classes for OpenCV and FFmpeg, for example, can automatically access all of their C/C++ APIs: OpenCV documentation FFmpeg documentation Sample Usage The class definitions are basically ports to Java of the original header files in C/C++, and I deliberately decided to keep as much of the original syntax as possible. For example, here is a method that tries to load an image file, smooth it, and save it back to disk: import static org.bytedeco.javacpp.opencv_core.*; import static org.bytedeco.javacpp.opencv_imgproc.*; import static org.bytedeco.javacpp.opencv_imgcodecs.*; public class Smoother { public static void smooth(String filename) { IplImage image = cvLoadImage(filename); if (image != null) { cvSmooth(image, image); cvSaveImage(filename, image); cvReleaseImage(image); } } } JavaCV also comes with helper classes and methods on top of OpenCV and FFmpeg to facilitate their integration to the Java platform. Here is a small demo program demonstrating the most frequently useful parts: import java.io.File; import java.net.URL; import org.bytedeco.javacv.*; import org.bytedeco.javacpp.*; import org.bytedeco.javacpp.indexer.*; import static org.bytedeco.javacpp.opencv_core.*; import static org.bytedeco.javacpp.opencv_imgproc.*; import static org.bytedeco.javacpp.opencv_calib3d.*; import static org.bytedeco.javacpp.opencv_objdetect.*; public class Demo { public static void main(String[] args) throws Exception { String classifierName = null; if (args.length > 0) { classifierName = args[0]; } else { URL url = new URL("https://raw.github.com/Itseez/opencv/2.4.0/data/haarcascades/haarcascade_frontalface_alt.xml"); File file = Loader.extractResource(url, null, "classifier", ".xml"); file.deleteOnExit(); classifierName = file.getAbsolutePath(); } // Preload the opencv_objdetect module to work around a known bug. Loader.load(opencv_objdetect.class); // We can "cast" Pointer objects by instantiating a new object of the desired class. CvHaarClassifierCascade classifier = new CvHaarClassifierCascade(cvLoad(classifierName)); if (classifier.isNull()) { System.err.println("Error loading classifier file \"" + classifierName + "\"."); System.exit(1); } // The available FrameGrabber classes include OpenCVFrameGrabber (opencv_videoio), // DC1394FrameGrabber, FlyCaptureFrameGrabber, OpenKinectFrameGrabber, OpenKinect2FrameGrabber, // RealSenseFrameGrabber, PS3EyeFrameGrabber, VideoInputFrameGrabber, and FFmpegFrameGrabber. FrameGrabber grabber = FrameGrabber.createDefault(0); grabber.start(); // CanvasFrame, FrameGrabber, and FrameRecorder use Frame objects to communicate image data. // We need a FrameConverter to interface with other APIs (Android, Java 2D, or OpenCV). OpenCVFrameConverter.ToIplImage converter = new OpenCVFrameConverter.ToIplImage(); // FAQ about IplImage and Mat objects from OpenCV: // - For custom raw processing of data, createBuffer() returns an NIO direct // buffer wrapped around the memory pointed by imageData, and under Android we can // also use that Buffer with Bitmap.copyPixelsFromBuffer() and copyPixelsToBuffer(). // - To get a BufferedImage from an IplImage, or vice versa, we can chain calls to // Java2DFrameConverter and OpenCVFrameConverter, one after the other. // - Java2DFrameConverter also has static copy() methods that we can use to transfer // data more directly between BufferedImage and IplImage or Mat via Frame objects. IplImage grabbedImage = converter.convert(grabber.grab()); int width = grabbedImage.width(); int height = grabbedImage.height(); IplImage grayImage = IplImage.create(width, height, IPL_DEPTH_8U, 1); IplImage rotatedImage = grabbedImage.clone(); // Objects allocated with a create*() or clone() factory method are automatically released // by the garbage collector, but may still be explicitly released by calling release(). // You shall NOT call cvReleaseImage(), cvReleaseMemStorage(), etc. on objects allocated this way. CvMemStorage storage = CvMemStorage.create(); // The OpenCVFrameRecorder class simply uses the CvVideoWriter of opencv_videoio, // but FFmpegFrameRecorder also exists as a more versatile alternative. FrameRecorder recorder = FrameRecorder.createDefault("output.avi", width, height); recorder.start(); // CanvasFrame is a JFrame containing a Canvas component, which is hardware accelerated. // It can also switch into full-screen mode when called with a screenNumber. // We should also specify the relative monitor/camera response for proper gamma correction. CanvasFrame frame = new CanvasFrame("Some Title", CanvasFrame.getDefaultGamma()/grabber.getGamma()); // Let's create some random 3D rotation... CvMat randomR = CvMat.create(3, 3), randomAxis = CvMat.create(3, 1); // We can easily and efficiently access the elements of matrices and images // through an Indexer object with the set of get() and put() methods. DoubleIndexer Ridx = randomR.createIndexer(), axisIdx = randomAxis.createIndexer(); axisIdx.put(0, (Math.random()-0.5)/4, (Math.random()-0.5)/4, (Math.random()-0.5)/4); cvRodrigues2(randomAxis, randomR, null); double f = (width + height)/2.0; Ridx.put(0, 2, Ridx.get(0, 2)*f); Ridx.put(1, 2, Ridx.get(1, 2)*f); Ridx.put(2, 0, Ridx.get(2, 0)/f); Ridx.put(2, 1, Ridx.get(2, 1)/f); System.out.println(Ridx); // We can allocate native arrays using constructors taking an integer as argument. CvPoint hatPoints = new CvPoint(3); while (frame.isVisible() && (grabbedImage = converter.convert(grabber.grab())) != null) { cvClearMemStorage(storage); // Let's try to detect some faces! but we need a grayscale image... cvCvtColor(grabbedImage, grayImage, CV_BGR2GRAY); CvSeq faces = cvHaarDetectObjects(grayImage, classifier, storage, 1.1, 3, CV_HAAR_FIND_BIGGEST_OBJECT | CV_HAAR_DO_ROUGH_SEARCH); int total = faces.total(); for (int i = 0; i < total; i++) { CvRect r = new CvRect(cvGetSeqElem(faces, i)); int x = r.x(), y = r.y(), w = r.width(), h = r.height(); cvRectangle(grabbedImage, cvPoint(x, y), cvPoint(x+w, y+h), CvScalar.RED, 1, CV_AA, 0); // To access or pass as argument the elements of a native array, call position() before. hatPoints.position(0).x(x-w/10) .y(y-h/10); hatPoints.position(1).x(x+w*11/10).y(y-h/10); hatPoints.position(2).x(x+w/2) .y(y-h/2); cvFillConvexPoly(grabbedImage, hatPoints.position(0), 3, CvScalar.GREEN, CV_AA, 0); } // Let's find some contours! but first some thresholding... cvThreshold(grayImage, grayImage, 64, 255, CV_THRESH_BINARY); // To check if an output argument is null we may call either isNull() or equals(null). CvSeq contour = new CvSeq(null); cvFindContours(grayImage, storage, contour, Loader.sizeof(CvContour.class), CV_RETR_LIST, CV_CHAIN_APPROX_SIMPLE); while (contour != null && !contour.isNull()) { if (contour.elem_size() > 0) { CvSeq points = cvApproxPoly(contour, Loader.sizeof(CvContour.class), storage, CV_POLY_APPROX_DP, cvContourPerimeter(contour)*0.02, 0); cvDrawContours(grabbedImage, points, CvScalar.BLUE, CvScalar.BLUE, -1, 1, CV_AA); } contour = contour.h_next(); } cvWarpPerspective(grabbedImage, rotatedImage, randomR); Frame rotatedFrame = converter.convert(rotatedImage); frame.showImage(rotatedFrame); recorder.record(rotatedFrame); } frame.dispose(); recorder.stop(); grabber.stop(); } } Furthermore, after creating a pom.xml file with the following content: <
project
>
4.0.0
org.bytedeco.javacv
demo
1.3.3
org.bytedeco
javacv-platform
1.3.3
project
> And by placing the source code above in src/main/java/Demo.java, we can use the following command to have everything first installed automatically and then executed by Maven: $ mvn compile exec:java -Dexec.mainClass=Demo
Build
Instructions If the binary files available above are not enough for your needs, you might need to
re
build
them from the source code. To this end, the
project
files were created for: Maven 3.x http://maven.apache.org/download.html JavaCPP 1.3 https://github.com/bytedeco/javacpp JavaCPP Presets 1.3 https://github.com/bytedeco/javacpp-presets Once installed, simply call the usual mvn install command for JavaCPP, its Presets, and JavaCV. By default, no other dependencies than a C++ compiler for JavaCPP are required. Please refer to the comments inside the pom.xml files for further details.
Project
lead: Samuel Audet [samuel.audet at gmail.com](mailto:samuel.audet at gmail.com) Developer site: https://github.com/bytedeco/javacv Discussion group: http://groups.google.com/group/javacv
记录
idea
build
/
re
build
项目
报错
(java.lang.IllegalArgumentException: MALFORMED) 解决方案
idea
build
/
re
build
报错
(MALFORMED) java.lang.IllegalArgumentException: MALFORMED
Eclipse
58,452
社区成员
49,451
社区内容
发帖
与我相关
我的任务
Eclipse
Java Eclipse
复制链接
扫一扫
分享
社区描述
Java Eclipse
社区管理员
加入社区
获取链接或二维码
近7日
近30日
至今
加载中
查看更多榜单
社区公告
暂无公告
试试用AI创作助手写篇文章吧
+ 用AI写文章