rac中某一节点asm磁盘组无法挂载

白昼ron
服务器虚拟化领域优质创作者
博客专家认证
2018-06-27 11:55:10
环境:Oracle 11.2.4.0 RAC
问题描述:
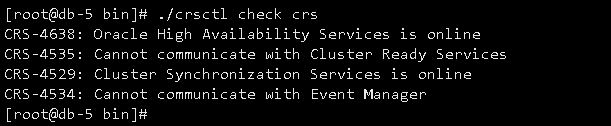
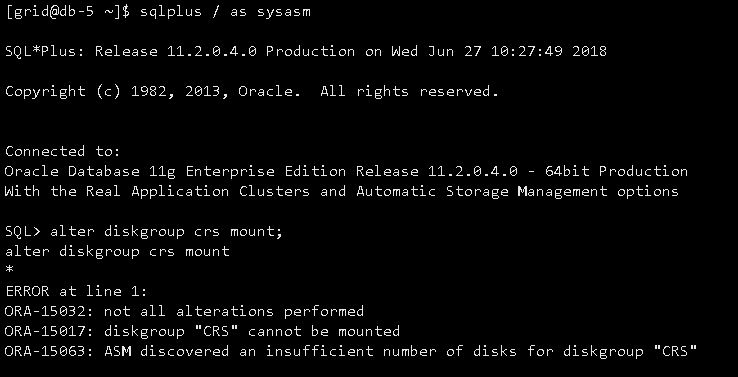
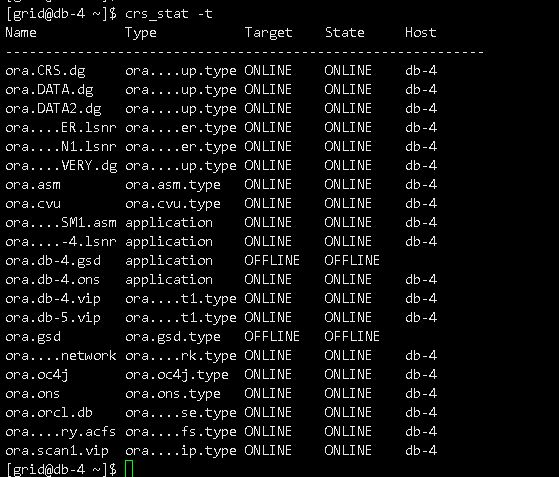
CRS服务不正常,asm diskgroup挂载不了,截图如下:


日志如下:
--------------------------------------------------------------------------------------------------
Wed Jun 27 10:28:10 2018
SQL> alter diskgroup crs mount
NOTE: cache registered group CRS number=1 incarn=0xdbd84eae
NOTE: cache began mount (not first) of group CRS number=1 incarn=0xdbd84eae
WARNING: detected duplicate paths to the same disk:
'/dev/mapper/CRSp1' and
'/dev/dm-23'
More trace information dumped to '/u01/app/grid/diag/asm/+asm/+ASM2/trace/+ASM2_ora_42445.trc'
Wed Jun 27 10:28:11 2018
ERROR: no read quorum in group: required 2, found 0 disks
NOTE: cache dismounting (clean) group 1/0xDBD84EAE (CRS)
NOTE: messaging CKPT to quiesce pins Unix process pid: 42445, image: oracle@db-5 (TNS V1-V3)
NOTE: dbwr not being msg'd to dismount
NOTE: lgwr not being msg'd to dismount
NOTE: cache dismounted group 1/0xDBD84EAE (CRS)
NOTE: cache ending mount (fail) of group CRS number=1 incarn=0xdbd84eae
NOTE: cache deleting context for group CRS 1/0xdbd84eae
GMON dismounting group 1 at 10 for pid 24, osid 42445
ERROR: diskgroup CRS was not mounted
WARNING: Disk Group CRS containing spfile for this instance is not mounted
WARNING: Disk Group CRS containing configured OCR is not mounted
WARNING: Disk Group CRS containing voting files is not mounted
ORA-15032: not all alterations performed
ORA-15017: diskgroup "CRS" cannot be mounted
ORA-15063: ASM discovered an insufficient number of disks for diskgroup "CRS"
ERROR: alter diskgroup crs mount
Wed Jun 27 10:28:13 2018
NOTE: No asm libraries found in the system
ERROR: -5(Duplicate disk DATA:DATA_0008)
ERROR: -5(Duplicate disk DATA:DATA_0001)
ERROR: -5(Duplicate disk DATA:DATA_0000)
ERROR: -5(Duplicate disk DATA:DATA_0003)
ERROR: -5(Duplicate disk CRS:CRS_0000)
ERROR: -5(Duplicate disk DATA:DATA_0007)
ERROR: -5(Duplicate disk DATA:DATA_0005)
ERROR: -5(Duplicate disk DATA2:DATA2_0002)
ERROR: -5(Duplicate disk DATA2:DATA2_0003)
ERROR: -5(Duplicate disk DATA:DATA_0004)
ERROR: -5(Duplicate disk RECOVERY:RECOVERY_0000)
ERROR: -5(Duplicate disk DATA:DATA_0002)
ERROR: -5(Duplicate disk DATA:DATA_0006)
ASM Health Checker found 1 new failures
------------------------------------------------------------------------------------

分析:
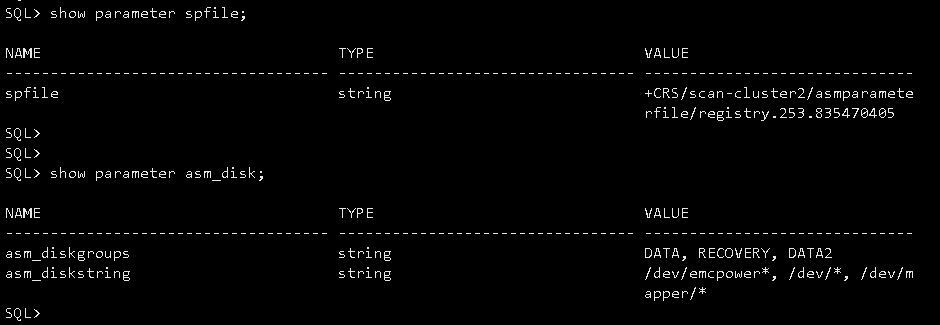
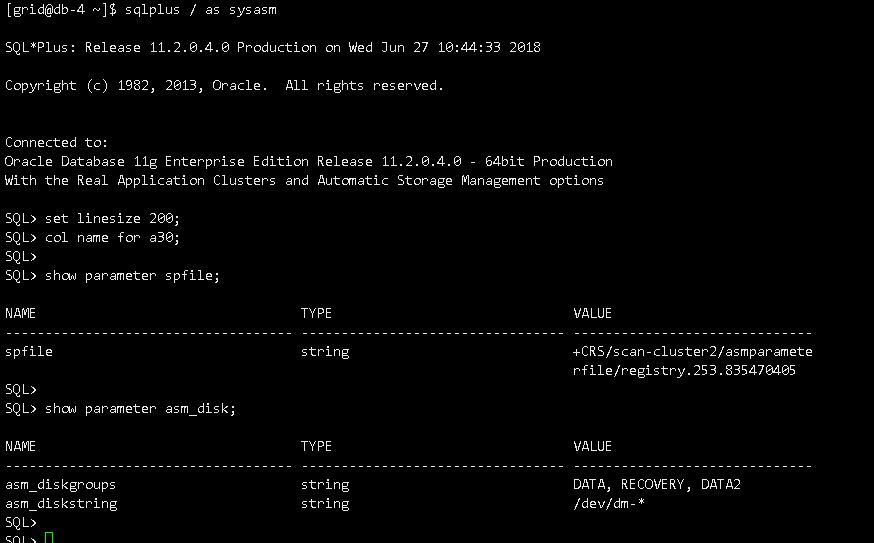
asm_diskstring里存在指向重复的路径:
/dev/*,/dev/mapper/*
造成日志中的提示:
----------------------------

WARNING: detected duplicate paths to the same disk:
'/dev/mapper/CRSp1' and
'/dev/dm-23'
--------------------------------------------------

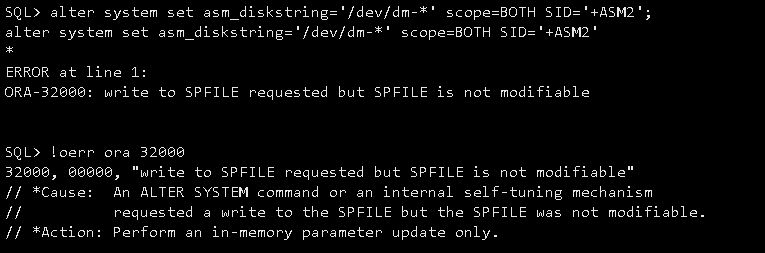
修改asm_diskstring,无法修改:


另一个节点正常,截图如下:


...全文
674 5 打赏 收藏 转发到动态 举报
写回复
用AI写文章
5 条回复
切换为时间正序
请发表友善的回复…
发表回复
minsic78 2018-06-27
  • 打赏
  • 举报
回复
自问自答
碧水幽幽泉 2018-06-27
  • 打赏
  • 举报
回复
引用 2 楼 xifenfei 的回复:
哈哈,记得感谢我哦

碧水幽幽泉 2018-06-27
  • 打赏
  • 举报
回复
不错,解决了就好。
惜分飞 2018-06-27
  • 打赏
  • 举报
回复
哈哈,记得感谢我哦
白昼ron 2018-06-27
  • 打赏
  • 举报
回复
解决了!
在正常的节点上执行:
alter system set asm_diskstring='/dev/dm-*' scope=spfile;
然后重启不正常的节点,重启后发现asm磁盘组挂载上了!
目录 推荐序 前言 第1章 认识Oracle RAC 1.1 RAC产生的背景 1.2 RAC体系结构 1.2.1整体结构 1.2.2物理层次结构 1.2.3逻辑层次结构 1.3 RAC的特点 1.3.1双机并行 1.3.2高可用性 1.3.3易伸缩性 1.3.4低成本 1.3.5高吞吐量 1.4 RAC存在的问题 1.4.1稳定性 1.4.2高性能 1.5 RAC软件 1.5.1存储管理软件 1.5.2集群管理软件 1.5.3数据库管理软件 1.6本章小结 第2章 搭建类似生产环境的RAC 2.1搭建环境 2.1.1 RAC的物理结构 2.1.硬件环境 2.1.3软件环境 2.2搭建存储服务器 2.2.1安装Openfiler操作系统 2.2.2Openfiler主界面 2.2.3配置iSCSI磁盘 2.3搭建数据库服务器 2.3.1为服务器配置4个网卡 2.3.2安装Linux操作系统 2.3.3挂载iSCSI磁盘 2.3.4配置udev固定iSCSI磁盘设备名称 2.3.5配置服务器的图形化环境 2.4 RAC运行环境安装前检查 2.4.1服务器检查 2.4.2存储检查 2.4.3网络检查 2.5配置数据库服务器 2.5.1安装软件包 2.5.2修改系统参数 2.5.3配置域名解析服务 2.5.4配置hosts文件 2.5.5创建、用户和目录 2.5.6设置环境变量 2.5.7配置SSH用户等效性 2.5.8配置时间同步服务 2.5.9安装cvuqdisk包 2.5.10 CVU验证安装环境 2.6创建ASM磁盘 2.6.1安装ASMLib驱动 2.6.2创建ASMLib磁盘 2.7部署RAC 2.7.1安装Grid Infrastructure 2.7.2安装Database DBMS 2.7.3创建ASM磁盘 2.7.4创建RAC数据库 2.8测试RAC 2.8.1连接方式测试 2.8.2异常情况测试 2.9虚拟机搭建RAC 2.9.1虚拟机Xen简介 2.9.2启动主机Xen内核 2.9.3 Xen虚拟机创建网络环境 2.9.4创建Xen存储服务器 2.9.5创建Xen数据库服务器 2.10本章小结 第3章 Clusterware集群软件 3.1 Grid Infrastructure架构 3.1.1 GI的特点 3.1.2 GI的应用 3.1.3 Clusterware的特点 3.1.4 Clusterware增强的特性 3.2 Clusterware磁盘文件 3.2.1表决磁盘 3.2.2集群注册表 3.2.3本地注册表 3.3 Clusterware启动流程 3.3.1启动流程 3.3.2后台进程 3.4 Clusterware隔离机制 3.4.1 Clusterware心跳 3.4.2 Clusterware隔离特性IPMI 3.4.3 RAC隔离体系 3.5网格即插即用 3.5.1 GPnP结构 3.5.2 GPnP profile文件 3.5.3 mDNS服务 3.6日志体系 3.6.1 ADR的特点 3.6.2 ADR目录结构 3.6.3命令行工具ADRCI 3.6.4 Clusterware日志文件 3.6.5 ASM实例和监听日志文件 3.6.6 Database日志文件 3.7本章小结 第4章 ASM存储软件 4.1 ASM简介 4.1.1 ASM的特点 4.1.2 ASM实例的功能 4.2 ASM磁盘 4.2.1 ASM磁盘 4.2.2共享ASM磁盘 4.2.3 ASM逻辑结构 4.2.4 ASM故障 4.2.5 ASM条带化 4.3 ASM文件 4.3.1 ASM文件类型 4.3.2 ASM别名 4.3.3 ASM文件模板 4.4 ASM数据结构 4.4.1物理元数据 4.4.2虚拟元数据 4.5 ASM操作 4.5.1 RDBMS操作ASM文件 4.5.2 ASM文件的分配 4.5.3 ASM区间读写特性 4.5.4 ASM同步技术 4.5.5 ASM实例恢复和Crash恢复 4.5.6 ASM磁盘操作 4.6 ACFS集群文件系统 4.6.1 ACFS概述 4.6.2 ADVM动态卷管理 4.6.3 ACFS快照 4.6.4 ACFS的备份和恢复 4.6.5 ACFS同ASM整合 4.7本章小结 第5章 RAC工作原理 5.1单实例并发与一致性 5.1.1数据读一致性与写一致性 5.1.2多版本数据块 5.1.3
一、安装前准备 磁盘规划 使用iscsi共享磁盘做成raw设备 Vote_OCR /dev/sdb1 /dev/raw/raw1 Vote_OCR /dev/sdb2 /dev/raw/raw2 Vote_OCR /dev/sdb3 /dev/raw/raw3 Vote_OCR /dev/sdb5 /dev/raw/raw4 Vote_OCR /dev/sdb6 /dev/raw/raw5 DATA / dev/sdb7 /dev/raw/raw6 DATA dev/sdb8 /dev/raw/raw7 DATA dev/sdb9 /dev/raw/raw8 FLR dev/sdb10 /dev/raw/raw9 FLR dev/sdb11 /dev/raw/raw10 以下操作如果没有特殊说明在两个节点都做相同操作 网络及主机名规划 #public 192.168.10.10 node1 192.168.10.20 node2 #vip 192.168.10.100 node1vip 192.168.10.200 node2vip #private 192.168.20.10 node1priv 192.168.20.20 node2priv #scan 192.168.10.101 scanip 修改/etc/hosts文件添加以上内容 # vi /etc/hosts 192.168.10.10 node1 192.168.10.20 node2 #vip 192.168.10.100 node1vip 192.168.10.200 node2vip #private 192.168.20.10 node1priv 192.168.20.20 node2priv #scan 192.168.10.101 scanip 修改以下文件的最后一行 # vi /etc/sysconfig/network HOSTNAME=node1 ---第二台机器修改为node2 命令行修改 # hostname node1 第二节点修改为 node2 执行 [root@localhost ~]# su - [root@node1 ~]# 我们在安装虚拟机时添加了两块网卡 在这里我们把 eth0作为对外访问使用 eth1作为对对内访问使用 配置IP地址 使用setup命令修改IP 分别配置eth0和eth1(我们只演示node1的配置,node2也配置成相应的IP) 保存退出 重启使配置生效 3、关闭没必要的服务 chkconfig autofs off chkconfig acpid off chkconfig sendmail off chkconfig cups-config-daemon off chkconfig cpus off chkconfig xfs off chkconfig lm_sensors off chkconfig gpm off chkconfig openibd off chkconfig iiim off chkconfig pcmcia off chkconfig cpuspeed off chkconfig nfslock off chkconfig ip6tables off chkconfig rpcidmapd off chkconfig apmd off chkconfig sendmail off chkconfig arptables_jf off chkconifg microcode_ctl off chkconfig rpcgssd off 上述服务有不存在的会提示,服务读取信息时出错:没有那个文件或目录。没问题,忽略。 停用NTP服务 /sbin/service ntpd stop chkconfig ntpd off mv /etc/ntp.conf /etc/ntp.conf.bak 重启所有节点 安装yum源规划 在/etc/yum.repos.d/ 目录下添加rhel5.repo文件 [root@node1 yum.repos.d]# pwd /etc/yum.repos.d [root@node1 yum.repos.d]# ls rhel5.repo [root@node1 yum.repos.d]# [root@node1 yum.repos.d]# vi rhel5.repo [Server] name=server baseurl=file:///mnt/Server/ enabled=1 gpgcheck=0 [ClusterStorage] name=server baseurl=file:///mnt/ClusterStorage/ enabled=1 gpgcheck=0 挂载光驱到/mnt目录 [root@node1 yum.repos.d]# mount /dev/hdc /mnt mount: block device /dev/hdc is write-protected, mounting read-only [root@node1 yum.repos.d]# cd /mnt/ [root@node1 mnt]# ls Server ClusterStorage -ld dr-xr-xr-x 3 root root 8192 2010-03-22 ClusterStorage dr-xr-xr-x 3 root root 557056 2010-03-22 Server [root@node1 mnt]# 刷新yum列表 [root@node1 mnt]# yum clean all Loaded plugins: rhnplugin, security Cleaning up Everything [root@node1 mnt]# 4、软件包规划 安装所有依赖包 binutils-* compat-libstdc++-* elfutils-libelf-* elfutils-libelf-devel-* gcc-* gcc-c++-* glibc-* glibc-common-* glibc-devel-* glibc-headers-* ksh-* libaio-* libaio-devel-* libgcc-* libstdc++-* make-* sysstat-* expat-* pdksh-* unixODBC-* 使用YUM安装 # yum install -y binutils-* compat-libstdc++-* elfutils-libelf-* elfutils-libelf-devel-* gcc-* gcc-c++-* glibc-* glibc-common-* glibc-devel-* glibc-headers-* ksh-* libaio-* libaio-devel-* libgcc-* libstdc++-* make-* sysstat-* expat-* pdksh-* unixODBC-* 5、建立用户和目录 用户及目录规划 /usr/sbin/groupadd -g 501 oinstall /usr/sbin/groupadd -g 502 dba /usr/sbin/groupadd -g 504 asmadmin /usr/sbin/groupadd -g 506 asmdba /usr/sbin/groupadd -g 507 asmoper /usr/sbin/useradd -u 501 -g oinstall -G asmadmin,asmdba,asmoper,dba grid /usr/sbin/useradd -u 502 -g oinstall -G dba,asmdba oracle # passwd grid Changing password for user grid. New UNIX password: BAD PASSWORD: it is too short Retype new UNIX password: passwd: all authentication tokens updated successfully. [root@node1 /]# passwd oracle Changing password for user oracle. New UNIX password: BAD PASSWORD: it is based on a dictionary word Retype new UNIX password: passwd: all authentication tokens updated successfully. 创建grid目录结构 mkdir -p /u01/app/oraInventory chown -R grid:oinstall /u01/app/oraInventory chmod -R 775 /u01/app/oraInventory mkdir -p /u01/app/grid chmod -R 775 /u01/app/grid chown -R grid:oinstall /u01/app/grid mkdir -p /u01/app/11.2.0/grid chown -R grid:oinstall /u01/app/11.2.0/grid chmod -R 775 /u01/app/11.2.0/grid 创建oracle目录结构 mkdir -p /u01/app/oracle mkdir /u01/app/oracle/cfgtoollogs chown -R oracle:oinstall /u01/app/oracle chmod -R 775 /u01/app/oracle mkdir -p /u01/app/oracle/product/11.2.0/db_1 chown -R oracle:oinstall /u01/app/oracle/product/11.2.0/db_1 chmod -R 775 /u01/app/oracle/product/11.2.0/db_1 mkdir –p /u01/software chmod -R 775 /u01 iscsi共享存储规划 (分为server端和client端,我们这里是实验环境,为了节省机器,有一台机器既做服务器同时也做客户端,另一台只有客户端。注:node1这个虚拟机尽量内存稍微大一些),下面我们开始配置。 在node1上准备要使用的磁盘,并做成相应的raw设备 我们在配置虚拟机的时候加了一块20G的盘 sdb 安装和配置 Node1+iscsi端: [root@node1 mnt]# yum install -y *scsi* [root@node1 /]# vi /etc/tgt/targets.conf #添加以下几行 #注:红色部分是在我们存储客户端登录的时候需要 backing-store /dev/sdb # Becomes LUN 1 [root@node1 /]# /etc/init.d/tgtd restart [root@node1 /]# chkconfig tgtd on [root@node1 /]#cd /etc/rc.d/rc5.d/ [root@node1 rc5.d]# mv S13iscsi S40iscsi [root@node1 rc5.d]# [root@node1 ~]# /etc/init.d/iscsi start [root@node1 ~] iscsiadm -m discovery -t st -p 192.168.10.10 <-----(存储地址) 192.168.10.10:3260,1 iqn.2012-09.com.example:server.target4 [root@node1 ~]#iscsiadm -m node -T iqn.2012-09.com.example:server.target4 -p 192.168.10.10 -l Logging in to [iface: default, target: iqn.2012-09.com.example:server.target4, portal: 192.168.10.10,3260] Login to [iface: default, target: iqn.2012-09.com.example:server.target4, portal: 192.168.10.10,3260]: successful 查看磁盘信息 [root@node1 /]# fdisk -l Node2端: [root@node2 ~]# yum install *scsi* -y [root@node2 ~]# /etc/init.d/iscsi start [root@node2 ~]# iscsiadm -m discovery -t st -p 192.168.10.10 <-----(存储地址) 192.168.10.10:3260,1 iqn.2012-09.com.example:server.target4 [root@node2 ~]#iscsiadm -m node -T iqn.2012-09.com.example:server.target4 -p 192.168.10.10 -l Logging in to [iface: default, target: iqn.2012-09.com.example:server.target4, portal: 192.168.10.10,3260] Login to [iface: default, target: iqn.2012-09.com.example:server.target4, portal: 192.168.10.10,3260]: successful [root@node2 /]# 查看磁盘信息 # fdisk -l 在其一个节点上分区 /dev/sdb 分成10个2G大小的分区 Device Boot Start End Blocks Id System /dev/sdb1 1 1908 1953776 83 Linux /dev/sdb2 1909 3816 1953792 83 Linux /dev/sdb3 3817 5724 1953792 83 Linux /dev/sdb4 5725 20480 15110144 5 Extended /dev/sdb5 5725 7632 1953776 83 Linux /dev/sdb6 7633 9540 1953776 83 Linux /dev/sdb7 9541 11448 1953776 83 Linux /dev/sdb8 11449 13356 1953776 83 Linux /dev/sdb9 13357 15264 1953776 83 Linux /dev/sdb10 15265 17172 1953776 83 Linux /dev/sdb11 17173 19080 1953776 83 Linux [root@node2 ~]# fdisk -l /dev/sdb Disk /dev/sdb: 21.4 GB, 21474836480 bytes 64 heads, 32 sectors/track, 20480 cylinders Units = cylinders of 2048 * 512 = 1048576 bytes Device Boot Start End Blocks Id System /dev/sdb1 1 1908 1953776 83 Linux /dev/sdb2 1909 3816 1953792 83 Linux /dev/sdb3 3817 5724 1953792 83 Linux /dev/sdb4 5725 20480 15110144 5 Extended /dev/sdb5 5725 7632 1953776 83 Linux /dev/sdb6 7633 9540 1953776 83 Linux /dev/sdb7 9541 11448 1953776 83 Linux /dev/sdb8 11449 13356 1953776 83 Linux /dev/sdb9 13357 15264 1953776 83 Linux /dev/sdb10 15265 17172 1953776 83 Linux /dev/sdb11 17173 19080 1953776 83 Linux [root@node2 ~]# 做完分区之后 在两个节点上分别执行以下命令: # partprobe 配置raw设备(每个节点都操作) #vi /etc/udev/rules.d/60-raw.rules ACTION=="add", KERNEL=="sdb1", RUN+="/bin/raw /dev/raw/raw1 %N" ACTION=="add", KERNEL=="sdb2", RUN+="/bin/raw /dev/raw/raw2 %N" ACTION=="add", KERNEL=="sdb3", RUN+="/bin/raw /dev/raw/raw3 %N" ACTION=="add", KERNEL=="sdb5", RUN+="/bin/raw /dev/raw/raw4 %N" ACTION=="add", KERNEL=="sdb6", RUN+="/bin/raw /dev/raw/raw5 %N" ACTION=="add", KERNEL=="sdb7", RUN+="/bin/raw /dev/raw/raw6 %N" ACTION=="add", KERNEL=="sdb8", RUN+="/bin/raw /dev/raw/raw7 %N" ACTION=="add", KERNEL=="sdb9", RUN+="/bin/raw /dev/raw/raw8 %N" ACTION=="add", KERNEL=="sdb10", RUN+="/bin/raw /dev/raw/raw9 %N" ACTION=="add", KERNEL=="sdb11", RUN+="/bin/raw /dev/raw/raw10 %N" KERNEL=="raw*", OWNER="grid" GROUP="asmadmin", MODE="0660" # start_udev  启动 udev: [确定] [root@node1 ~]# ll /dev/raw/ 总计 0 crw-rw---- 1 grid asmadmin 162, 1 09-29 18:13 raw1 crw-rw---- 1 grid asmadmin 162, 10 09-29 18:13 raw10 crw-rw---- 1 grid asmadmin 162, 2 09-29 18:13 raw2 crw-rw---- 1 grid asmadmin 162, 3 09-29 18:13 raw3 crw-rw---- 1 grid asmadmin 162, 4 09-29 18:13 raw4 crw-rw---- 1 grid asmadmin 162, 5 09-29 18:13 raw5 crw-rw---- 1 grid asmadmin 162, 6 09-29 18:13 raw6 crw-rw---- 1 grid asmadmin 162, 7 09-29 18:13 raw7 crw-rw---- 1 grid asmadmin 162, 8 09-29 18:13 raw8 crw-rw---- 1 grid asmadmin 162, 9 09-29 18:13 raw9 [root@node1 ~]# 各类参数及所需配置设置 配置内核参数 vi /etc/sysctl.conf kernel.shmmni = 4096 kernel.sem = 250 32000 100 128 fs.file-max = 6553600 net.ipv4.ip_local_port_range = 9000 65500 net.core.rmem_default = 262144 net.core.rmem_max = 4194304 net.core.wmem_default = 262144 net.core.wmem_max = 1048576 # sysctl -p net.ipv4.ip_forward = 0 net.ipv4.conf.default.rp_filter = 1 net.ipv4.conf.default.accept_source_route = 0 kernel.sysrq = 0 kernel.core_uses_pid = 1 net.ipv4.tcp_syncookies = 1 kernel.msgmnb = 65536 kernel.msgmax = 65536 kernel.shmmax = 68719476736 kernel.shmall = 4294967296 kernel.shmmni = 4096 kernel.sem = 250 32000 100 128 net.ipv4.ip_local_port_range = 9000 65500 net.core.rmem_default = 262144 net.core.rmem_max = 4194304 net.core.wmem_default = 262144 net.core.wmem_max = 1048576 fs.file-max = 6553600 fs.file-max = 6815744 fs.aio-max-nr = 1048576 修改limits文件,添加如下内容 vi /etc/security/limits.conf grid soft nproc 2047 grid hard nproc 16384 grid soft nofile 1024 grid hard nofile 65536 oracle soft nproc 2047 oracle hard nproc 16384 oracle soft nofile 1024 oracle hard nofile 65536 配置hangcheck-timer # modprobe hangcheck-timer hangcheck_tick=1 hangcheck_margin=10 hangcheck_reboot=1 修改pam文件 #vi /etc/pam.d/login 添加一行 session required pam_limits.so 修改profile文件 #vi /etc/profile if [ $USER = "oracle" ] || [ $USER = "grid" ]; then if [ $SHELL = "/bin/ksh" ]; then ulimit -p 16384 ulimit -n 65536 else ulimit -u 16384 -n 65536 fi umask 022 fi 配置ssh密钥互认(oracle和grid两个用户) [root@node1 u01]# su - oracle [oracle@node1 ~]$ [oracle@node1 ~]$ ssh-keygen -t rsa Generating public/private rsa key pair. Enter file in which to save the key (/home/oracle/.ssh/id_rsa): Created directory '/home/oracle/.ssh'. Enter passphrase (empty for no passphrase): Enter same passphrase again: Your identification has been saved in /home/oracle/.ssh/id_rsa. Your public key has been saved in /home/oracle/.ssh/id_rsa.pub. The key fingerprint is: 5d:94:12:23:9c:5b:ae:e8:5e:23:fb:ce:65:bc:a6:23 oracle@node1 [oracle@node1 ~]$ cd .ssh/ [oracle@node1 .ssh]$ mv id_rsa.pub authorized_keys [oracle@node1 .ssh]$ ll 总计 8 -rw-r--r-- 1 oracle oinstall 394 09-27 21:52 authorized_keys -rw------- 1 oracle oinstall 1675 09-27 21:52 id_rsa [oracle@node1 .ssh]$ chmod 600 authorized_keys [oracle@node1 .ssh]$ cd .. [oracle@node1 ~]$ scp -r .ssh/ 192.168.10.20:/home/oracle The authenticity of host '192.168.10.20 (192.168.10.20)' can't be established. RSA key fingerprint is 95:ed:6d:87:61:00:27:ed:38:17:6c:e9:6c:c3:8a:1d. Are you sure you want to continue connecting (yes/no)? yes Warning: Permanently added '192.168.10.20' (RSA) to the list of known hosts. oracle@192.168.10.20's password: id_rsa 100% 1675 1.6KB/s 00:00 authorized_keys 100% 394 0.4KB/s 00:00 known_hosts 100% 395 0.4KB/s 00:00 [oracle@node1 ~]$ [oracle@node1 ~]$ su - grid 口令: [grid@node1 ~]$ ssh-keygen -t rsa Generating public/private rsa key pair. Enter file in which to save the key (/home/grid/.ssh/id_rsa): Created directory '/home/grid/.ssh'. Enter passphrase (empty for no passphrase): Enter same passphrase again: Your identification has been saved in /home/grid/.ssh/id_rsa. Your public key has been saved in /home/grid/.ssh/id_rsa.pub. The key fingerprint is: 09:b9:21:44:1e:fc:a1:94:6f:9a:e6:5e:ee:d2:76:e4 grid@node1 [grid@node1 ~]$ cd .ssh/ [grid@node1 .ssh]$ ls id_rsa id_rsa.pub [grid@node1 .ssh]$ mv id_rsa.pub authorized_keys [grid@node1 .ssh]$ chmod 600 authorized_keys [grid@node1 .ssh]$ cd .. [grid@node1 ~]$ scp -r .ssh/ 192.168.10.20:/home/grid The authenticity of host '192.168.10.20 (192.168.10.20)' can't be established. RSA key fingerprint is 95:ed:6d:87:61:00:27:ed:38:17:6c:e9:6c:c3:8a:1d. Are you sure you want to continue connecting (yes/no)? yes Warning: Permanently added '192.168.10.20' (RSA) to the list of known hosts. grid@192.168.10.20's password: id_rsa 100% 1671 1.6KB/s 00:00 authorized_keys 100% 392 0.4KB/s 00:00 known_hosts 100% 395 0.4KB/s 00:00 [grid@node1 ~]$ 测试: #su - oracle [oracle@node1 ~]$ ssh node2 date The authenticity of host 'node2 (192.168.10.20)' can't be established. RSA key fingerprint is 95:ed:6d:87:61:00:27:ed:38:17:6c:e9:6c:c3:8a:1d. Are you sure you want to continue connecting (yes/no)? yes Warning: Permanently added 'node2' (RSA) to the list of known hosts. 2012年 09月 27日 星期四 21:57:17 CST [oracle@node1 ~]$ ssh node2priv date The authenticity of host 'node2priv (192.168.20.20)' can't be established. RSA key fingerprint is 95:ed:6d:87:61:00:27:ed:38:17:6c:e9:6c:c3:8a:1d. Are you sure you want to continue connecting (yes/no)? yes Warning: Permanently added 'node2priv,192.168.20.20' (RSA) to the list of known hosts. 2012年 09月 27日 星期四 21:57:28 CST [oracle@node1 ~]$ ssh node1 date The authenticity of host 'node1 (192.168.10.10)' can't be established. RSA key fingerprint is 95:ed:6d:87:61:00:27:ed:38:17:6c:e9:6c:c3:8a:1d. Are you sure you want to continue connecting (yes/no)? yes Warning: Permanently added 'node1,192.168.10.10' (RSA) to the list of known hosts. 2012年 09月 27日 星期四 21:57:45 CST [oracle@node1 ~]$ ssh node1priv date The authenticity of host 'node1priv (192.168.20.10)' can't be established. RSA key fingerprint is 95:ed:6d:87:61:00:27:ed:38:17:6c:e9:6c:c3:8a:1d. Are you sure you want to continue connecting (yes/no)? yes Warning: Permanently added 'node1priv,192.168.20.10' (RSA) to the list of known hosts. 2012年 09月 27日 星期四 21:58:02 CST [oracle@node1 ~]$ [oracle@node1 ~]$ ssh node2 [oracle@node2 ~]$ id uid=502(oracle) gid=501(oinstall) groups=501(oinstall),502(dba),506(asmdba) [oracle@node2 ~]$ ssh node2 date The authenticity of host 'node2 (192.168.10.20)' can't be established. RSA key fingerprint is 95:ed:6d:87:61:00:27:ed:38:17:6c:e9:6c:c3:8a:1d. Are you sure you want to continue connecting (yes/no)? yes Warning: Permanently added 'node2' (RSA) to the list of known hosts. 2012年 09月 27日 星期四 21:58:41 CST [oracle@node2 ~]$ ssh node2priv date The authenticity of host 'node2priv (192.168.20.20)' can't be established. RSA key fingerprint is 95:ed:6d:87:61:00:27:ed:38:17:6c:e9:6c:c3:8a:1d. Are you sure you want to continue connecting (yes/no)? yes Warning: Permanently added 'node2priv,192.168.20.20' (RSA) to the list of known hosts. 2012年 09月 27日 星期四 21:58:49 CST [oracle@node2 ~]$ ssh node1 date The authenticity of host 'node1 (192.168.10.10)' can't be established. RSA key fingerprint is 95:ed:6d:87:61:00:27:ed:38:17:6c:e9:6c:c3:8a:1d. Are you sure you want to continue connecting (yes/no)? yes Warning: Permanently added 'node1,192.168.10.10' (RSA) to the list of known hosts. 2012年 09月 27日 星期四 21:59:01 CST [oracle@node2 ~]$ ssh node1priv date The authenticity of host 'node1priv (192.168.20.10)' can't be established. RSA key fingerprint is 95:ed:6d:87:61:00:27:ed:38:17:6c:e9:6c:c3:8a:1d. Are you sure you want to continue connecting (yes/no)? yes Warning: Permanently added 'node1priv,192.168.20.10' (RSA) to the list of known hosts. 2012年 09月 27日 星期四 21:59:12 CST [oracle@node2 ~]$ [root@node1 /]# su - grid [grid@node1 ~]$ ssh node1 date The authenticity of host 'node1 (192.168.10.10)' can't be established. RSA key fingerprint is 95:ed:6d:87:61:00:27:ed:38:17:6c:e9:6c:c3:8a:1d. Are you sure you want to continue connecting (yes/no)? yes Warning: Permanently added 'node1,192.168.10.10' (RSA) to the list of known hosts. 2012年 09月 27日 星期四 21:59:53 CST [grid@node1 ~]$ ssh node1priv date The authenticity of host 'node1priv (192.168.20.10)' can't be established. RSA key fingerprint is 95:ed:6d:87:61:00:27:ed:38:17:6c:e9:6c:c3:8a:1d. Are you sure you want to continue connecting (yes/no)? yes Warning: Permanently added 'node1priv,192.168.20.10' (RSA) to the list of known hosts. 2012年 09月 27日 星期四 21:59:59 CST [grid@node1 ~]$ ssh node2 date The authenticity of host 'node2 (192.168.10.20)' can't be established. RSA key fingerprint is 95:ed:6d:87:61:00:27:ed:38:17:6c:e9:6c:c3:8a:1d. Are you sure you want to continue connecting (yes/no)? yes Warning: Permanently added 'node2' (RSA) to the list of known hosts. 2012年 09月 27日 星期四 22:00:09 CST [grid@node1 ~]$ ssh node2priv date The authenticity of host 'node2priv (192.168.20.20)' can't be established. RSA key fingerprint is 95:ed:6d:87:61:00:27:ed:38:17:6c:e9:6c:c3:8a:1d. Are you sure you want to continue connecting (yes/no)? Host key verification failed. [grid@node1 ~]$ ssh node2priv date The authenticity of host 'node2priv (192.168.20.20)' can't be established. RSA key fingerprint is 95:ed:6d:87:61:00:27:ed:38:17:6c:e9:6c:c3:8a:1d. Are you sure you want to continue connecting (yes/no)? yes Warning: Permanently added 'node2priv,192.168.20.20' (RSA) to the list of known hosts. 2012年 09月 27日 星期四 22:00:16 CST [grid@node1 ~]$ ssh node2 [grid@node2 ~]$ ssh node2 date The authenticity of host 'node2 (192.168.10.20)' can't be established. RSA key fingerprint is 95:ed:6d:87:61:00:27:ed:38:17:6c:e9:6c:c3:8a:1d. Are you sure you want to continue connecting (yes/no)? yes Warning: Permanently added 'node2' (RSA) to the list of known hosts. 2012年 09月 27日 星期四 22:00:29 CST [grid@node2 ~]$ ssh node2priv date The authenticity of host 'node2priv (192.168.20.20)' can't be established. RSA key fingerprint is 95:ed:6d:87:61:00:27:ed:38:17:6c:e9:6c:c3:8a:1d. Are you sure you want to continue connecting (yes/no)? yes Warning: Permanently added 'node2priv,192.168.20.20' (RSA) to the list of known hosts. 2012年 09月 27日 星期四 22:00:38 CST [grid@node2 ~]$ ssh node1 date The authenticity of host 'node1 (192.168.10.10)' can't be established. RSA key fingerprint is 95:ed:6d:87:61:00:27:ed:38:17:6c:e9:6c:c3:8a:1d. Are you sure you want to continue connecting (yes/no)? yes Warning: Permanently added 'node1,192.168.10.10' (RSA) to the list of known hosts. 2012年 09月 27日 星期四 22:00:49 CST [grid@node2 ~]$ ssh node1priv date The authenticity of host 'node1priv (192.168.20.10)' can't be established. RSA key fingerprint is 95:ed:6d:87:61:00:27:ed:38:17:6c:e9:6c:c3:8a:1d. Are you sure you want to continue connecting (yes/no)? yes Warning: Permanently added 'node1priv,192.168.20.10' (RSA) to the list of known hosts. 2012年 09月 27日 星期四 22:00:58 CST [grid@node2 ~]$ 最后 在每个节点的 oracle用户 grid用户都执行一个命令 $ ssh node1 date && ssh node1priv date && ssh node2 date && ssh node2priv date $ id uid=501(grid) gid=501(oinstall) groups=501(oinstall),502(dba),504(asmadmin),506(asmdba),507(asmoper) 最后是这个效果: [grid@node2 ~]$ ssh node1 date && ssh node1priv date && ssh node2 date && ssh node2priv date 2012年 09月 27日 星期四 22:04:03 CST 2012年 09月 27日 星期四 22:04:03 CST 2012年 09月 27日 星期四 22:04:00 CST 2012年 09月 27日 星期四 22:04:01 CST [grid@node2 ~]$ su - oracle 口令: [oracle@node2 ~]$ ssh node1 date && ssh node1priv date && ssh node2 date && ssh node2priv date 2012年 09月 27日 星期四 22:04:14 CST 2012年 09月 27日 星期四 22:04:14 CST 2012年 09月 27日 星期四 22:04:11 CST 2012年 09月 27日 星期四 22:04:12 CST [oracle@node2 ~]$ ssh node1 [oracle@node1 ~]$ ssh node1 date && ssh node1priv date && ssh node2 date && ssh node2priv date 2012年 09月 27日 星期四 22:04:22 CST 2012年 09月 27日 星期四 22:04:22 CST 2012年 09月 27日 星期四 22:04:19 CST 2012年 09月 27日 星期四 22:04:20 CST [oracle@node1 ~]$ su - grid 口令: [grid@node1 ~]$ ssh node1 date && ssh node1priv date && ssh node2 date && ssh node2priv date 2012年 09月 27日 星期四 22:04:45 CST 2012年 09月 27日 星期四 22:04:45 CST 2012年 09月 27日 星期四 22:04:42 CST 2012年 09月 27日 星期四 22:04:42 CST [grid@node1 ~]$ 8、配置远程图形界面管理 可以使用xmanager,也可以使用vnc。对于远程链接跨越互联网的建议用vnc,如果在局域网我们使用xmanager即可。 Xmanager配置说明: 配置文件位置: vi /usr/share/gdm/defaults.conf找到下面内容修改配置选项: [xdmcp] DisplaysPerHost=10 Enable=true //257行 Port=177 //284行 [security] AllowRemoteRoot =true //214行 /etc/inittab文件最后一行添加 x:5:respawn:/usr/sbin/gdm 使用命令 # gdm-restart 重启gdm; 查看gdm监听端口开启成功 netstat -nltpu | grep 177 [root@node1 /]# netstat -nltpu | grep 177 udp 0 0 0.0.0.0:177 0.0.0.0:* 3184/gdm-binary [root@node1 /]# 安装前检测 将软件上传到服务器的我们之前建好的/u01/software 并解压 [root@node1 /]# chown –R grid.oinstall /u01/software/ #su -grid #cd /u01/software/grid #./runcluvfy.sh stage -pre crsinst -n node1,node2 -fixup -verbose > check.txt 最后查看check.txt文件,如果有错误,可以尝试使用root身份运行/tmp/CVU_11.2.0.1.0_grid/runfixup.sh。最后我们可能看到关于NTP的错误,我们忽略。 二、图形界面开始安装clusterware [root@node1 ~]# su – grid [grid@node1 ~]$ cd /u01/software/grid [grid@node1 grid]$ ls check1.txt doc response runcluvfy.sh sshsetup welcome.html check.txt install rpm runInstaller stage [grid@node1 grid]$ ./runInstaller 选择语言支持 配置集群名称,第二行的“SCAN名称”要和hosts文件里面的scan那项要对应 添加修改节点信息,一定要和hosts文件的名字对应。在此步骤可以配置ssh互信。因为我们事先已经配置好,这里就不需要修改了。 网络配置 选择磁盘管理方式,我们选择ASM表决盘管理 创建ASM磁盘 搜索路径 选择需要的盘 设置密码 选择“是” 不使用 使用默认用户即可 设置grid的base和home目录 设置日志目录 检查环境 这项可以忽略 摘要 开始安装 将两个脚本分别在两个节点上以root身份运行 每个脚本等node1执行完了,在去下一个节点执行 执行完成之后点击确定 等待完成,clusterware安装成功。 三、安装数据库软件 #su - oracle $cd /u01/software/database $ cd database/ $ ls doc install response rpm runInstaller sshsetup stage welcome.html $ ./runInstaller 关闭电子邮件接收 选择是 仅安装数据库软件 选择RAC数据库安装 选择语言支持 企业版安装 选择安装目录 选择操作 点击完成,直到安装结束。 建库(dbca) 以oracle用户身份执行dbca 点击完成直到结束。
由国内著名技术社区联合推荐的2012年IT技术力作:《高性能Linux服务器构建实战:运维监控、性能调优与集群应用》,即将上架发行,此书从Web应用、数据备份与恢复、网络存储应用、运维监控与性能优化、集群高级应用等多个方面深入讲解了如何构建高性能的Linux服务器。其蕴含了丰富的运维经验。更为重要的是,本书的内容不受硬件环境的限制,而且包含大量实用性极强的案例。对于广大Linux运维人员和系统管理人员来说,具有非常实用的指导意义。 全书共分五个篇幅,由14个章节成,内容涉及Web应用、数据备份恢复、网络存储应用、性能优化与运维监控、集群高级应用方面,每个篇幅占用比例分别为:20%、20%、14%、14%,32%。 前言 第1篇 Web应用篇 第1章 轻量级HTTP服务器Nginx 1.1 什么是Nginx 1.2 为什么要选择Nginx 1.2.1 Nginx与Apache的异同 1.2.2 选择Nginx的优势所在 1.3 Nginx的模块与工作原理 1.4 Nginx的安装与配置 1.4.1 下载与安装Nginx 1.4.2 Nginx配置文件的结构 1.4.3 配置与调试Nginx 1.4.4 Nginx的启动、关闭和平滑重启 1.5 Nginx常用配置实例 1.5.1 虚拟主机配置实例 1.5.2 负载均衡配置实例 1.5.3 防盗链配置实例 1.5.4 日志分割配置实例 1.6 Nginx性能优化技巧 1.6.1 编译安装过程优化 1.6.2 利用TCMalloc优化Nginx的性能 1.6.3 Nginx内核参数优化 1.7 实战Nginx与PHP(FastCGI)的安装、配置与优化 1.7.1 什么是 FastCGI 1.7.2 Nginx+FastCGI运行原理 1.7.3 spawn-fcgi与PHP-FPM 1.7.4 PHP与PHP-FPM的安装及优化 1.7.5 配置Nginx来支持PHP 1.7.6 测试Nginx对PHP的解析功能 1.7.7 优化NginxFastCGI参数的实例 1.8 实战Nginx与Perl、Java的安装与配置 1.8.1 Perl(FastCGI)的安装 1.8.2 为Nginx添加FCGI支持 1.8.3 测试Nginx +Perl(FastCGI) 1.8.4 搭建Nginx+Java环境 1.9 本章小结 第2章 高性能HTTP加速器Varnish 2.1 初识Varnish 2.1.1 Varnish概述 2.1.2 Varnish的结构与特点 2.1.3 Varnish与Squid的对比 2.2 开始安装Varnish 2.2.1 安装前的准备 2.2.2 获取Varnish软件 2.2.3 安装pcre 2.2.4 安装Varnish 2.3 配置Varnish 2.3.1 VCL使用说明 2.3.2 配置一个简单的Varnish实例 2.3.3 Varnish对应多台Web服务器的配置实例 2.4 运行Varnish 2.4.1 varnishd指令 2.4.2 配置Varnish运行脚本 2.4.3 管理Varnish运行日志 2.5 管理Varnish 2.5.1 查看Varnish进程 2.5.2 查看Varnish缓存效果与状态 2.5.3 通过端口管理Varnish 2.5.4 管理Varnish缓存内容 2.6 Varnish优化 2.6.1 优化Linux内核参数 2.6.2 优化系统资源 2.6.3 优化Varnish参数 2.7 Varnish的常见应用实例 2.7.1 利用Varnish实现图片防盗链 2.7.2 利用Varnish实现静态文件压缩处理 2.8 本章小结 第3章 Memcached应用实战 3.1 Memcached基础 3.1.1 什么是Memcached 3.1.2 Memcached的特征 3.1.3 Memcached的安装 3.1.4 Memcached的简单使用过程 3.2 剖析Memcached的工作原理 3.2.1 Memcached的工作过程 3.2.2 Slab Allocation的工作机制 3.2.3 Memcached的删除机制 3.2.4 Memcached的分布式算法 3.3 Memcached的管理与性能监控 3.3.1 如何管理Memcached 3.3.2 Memcached的监控 3.3.3 Memcached变种产品介绍 3.4 通过UDFs实现Memcached与MySQL的自动更新 3.4.1 UDFs使用简介 3.4.2 memcached_functions_mysql应用实例 3.4.3 对memcached_functions_mysql的简单功能进行测试 3.4.4 使用memcached_functions_mysql的经验与技巧 3.5 本章小结 第2篇 数据备份恢复篇 第4章 开源网络备份软件bacula 4.1 bacula总体概述 4.1.1 bacula是什么 4.1.2 bacula适合哪些用户 4.1.3 bacula的功能特点 4.1.4 bacula的工作原理 4.2 安装bacula 4.2.1 bacula的几种网络备份拓扑 4.2.2 编译与安装bacula 4.2.3 初始化MySQL数据库 4.3 配置一个bacula备份系统 4.3.1 配置bacula的Console端 4.3.2 配置bacula的Director端 4.3.3 配置bacula的SD 4.3.4 配置bacula的FD端 4.4 启动与关闭bacula 4.4.1 启动bacula的Director daemon与Storage daemon 4.4.2 在客户端FD启动File daemon 4.5 实战bacula备份恢复过程 4.5.1 实例演示bacula的完全备份功能 4.5.2 实例演示bacula的增量备份功能 4.5.3 实例演示bacula的差异备份功能 4.5.4 实例演示bacula的完全恢复功能 4.5.5 实例演示bacula的不完全恢复功能 4.6 本章小结 第5章 数据镜像备份工具rsync与unison 5.1 rsync简介 5.1.1 什么是rsync 5.1.2 rsync的功能特性 5.1.3 下载与安装rsync软件 5.2 利用rsync搭建数据镜像备份系统 5.2.1 rsync的应用模式 5.2.2 企业案例:搭建远程容灾备份系统 5.3 通过rsync+inotify实现数据的实时备份 5.3.1 rsync的优点与不足 5.3.2 初识inotify 5.3.3 安装inotify工具inotify-tools 5.3.4 inotify相关参数 5.3.5 inotifywait相关参数 5.3.6 企业应用案例:利用rsync+inotify搭建实时同步系统 5.4 unison简介 5.5 安装unison 5.6 配置双机ssh信任 5.6.1 在两台机器上创建 RSA密钥 5.6.2 添加密钥到授权密钥文件 5.7 unison的使用 5.7.1 本地使用unison 5.7.2 远程使用unison 5.7.3 unison参数说明 5.7.4 通过配置文件来使用unison 5.8 本章小结 第6章 ext3文件系统反删除利器ext3grep 6.1 “rm–rf”带来的困惑 6.2 ext3grep的安装与使用 6.2.1 ext3grep的恢复原理 6.2.2 ext3grep的安装过程 6.3 通过ext3grep恢复误删除的文件与目录 6.3.1 数据恢复准则 6.3.2 实战ext3grep恢复文件 6.4 通过ext3grep恢复误删除的MySQL表 6.4.1 MySQL存储引擎介绍 6.4.2 模拟MySQL表被误删除的环境 6.4.3 通过ext3grep分析数据、恢复数据 6.5 本章小结 第3篇 网络存储应用篇 第7章 IP网络存储iSCSI 7.1 存储的概念与术语 7.1.1 SCSI介绍 7.1.2 FC介绍 7.1.3 DAS介绍 7.1.4 NAS介绍 7.1.5 SAN介绍 7.2 iSCSI的概念 7.3 FC SAN与IP SAN 7.4 iSCSI的成 7.4.1 iSCSI Initiator 7.4.2 iSCSI Target 7.5 iSCSI的工作原理 7.6 搭建基于IP SAN的iSCSI存储系统 7.6.1 安装iSCSI Target软件 7.6.2 配置一个简单的iSCSI Target 7.6.3 在Windows上配置iSCSI Initiator 7.6.4 在Linux上配置iSCSI Initiator 7.7 iSCSI 在安全方面的相关设定 7.7.1 Initiator主机以IP认证方式获取iSCSI Target资源 7.7.2 Initiator主机以密码认证方式获取iSCSI Target资源 7.8 iSCSI性能优化方案 7.8.1 iSCSI性能瓶颈 7.8.2 iSCSI性能优化 7.9 本章小结 第8章 分布式存储系统MFS 8.1 MFS概论 8.2 MFS 文件系统 8.2.1 MFS文件系统结构 8.2.2 MFS的编译与安装实例 8.3 编译与使用MFS的经验总结 8.3.1 安装选项说明 8.3.2 管理服务器 8.3.3 元数据日志服务器 8.3.4 数据存储服务器 8.3.5 客户端挂载 8.4 管理与使用MFS 8.4.1 在客户端挂载文件系统 8.4.2 MFS常用操作 8.4.3 为垃圾箱设定隔离时间 8.4.4 快照 8.4.5 MFS的其他命令 8.5 维护MFS 8.5.1 启动MFS集群 8.5.2 停止MFS集群 8.5.3 MFS 数据存储服务器的维护 8.5.4 MFS元数据的备份 8.5.5 MFS 管理服务器的恢复 8.5.6 从备份恢复MFS 管理服务器 8.6 通过冗余实现失败防护的解决方案 8.7 本章小结 第4篇 运维监控与性能优化篇 第9章 运维监控利器Nagios 9.1 Nagios综述 9.1.1 什么是Nagios 9.1.2 Nagios的结构与特点 9.2 Nagios的安装与配置 9.2.1 安装Nagios 9.2.2 配置Nagios 9.3 Nagios的运行和维护 9.3.1 验证Nagios配置文件的正确性 9.3.2 启动与停止Nagios 9.3.3 Nagios故障报警 9.4 Nagios性能分析图表的实现 9.4.1 Nagios性能分析图表的作用 9.4.2 PNP的概念与安装环境 9.4.3 安装PNP 9.4.4 配置PNP 9.4.5 修改Nagios配置文件 9.4.6 测试PNP功能 9.5 利用插件扩展Nagios的监控功能 9.5.1 利用NRPE外部构件监控远程主机 9.5.2 利用飞信实现Nagios短信报警功能 9.6 本章小结 第10章 基于Linux服务器的性能分析与优化 10.1 系统性能分析的目的 10.1.1 找到系统性能的瓶颈 10.1.2 提供性能优化方案 10.1.3 使系统硬件和软件资源的使用达到平衡 10.2 分析系统性能涉及的人员 10.2.1 Linux系统管理人员 10.2.2 系统架构设计人员 10.2.3 软件开发人员 10.3 影响Linux性能的各种因素 10.3.1 系统硬件资源 10.3.2 操作系统相关资源 10.3.3 应用程序软件资源 10.4 系统性能分析标准和优化原则 10.5 几种典型应用对系统资源使用的特点 10.5.1 以静态内容为主的Web应用 10.5.2 以动态内容为主的Web应用 10.5.3 数据库应用 10.5.4 软件下载应用 10.5.5 流媒体服务应用 10.6 Linux下常见的性能分析工具 10.6.1 vmstat命令 10.6.2 sar命令 10.6.3 iostat命令 10.6.4 free命令 10.6.5 uptime命令 10.6.6 netstat命令 10.6.7 top命令 10.7 基于Web应用的性能分析及优化案例 10.7.1 基于动态内容为主的网站优化案例 10.7.2 基于动态、静态内容结合的网站优化案例 10.8 本章小结 第5篇 集群高级应用篇 第11章 构建高可用的LVS负载均衡集群 11.1 LVS集群的成与特点 11.1.1 LVS集群的成 11.1.2 LVS集群的特点 11.1.3 LVS集群系统的优缺点 11.2 高可用 LVS负载均衡集群体系结构 11.3 高可用性软件Heartbeat与Keepalived 11.3.1 开源HA软件Heartbeat的介绍 11.3.2 安装heartbeat 11.3.3 开源HA软件Keepalived的介绍 11.3.4 安装Keepalived 11.4 安装LVS软件 11.4.1 配置与检查安装环境 11.4.2 在Director Server上安装IPVS管理软件 11.5 搭建高可用 LVS集群 11.5.1 通过heartbeat搭建LVS高可用性集群 11.5.2 通过Keepalived搭建LVS高可用性集群系统 11.5.3 通过piranha搭建LVS高可用性集群 11.6 测试高可用LVS负载均衡集群系统 11.6.1 高可用性功能测试 11.6.2 负载均衡测试 11.6.3 故障切换测试 11.7 本章小结 第12章 RHCS集群 12.1 RHCS集群概述 12.2 RHCS集群的成与结构 12.2.1 RHCS集群的成 12.2.2 RHCS集群结构 12.3 RHCS集群的运行原理及功能 12.3.1 分布式集群管理器(CMAN) 12.3.2 锁管理(DLM) 12.3.3 配置文件管理(CCS) 12.3.4 栅设备(Fence) 12.3.5 高可用性服务管理器 12.3.6 集群配置和管理工具 12.3.7 Redhat GFS 12.4 安装RHCS 12.4.1 安装前准备工作 12.4.2 配置共享存储和RHCS管理端Luci 12.4.3 在集群节点上安装RHCS软件包 12.4.4 在集群节点上安装和配置iSCSI客户端 12.5 配置RHCS高可用集群 12.5.1 创建一个cluster 12.5.2 创建Failover Domain 12.5.3 创建Resources 12.5.4 创建Service 12.5.5 配置存储集群GFS 12.5.6 配置表决磁盘 12.5.7 配置Fence设备 12.6 管理和维护RHCS集群 12.6.1 启动RHCS集群 12.6.2 关闭RHCS集群 12.6.3 管理应用服务 12.6.4 监控RHCS集群状态 12.6.5 管理和维护GFS2文件系统 12.7 RHCS集群功能测试 12.7.1 高可用集群测试 12.7.2 存储集群测试 12.8 本章小结 第13章 Oracle RAC集群 13.1 Oracle集群体系结构 13.2 Oracle ClusterWare体系结构与进程介绍 13.2.1 Oracle ClusterWare 简介 13.2.2 Oracle ClusterWare 进程介绍 13.3 RAC数据库体系结构与进程 13.3.1 RAC 简介 13.3.2 Oracle RAC的特点 13.3.3 RAC进程管理 13.3.4 RAC数据库存储规划 13.4 安装Oracle RAC数据库 13.4.1 安装前的系统配置需求 13.4.2 设置数据库安装资源 13.4.3 配置主机解析文件 13.4.4 检查所需软件包 13.4.5 配置系统内核参数 13.4.6 设置 Shell对Oracle用户的限制 13.4.7 配置hangcheck-timer内核模块 13.4.8 配置系统安全设置 13.4.9 创建Oracle用户和 13.4.10 设置Oracle用户环境变量 13.4.11 配置节点间SSH信任 13.4.12 配置共享存储系统 13.4.13 安装Oracle Clusterware 13.4.14 安装Oracle数据库 13.4.15 配置Oracle Net 13.4.16 创建RAC数据库 13.5 Oracle CRS的管理与维护 13.5.1 查看集群状态 13.5.2 启动与关闭集群服务资源 13.5.3 启动与关闭CRS 13.5.4 管理voting disk 13.5.5 管理OCR 13.5.6 快速卸载CRS 13.6 ASM基本操作维护 13.6.1 ASM的特点 13.6.2 ASM的体系结构与后台进程 13.6.3 管理ASM实例 13.7 利用srvctl管理RAC数据库 13.7.1 查看实例状态(srvctl status) 13.7.2 查看RAC数据库配置信息(srvctl config) 13.7.3 启动 13.7.4 增加 13.8 测试RAC数据库集群的功能 13.8.1 负载均衡测试 13.8.2 透明应用失败切换测试 13.9 本章小结 第14章 构建MySQL+heartbeat+DRBD+LVS集群应用系统 14.1 MySQL高可用集群概述 14.2 heartbeat + DRBD高可用性方案的实现原理 14.3 部署MySQL高可用高扩展集群 14.3.1 配置之前的准备 14.3.2 DRBD的部署 14.3.3 DRBD的配置 14.3.4 DRBD的维护和管理 14.3.5 DRBD的性能优化 14.3.6 MySQL的部署 14.3.7 heartbeat的部署 14.4 搭建Slave集群 14.4.1 为什么要搭建Slave集群 14.4.2 利用LVS+Keepalived搭建高可用MySQL Slave集群 14.4.3 高可用Slave集群的一些注意点 14.5 部署MySQL集群要考虑的问题 14.6 本章小结

17,377

社区成员

发帖
与我相关
我的任务
社区描述
Oracle 基础和管理
社区管理员
  • 基础和管理社区
加入社区
  • 近7日
  • 近30日
  • 至今
社区公告
暂无公告

试试用AI创作助手写篇文章吧