社区
新手乐园
帖子详情
小白求助,跪求大神们的帮助
weixin_39519235
2018-10-18 09:40:16
小白的求助帖,有关opencv和D3D的
如题,求助求助求助,想求各位大神帮忙。小弟想做一个如下的效果:
第一、将一副图显示(已解决)
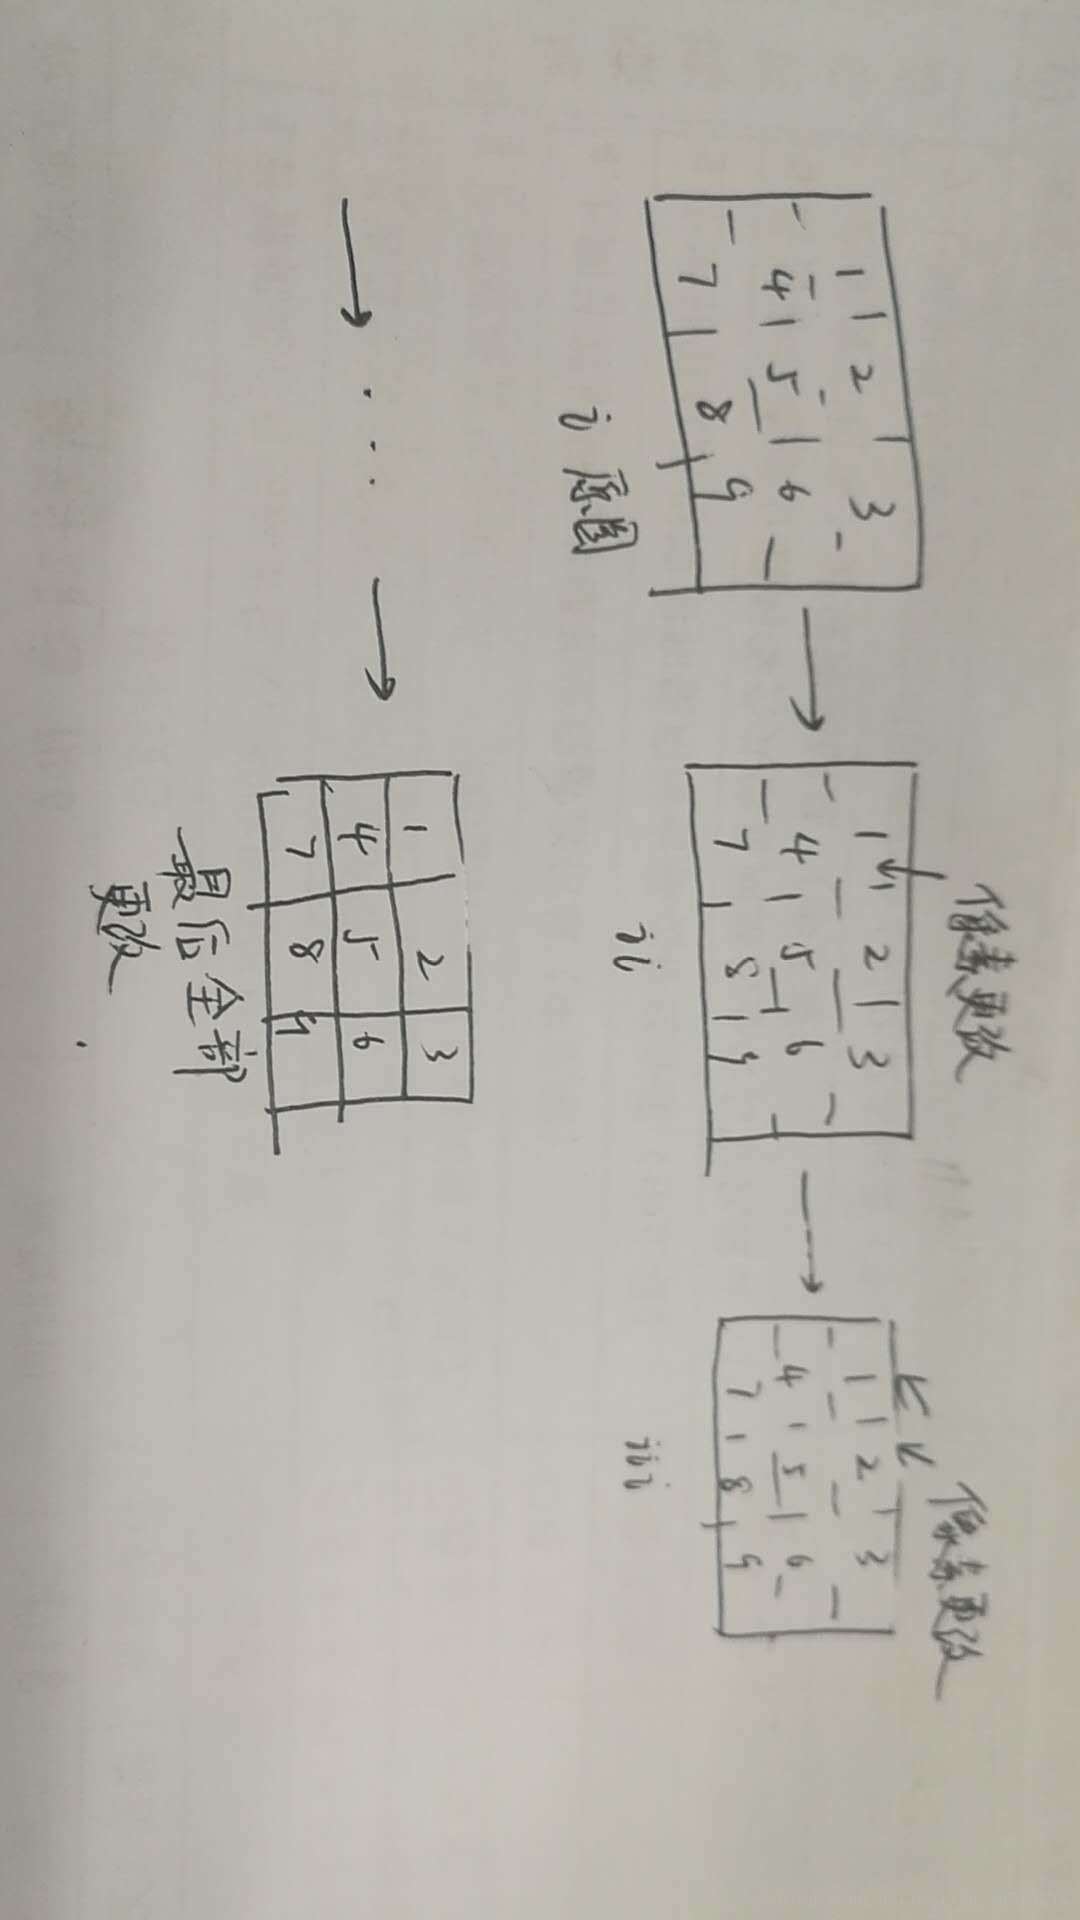
第二、将图分为很多块(例如如图的九块)
第三、依次修改每一区域的像素值(通过键盘按键来实现像素的变化),并实时显示
效果就是先修改第一区域的,然后第二区域,最后所有全部更改。
想求各位大神的帮忙,怎么实现,如果有大神能给出代码更是感激不尽。、
小弟在此谢谢各位大神
...全文
510
4
打赏
收藏
小白求助,跪求大神们的帮助
小白的求助帖,有关opencv和D3D的 如题,求助求助求助,想求各位大神帮忙。小弟想做一个如下的效果: 第一、将一副图显示(已解决) 第二、将图分为很多块(例如如图的九块) 第三、依次修改每一区域的像素值(通过键盘按键来实现像素的变化),并实时显示 效果就是先修改第一区域的,然后第二区域,最后所有全部更改。 想求各位大神的帮忙,怎么实现,如果有大神能给出代码更是感激不尽。、 小弟在此谢谢各位大神
复制链接
扫一扫
分享
转发到动态
举报
写回复
配置赞助广告
用AI写文章
4 条
回复
切换为时间正序
请发表友善的回复…
发表回复
打赏红包
636f6c696e
2018-10-23
打赏
举报
回复
没看出任何实现上的难度 监听键盘按键时间,根据按键修改像素值,这很困难么?
weixin_39519235
2018-10-23
打赏
举报
回复
可能对于大神比较简单,但是对于小白有点困难。。。我现在只能实现同时更改所有的区域像素值,譬如用↑↓←→来更改整体的值,然后整体显示出来。但是我想做到的是这个效果 譬如用小键盘2,4,6,8选中每一个区域,然后用↑↓←→更改选中的区域,然后用space就是保存这一区域更改后的值,然后此时显示的是该区域更改过之后的和其他区域未更改的效果,然后再用2,4,6,8选中另一区域,然后继续,这一部分功能不知道去怎么实现
weixin_39519235
2018-10-19
打赏
举报
回复
第二部分
//-------------------------------------------------------------------------------------- // Render a frame //---------------------------------------------------uu----------------------------------- void Render( Mat MaskFrame ) { Mat MaskFrameRGBA;//彩色 cvtColor(MaskFrame,MaskFrameRGBA,CV_BGR2RGBA); ////////////////////////////////////////////////////////////////////////将opencv的内容导入到d3d D3D10_MAPPED_TEXTURE2D mappedTex; ShowTex->Map( 0, D3D10_MAP_WRITE_DISCARD , 0, &mappedTex ); UCHAR* pTexels = (UCHAR*)mappedTex.pData; int texstep = mappedTex.RowPitch; for(int j=0;j < g_height;j++) { memcpy(pTexels + j*texstep, MaskFrameRGBA.datastart + j * MaskFrameRGBA.step.buf[0], MaskFrameRGBA.step.buf[0]); } ShowTex->Unmap( 0 ); g_pTexVariable->SetResource(g_ShowTex); //载入纹理 ////////////////////////////////////////////////////////////////////////////////////////////////////////////////// //d3d显示 /////////////////////////////////////////////////////////////////////////////////////////////////////////////////////////////////////////// float ClearColor[4] = { 0.0f, 0.0f, 0.0f, 1.0f }; // red, green, blue, alpha g_pd3dDevice->ClearRenderTargetView( g_pRenderTargetView, ClearColor ); // Initialize the view matrix // // Renders a triangle // D3D10_TECHNIQUE_DESC techDesc; g_pTechnique->GetDesc( &techDesc ); for( UINT p = 0; p < techDesc.Passes; ++p ) { g_pTechnique->GetPassByIndex( p )->Apply( 0 ); g_pd3dDevice->DrawIndexed( 6, 0, 0 ); // 36 vertices needed for 12 triangles in a triangle list } g_pSwapChain->Present( 0, 0 ); } //-------------------------------------------------------------------------------------- // Clean up the objects we've created //-------------------------------------------------------------------------------------- void CleanupDevice() { if( g_pd3dDevice ) g_pd3dDevice->ClearState(); if( g_pVertexLayout ) g_pVertexLayout->Release(); if( g_pEffect ) g_pEffect->Release(); if( g_pRenderTargetView ) g_pRenderTargetView->Release(); } //-------------------------------------------------------------------------------------- // Called every time the application receives a message //--------------------------------------------------------------------------------------
LRESULT CALLBACK WndProc( HWND hWnd, UINT message, WPARAM wParam, LPARAM lParam ) { PAINTSTRUCT ps; HDC hdc; switch( message ) { case WM_PAINT: hdc = BeginPaint( hWnd, &ps ); EndPaint( hWnd, &ps ); break; case WM_KEYDOWN: if( wParam == VK_ESCAPE ) ::DestroyWindow(hWnd); else if (wParam == VK_LEFT) { Num += 1;//调整Num值 } else if (wParam == VK_RIGHT) { Num -= 1; } else if (wParam == VK_F5) { ofstream in; in.open("a.txt",ios::trunc); in<<"Num"<<Num; in.close(); } case WM_DESTROY: PostQuitMessage( 0 ); break; default: return DefWindowProc( hWnd, message, wParam, lParam ); } return 0; }
///////////////////////////////////////////////
Mat opencvMask() { IplImage *save_image = cvCreateImage(cvSize(g_width, g_height), 8, 3); UCHAR* image_data = (UCHAR*)save_image->imageData; int image_step = save_image->widthStep / sizeof(UCHAR); int image_channels = save_image->nChannels; for (int i = 0; i < g_height; i++) { for (int j = 0; j < g_width; j++) { for (int k = 0; k < 3; k++) { image_data[i * image_step + j * image_channels + 2 - k] = Num; } } } Mat B = save_image; Mat C; B.copyTo(C); return C; }
/////////////////////////////////// 只有很小一部分是我自己写的,我现在能做到的是,创建一个空白图片,然后通过键位来对整副图片的像素来进行变化,然后显示出来。我想要实现的效果是,假设将这个图片分割成如图的九块(实际会是很多块,20*20或者30*30),然后先修改区域1中的像素值,然后此时电脑上显示的是1区域修改过之后和其他区域未修改的图像,然后修改2区域,同样显示1,2区域都修改后其余区域未修改的图像,直到所有的区域全部修改。同样也是需要通过键位来改变其像素值。 ////////////// 谢谢大佬帮忙
weixin_39519235
2018-10-19
打赏
举报
回复
整体的代码比较长,我分了几段,代码中有很大一部分是D3D的配置,这一部分是之前的师兄封装好的,我把我用到的一丢丢代码标红,谢谢大佬 第一部分 #include "stdio.h" #include <windows.h> #include <d3d10.h> #include <d3dx10.h> #include "resource.h" #include "tchar.h" #include <core\core.hpp> #include <highgui\highgui.hpp> #include <imgproc\imgproc.hpp> #include <iostream> #include <fstream> using namespace std; using namespace cv;
UINT g_width = 1920; UINT g_height = 1080; bool matchanged = false; int Num = 0;
//-------------------------------------------------------------------------------------- // Forward declarations //-------------------------------------------------------------------------------------- HRESULT InitWindow( HINSTANCE hInstance, int nCmdShow ); HRESULT InitDevice(); HRESULT InitTex(); void CleanupDevice(); LRESULT CALLBACK WndProc( HWND, UINT, WPARAM, LPARAM ); void Render( Mat MaskFrame ); Mat opencvMask(); //-------------------------------------------------------------------------------------- // Entry point to the program. Initializes everything and goes into a message processing // loop. Idle time is used to render the scene. //--------------------------------------------------------------------------------------
int WINAPI wWinMain( HINSTANCE hInstance, HINSTANCE hPrevInstance, LPWSTR lpCmdLine, int nCmdShow ) { UNREFERENCED_PARAMETER( hPrevInstance ); UNREFERENCED_PARAMETER( lpCmdLine ); InitWindow( hInstance, nCmdShow ) ; InitDevice(); Mat colorframe; MSG msg = {0}; while( WM_QUIT != msg.message ) { if( PeekMessage( &msg, NULL, 0, 0, PM_REMOVE ) ) { TranslateMessage( &msg ); DispatchMessage( &msg ); } else { if (1) //如果调整,那么重新生成蒙板 { colorframe = opencvMask(); } Render(colorframe); } } CleanupDevice(); return ( int )msg.wParam; }
//-------------------------------------------------------------------------------------- // Register class and create window //-------------------------------------------------------------------------------------- HRESULT InitWindow( HINSTANCE hInstance, int nCmdShow ) { // Register class WNDCLASSEX wcex; wcex.cbSize = sizeof( WNDCLASSEX ); wcex.style = CS_HREDRAW | CS_VREDRAW; wcex.lpfnWndProc = WndProc; wcex.cbClsExtra = 0; wcex.cbWndExtra = 0; wcex.hInstance = hInstance; wcex.hIcon = LoadIcon( hInstance, ( LPCTSTR )IDI_TUTORIAL1 ); wcex.hCursor = LoadCursor( NULL, IDC_ARROW ); wcex.hbrBackground = ( HBRUSH )( COLOR_WINDOW + 1 ); wcex.lpszMenuName = NULL; wcex.lpszClassName = "TutorialWindowClass"; wcex.hIconSm = LoadIcon( wcex.hInstance, ( LPCTSTR )IDI_TUTORIAL1 ); if( !RegisterClassEx( &wcex ) ) return E_FAIL; // Create window g_hInst = hInstance; RECT rc = { 0, 0, 800, 500 }; AdjustWindowRect(&rc, WS_MAXIMIZEBOX, FALSE); g_hWnd = CreateWindow("TutorialWindowClass", "Direct3D 10 Tutorial 7", WS_MAXIMIZEBOX, CW_USEDEFAULT, CW_USEDEFAULT,(rc.right - rc.left ), (rc.bottom - rc.top), NULL, NULL, hInstance, NULL ); if( !g_hWnd ) return E_FAIL; ShowWindow( g_hWnd, nCmdShow ); return S_OK; } //-------------------------------------------------------------------------------------- // Create Direct3D device and swap chain //-------------------------------------------------------------------------------------- HRESULT InitDevice() { HRESULT hr = S_OK; UINT createDeviceFlags = 0; //#ifdef _DEBUG // createDeviceFlags |= D3D10_CREATE_DEVICE_DEBUG; //#endif D3D10_DRIVER_TYPE driverTypes[] = { D3D10_DRIVER_TYPE_HARDWARE, D3D10_DRIVER_TYPE_REFERENCE, }; UINT numDriverTypes = sizeof( driverTypes ) / sizeof( driverTypes[0] ); DXGI_SWAP_CHAIN_DESC sd; ZeroMemory( &sd, sizeof( sd ) ); sd.BufferCount = 1; sd.BufferDesc.Width = g_width; sd.BufferDesc.Height = g_height; sd.BufferDesc.Format = DXGI_FORMAT_R8G8B8A8_UNORM; sd.BufferDesc.RefreshRate.Numerator = 60; sd.BufferDesc.RefreshRate.Denominator = 1; sd.BufferUsage = DXGI_USAGE_RENDER_TARGET_OUTPUT; sd.OutputWindow = g_hWnd; sd.SampleDesc.Count = 1; sd.SampleDesc.Quality = 0; sd.Windowed = false; for( UINT driverTypeIndex = 0; driverTypeIndex < numDriverTypes; driverTypeIndex++ ) { g_driverType = driverTypes[driverTypeIndex]; hr = D3D10CreateDeviceAndSwapChain( NULL, g_driverType, NULL, createDeviceFlags, D3D10_SDK_VERSION, &sd, &g_pSwapChain, &g_pd3dDevice ); if( SUCCEEDED( hr ) ) break; } if( FAILED( hr ) ) return hr; // Create a render target view ID3D10Texture2D* pBuffer; hr = g_pSwapChain->GetBuffer( 0, __uuidof( ID3D10Texture2D ), ( LPVOID* )&pBuffer ); if( FAILED( hr ) ) return hr; hr = g_pd3dDevice->CreateRenderTargetView( pBuffer, NULL, &g_pRenderTargetView ); pBuffer->Release(); if( FAILED( hr ) ) return hr; g_pd3dDevice->OMSetRenderTargets(1, &g_pRenderTargetView, NULL); D3D10_VIEWPORT vp; vp.Width = g_width; vp.Height = g_height; vp.MinDepth = 0.0f; vp.MaxDepth = 1.0f; vp.TopLeftX = 0; vp.TopLeftY = 0; g_pd3dDevice->RSSetViewports( 1, &vp ); // Create the effect DWORD dwShaderFlags = D3D10_SHADER_ENABLE_STRICTNESS; #if defined( DEBUG ) || defined( _DEBUG ) // Set the D3D10_SHADER_DEBUG flag to embed debug information in the shaders. // Setting this flag improves the shader debugging experience, but still allows // the shaders to be optimized and to run exactly the way they will run in // the release configuration of this program. dwShaderFlags |= D3D10_SHADER_DEBUG; #endif hr = D3DX10CreateEffectFromFile( "Tutorial07.fx", NULL, NULL, "fx_4_0", dwShaderFlags, 0, g_pd3dDevice, NULL, NULL, &g_pEffect, NULL, NULL ); if( FAILED( hr ) ) { MessageBox( NULL, "The FX file cannot be located. Please run this executable from the directory that contains the FX file.", "Error", MB_OK ); return hr; } // Obtain the technique g_pTechnique = g_pEffect->GetTechniqueByName( "Render" ); // Obtain the variables g_pWorldVariable = g_pEffect->GetVariableByName( "World" )->AsMatrix(); g_pViewVariable = g_pEffect->GetVariableByName( "View" )->AsMatrix(); g_pProjectionVariable = g_pEffect->GetVariableByName( "Projection" )->AsMatrix(); g_pTexVariable = g_pEffect->GetVariableByName( "tex" )->AsShaderResource(); // Define the input layout D3D10_INPUT_ELEMENT_DESC layout[] = { { "POSITION", 0, DXGI_FORMAT_R32G32B32_FLOAT, 0, 0, D3D10_INPUT_PER_VERTEX_DATA, 0 }, { "TEXCOORD", 0, DXGI_FORMAT_R32G32_FLOAT, 0, 12, D3D10_INPUT_PER_VERTEX_DATA, 0 }, }; UINT numElements = sizeof( layout ) / sizeof( layout[0] ); // Create the input layout D3D10_PASS_DESC PassDesc; g_pTechnique->GetPassByIndex( 0 )->GetDesc( &PassDesc ); hr = g_pd3dDevice->CreateInputLayout( layout, numElements, PassDesc.pIAInputSignature, PassDesc.IAInputSignatureSize, &g_pVertexLayout ); if( FAILED( hr ) ) return hr; g_pd3dDevice->IASetInputLayout( g_pVertexLayout ); // Create vertex buffer SimpleVertex vertices[] = { { D3DXVECTOR3( -16.0f, 9.0f, 0.0f ), D3DXVECTOR2( 0.0f, 0.0f ) }, { D3DXVECTOR3( 16.0f, 9.0f, 0.0f ), D3DXVECTOR2( 1.0f, 0.0f ) }, { D3DXVECTOR3( 16.0f, -9.0f, 0.0f ), D3DXVECTOR2( 1.0f, 1.0f ) }, { D3DXVECTOR3( -16.0f, -9.0f, 0.0f ), D3DXVECTOR2( 0.0f, 1.0f ) }, //{ D3DXVECTOR3( -16.0f, -9.0f, 0.0f ), D3DXVECTOR2( 0.0f, 1.0f ) }, }; D3D10_BUFFER_DESC bd; bd.Usage = D3D10_USAGE_DEFAULT; bd.ByteWidth = sizeof( SimpleVertex ) * 4; bd.BindFlags = D3D10_BIND_VERTEX_BUFFER; bd.CPUAccessFlags = 0; bd.MiscFlags = 0; D3D10_SUBRESOURCE_DATA InitData; InitData.pSysMem = vertices; hr = g_pd3dDevice->CreateBuffer( &bd, &InitData, &g_pVertexBuffer ); if( FAILED( hr ) ) return hr; // Set vertex buffer UINT stride = sizeof( SimpleVertex ); UINT offset = 0; g_pd3dDevice->IASetVertexBuffers( 0, 1, &g_pVertexBuffer, &stride, &offset ); // Create index buffer // Create vertex buffer DWORD indices[] = { 3,0,1, 3,1,2 }; bd.Usage = D3D10_USAGE_DEFAULT; bd.ByteWidth = sizeof( DWORD ) * 6; bd.BindFlags = D3D10_BIND_INDEX_BUFFER; bd.CPUAccessFlags = 0; bd.MiscFlags = 0; InitData.pSysMem = indices; hr = g_pd3dDevice->CreateBuffer( &bd, &InitData, &g_pIndexBuffer ); if( FAILED( hr ) ) return hr; // Set index buffer g_pd3dDevice->IASetIndexBuffer( g_pIndexBuffer, DXGI_FORMAT_R32_UINT, 0 ); // Set primitive topology g_pd3dDevice->IASetPrimitiveTopology( D3D10_PRIMITIVE_TOPOLOGY_TRIANGLELIST ); D3DXMatrixIdentity( &g_World); D3DXVECTOR3 Eye( 0 , 0 ,-500); D3DXVECTOR3 At( 0 , 0 , 128); D3DXVECTOR3 Up( 0.0f, 1.0f, 0.0f ); D3DXMatrixLookAtLH( &g_View, &Eye, &At, &Up ); D3DXMatrixOrthoLH(&g_Projection,32,18,0,1000); g_pViewVariable->SetMatrix ( ( float* )&g_View ); g_pProjectionVariable->SetMatrix ( ( float* )&g_Projection ); g_pWorldVariable->SetMatrix( ( float* )&g_World); //////////////////////////////////////////////////纹理 D3D10_TEXTURE2D_DESC desc; ZeroMemory( &desc, sizeof(desc) ); desc.Width = g_width; //因为是蒙板,所以纹理大小和backbuffer一样 desc.Height = g_height; desc.MipLevels = 1; desc.ArraySize = 1; desc.Format = DXGI_FORMAT_R8G8B8A8_UNORM; desc.SampleDesc.Count = 1; desc.SampleDesc.Quality = 0; desc.Usage = D3D10_USAGE_DYNAMIC; desc.BindFlags = D3D10_BIND_SHADER_RESOURCE; desc.CPUAccessFlags = D3D10_CPU_ACCESS_WRITE; g_pd3dDevice->CreateTexture2D( &desc, NULL, &ShowTex); D3D10_SHADER_RESOURCE_VIEW_DESC srDesc; srDesc.Format = desc.Format; srDesc.ViewDimension = D3D10_SRV_DIMENSION_TEXTURE2D; srDesc.Texture2D.MostDetailedMip = 0; srDesc.Texture2D.MipLevels = 1; g_pd3dDevice->CreateShaderResourceView( ShowTex , &srDesc, &g_ShowTex ); return S_OK; }
赵4老师
2018-10-19
打赏
举报
回复
已解决的代码贴出来。
小白
学习Python第一步
Python安装和环境选择 官网下载 Python,推荐 Python 3.6+, Python 2 就不要选了,明年 Python 2 就要被停止维护了, Python 3.5 及其以前的版本没有诸如协程等新特性的加持, Python 3.7 又因为太新而不稳定。 安装 Python 时注意两个要点, 第一:勾选 Add Python to Path, 第二:最后自定义安装路径,安装路径一定...
求助
大神
......
求
大神
帮我解答一下下…实在找不到人帮我了 题目要求为:输出分数为80分以上的学生学号和成绩;谢谢,万分感谢,磕头跪谢;
vba 执行网页javascript_【
求助
】VBA操作网页的问题(窗口句柄,模拟鼠标点击)...
该楼层疑似违规已被系统折叠隐藏此楼查看此楼
跪求
各位
大神
,最近因为VBA调用IE的问题弄得焦头烂额,深夜3点还是睡不着,小弟VBA
小白
一枚,在大量百度各种求救无奈之下发此贴,肯请各位老师帮忙看看下面代码的问题,万分感激,谢谢大家了。Private Declare Function FindWindow Lib "user32" Alias "FindWindowA" (ByVal lpClassN...
java url数字签名_【技术
求助
】有关数字签名的问题
该楼层疑似违规已被系统折叠隐藏此楼查看此楼偶碰见个问题,银行给提供了pem格式的私钥和pfx格式的公钥文件,对于别人发过来的请求,需要用公钥进行验签,返回给别人时用私钥加签到固定字段中。从网上扣了点代码运行有些问题,求
大神
指教。。。。/*** 读取pem格式的私钥算法* @param pem pem文件路径* @param password 密码* @throws Exception 异常处理*...
网络安全学习的15个残酷真相与实用建议(新老手都值得一看)
网上到处是「29元成为黑客
大神
」,朋友圈广告下面全是「求教程」的评论,连小学生都在学Kali Linux,渗透测试都从娃娃抓起了…有时候我挺纳闷,真有这么多人学黑客?但最近看到我身边一个连钓鱼邮件都点在折腾BurpSuite了,我悟了,是时候展开聊聊了!一个
小白
从零学安全,往往是头铁又懵圈的。说来惭愧,我现在工作也搞安全,属于
小白
里胡子最长的那一撮。作为一名老菜鸟,今天就跟大伙唠点实在的!萌新可以避坑,大佬请无情嘲笑,没入坑的当看个热闹。报班前先想明白:你学安全图个啥?
新手乐园
33,318
社区成员
41,771
社区内容
发帖
与我相关
我的任务
新手乐园
C/C++ 新手乐园
复制链接
扫一扫
分享
社区描述
C/C++ 新手乐园
社区管理员
加入社区
获取链接或二维码
近7日
近30日
至今
加载中
查看更多榜单
社区公告
暂无公告
试试用AI创作助手写篇文章吧
+ 用AI写文章


 发帖
发帖 与我相关
与我相关 我的任务
我的任务
 分享
分享

