特别说明:本帖不提供任何密钥或激活方法,请大家也不要在帖内回复或讨论涉及版权的相关内容,仅提供原版ISO下载链接
欢迎加入QQ讨论群:20967576
20210521更新说明
更新21H1版本2021年5月最新正式版本19043.985
增加Windows Server 2019下载
20201014更新说明
更新2004版本2020年9月最新正式版本19041.508
20200515更新说明
更新2004版本2020年4月最新正式版本19041.264
20200506更新说明
更新1909版本2020年1月最新正式版本18363.815(移至本帖62楼)
20200114更新说明
更新1909版本2019年12月最新正式版本18363.535
20190523更新说明
更新1903版本2019年5月最新正式版本18362.116(移至本帖62楼)
由于论坛限制,以下更新请访问旧帖
https://bbs.csdn.net/topics/391111024
20190409更新说明
更新1809版本2019年3月正式版本17763.379
20190222更新说明
更新1809版本2019年1月正式版本17763.316;新增Visio 2019和Project 2019下载
20181205更新说明
新增1809各正式版本下载
20181114更新说明
增加官方1809版本升级渠道及工具
20181023更新说明
新增Office 2019、OneNote 2016下载,Office 2016等资源移至本帖177楼
20180507更新说明:
Windows 10更新至1803(17134)版本
20180314更新说明:
Windows 10更新至1709(16299)版本
20171130更新说明:
新增下载(移至旧帖177楼):
1.Office Home and Business 2016 for Mac
2.OneNote 2013 中文版
3.Visio 2016 英文版
4.Project 2016英文版
推荐购买正版Windows 10:
https://www.microsoftstore.com.cn/software/windows
下载指引:
21H1(19043.985)版本 (20210521更新) 1楼
2004(19041.508)版本(20201014更新) 62楼
1909(18363.815)版本 (20200506更新) 62楼
由于论坛限制,以下更新请访问旧帖
https://bbs.csdn.net/topics/391111024
1809(17763)版本 (20190409更新)318楼
1803(17134)版本 (20180507更新) 204楼
1709(16299)版本 (20180314更新) 133楼
1703(15063)版本 (20170630更新) 115楼
1607(14393)版本 (20160803更新) 97楼
1511(10586)版本 (20151112更新) 68楼
10240版本 (20150729更新) 68楼
 系统要求
系统要求
升级安装
如果要在普通电脑或平板电脑上升级到 Windows 10,必须满足下文所述的要求。最新版本的操作系统:确保您运行的是最新版本,即 Windows 7 SP1 或 Windows 8.1 更新。
全新安装*
处理器:1 GHz 或更快的处理器或 SoC
RAM:1 GB(32 位)或 2 GB(64 位)
硬盘空间:16 GB(32 位操作系统)或 20 GB(64 位操作系统)
图形卡:DirectX 9 或更高版本(包含 WDDM 1.0 驱动程序)
显示器:800x600
*以上为微软官方给出的最低要求(详见后面前述1中链接)
一、前述
1、下载前请详细阅读《查找 Windows 10 电脑规格和系统需求》:
https://www.microsoft.com/zh-cn/windows/windows-10-specifications#system-specifications
2、Windows 10 一共有四个版本:家庭版(Home)/专业版(Professional)/企业版(Enterprise)/教育版(Education)。其中企业版和教育版的功能几乎是一致的。
3、版本比较*:
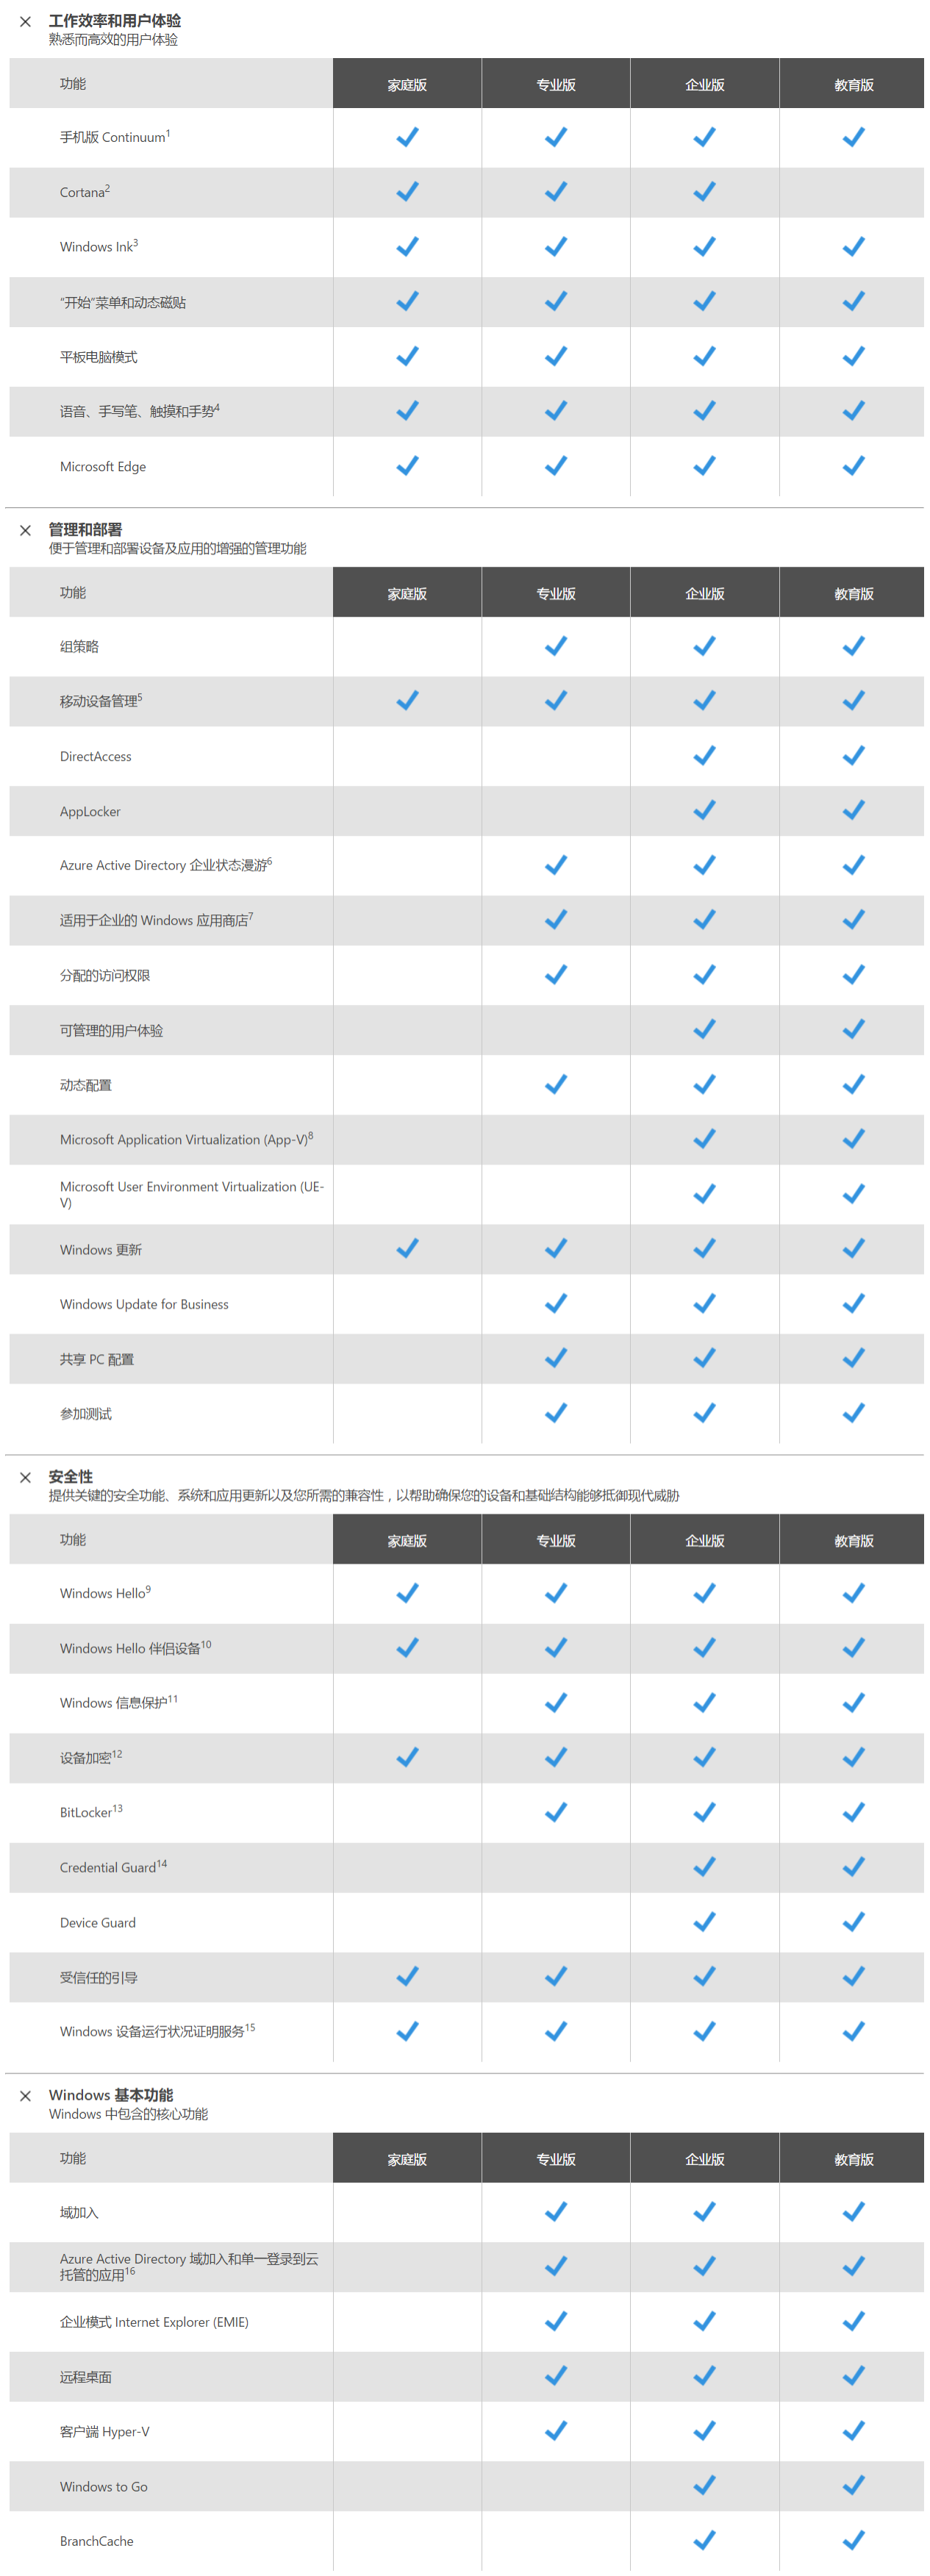
*官方最新版本比较列表:
https://www.microsoft.com/zh-cn/windowsforbusiness/compare
二、下载(请直接复制地址到下载工具)
通过“微软 Windows 10 易升”工具升级
https://www.microsoft.com/zh-cn/software-download/windows10
20H1(19043.985)版本(20210521更新)
Windows 10 (business edition), version 21H1 (x64) - DVD (Chinese-Simplified)
文件:cn_windows_10_business_editions_version_21h1_x64_dvd_57455ea1.iso
大小:5.3GB
MD5:E2B67B11553F15802E4708A786A715BD
SHA1:D35C56C76F9C5D0F03CAB06926035BB9536B7A25
SHA256:F1FA599DA150F0443BF4ED01895AA5B1F447855934B12A0D750A74A69DC263D7
ed2k://|file|cn_windows_10_business_editions_version_21h1_x64_dvd_57455ea1.iso|5693655040|68EB323345DC095D367A19CB3A22342C|/
Windows 10 (consumer edition), version 21H1 (x64) - DVD (Chinese-Simplified)
文件:cn_windows_10_consumer_editions_version_21h1_x64_dvd_1baf479d.iso
大小:5.41GB
MD5:060A010410E46B58A92960ACBF3B3C1A
SHA1:667836E090DBA6B2CDD593152F8E51D497F5779D
SHA256:DF88FFFE7E4763A7A01CF2F6546C83A864DA3E4DA35C78EC0838E2339371DB8F
ed2k://|file|cn_windows_10_consumer_editions_version_21h1_x64_dvd_1baf479d.iso|5807677440|E53960C7CAD323F60442A8AB9C269C2E|/
================
Windows Server 2019 (Updated July 2020) (x64) - DVD (Chinese-Simplified)
文件:cn_windows_server_2019_updated_july_2020_x64_dvd_2c9b67da.iso
大小:5.29GB
MD5:B5F339DC7743D202FEF3E0E0763D6B0C
SHA1:A2021F99E0B49D4AF5C5B83A8BC6B8A664AD1BC0
SHA256:041EED795E6452503D49136AF14EF65A87BFAFB8293FCFE5A63B9A45126411D6
ed2k://|file|cn_windows_server_2019_updated_july_2020_x64_dvd_2c9b67da.iso|5675251712|19AE348F0D321785007D95B7D2FAF320|/
一楼持续更新中,敬请等待......
由于帖子字数限制,其它版本请到相应楼层查看
==========================================================
三、版本的选择
1、Business editions和Consumer editions是微软两种不同的授权方式,分别相当于原来的批量授权版和零售版,根据需要选择即可。
2、通过官方网站升级
https://www.microsoft.com/zh-cn/software-download/windows10
注意:在线升级前务必保存重要资料!
四、其他信息
1.Windows 10 版本信息:
https://docs.microsoft.com/zh-cn/windows/release-information/
2.Windows 即服务概述:
https://docs.microsoft.com/zh-cn/windows/deployment/update/waas-overview
3.用于更新和升级的 Windows 10 服务选项
https://docs.microsoft.com/zh-cn/previous-versions//mt598226(v=vs.85)?redirectedfrom=MSDN#%E4%B8%AD%E5%9B%BD%EF%BC%88%E7%AE%80%E4%BD%93%E4%B8%AD%E6%96%87%EF%BC%89
4.Windows 10更多相关信息
https://docs.microsoft.com/zh-cn/previous-versions//dn986868(v=vs.85)?redirectedfrom=MSDN
============================================================
 推荐购买正版Office 2019或Office 365:
https://www.microsoftstore.com.cn/software/office
Microsoft Office 2019
20181007更新:Office Professional Plus 2019 (x86 and x64) 简体中文版
ed2k://|file|cn_office_professional_plus_2019_x86_x64_dvd_5e5be643.iso|3775004672|1E4FFA5240F21F60DC027F73F1C62FF4|/
文件名
cn_office_professional_plus_2019_x86_x64_dvd_5e5be643.iso
SHA1
d850365b23e1e1294112a51105a2892b2bd88eb9
文件大小
3.52GB
发布时间
2018-10-03
20181023更新:OneNote 2016 (x86 and x64) 简体中文版
https://support.office.com/zh-cn/article/%E5%AE%89%E8%A3%85%E6%88%96%E9%87%8D%E6%96%B0-onenote-2016-for-windows-c08068d8-b517-4464-9ff2-132cb9c45c08?omkt=zh-CN&ui=zh-CN&rs=zh-CN&ad=CN
Visio 2019
Visio Professional 2019 (x86 and x64) – DVD (Chinese-Simplified)
文件名:cn_visio_professional_2019_x86_x64_dvd_97bda48c.iso
SHA1:c82c7d1967870307afbff0d4ef4e9e59219ad857
文件大小:3.52 GB
发布时间:2018-10-03
ed2k://%7Cfile%7Ccn_visio_professional_2019_x86_x64_dvd_97bda48c.iso%7C3775004672%7C26D248309B18EDBEEBE8DC43C55995DB%7C/
Project 2019
Project Professional 2019 (x86 and x64) – DVD (Chinese-Simplified)
文件名:cn_project_professional_2019_x86_x64_dvd_cfa04e72.iso
SHA1:4e8605ebe917a7e4e4321d46e336d844e91ff8ba
文件大小:3.52 GB
发布时间:2018-10-03
ed2k://%7Cfile%7Ccn_project_professional_2019_x86_x64_dvd_cfa04e72.iso%7C3775004672%7C8616DFB9676104B11823BAE7E5EE9CC0%7C/
以下资源已移至【本帖177楼】
Office 2016、OneNote 2013、Visio 2016、Project 2016、Office Home and Business 2016 for Mac
欢迎加入QQ讨论群:20967576
再次特别说明:本帖不提供任何密钥或激活方法,以上所有信息均来自网络


 发帖
发帖 与我相关
与我相关 我的任务
我的任务
 分享
分享


 安装包越来越大,功能越来越新


