568
社区成员
 发帖
发帖 与我相关
与我相关 我的任务
我的任务
 分享
分享
[BxCxHxW]=1x1x32x120[WxBxL] = 30x1x37# 加载IR
log.info("Reading IR...")
net = IENetwork(model=model_xml, weights=model_bin)
text_net = IENetwork(model=text_xml, weights=text_bin)# image = cv2.imread("D:/images/openvino_ocr.png");
image = cv2.imread("D:/images/cover_01.jpg");
cv2.imshow("image", image)
inf_start = time.time()
in_frame = cv2.resize(image, (w, h))
in_frame = in_frame.transpose((2, 0, 1)) # Change data layout from HWC to CHW
in_frame = in_frame.reshape((n, c, h, w))
exec_net.infer(inputs={input_blob: in_frame})x, y, width, height = cv2.boundingRect(contours[c])
roi = image[y-5:y+height+10,x-5:x+width+10,:]
gray = cv2.cvtColor(roi, cv2.COLOR_BGR2GRAY)
text_roi = cv2.resize(gray, (tw, th))
text_roi = np.expand_dims(text_roi, 2)
text_roi = text_roi.transpose((2, 0, 1))
text_roi = text_roi.reshape((tn, tc, th, tw))
text_exec_net.infer(inputs={input_blob: text_roi})
text_out = text_exec_net.requests[0].outputs[text_out_blob]# 解析输出text
ocrstr = ""
prev_pad = False;
for i in range(text_out.shape[0]):
ctc = text_out[i]
ctc = np.squeeze(ctc, 0)
index, prob = ctc_soft_max(ctc)
if alphabet[index] == '#':
prev_pad = True
else:
if len(ocrstr) == 0 or prev_pad or (len(ocrstr) > 0 and alphabet[index] != ocrstr[-1]):
prev_pad = False
ocrstr += alphabet[index]# 显示识别结果
print("result: %s"%ocrstr)
cv2.drawContours(image, [box], 0, (0, 255, 0), 2)
cv2.putText(image, ocrstr, (x, y), cv2.FONT_HERSHEY_COMPLEX, 0.75, (255, 0, 0), 1)def demo():
# 加载MKLDNN - CPU Target
log.basicConfig(format="[ %(levelname)s ] %(message)s", level=log.INFO, stream=sys.stdout)
plugin = IEPlugin(device="CPU", plugin_dirs=plugin_dir)
plugin.add_cpu_extension(cpu_extension)
# 加载IR

log.info("Reading IR...")

net = IENetwork(model=model_xml, weights=model_bin)

text_net = IENetwork(model=text_xml, weights=text_bin)
if plugin.device == "CPU":
supported_layers = plugin.get_supported_layers(net)
not_supported_layers = [l for l in net.layers.keys() if l not in supported_layers]
if len(not_supported_layers) != 0:
log.error("Following layers are not supported by the plugin for specified device {}:\n {}".
format(plugin.device, ', '.join(not_supported_layers)))
log.error("Please try to specify cpu extensions library path in demo's command line parameters using -l "
"or --cpu_extension command line argument")
sys.exit(1)
# 获取输入输出层
input_blob = next(iter(net.inputs))
outputs = iter(net.outputs)
# 获取多个输出层名称
out_blob = next(outputs)
second_blob = next(outputs)
log.info("Loading IR to the plugin...")
print("pixel output: %s, link output: %s \n"%(out_blob, second_blob))
text_input_blob = next(iter(text_net.inputs))
text_out_blob = next(iter(text_net.outputs))
print("text_out_blob : %s"%text_out_blob)
# 创建可执行网络
exec_net = plugin.load(network=net)
text_exec_net = plugin.load(network=text_net)
# Read and pre-process input image
n, c, h, w = net.inputs[input_blob].shape
tn, tc, th, tw = text_net.inputs[text_input_blob].shape
del net
del text_net
log.info("Starting inference in async mode...")
log.info("To switch between sync and async modes press Tab button")
log.info("To stop the demo execution press Esc button")
image = cv2.imread("D:/images/openvino_ocr.png");
# image = cv2.imread("D:/images/cover_01.jpg");
cv2.imshow("image", image)
inf_start = time.time()
in_frame = cv2.resize(image, (w, h))
in_frame = in_frame.transpose((2, 0, 1)) # Change data layout from HWC to CHW
in_frame = in_frame.reshape((n, c, h, w))
exec_net.infer(inputs={input_blob: in_frame})
inf_end = time.time()
det_time = inf_end - inf_start
# 获取输出
res1 = exec_net.requests[0].outputs[out_blob]
res2 = exec_net.requests[0].outputs[second_blob]
# 降维
res1 = np.squeeze(res1, 0)
res2 = np.squeeze(res2, 0)
# 矩阵转置
res1 = res1.transpose((1, 2, 0))
res2 = res2.transpose((1, 2, 0))
h, w = res1.shape[:2]
print(res1.shape)
print(res2.shape)
# 文本与非文本像素
pixel_mask = np.zeros((h, w), dtype=np.uint8)
# 解析输出结果
res1 = soft_max(res1)
# 像素分割
for row in range(h):
for col in range(w):
pv2 = res1[row, col, 1]
if pv2 > 0.50:
pixel_mask[row, col] = 255
se = cv2.getStructuringElement(cv2.MORPH_RECT, (1, 1))
mask = cv2.morphologyEx(pixel_mask, cv2.MORPH_CLOSE, se)
cv2.imshow("text mask", mask)
cv2.imwrite("D:/mask.png", mask)
# 后处理,检测框
h, w = image.shape[:2]
mask = cv2.resize(mask, (w, h))
contours, hierarchy = cv2.findContours(mask, cv2.RETR_EXTERNAL, cv2.CHAIN_APPROX_SIMPLE)
for c in range(len(contours)):
rect = cv2.minAreaRect(contours[c])
box = cv2.boxPoints(rect)
box = np.int0(box)
x, y, width, height = cv2.boundingRect(contours[c])

roi = image[y-5:y+height+10,x-5:x+width+10,:]

gray = cv2.cvtColor(roi, cv2.COLOR_BGR2GRAY)

text_roi = cv2.resize(gray, (tw, th))

text_roi = np.expand_dims(text_roi, 2)

text_roi = text_roi.transpose((2, 0, 1))

text_roi = text_roi.reshape((tn, tc, th, tw))

text_exec_net.infer(inputs={input_blob: text_roi})

text_out = text_exec_net.requests[0].outputs[text_out_blob]
# 解析输出text

ocrstr = ""

prev_pad = False;

for i in range(text_out.shape[0]):

    ctc = text_out[i]

    ctc = np.squeeze(ctc, 0)

    index, prob = ctc_soft_max(ctc)

    if alphabet[index] == '#':

        prev_pad = True

    else:

        if len(ocrstr) == 0 or prev_pad or (len(ocrstr) > 0 and alphabet[index] != ocrstr[-1]):

            prev_pad = False

            ocrstr += alphabet[index]
# 显示识别结果

print("result: %s"%ocrstr)

cv2.drawContours(image, [box], 0, (0, 255, 0), 2)

cv2.putText(image, ocrstr, (x, y), cv2.FONT_HERSHEY_COMPLEX, 0.75, (255, 0, 0), 1)
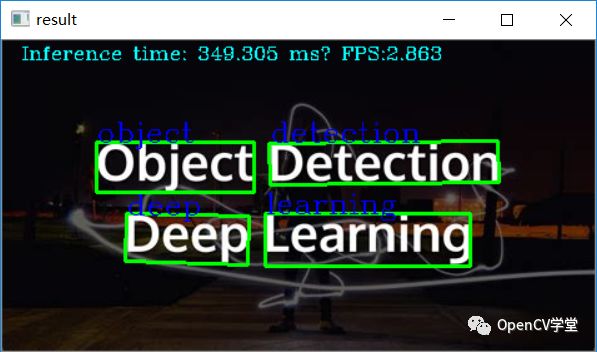
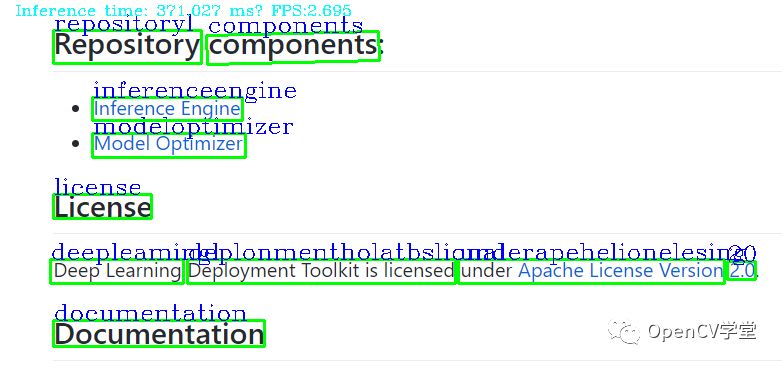
inf_time_message = "Inference time: {:.3f} ms, FPS:{:.3f}".format(det_time * 1000, 1000 / (det_time * 1000))
cv2.putText(image, inf_time_message, (15, 15), cv2.FONT_HERSHEY_COMPLEX, 0.5, (255, 255, 0), 1)
cv2.imshow("result", image)
cv2.imwrite("D:/result.png", image)
cv2.waitKey(0)
# 释放资源
cv2.destroyAllWindows()
del exec_net
del plugin