


183
社区成员
 发帖
发帖 与我相关
与我相关 我的任务
我的任务
 分享
分享|
The Link Your Class | |
|
The Link of Requirement of This Assignment | LAB 11 Software Testing-CSDN社区 |
|
The Aim of This Assignment |
Software Testing |
|
MU STU ID and FZU STU ID |
19105428_831902220 |
Learn related knowledge about Junit Test for Java and Unittest for python. You can finish the following assignment or test Your Project.
@Parameters:Add this annotation to every method if it provide data. By the way, these methods must be static, return a Collection and receive no parameter.
P.S.: You must assign value for every field in the class no matter used or unused!
In Junit, you can use @RunWith and @parameter to pass parameters.
@RunWith:When a class annotated by @RunWith or when a class extends a base class which annotated by @RunWith,then Junit will run test through a runner pointed by the annotation.
The following is the code I use to test:
Related Knowledge: you can check the expected result and the real result of the method you test with the help of org.junit.Assert.
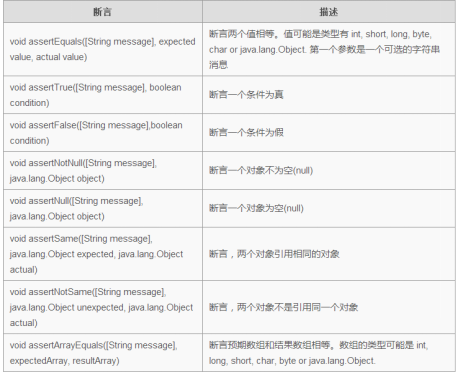
1.Junit assert
import static org.junit.Assert.*;
import org.junit.Test;
public class AssertionsTest {
	String obj1 = "junit";
	String obj2 = "junit";
	String obj3 = "test";
	String obj4 = "test";
	String obj5 = null;
	int var1 = 1;
	int var2 = 2;
	int[] arithmetic1 = { 1, 2, 3 };
	int[] arithmetic2 = { 1, 2, 3 };
	@Test
    public void test() {
	    // add assert test code between Begin and End, no other change allowed
	    /***********************Begin**************************/
        assertTrue(var1 < var2);
        assertFalse(obj4==obj5);
        assertEquals(obj1,obj2);
        assertSame(obj1,obj2);
        assertNotSame(obj1,obj3);
        assertArrayEquals(arithmetic1,arithmetic2);
        assertNotNull(obj1);
        assertNull(obj5);
        //assertTrue(var1 < var2); for example
	    /************************End***************************/
        }
}
2. Junit time test
import org.junit.Test;
public class TestTimeOut
{
    // Fix timeout assert in Test function below. Test fail if running 1000ms longer
    /***********************Begin**************************/
    @Test(timeout=1000)
    public void test()
     {
        int i = 0;
    	while(true)
        {
        	break;
        }
    }
    /************************End***************************/
}
3.Junit parameterized test
Related knowledge:Junit parameterized test allows you test the same test with different parameters. Learning Junit parameterized test with five steps bellow.
In Junit, you can use @RunWith and @parameter to pass parameters. @RunWith:When a class annotated by @RunWith or when a class extends a base class which annotated by @RunWith,then Junit will run test through a runner pointed by the annotation.@Parameters:Add this annotation to every method if it provide data. By the way, these methods must be static, return a Collection and receive no parameter.
import static org.junit.Assert.assertEquals; // static import
import java.util.Arrays;
import java.util.Collection;
import org.junit.Test;
import org.junit.runner.RunWith;
import org.junit.runners.Parameterized;
import org.junit.runners.Parameterized.Parameters;
import step1.Calculator;
/**
 * JUnit4 parameterized test
 */
@RunWith(Parameterized.class)
public class ParameterTest {
    private int input11;
    private int input22;
    private int expected;
    public ParameterTest(int input11, int input22, int expected){
        this.input11 = input11;
        this.input22 = input22;
        this.expected = expected;
    }
    @Parameters
    public static Collection prepareData(){
        /**
         *the type of the two-dimension array must be Object.
         *data in the two-dimension array is ready of test sub() in Calculator
         * every element in the two-dimension array should corresponds to position of parameters in construct method ParameterTest
         *let the third element equals the first subtract the second element according to parameters’ postion
         *fix missing codes under ‘Begin’ and above ‘End’,pass 4 groups of parameters to test sub method in Calculator is right or not
         *tip:only two lines of codes
         */
                    /*********************************Begin********************************************/
        Object[][] ages={{2,2,0},{0,1,-1},{0,1,-1},{3,1,2}};
		return Arrays.asList(ages);
        /**********************************End********************************************/
    }
    @Test
    public void testSub(){
        Calculator cal = new Calculator();
        assertEquals(cal.sub(input11, input22), expected);
    }
}
// Calculator.java Junit Parameterized Test
/**
 * Mathematical Calculation  subtract
 */
public class Calculator {
    public int sub(int a, int b) {
        return a - b;
    }
}
4.Junit Exception Test
Related knowledge:you can check codes if throw expected exception or not by using ‘expected’ attribute in @Test meta data. value of the ‘expected attribute’ is a kind of Exception, if codes throw the expected exception, then test successfully, otherwise, failed.
import static org.junit.Assert.*;

import org.junit.Rule;
import org.junit.Test;
import org.junit.rules.ExpectedException;
import step2.Person;

public class JunitException {
    /**
*add a line of annotation in Begin/End,check the age of Person Object is legal or not.     *throw IllegalArgumentException exception
    */
    /***********************************Begin***********************************/
  	@Test(expected = IllegalArgumentException.class)
  /************************************End************************************/
    public void checkage() {
    Person person = new Person();
    person.setAge(-1);
    }
}
//Person.java
public class Person {
        private String name;
        private int age;
        public String getName() {
        return name;
        }
        public void setName(String name) {
        this.name = name;
        }
        public int getAge() {
        return age;
        }
        public void setAge(int age) {
        if (age < 0 ) {
        throw new IllegalArgumentException("age is invalid");
        }
    this.age = age;
    }
}
5.Junit Suite Test
Related knowledge:Suite Test means test a couple of test cases together. Precisely speaking, Using @RunWith and @Suite.
import static org.junit.Assert.*;
import org.junit.Test;
import org.junit.runner.RunWith;
import org.junit.runners.Suite;
import step3.Calculate;
import step3.CalculateTest;
import step3.Car;
import step3.CarTest;

/*
add two lines of annotations. Implement Suite Test of CalculateTest and CarTest
Suite Test codes must next to Class SuiteTest, no shift allowed!
*/
//**************************************************************
@RunWith(Suite.class)
@Suite.SuiteClasses({ CalculateTest.class, CarTest.class})
public class SuiteTest {
    @Test
    public void testPrint() {
        System.out.println("The result of CalculateTest");
assertEquals(24, result);
System.out.println("The result of CarTest");
assertEquals(4, result);
    }
}

//Calculate.java
public class Calculate {
    public int add(int a, int b) {
        return a + b;
    }
}

//CalculateTest.java
public class CalculateTest {
    Calculate calculate;
    @Before
    public void setUp() throws Exception {
        calculate = new Calculate();
    }
    @Test
    public void testAdd() {
        int result = calculate.add(12, 12);
        assertEquals(24, result);
}
}

//CarTest.java
public class CarTest {
    Car car;
    @Before
    public void setUp() throws Exception {
        car = new Car();
    }
    @Test
    public void testGetWheels() {
        int result = car.getWheels();
        assertEquals(4, result);
    }
}

//Car.java
public class Car {
    public int getWheels() {
        return 4;
    }
}

