


571
社区成员
 发帖
发帖 与我相关
与我相关 我的任务
我的任务
 分享
分享QUIC 是 Google 为了改进 HTTP/2 而设计的一种基于 UDP 的传输协议,使用 QUIC 传输 HTTP 的协议现在已经被标准化为了 HTTP/3。
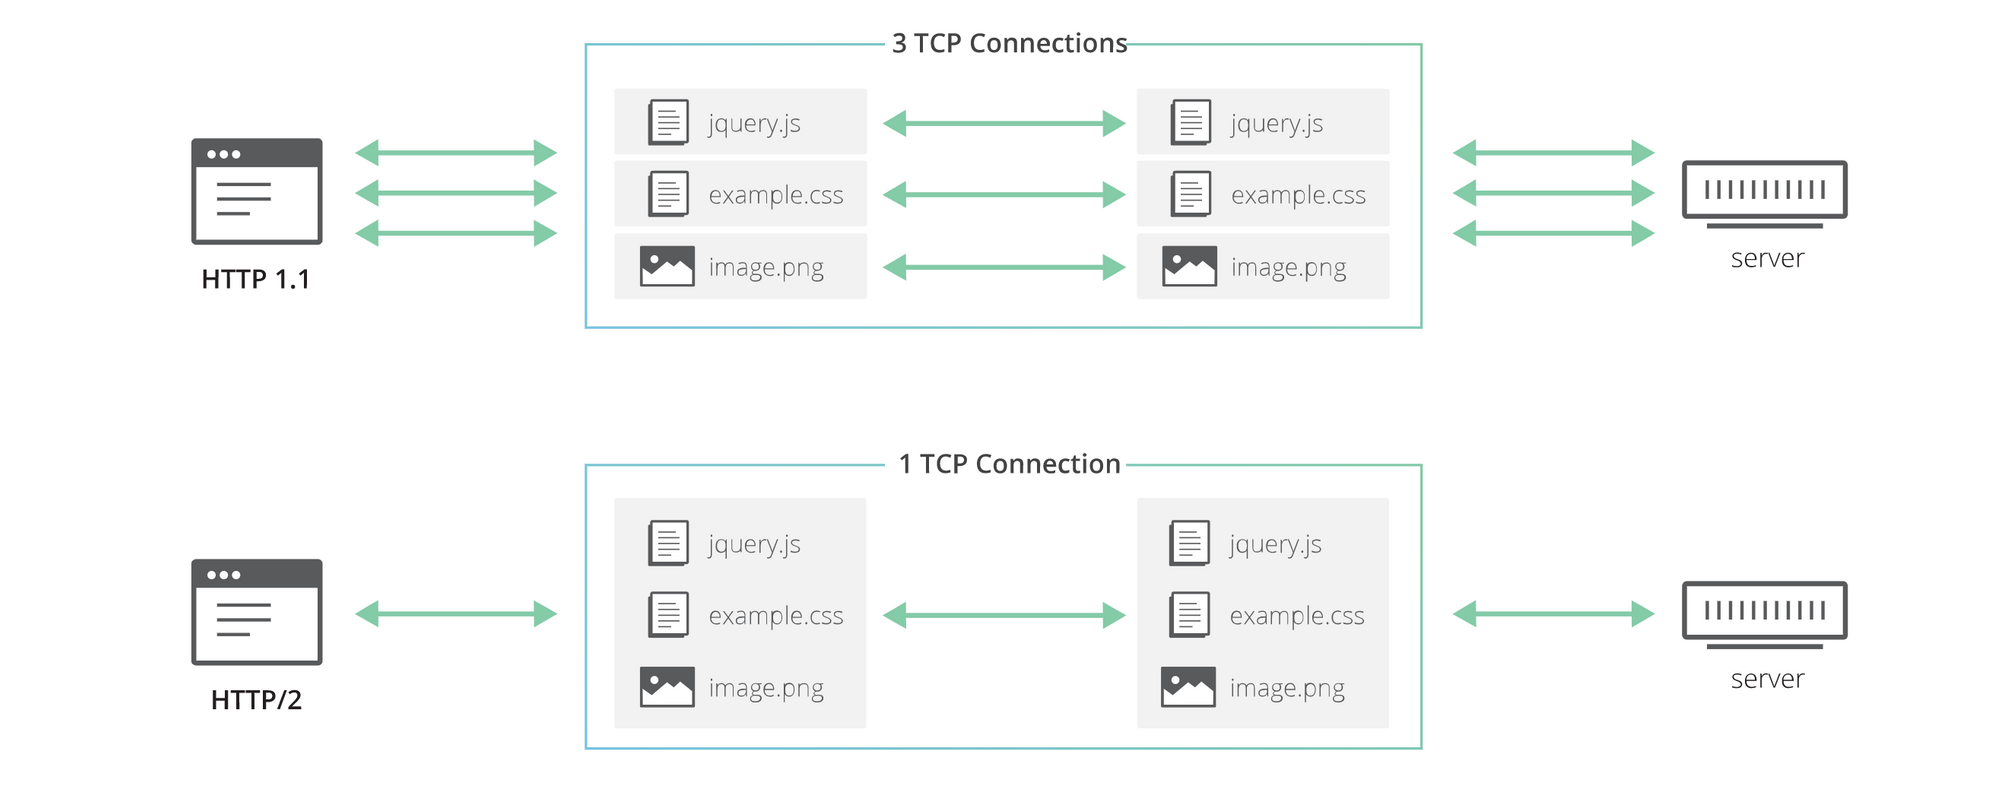
HTTP/2 在 HTTP/1.1 的基础上主要增加了多路复用(multiplexing)的特性,可以将一个 TCP 连接划分为多个逻辑上的流来传输多个请求,HTTP/2 通过多路复用减少了 TCP 连接数,能更加有效的利用带宽,并且解决了 HTTP 队头阻塞问题(即客户端必须等待上一个请求完成才能发送接下来的请求)。但是 HTTP/2 依然是一种基于 TCP 的协议,存在 TCP 队头阻塞等问题,而且如今大多数网站使用 TLS 保障安全,TCP 和 TLS 的握手时间也成为了影响延迟的关键因素。
TCP 队头阻塞
TCP 是一个基于分组交换而实现的可靠的传输协议,HTTP/2 会在一个 TCP 连接中同时传输多个流,一旦 TCP 连接出现了丢包,被阻塞的就不仅仅是一个流,所有要传输的内容都需要等待,这是一个因为 HTTP/2 多路复用而带来的负面影响。
延迟
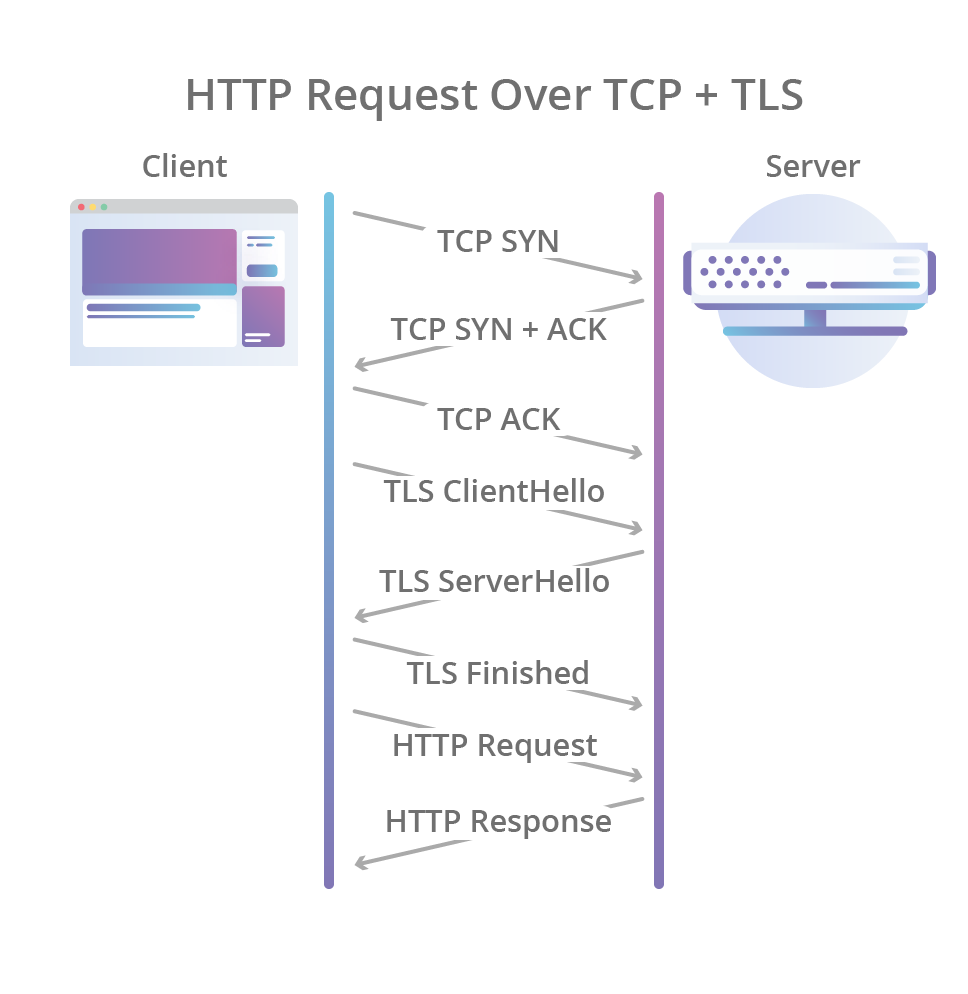
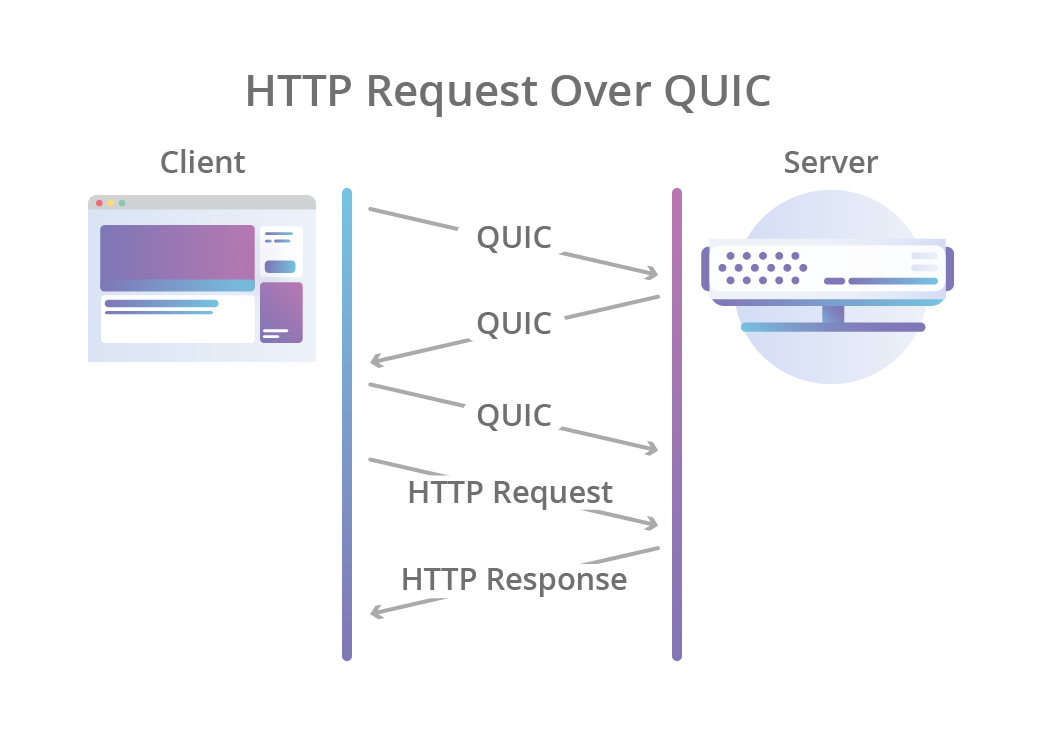
TCP 3 次握手加上 TLS 握手成为了优化延迟的瓶颈,而 QUIC 协议将自身的握手和 TLS 握手相结合,实现了 1-RTT 甚至是 0-RTT 的握手。
拥塞控制
TCP 的拥塞控制一般由内核实现,修改内核所需时间长且难以推广。而 QUIC 的拥塞控制在用户空间实现,很容易通过软件更新来推广新的拥塞控制方法。
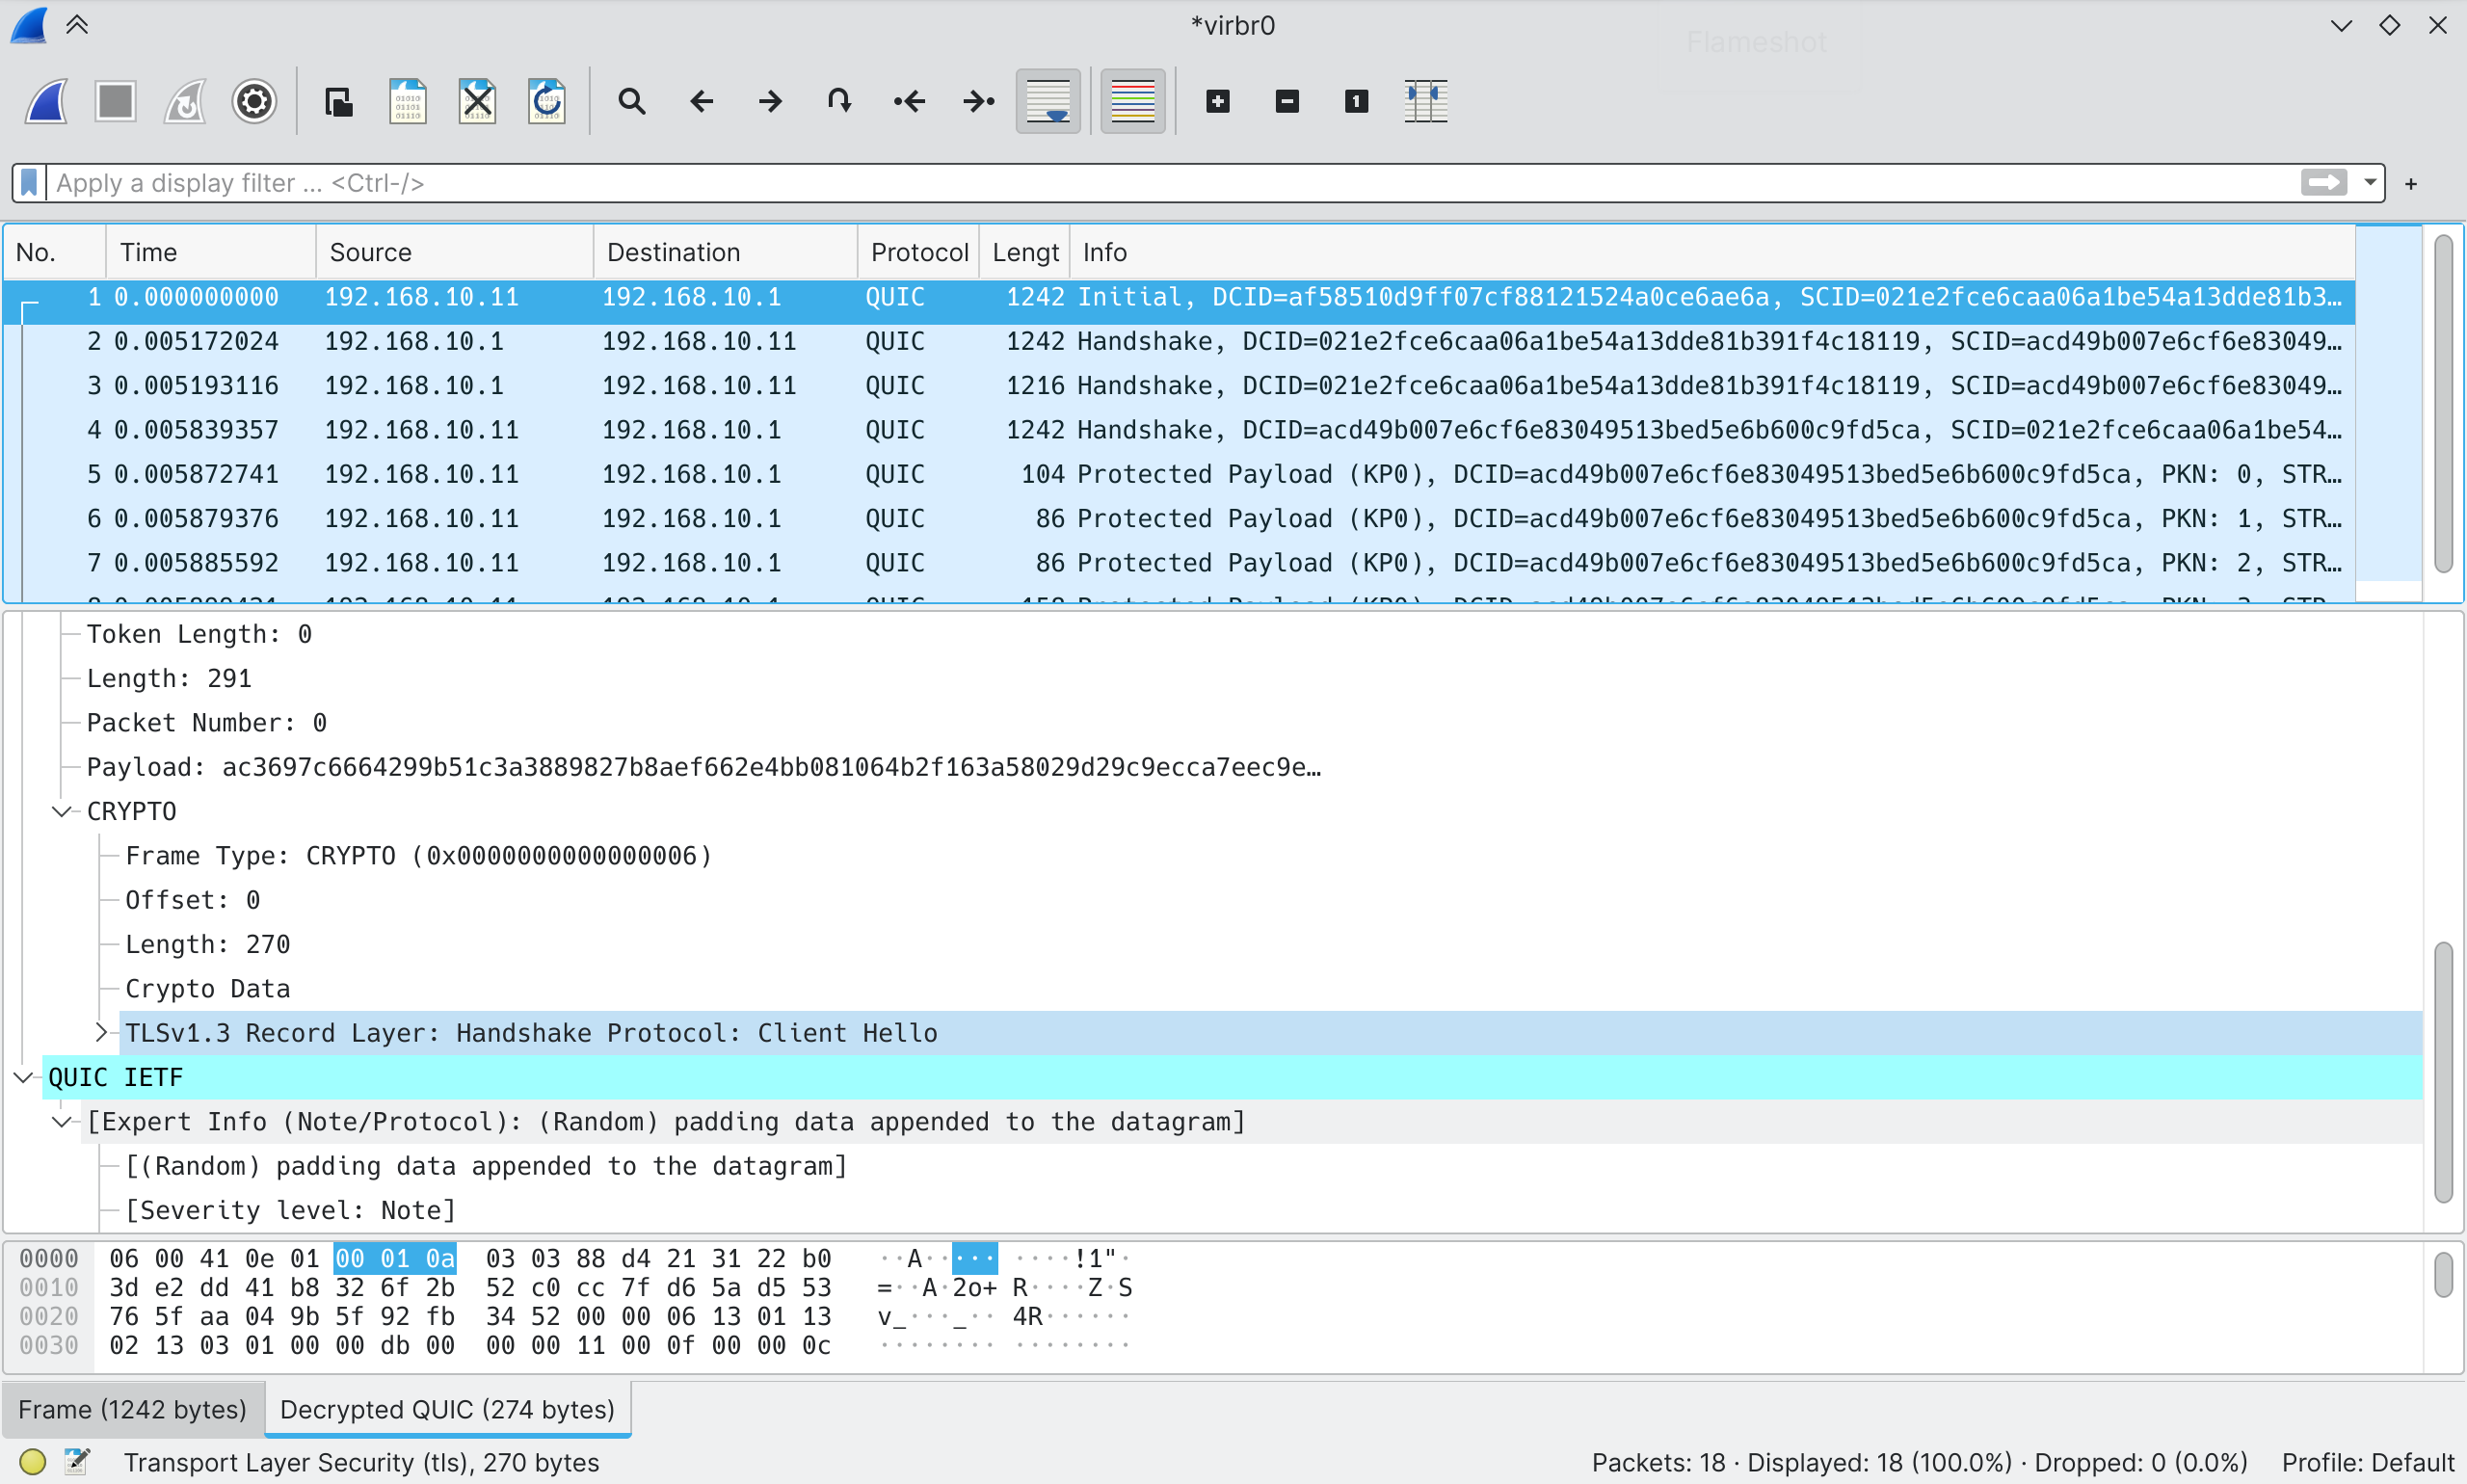
QUIC 连接由客户端和服务端的连接 ID 标识。建立 QUIC 连接时,客户端首先生成 2 个连接 ID (DCID 和 SCID,SCID 即客户端的连接 ID),并发送 Client HELLO,从 Wireshark 截图中可以看到 QUIC 的 Client HELLO 包含了 TLS 握手的 Client HELLO。然后服务器会忽略 Client HELLO 中的 DCID,生成自己的连接 ID,发送 Server HELLO 给客户端,这样双方就完成了连接 ID 的交换,同样的,QUIC 的 Server HELLO 也包含 TLS 握手的 Server HELLO。
与 HTTP/2 类似,一个 QUIC 连接中也包含多个流。QUIC 中的流由流 ID 标识,流 ID 是一个 62 bits 无符号整数,低 2 位用来标识流的类型(单向或双向)和流的发起者(客户端或服务端),QUIC 协议保证了一条流的数据收发是有序的,可以类似 TCP 连接,不同流之间没有保证。
quiche 是 Cloudflare 使用 rust 编写的一个 QUIC 协议库,已经在 Cloudflare 的边缘网络上大规模使用,为数百万网站提供了 QUIC (HTTP/3) 支持。
下载 nginx 源码
curl -O https://nginx.org/download/nginx-1.16.1.tar.gz
tar xzvf nginx-1.16.1.tar.gz
下载 quiche 源码
git clone --recursive https://github.com/cloudflare/quiche
给 nginx 打补丁
cd nginx-1.16.1
patch -p01 < ../quiche/nginx/nginx-1.16.patch
编译
./configure                                 \
    --prefix=$PWD                           \
    --build="quiche-$(git --git-dir=../quiche/.git rev-parse --short HEAD)" \
    --with-http_ssl_module                  \
    --with-http_v2_module                   \
    --with-http_v3_module                   \
    --with-openssl=../quiche/quiche/deps/boringssl \
    --with-quiche=../quiche
make
生成证书: openssl req -x509 -newkey rsa:4096 -keyout key.pem -out cert.pem -sha256 -days 365 -nodes
创建配置文件 nginx.conf:
events {
    worker_connections  1024;
}

http {
    server {
        # Enable QUIC and HTTP/3.
        listen 1443 quic reuseport;

        # Enable HTTP/2 (optional).
        listen 1443 ssl http2;

        ssl_certificate      cert.pem;
        ssl_certificate_key  key.pem;

        # Enable all TLS versions (TLSv1.3 is required for QUIC).
        ssl_protocols TLSv1.2 TLSv1.3;

        # Add Alt-Svc header to negotiate HTTP/3.
        add_header alt-svc 'h3=":443"; ma=86400';

        location / {
            root /srv/http;
        }
    }
}
运行: ./objs/nginx -c $PWD/nginx.conf
构建 quiche
cd quiche
cargo build --package quiche --release --features ffi,pkg-config-meta,qlog
mkdir quiche/deps/boringssl/src/lib
ln -vnf $(find target/release -name libcrypto.a -o -name libssl.a) quiche/deps/boringssl/src/lib/
构建 curl
cd ..
git clone https://github.com/curl/curl
cd curl
autoreconf -fi
./configure LDFLAGS="-Wl,-rpath,$PWD/../quiche/target/release" --with-openssl=$PWD/../quiche/quiche/deps/boringssl/src --with-quiche=$PWD/../quiche/target/release
make
[root@vm ~]# ./curl/src/curl -k -v --http3 https://192.168.10.1:1443/
*   Trying 192.168.10.1:1443...
* Connect socket 5 over QUIC to 192.168.10.1:1443
* Sent QUIC client Initial, ALPN: h3,h3-29,h3-28,h3-27
* Skipped certificate verification
* Connected to 192.168.10.1 () port 1443 (#0)
* h3 [:method: GET]
* h3 [:path: /]
* h3 [:scheme: https]
* h3 [:authority: 192.168.10.1:1443]
* h3 [user-agent: curl/7.82.0-DEV]
* h3 [accept: */*]
* Using HTTP/3 Stream ID: 0 (easy handle 0x562d60b29110)
> GET / HTTP/3
> Host: 192.168.10.1:1443
> user-agent: curl/7.82.0-DEV
> accept: */*
>
< HTTP/3 403
< server: nginx/1.20.2
< date: Wed, 19 Jan 2022 08:52:35 GMT
< content-type: text/html
< content-length: 153
<
<html>
<head><title>403 Forbidden</title></head>
<body>
<center><h1>403 Forbidden</h1></center>
<hr><center>nginx/1.20.2</center>
</body>
</html>
* Connection #0 to host 192.168.10.1 left intact
可以看到 curl 使用 QUIC 协议发出请求并收到了 nginx 的响应。
我们从 examples 中的 client 开始分析。
client.rsclient.rs 是通过调用 quiche 实现的一个简单 QUIC 客户端。
fn main() {
    // Setup the event loop.
    let poll = mio::Poll::new().unwrap();
    let mut events = mio::Events::with_capacity(1024);

    // Create the UDP socket backing the QUIC connection, and register it with
    // the event loop.
    let socket = std::net::UdpSocket::bind(bind_addr).unwrap();

    let socket = mio::net::UdpSocket::from_socket(socket).unwrap();
    poll.register(
        &socket,
        mio::Token(0),
        mio::Ready::readable(),
        mio::PollOpt::edge(),
    )
    .unwrap();

    // Generate a random source connection ID for the connection.
    let mut scid = [0; quiche::MAX_CONN_ID_LEN];
    SystemRandom::new().fill(&mut scid[..]).unwrap();

    let scid = quiche::ConnectionId::from_ref(&scid);

    // Create a QUIC connection and initiate handshake.
    let mut conn =
        quiche::connect(url.domain(), &scid, peer_addr, &mut config).unwrap();

    let (write, send_info) = conn.send(&mut out).expect("initial send failed");

    while let Err(e) = socket.send_to(&out[..write], &send_info.to) {
        if e.kind() == std::io::ErrorKind::WouldBlock {
            debug!("send() would block");
            continue;
        }

        panic!("send() failed: {:?}", e);
    }

    loop {
        // ...
    }
}
首先从入口 fn main() 开始,程序解析完参数之后初始化 event loop,然后创建了一个 UDP socket,并初始化 quiche 库。
接着生成了客户端的连接 ID,在 quiche 库中创建连接,调用 conn 的 send 方法,此时客户端还没有真正发出 UDP 包,quiche 库只是将要发出的包放在了缓冲区,下一步 socket.send_to 才真正发出 UDP 包。
在接下来的 event loop 中,客户端从 socket 调用 recv_from 接收包并调用 conn.recv 传递给 quiche 库,使用 conn.stream_send 和 conn.stream_recv 收发 HTTP,从 quiche 库获取要发送的包并通过 socket 发送,如此循环,直至连接关闭。
lib.rslib.rs 中包含了 quiche 库被调用时所需的 数据结构和方法。
/// A QUIC connection.
pub struct Connection {
    /// QUIC wire version used for the connection.
    version: u32,

    /// Peer's connection ID.
    dcid: ConnectionId<'static>,

    /// Local connection ID.
    scid: ConnectionId<'static>,

    /// Unique opaque ID for the connection that can be used for logging.
    trace_id: String,
    // ...
}
Connection 结构 包含了协议版本、双方的连接 ID、TLS 信息、流信息等与连接相关的状态与信息,其可以通过 connect 函数和 accept 函数创建,分别对应客户端和服务端。
#[inline]
pub fn accept(
    scid: &ConnectionId, odcid: Option<&ConnectionId>, from: SocketAddr,
    config: &mut Config,
) -> Result<Pin<Box<Connection>>> {
    let conn = Connection::new(scid, odcid, from, config, true)?;

    Ok(conn)
}

#[inline]
pub fn connect(
    server_name: Option<&str>, scid: &ConnectionId, to: SocketAddr,
    config: &mut Config,
) -> Result<Pin<Box<Connection>>> {
    let mut conn = Connection::new(scid, None, to, config, false)?;

    if let Some(server_name) = server_name {
        conn.handshake.set_host_name(server_name)?;
    }

    Ok(conn)
}
connect 函数 和 accept 函数 都是调用 Connection::new 方法来创建一个新的 Connection,Connection::new 初始化 TLS 上下文然后调用 Connection::with_tls 方法,Connection::with_tls 真正实例化了一个 Connection 结构,并进行了一些初始化。
impl Connection {
    pub fn recv(&mut self, buf: &mut [u8], info: RecvInfo) -> Result<usize> {
        let len = buf.len();

        if len == 0 {
            return Err(Error::BufferTooShort);
        }

        if !self.verified_peer_address {
            self.max_send_bytes += len * MAX_AMPLIFICATION_FACTOR;
        }

        let mut done = 0;
        let mut left = len;

        // Process coalesced packets.
        while left > 0 {
            let read = match self.recv_single(&mut buf[len - left..len], &info) {
                Ok(v) => v,

                Err(Error::Done) => left,

                Err(e) => {
                    // In case of error processing the incoming packet, close
                    // the connection.
                    self.close(false, e.to_wire(), b"").ok();
                    return Err(e);
                },
            };

            done += read;
            left -= read;
        }
        // ...
    }
}
recv 方法 从缓冲区读取数据包,对合并包的每个部分调用 recv_single 方法,recv_single 方法 根据连接所处的阶段以及包的类型处理数据包,若是属于某个流的数据包,会将数据放在流的缓冲区并标记可读。
impl Connection {
    pub fn send(&mut self, out: &mut [u8]) -> Result<(usize, SendInfo)> {
        // ...
        // Generate coalesced packets.
        while left > 0 {
            let (ty, written) = match self
                .send_single(&mut out[done..done + left], has_initial)
            {
                Ok(v) => v,

                Err(Error::BufferTooShort) | Err(Error::Done) => break,

                Err(e) => return Err(e),
            };

            done += written;
            left -= written;

            match ty {
                packet::Type::Initial => has_initial = true,

                // No more packets can be coalesced after a 1-RTT.
                packet::Type::Short => break,

                _ => (),
            };

            // When sending multiple PTO probes, don't coalesce them together,
            // so they are sent on separate UDP datagrams.
            if let Ok(epoch) = ty.to_epoch() {
                if self.recovery.loss_probes[epoch] > 0 {
                    break;
                }
            }
        }
        // ...
    }
}
send 方法 用于生成即将发送的数据包,同样存在 send_single 方法生成合并包。
impl Connection {
    pub fn stream_send(
        &mut self, stream_id: u64, buf: &[u8], fin: bool,
    ) -> Result<usize> {
        // ...
    }

    pub fn stream_recv(
        &mut self, stream_id: u64, out: &mut [u8],
    ) -> Result<(usize, bool)> {
        // ...
    }
}
stream_recv 方法 和 stream_send 方法 则用于处理连接中的某个流,通常为 HTTP 请求与响应。

