1,395
社区成员
 发帖
发帖 与我相关
与我相关 我的任务
我的任务
 分享
分享通过将计算密集型部件卸载到 GPU 上,可以大大加快许多工作负载。在 CUDA 术语中,这被称为启动内核。当这些内核很多且持续时间很短时,启动开销有时会成为一个问题。
CUDA Graphs提供了一种减少开销的方法。图形之所以有效,是因为它们将任意数量的异步 CUDA API 调用(包括内核启动)组合到一个只需要一次启动的操作中。它们在创建时确实会产生一些开销,因此它们的最大好处来自多次重用。
在 ToolkitVersion10 中引入 CUDA 图形时,可以对其进行更新,以反映其实例化中的一些细微变化。此后,此类更新操作的覆盖范围和效率显著提高。在这篇文章中,我描述了一些通过使用 CUDA 图来提高实际应用程序性能的场景,其中一些场景包括图更新功能。
考虑一个应用程序,该函数具有启动许多短运行内核的功能,例如:
tight_loop(); //function containing many small kernels
如果每次遇到此函数时都以相同的方式执行,则可以使用流捕获将其转换为 CUDA 图。在本例中,必须引入一个开关布尔值captured,以指示是否已经创建了图形。将此开关的解除 Clara 操作和初始化放在源代码中,使其范围包括对函数tight_loop的每次调用。
cudaGraphExec_t instance; static bool captured = false;
接下来,用代码包装函数的任何实际调用,以创建对应的 CUDA 图(如果它不存在),然后启动该图。
if (!captured) {// you haven’t captured the graph yet cudaGraph_t graph; cudaStreamBeginCapture(stream, cudaStreamCaptureModeGlobal); tight_loop(); //function containing many small kernels //aggregate all info about the stream capture into “graph” cudaStreamEndCapture(stream, &graph); //turn this info into executable CUDA Graph “instance” cudaGraphInstantiate(&instance, graph, NULL, NULL, 0); //no need to hang on to the stream info cudaGraphDestroy(graph); captured = true; } cudaGraphLaunch(instance, stream);//launch the executable graph
对 tight _循环函数的调用实际上并不执行任何内核启动或其他 CUDA 操作。它只记录所有这些操作并将它们存储在数据结构中。
关注启动内核的函数。在实际应用中,它看起来像以下代码:
void tight_loop(int first_step, MyStruct params, int delta, dim3 grid_dim, dim3 block_dim, cudaStream_t stream) { for (int step = first_step; step >= 0; --step, params.size -= delta) { tiny_kernel1<<<grid_dim, block_dim, 0, stream>>>(params); tiny_kernel2<<<grid_dim, block_dim, 0, stream>>>(params); } }
显然,如果函数的参数在连续调用后发生变化,那么表示 GPU 内部工作的 CUDA 图也应该发生变化。不能重复使用原始图形。但是,假设多次遇到相同的函数参数集,您至少可以通过两种不同的方式来处理这种情况:保存和识别图形或更新图形。
第一种方法从 C ++标准模板库中引入容器来存储参数集。每当您遇到一个新的参数集来唯一地定义函数tight_loop,请将它连同相应的可执行图形一起添加到容器中。
当您遇到容器中已经存在的参数集时,启动相应的 CUDA 图形。假设在本例中,变量first、params.size和delta唯一地定义了tight_loop。这个三胞胎是钥匙用于区分图形。您可以在源代码中定义它和要使用的容器,使其范围包括对函数tight_loop的每次调用。
typedef struct { //define the fields of a key int first; double delta; int size; } Key; //define the container (map) containing (key,value) pairs map<Key, cudaGraphExec_t, cmpKeys> MapOfGraphs;
无论函数tight_loop出现在何处,都要用填充键的代码将其包装起来,并在容器中查找。如果找到键,代码将启动相应的可执行 CUDA 图。否则,它将创建一个新图形,将其添加到容器中,然后启动它(图 1 )。
Key triplet = {first_step, delta, params.size}; map<Key, cudaGraphExec_t, cmpKeys>::iterator it = MapOfGraphs.find(triplet); if (it == MapOfGraphs.end()) { // new parameters, so need to capture new graph cudaStreamBeginCapture(stream, cudaStreamCaptureModeGlobal); tight_loop(first_step, params, delta, grid_dim, block_dim, stream); cudaStreamEndCapture(stream, &graph); cudaGraphInstantiate(&instance, graph, NULL, NULL, 0); cudaGraphDestroy(graph); // add this graph to the container of saved graphs MapOfGraphs.insert(make_pair(trio,instance)); cudaGraphLaunch(instance, stream); } else {// recognized parameters, so can launch previously captured graph cudaGraphLaunch(it->second, stream); }
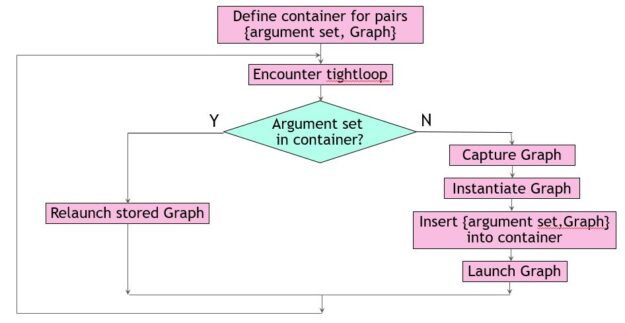 图 1 。保存和识别图形。
这种方法通常效果很好,但有一些固有的危险。在本例中,您确定只需要三个参数来定义容器中的键。对于不同的工作负载,这可能不同,或者另一个开发团队成员可能会默默地向结构中添加字段MyStruct。这会影响非平凡函数cmpKeys的编写方式。此函数是容器所必需的,用于确定某个密钥是否比另一个密钥小。
为 STL 容器编写一个非平凡的比较函数通常并不困难,但当一个键由多个非平凡的实体组成时,可能会很乏味。一种普遍适用的方法是使用词典比较。对于本例,以下代码示例有效:
struct cmpKeys { bool operator()(const Key& a, const Key& b) const { if (a.first != b.first) return(a.first < b.first); else { if (a.delta != b.delta ) return (a.delta < b.delta); else return(a.size < b.size); } } }
请记住,要重用以前捕获的可执行 CUDA 图,它必须与调用上下文完全匹配:
但是,如果 CUDA 图的拓扑结构保持不变,则可以调整它以使其符合新的需要。存在一种方便的机制来确认拓扑等价性,同时调整节点参数以返回修改后的可执行图。它由cudaGraphExecUpdate提供,其工作原理是将现有的可执行图与新派生的图进行比较(例如,通过流捕获方便地获得)。如果可能,差异用于进行更改。
这种方法的好处是双重的。首先,当更新足够时,可以避免昂贵的新 CUDA 图实例化。第二,你不必知道是什么让图形独一无二。任何图形比较都由 update 函数隐式执行。下面的代码示例实现了此方法。与之前一样,它从开关的解除 Clara 和初始化开始,以指示先前创建的图形。
static bool captured = false;
tight_loop的调用站点更改如下:
cudaStreamBeginCapture(stream, cudaStreamCaptureModeGlobal); tight_loop(first_step, params, delta, grid_dim, block_dim, stream); cudaStreamEndCapture(stream, &graph); if (!captured) { cudaGraphInstantiate(&instance, graph, NULL, NULL, 0); captured = true; } else { // graph already exists; try to apply changes if (cudaGraphExecUpdate(instance, graph, NULL, &update) != cudaSuccess) {// only instantiate a new graph if update fails cudaGraphExecDestroy(instance); cudaGraphInstantiate(&instance, graph, NULL, NULL, 0) { } cudaGraphDestroy(graph); cudaGraphLaunch(instance, stream);
在这个场景中,您总是执行流捕获来收集关于tight_loop中 CUDA 操作的信息。这是一个相对便宜的操作,完全在主机上执行,而不是 GPU 。它可以与以前的 CUDA 图形启动重叠,这些启动本身就是异步操作(图 2 )。
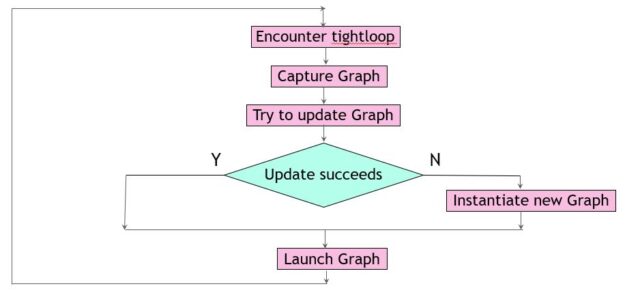 图 2 。更新图形
一句警告的话已经准备好了。cudaGraphExecUpdate的复杂性大致与 CUDA 图形节点的更改数量成正比,因此如果大部分节点发生更改,则效率会降低。
推动这两种方法以灵活方式管理 CUDA 图的应用程序有两种不同的工作负载大小,但行为有所不同(表 1 )。所有涉及的内核在单个 NVIDIA A100 GPU 上执行需要 2 – 8 微秒。报告的加速是针对代码中可以转换为 CUDA 图形的部分。
| Workload size | ||||
|---|---|---|---|---|
| Small | Large | |||
| Kernels per Graph | 504 | 2520 | ||
| Graph launches | 70 | 1540 | ||
| Method | Update | Recognize | Update | Recognize |
| Stream captures | 70 | 5 | 1540 | 3 |
| Graph updates | 69 | N.A | 1539 | N.A |
| Graph instantiations | 3 | 5 | 1 | 3 |
| Speedup | 16% | 19% | 26% | 24% |
具有许多小 CUDA 内核的应用程序通常可以使用 CUDA 图进行加速,即使内核启动模式在整个应用程序中发生变化。鉴于这种动态环境,最佳方法取决于应用程序的具体情况。希望您能发现本文中描述的两个示例易于理解和实现。