


571
社区成员
 发帖
发帖 与我相关
与我相关 我的任务
我的任务
 分享
分享在Arch Linux下直接安装Go环境和VSCode:
pacman -S go code
执行以下命令将open-vsx.org插件市场切换为微软官方的插件市场:
sed -i -e 's/^[[:blank:]]*"serviceUrl":.*/\t\t"serviceUrl": "https:\/\/marketplace.visualstudio.com\/_apis\/public\/gallery",/' \
    -e '/^[[:blank:]]*"cacheUrl/d' \
    -e '/^[[:blank:]]*"serviceUrl/a\\t\t"cacheUrl": "https:\/\/vscode.blob.core.windows.net\/gallery\/index",' \
    -e 's/^[[:blank:]]*"itemUrl":.*/\t\t"itemUrl": "https:\/\/marketplace.visualstudio.com\/items",/' \
    -e '/^[[:blank:]]*"itemUrl/a\\t\t"resourceUrlTemplate": "https:\/\/{publisher}.vscode-unpkg.net\/{publisher}\/{name}\/{version}\/{path}",\n\t\t"controlUrl": "https:\/\/az764295.vo.msecnd.net\/extensions\/marketplace.json"' \
    -e '/^[[:blank:]]*"linkProtectionTrustedDomains/d' \
    -e '/^[[:blank:]]*"documentationUrl/i\\t"linkProtectionTrustedDomains": ["https:\/\/*.visualstudio.com", "https:\/\/*.microsoft.com", "https:\/\/aka.ms", "https:\/\/vscode-auth.github.com", "https:\/\/client-auth-staging-14a768b.herokuapp.com", "https:\/\/*.gallerycdn.vsassets.io", "https:\/\/github.com\/microsoft\/", "https:\/\/github.com\/MicrosoftDocs\/", "https:\/\/login.microsoftonline.com"],' \
    /usr/lib/code/product.json
启动VSCode,安装Google官方的Go插件:

按照Go插件的提示安装gopls(Go语言的LSP服务端)和delve(调试器)工具。
创建menu文件夹,并创建menu.go文件,内容如下:
package menu

import (
	"bufio"
	"fmt"
	"os"
	"strings"
)

func New() *Processor {
	return &Processor{make(map[string]func([]string))}
}

type Processor struct {
	handlers map[string]func([]string)
}

func (p *Processor) Register(cmd string, handler func([]string)) {
	if _, ok := p.handlers[cmd]; !ok {
		p.handlers[cmd] = handler
	} else {
		panic("command already registered")
	}
}

func (p *Processor) Run() {
	scanner := bufio.NewScanner(os.Stdin)
	for {
		fmt.Printf("> ")
		ok := scanner.Scan()
		if !ok {
			break
		}
		cmdline := scanner.Text()
		parts := strings.Fields(cmdline)
		if len(parts) == 0 {
			fmt.Printf("no command specified")
			continue
		}
		handler, ok := p.handlers[parts[0]]
		if ok {
			handler(parts[1:])
		} else {
			fmt.Printf("no such command")
			continue
		}
	}
}
Processor的Register方法可以为特定命令注册相应的处理函数,命令后面的参数会作为一个字符串slice传入处理函数。
为了展示Linktable库编写了如下代码:
package main

import (
	"fmt"
	"linktable/linktable"
	"linktable/menu"
	"strconv"
)

func main() {
	p := menu.New()
	l := linktable.New[int]()
	p.Register("prepend", func(args []string) {
		n, err := strconv.Atoi(args[0])
		if err != nil {
			panic(err)
		}
		l.Prepend(n)
	})
	p.Register("append", func(args []string) {
		n, err := strconv.Atoi(args[0])
		if err != nil {
			panic(err)
		}
		l.Append(n)
	})
	p.Register("show", func(args []string) {
		fmt.Printf("Linked Table: %+v\n", l.ToSlice())
	})
	p.Register("popleft", func(args []string) {
		fmt.Printf("Popped %v\n", l.RemoveHead())
	})
	p.Register("popright", func(args []string) {
		fmt.Printf("Popped %v\n", l.RemoveTail())
	})
	p.Register("find", func(args []string) {
		n, err := strconv.Atoi(args[0])
		if err != nil {
			panic(err)
		}
		fmt.Printf("Index: %v\n", l.Find(n))
	})
	p.Run()
}
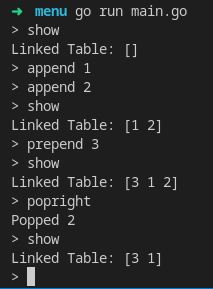
可以看到定义了show、append、prepend、popleft、popright,find等命令。
在VSCode的Terminal里执行go run main.go命令,效果如下:
在项目文件夹下使用git init创建Git版本库,使用
git add .
命令将所有文件加入Git的跟踪范围。
使用
git remote add origin <URL>
添加远程Git服务器。
使用
git commit -m "<commit message>"
创建一次提交。
最后使用
git push -u origin <branch> #首次提交使用
git push
将本地的提交(commit)推送给远程服务器。
作者:SA*****442

