13,654
社区成员
 发帖
发帖 与我相关
与我相关 我的任务
我的任务
 分享
分享1.下载安装Activemq
下载地址: http://activemq.apache.org/download.html
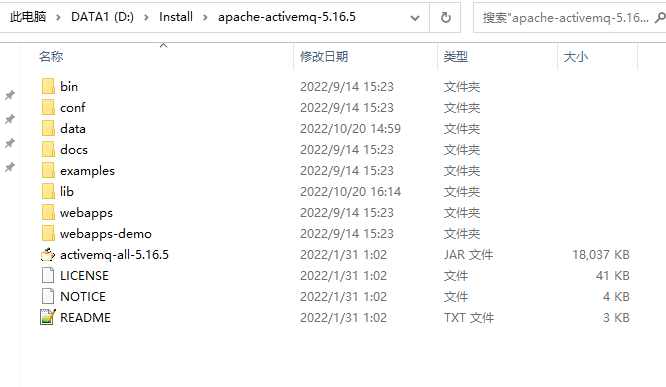
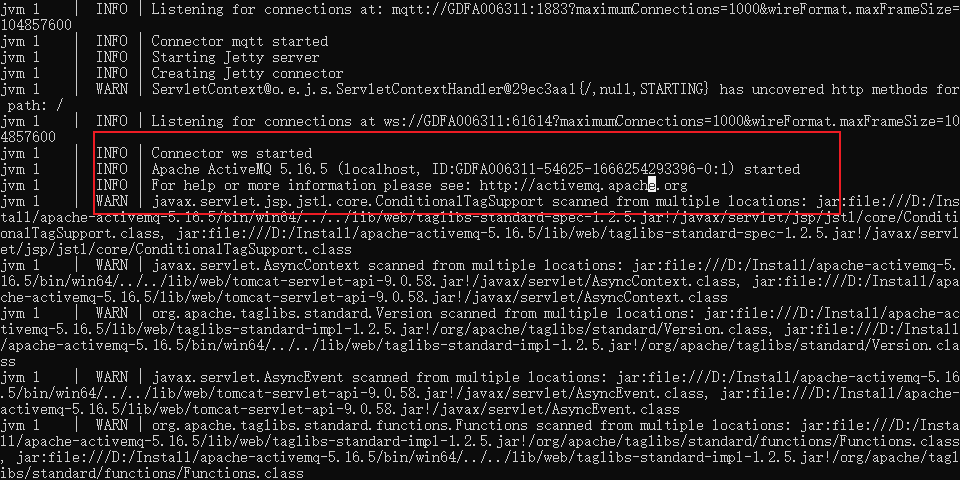
下载完成后,进行Activemq配置
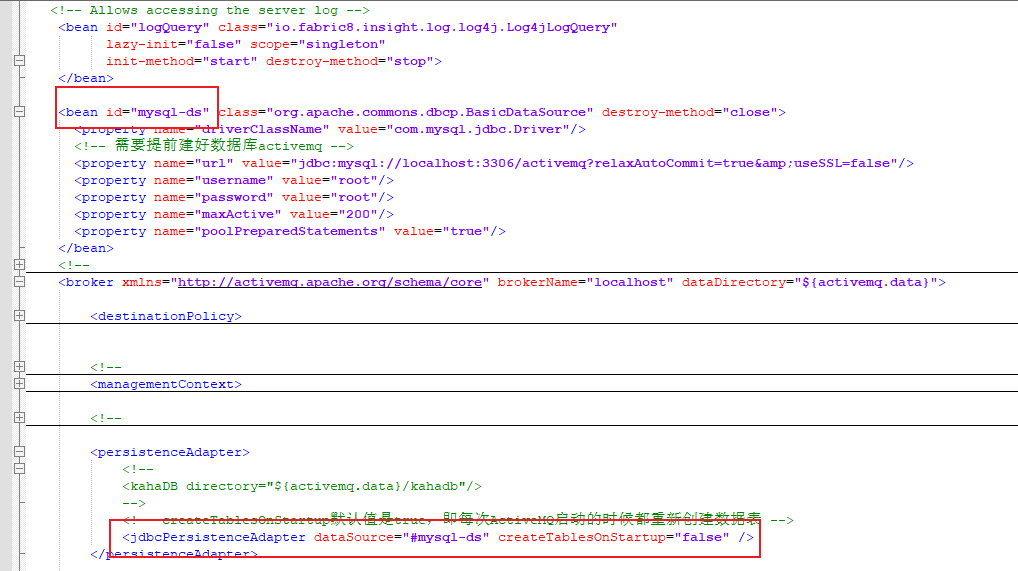
如上所示,做了mysql持久化,因此需要创建数据库activemq
根据系统win32和win64进入对于的目录进行启动
 2.Springboot配置
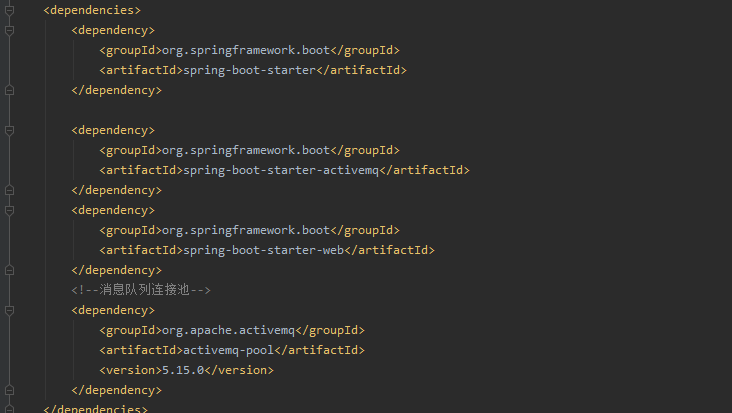
pom文件
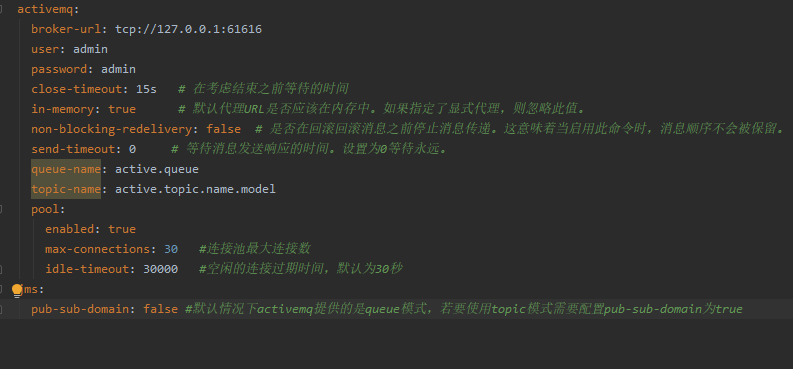
bootstrap.yml
代码主要分为三部分
创建配置类ActivemqConfig
package com.ruoyi.activemq.config;

import org.apache.activemq.ActiveMQConnectionFactory;
import org.apache.activemq.ActiveMQPrefetchPolicy;
import org.apache.activemq.command.ActiveMQQueue;
import org.apache.activemq.command.ActiveMQTopic;
import org.slf4j.Logger;
import org.slf4j.LoggerFactory;
import org.springframework.beans.factory.annotation.Value;
import org.springframework.boot.CommandLineRunner;
import org.springframework.context.annotation.Bean;
import org.springframework.context.annotation.Configuration;
import org.springframework.jms.config.JmsListenerContainerFactory;
import org.springframework.jms.config.SimpleJmsListenerContainerFactory;
import org.springframework.jms.core.JmsMessagingTemplate;

import javax.jms.ConnectionFactory;
import javax.jms.Queue;
import javax.jms.Topic;

/**
 * 创建配置类ActivemqConfig,读取yml中的内容,并且创建对象
 */
@Configuration
public class ActivemqConfig implements CommandLineRunner {
    private static final Logger logger = LoggerFactory.getLogger(ActivemqConfig.class);


    @Value("${spring.activemq.broker-url}")
    private String brokerUrl;

    @Value("${spring.activemq.user}")
    private String username;

    @Value("${spring.activemq.password}")
    private String password;

    @Value("${spring.activemq.queue-name}")
    private String queueName;

    @Value("${spring.activemq.topic-name}")
    private String topicName;

    /**
     * 初始化队列配置
     * @return
     */
    @Bean(name = "queue")
    public Queue queue() {
        return new ActiveMQQueue(queueName);
    }

    /**
     * 初始化主题配置
     * @return
     */
    @Bean(name = "topic")
    public Topic topic() {
        return new ActiveMQTopic(topicName);
    }

    /**
     * mq连接对象
     * @return
     */
    @Bean
    public ConnectionFactory connectionFactory() {
        ActiveMQConnectionFactory activeMQConnectionFactory = new ActiveMQConnectionFactory(username, password, brokerUrl);
        //解决多个线程从activeMQ中取消息,随着业务的扩大,该机器占用的网络带宽越来越高
        ActiveMQPrefetchPolicy activeMQPrefetchPolicy = new ActiveMQPrefetchPolicy();
        activeMQPrefetchPolicy.setQueuePrefetch(1);
        activeMQConnectionFactory.setPrefetchPolicy(activeMQPrefetchPolicy);
        return activeMQConnectionFactory;
    }

    /**
     * mq消息模板
     * 多个线程从activeMQ中取消息,随着业务的扩大,该机器占用的网络带宽越来越高
     * 原因分析:
     * jmsTemplate实现机制是:每次调用receive()时都会创建一个新的consumer对象,用完即销毁。
     * activeMQ的prefetch机制
     * 每次consumer连接至MQ时,MQ预先存放许多message到消费者(前提是MQ中存在大量消息),预先存放message的数量取决于prefetchSize(默认为1000)。此机制的目的很显然,是想让客户端代码用一个consumer反复进行receive操作,这样能够大量提高出队性能
     * 每次jmsTemplate.receive(),都会产生1000个消息的网络流量,但是因为jmsTemplae并不会重用consumer,导致后面999个消息都被废弃
     *
     * 解决方案:
     * 1、若坚持使用jmsTemplate,需要设置prefetch值为1,相当于禁用了activeMQ的prefetch机制,反复调用jmsTemplate.receive()也不会有任何问题。但是会有资源浪费,因为要反复创建consumer并频繁与服务器进行数据通信,但在性能要求不高的应用中也不算什么问题。
     * 2、不使用jmsTemplate,手工创建一个consumer,并单线程反复使用它来receive(),此时可以充分利用prefetch机制。配合多线程的方式每个线程拥有自己的一个consumer,此时能够充分发挥MQ在大吞吐量时的速度优势。
     * @return
     */
    @Bean
    public JmsMessagingTemplate jmsMessageTemplate() {
        return new JmsMessagingTemplate(connectionFactory());
    }

    // 在Queue模式中,对消息的监听需要对containerFactory进行配置
    @Bean("queueListener")
    public JmsListenerContainerFactory<?> queueJmsListenerContainerFactory(ConnectionFactory connectionFactory) {
        SimpleJmsListenerContainerFactory factory = new SimpleJmsListenerContainerFactory();
        factory.setConnectionFactory(connectionFactory);
        factory.setPubSubDomain(false);
        return factory;
    }

    //在Topic模式中,对消息的监听需要对containerFactory进行配置
    @Bean("topicListener")
    public JmsListenerContainerFactory<?> topicJmsListenerContainerFactory(ConnectionFactory connectionFactory) {
        SimpleJmsListenerContainerFactory factory = new SimpleJmsListenerContainerFactory();
        factory.setConnectionFactory(connectionFactory);
        factory.setPubSubDomain(true);
        return factory;
    }

    /**
     * 实现CommandLineRunne接口,便于在实例化的时候能看到启动信息(不必须)
     * @param args
     * @throws Exception
     */
    @Override
    public void run(String... args) throws Exception {
        logger.info(this.getClass().getName() + " is running\n***************************");
    }
}
生产者
package com.ruoyi.activemq.controller;
import org.springframework.beans.factory.annotation.Autowired;
import org.springframework.jms.core.JmsMessagingTemplate;
import org.springframework.scheduling.annotation.Async;
import org.springframework.scheduling.annotation.AsyncResult;
import org.springframework.util.concurrent.ListenableFuture;
import org.springframework.web.bind.annotation.RequestBody;
import org.springframework.web.bind.annotation.RequestMapping;
import org.springframework.web.bind.annotation.RestController;
import javax.jms.Destination;
import javax.jms.Queue;
import javax.jms.Topic;
@RestController
@RequestMapping("/test")
public class ProducerController {
@Autowired
private Queue queue;
@Autowired
private Topic topic;
@Autowired
private JmsMessagingTemplate jmsMessagingTemplate;
/**
* 发送 队列消息
* @return
*/
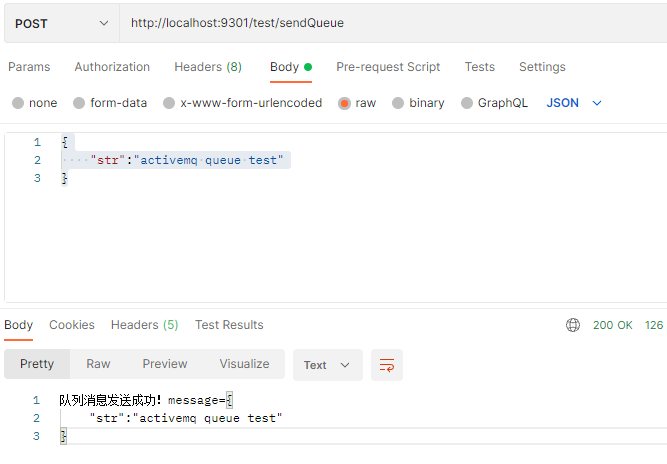
@RequestMapping("/sendQueue")
public String sendQueue(@RequestBody String str) {
this.sendMessage(this.queue, str);
return "队列消息发送成功!message=" + str;
}
/**
* 异步发送
* @return
*/
@Async
public ListenableFuture<Object> asyncSendQueue(@RequestBody String str) {
try {
// 发送消息
this.sendQueue(str);
// 返回成功的 Future
return AsyncResult.forValue(null);
} catch (Throwable ex) {
// 返回异常的 Future
return AsyncResult.forExecutionException(ex);
}
}
/**
* 发送 主题消息
* @return
*/
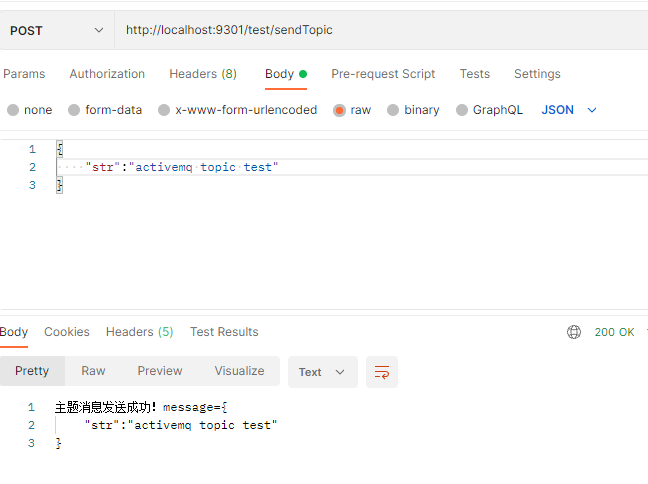
@RequestMapping("/sendTopic")
public String sendTopic(@RequestBody String str) {
this.sendMessage(this.topic, str);
return "主题消息发送成功!message=" + str;
}
// 发送消息,destination是发送到的队列,message是待发送的消息
private void sendMessage(Destination destination, final String message) {
jmsMessagingTemplate.convertAndSend(destination, message);
}
}
package com.ruoyi.activemq.controller;

import org.springframework.jms.annotation.JmsListener;
import org.springframework.web.bind.annotation.RestController;

@RestController
public class ConsumerController {
    @JmsListener(destination = "${spring.activemq.queue-name}", containerFactory = "queueListener")
    public void readActiveQueue(String message) {
        System.out.println("收到队列消息:" + message);
    }

    @JmsListener(destination = "${spring.activemq.topic-name}", containerFactory = "topicListener")
    public void readActiveTopic(String message) {
        System.out.println("收到主题消息:" + message);
    }

    /*
    如果想要【多个消费者】进行消费则注解为:
    @JmsListener(destination="${spring.activemq.queue-name}", containerFactory="queueListener",concurrency="3")
     */
}
测试一下