1,400
社区成员
 发帖
发帖 与我相关
与我相关 我的任务
我的任务
 分享
分享这篇文章最初发表在 NVIDIA 技术博客上。有关此类的更多内容,请参阅最新的 计算机视觉/视频分析 新闻和教程。
人工智能应用程序由机器学习模型提供动力,这些模型经过训练,能够根据图像、文本或音频等输入数据准确预测结果。从头开始训练机器学习模型需要大量的数据和相当多的人类专业知识,这往往使这个过程对大多数组织来说过于昂贵和耗时。
迁移学习是从零开始构建定制模型和选择现成的商业模型集成到 ML 应用程序之间的一种愉快的媒介。通过迁移学习,您可以选择与您的解决方案相关的 pretrained model ,并根据反映您特定用例的数据对其进行再培训。转移学习在“定制一切”方法(通常过于昂贵)和“现成”方法(通常过于僵化)之间取得了正确的平衡,使您能够用较少的资源构建定制的解决方案。
这个 NVIDIA TAO 工具包 使您能够将转移学习应用于预训练的模型,并创建定制的、可用于生产的模型,而无需人工智能框架的复杂性。要训练这些模型,必须有高质量的数据。 TAO 专注于开发过程中以模型为中心的步骤,而 Innotescus 专注于以数据为中心的步骤。
Innotescus 是一个基于网络的平台,用于注释、分析和管理基于计算机视觉的机器学习的健壮、无偏见的数据集。 Innotecus 帮助团队在不牺牲质量的情况下扩大运营规模。该平台包括图像和视频的自动和辅助注释、 QA 流程的共识和审查功能,以及用于主动数据集分析和平衡的交互式分析。 Innotecus 和 TAO 工具包使企业能够在定制应用程序中成功应用迁移学习,从而在短时间内获得高性能的解决方案,从而提高成本效益。
在这篇文章中,我们通过构建NVIDIA TAO 工具包与 NoNeTeSUS 来解决构建健壮的对象检测模型的挑战。此解决方案缓解了企业在构建和部署商业解决方案时遇到的几个常见问题。
您在本项目中的目标是使用 Innotecus 上整理的数据,将转移学习应用于 TAO 工具包中的 YOLO 对象检测模型。
目标检测是利用图像或视频中的边界框对目标进行定位和分类的能力。它是计算机视觉技术最广泛的应用。目标检测解决了许多复杂的现实挑战,例如:
你为什么要用 YOLO 来制作这个模型?传统上,基于深度学习的对象检测器通过两个阶段进行操作。在第一阶段,模型识别图像中的感兴趣区域。在第二阶段,对每个区域进行分类。
通常,许多区域被发送到分类阶段,由于分类是一项昂贵的操作,两级目标检测器的速度非常慢。 YOLO 代表“你只看一次”顾名思义, YOLO 可以同时进行本地化和分类,从而获得高度准确的实时性能,这对于大多数可部署解决方案至关重要。 2020 年 4 月, YOLO 的第四次迭代是 published 。它已经在许多应用程序和行业上进行了测试,并被证明是健壮的。
图 1 显示了训练目标检测模型的通用管道。对于这个更传统的开发流程的每一步,我们都会讨论人们遇到的典型挑战,以及 TAO 和 Innotecus 的结合如何解决这些问题。
 图 1 。典型的人工智能开发工作流程
在开始之前,请安装 TAO 工具包并验证 Innotescus API 的实例。
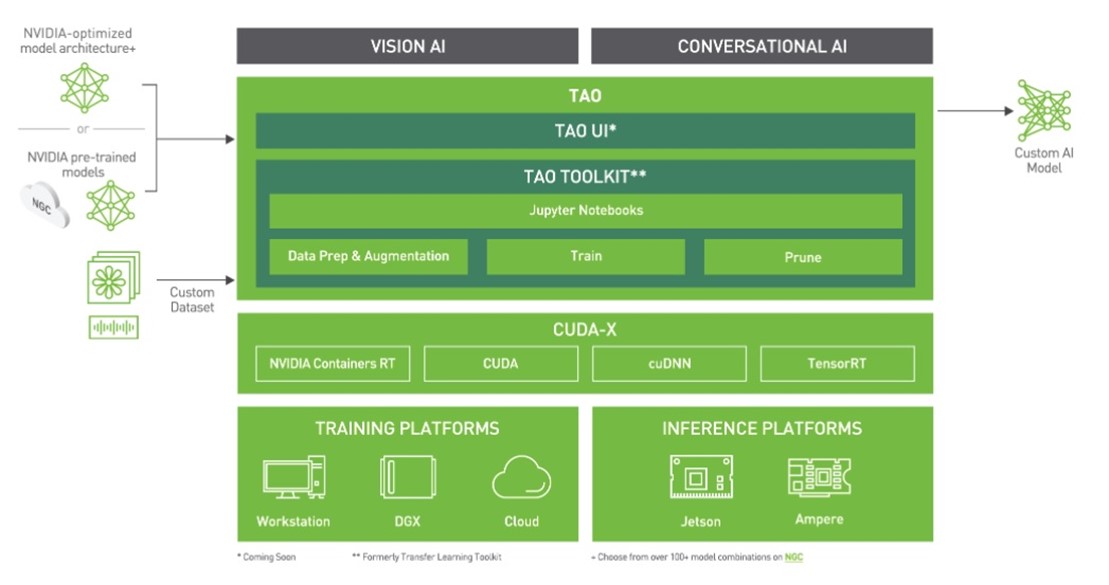 图 2 。 TAO 工具包堆栈
TAO 工具包可以作为 CLI 或 Jupyter 笔记本运行。它只与 Python3 ( 3.6.9 和 3.7 )兼容,所以首先安装必备软件。
先决条件安装完成后,安装 TAO 工具包。 NVIDIA 建议使用 virtualenvwrapper 在虚拟环境中安装该软件包。要安装 TAO 启动器 Python 软件包,请运行以下命令:
pip3 install nvidia-pyindex pip3 install nvidia-tao
通过运行tao --help检查您是否正确完成了安装。
Innotecus 可以作为基于 web 的应用程序访问,但您也可以使用其 API 演示如何以编程方式完成相同的任务。首先,安装 Innotecus 库。
pip install innotescus
接下来,使用从平台检索的client_id和client_secret值对 API 实例进行身份验证。
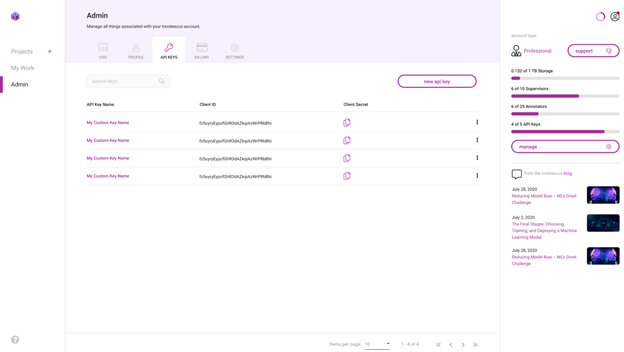 图 3 。生成和检索 API 密钥
from innotescus import client_factory client = client_factory(client_id=’client_id’, client_secret=’client_secret’)
现在,您已经准备好通过 API 与平台进行交互,您将在接下来的管道中完成每一步。
你需要数据来训练模型。尽管数据收集经常被忽视,但可以说是开发过程中最重要的一步。收集数据时,你应该问自己几个问题:
你不能总是完整地回答这些问题,但是有一个全面的数据收集计划可以帮助你在开发过程的后续步骤中避免问题。数据收集是一个耗时且昂贵的过程。由于 TAO 提供的模型是经过预培训的,因此再培训的数据要求要小得多,为组织节省了这一阶段的大量资源。
在本实验中,使用 MS COCO 验证 2017 数据集 中的图像和注释。这个数据集有 5000 张包含 80 个不同类别的图像,但您只使用包含至少一个人的 2685 张图像。
%matplotlib inline from pycocotools.coco import COCO import matplotlib.pyplot as plt dataDir=’Your Data Directory’ dataType=’val2017’ annFile=’{}/annotations/instances_{}.json’.format(dataDir,dataType) coco=COCO(annFile) catIds = coco.getCatIds(catNms=[‘person’]) # only using ‘person’ category imgIds = coco.getImgIds(catIds=catIds) for num_imgs in len(imgIds): img = coco.loadImgs(imgIds[num_imgs])[0] I = io.imread(img[‘coco_url’])
 图 4 。数据集中包含一个或多个“ person ”对象的图像示例
使用 Innotescus 客户端的已验证实例,开始设置一个项目并上传以人为中心的数据集。
#create a new project client.create_project(project_name) #upload data to the new project client.upload_data(project_name, dataset_name, file_paths, data_type, storage_type)
该数据集现在可以通过 Innotescus 用户界面访问。
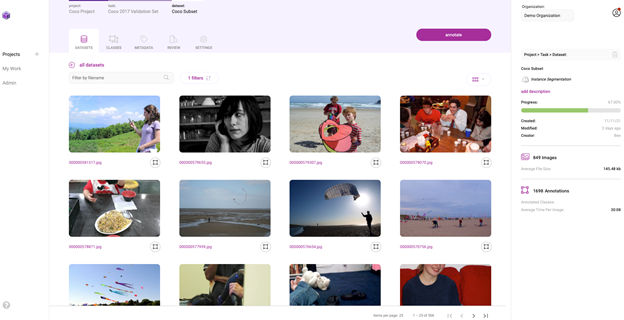 图 5 。 Innotescus 平台内以人为中心的 Coco 验证 2017 数据集的图库视图
既然你有了最初的数据集,开始整理它以确保数据集的平衡。研究反复表明,这个过程的这一阶段花费了机器学习项目 80% 左右的时间。
使用 TAO 和 Innotescus ,我们重点介绍了预注释和审阅等技术,这些技术可以在不牺牲数据集大小或质量的情况下节省时间。
Pre annotation 使您能够使用模型生成的注释来删除准确标记 2685 图像子集所需的大量时间和手动工作。您使用的 YOLOv4 与您正在重新培训的模型相同,以生成预注释,供注释者进行细化。
因为预注释可以在注释任务的简单部分上节省大量时间,所以可以将注意力集中在模型尚无法处理的更难的示例上。
YOLOv4 包含在 TAO 工具包中,支持 k 均值聚类、训练、评估、推理、修剪和导出。要使用该模型,必须首先创建一个 YOLOv4 spec 文件,该文件包含以下主要组件:
spec 文件是protobuf文本(prototxt)消息,其每个字段可以是基本数据类型,也可以是嵌套消息。
接下来,下载带有预训练权重的模型。 TAO 工具箱 Docker 容器提供了对预训练模型库的访问,这些模型是训练深层神经网络的一个很好的起点。由于这些模型托管在 NGC 目录中,因此必须首先下载并安装 NGC CLI 。有关更多信息,请参阅 NGC documentation 。
安装 CLI 后,可以在 NGC repo 上查看预训练计算机视觉模型列表,并下载预训练模型。
ngc registry model list nvidia/tao/pretrained_* ngc registry model download-version /path/to/model_on_NGC_repo/ -dest /path/to/model_download_dir/
下载模型并更新规范文件后,现在可以通过运行推断子任务来生成预注释。
tao yolo_v4 inference [-h] -i /path/to/imgFolder/ -l /path/to/annotatedOutput/ -e /path/to/specFile.txt -m /path/to/model/ -k $KEY
推理子任务的输出是一系列 KITTI 格式的注释,保存在指定的输出目录中。图 6 显示了这些注释的两个示例:
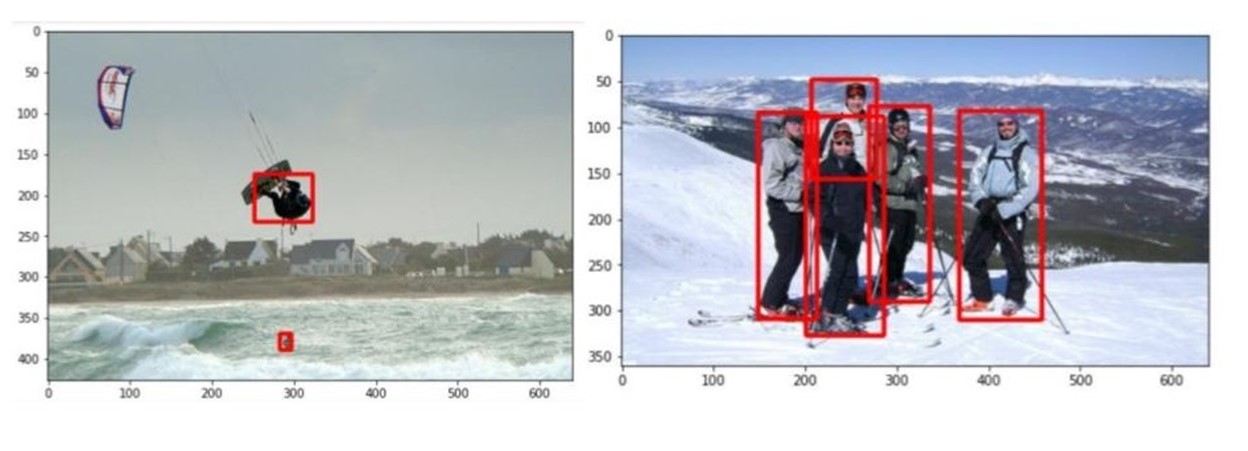 图 6 。 TAO 工具包使用预训练的 YOLOv4 模型生成的注释示例
通过基于 web 的用户界面或使用 API 手动将预先说明上传到 Innotescus 平台。由于 KITTI 格式是 Innotecus 接受的众多格式之一,因此不需要预处理。
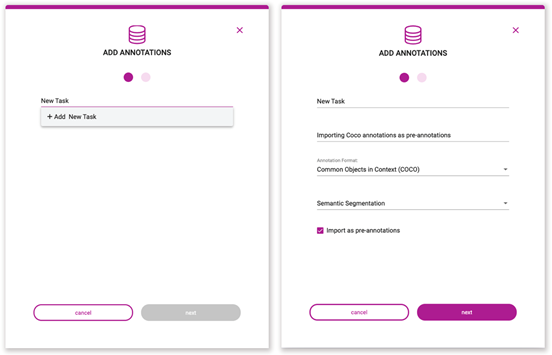 图 7 。预注释上载过程
#upload pre-annotations generated by YOLOv4 Response = client.upload_annotations(project_name, dataset_name, task_type, data_type, annotation_format, file_paths, task_name, task_description, overwrite_existing_annotations, pre_annotate)
将预注释导入平台并节省大量初始注释工作后,进入 Innotecus 以进一步更正、细化和分析数据。
成功导入预注释后,前往平台对预注释进行检查和更正。虽然预训练模型节省了大量的注释时间,但它仍然不够完美,需要一些人在回路中的交互来确保高质量的训练数据。图 8 显示了您可能进行的典型更正的示例。
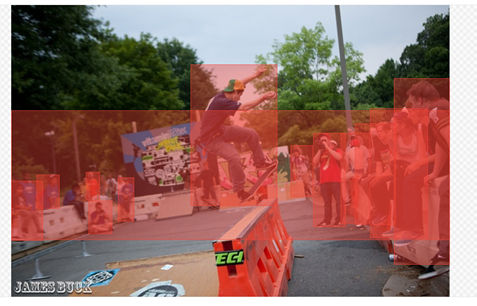 图 8 。使用预训练的 YOLOv4 生成的预注释出错
除了第一次修复和提交预注释外, Innotecus 还可以对图像和注释进行更集中的采样,以便进行多阶段审查。这使大型团队能够系统高效地确保整个数据集的高质量。
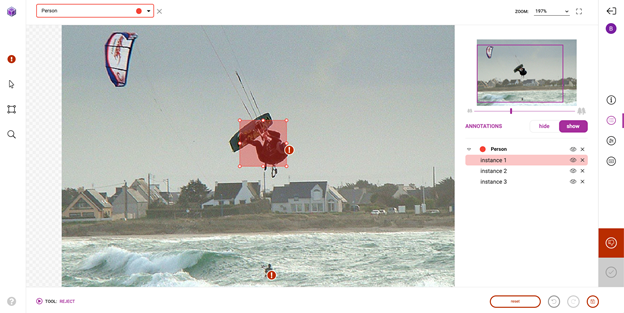 图 9 。无害化过程
探索性数据分析( EDA )是从多个统计角度调查和可视化数据集的过程,以全面了解数据中存在的潜在模式、异常和偏差。在深思熟虑地解决数据集包含的统计不平衡之前,这是一个有效且必要的步骤。
Innotecus 提供预先计算的指标,用于理解数据和注释的类别、颜色、空间和复杂性分布,并使您能够在图像和注释元数据中添加自己的信息层,以将特定于应用程序的信息纳入分析。
以下是如何使用 Innotecus 的潜水可视化来理解数据集中存在的一些模式和偏差。下面的散点图显示了图像熵在数据集中沿 x 轴的分布,图像熵是图像中的平均信息或随机程度。你可以看到一个清晰的模式,但你也可以发现异常,比如低熵或信息含量的图像。
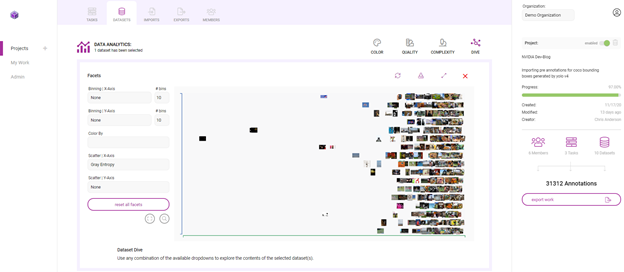 图 10 。 Innotescus 上的数据集图
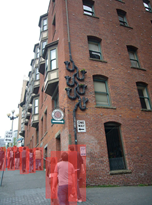
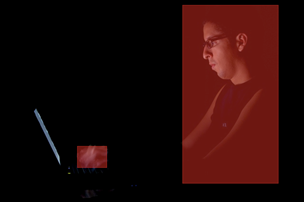 图 11 。(左)低熵和(右)高熵图像示例
这样的异常值引发了如何处理数据集中异常的问题。识别异常可以让你提出一些关键问题:
在另一个例子中,查看每个注释的区域,相对于它所在的图像。
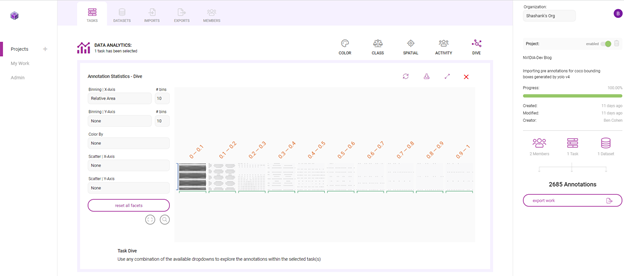 图 12 。使用俯冲图调查 Innotecus 计算的许多指标
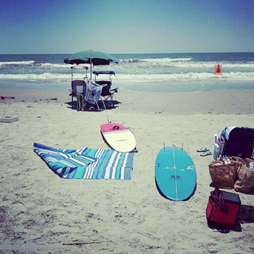
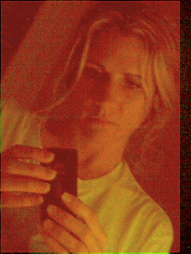 图 13 。数据集中相对注释大小的变化
在图 13 中,这两幅图像显示了数据集中注释大小的变化。虽然一些注释捕捉了占据大量图像的人,但大多数注释显示的是远离相机的人。
在这里,很大一部分注释在各自图像大小的 0% 到 10% 之间。这意味着数据集偏向于小对象,或远离相机的人。那么,您是否需要在训练数据中添加更多具有更大注释的示例,以表示离摄像机更近的人?以这种方式理解数据分布有助于您开始考虑数据扩充计划。
通过 Innotescus , EDA 变得直观。它为您提供了所需的信息,以便对数据集进行强大的扩充,并在开发过程的早期消除偏见。
集群再平衡的增强背后的想法是强大的。 这方法 显示了在最近的数据中心 AI 竞赛由 Andrew Ng 和深入学习的 21% 的性能提升。人工智能。
为每个数据点(每个边界框注释)生成 N 维特征向量,并将所有数据点聚集在更高维空间中。当使用相似的特征对对象进行聚类时,可以扩充数据集,使每个聚类具有相同的表示形式。
我们选择使用[red channel mean, green channel mean, blue channel mean, gray image std, gray image entropy, relative area]作为 N 维特征向量。这些指标是从 Innotecus 导出的, Innotecus 会自动计算这些指标。您还可以使用预训练模型生成的嵌入来填充特征向量,这可能会更健壮。
您使用 k – 均值聚类, k = 4 作为聚类算法,使用 UMAP 将维度减少到两个,以便可视化。下面的代码示例生成显示 UMAP 图的图形,用这四个簇进行颜色编码。
import umap from sklearn.decomposition import PCA from sklearn.cluster import KMeans # k-means on the feature vector kmeans = KMeans(n_clusters=4, random_state=0).fit(featureVector) # UMAP for dim reduction and visualization fit = umap.UMAP(n_neighbors=5, min_dist=0.2, n_components=2, metric=’manhattan’) u = fit.fit_transform(featureVector) # Plot UMAP components plt.scatter(u[:,0], u[:,1], c=(kmeans.labels_)) plt.title(‘UMAP embedding of kmeans colours’)
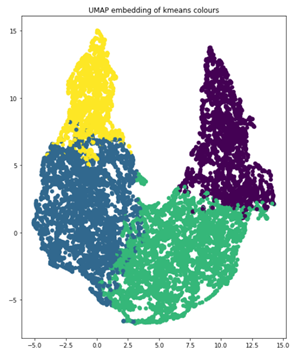 图 14 。四个簇,在二维上绘制
当您查看每个集群中对象的数量时,您可以清楚地看到不平衡,这将告诉您应该如何增加数据以进行再培训。这四个簇分别代表 854 、 1523 、 1481 和 830 幅图像。如果一个图像的对象位于多个簇中,请将该图像与其大多数对象分组以进行增强。
clusters = {} for file, cluster in zip(filename, kmeans.labels_): if cluster not in clusters.keys(): clusters[cluster] = [] clusters[cluster].append(file) else: clusters[cluster].append(file) for numCls in range(0, len(clusters)): print(‘Cluster {}: {} objects, {} images’.format(numCls+1, len(clusters[numCls]), len(list(set(clusters[numCls])))))
输出:
Cluster 1: 2234 objects, 854 images Cluster 2: 3490 objects, 1523 images Cluster 3: 3629 objects, 1481 images Cluster 4: 1588 objects, 830 images
定义好集群后,可以使用 imgaug Python 库引入增强技术来增强训练数据:平移、图像亮度调整和缩放增强。您可以进行扩展,使每个集群包含 2000 个图像,总计 8000 个。在增强图像时,imgaug确保注释坐标也得到适当更改。
import imgaug as ia import imgaug.augmenters as iaa # augment images seq = iaa.Sequential([ iaa.Multiply([1.1, 1.5]), # change brightness, doesn’t affect BBs iaa.Affine( translate_px={“x”:60, “y”:60}, scale=(0.5, 0.8) ) # translate by 60px on x/y axes & scale to 50-80%, includes BBs ]) # augment BBs and images image_aug, bbs_aug = seq(image=I, bounding_boxes=boundingBoxes)
使用相同的 UMAP 可视化技术,增加的数据点现在为红色,您可以看到数据集现在更加平衡,因为它更像高斯分布。
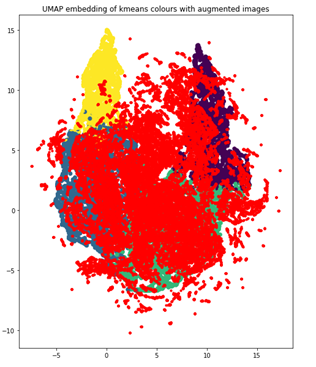 图 15 。重新平衡的集群
利用平衡良好、高质量的训练数据,最后一步是训练模型。
要开始重新训练模型,首先确保 spec 文件包含感兴趣的类,以及预训练模型和训练数据的正确目录路径。在training_config部分更改训练参数。保留 30% 的扩充数据集作为测试数据集,以比较预训练模型和再训练模型的性能。
ttraining_config { batch_size_per_gpu: 8 num_epochs: 80 enable_qat: false checkpoint_interval: 10 learning_rate { soft_start_cosine_annealing_schedule { min_learning_rate: 1e-7 max_learning_rate: 1e-4 soft_start: 0.3 } } regularizer { type: L1 weight: 3e-5 } optimizer { adam { epsilon: 1e-7 beta1: 0.9 beta2: 0.999 amsgrad: false } } pretrain_model_path: “path/to/model/model.hdf5” }
运行训练命令。
tao yolo_v4 train -e /path/to/specFile.txt -r /path/to/result -k $KEY
如您所见,平均精度提高了 14.93% ,比预训练模型的地图提高了 21.37% :
| Model | mAP50 |
| Yolov4 pretrained model | 69.86% |
| Yolov4 retrained model with cluster-rebalanced augmentation | 84.79% |
表 1 。利用策展数据集对迁移学习前后的绩效进行建模
使用 NVIDIA TAO 工具包进行预注释和模型培训,使用 Innotecus 进行数据细化、分析和整理,您将 YOLOv4 在 person 类上的平均精度提高了 20% 以上。你不仅提高了所选课程的成绩,而且比没有迁移学习的显著好处时,你所用的时间和数据更少。
迁移学习是在资源有限的环境中生成高性能、特定于应用程序的模型的一种好方法。使用 TAO 工具包和 Innotecus 等工具,可以让各种规模和背景的团队都能使用。
有兴趣使用 Innotescus 来增强和完善您自己的数据集吗?注册 free trial . 使用 TAO 工具包开始 下载示例资源 的人工智能模型培训。