535
社区成员
 发帖
发帖 与我相关
与我相关 我的任务
我的任务 分享
分享
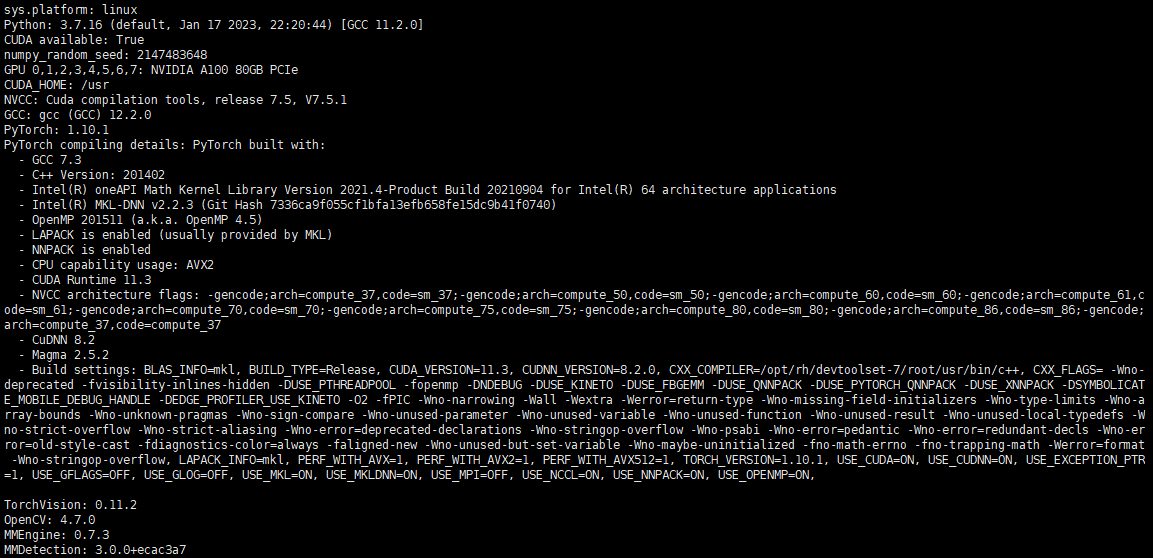
nvcc -V
gcc --version
python

from mmengine.utils import get_git_hash
from mmengine.utils.dl_utils import collect_env as collect_base_env
import mmdet
def collect_env():
    """Collect the information of the running environments."""
    env_info = collect_base_env()
    env_info['MMDetection'] = f'{mmdet.__version__}+{get_git_hash()[:7]}'
    return env_info
if __name__ == '__main__':
    for name, val in collect_env().items():  # shit+enter进入下一行
        print(f'{name}: {val}')  # 编写函数时用Tab键对齐

exit()

unzip balloon_dataset.zip -d balloon_dataset && rm balloon_dataset.zip
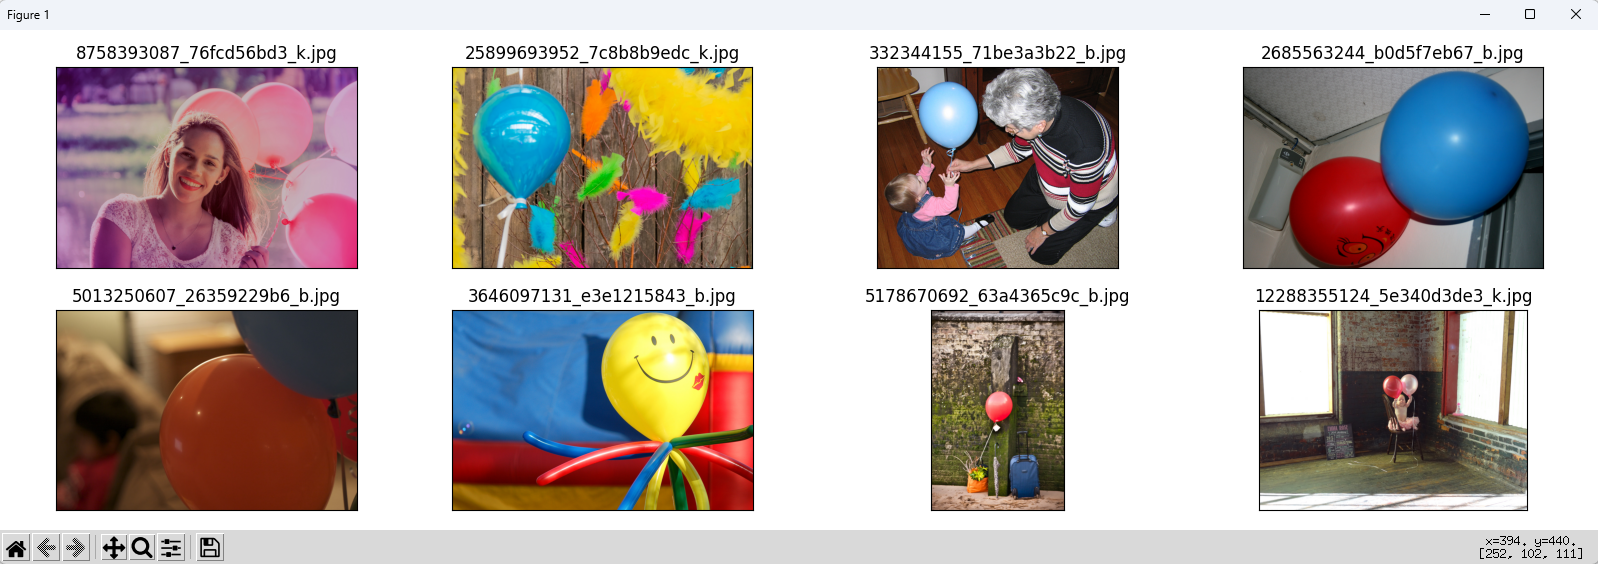
# 数据集可视化

import os
import matplotlib.pyplot as plt
from PIL import Image

#%matplotlib inline  # 输出窗口显示图形--IPython/Jupyter Notebook中的魔术命令
#%config InlineBackend.figure_format = 'retina'  # 设置高分辨率--同上

original_images = []
images = []
texts = []
plt.figure(figsize=(16, 5))

image_paths= [filename for filename in os.listdir('train')][:8]  # 文件路径自己设置下

for i,filename in enumerate(image_paths):
    name = os.path.splitext(filename)[0]

    image = Image.open('train/'+filename).convert("RGB")  # 文件路径设置好

    plt.subplot(2, 4, i+1)
    plt.imshow(image)
    plt.title(f"{filename}")
    plt.xticks([])
    plt.yticks([])

plt.tight_layout()
plt.show()  # 显示在窗口
创建一个visualization.py文件,在linux命令行里运行文件
python visualization.py

from pycocotools.coco import COCO
import matplotlib.pyplot as plt
import numpy as np
from PIL import Image
import os.path as osp
from matplotlib.collections import PatchCollection
from matplotlib.patches import Polygon

def apply_exif_orientation(image):
    _EXIF_ORIENT = 274
    if not hasattr(image, 'getexif'):
        return image

    try:
        exif = image.getexif()
    except Exception:
        exif = None

    if exif is None:
        return image

    orientation = exif.get(_EXIF_ORIENT)

    method = {
        2: Image.FLIP_LEFT_RIGHT,
        3: Image.ROTATE_180,
        4: Image.FLIP_TOP_BOTTOM,
        5: Image.TRANSPOSE,
        6: Image.ROTATE_270,
        7: Image.TRANSVERSE,
        8: Image.ROTATE_90,
    }.get(orientation)
    if method is not None:
        return image.transpose(method)
    return image


def show_bbox_only(coco, anns, show_label_bbox=True, is_filling=True):
    """Show bounding box of annotations Only."""
    if len(anns) == 0:
        return

    ax = plt.gca()
    ax.set_autoscale_on(False)

    image2color = dict()
    for cat in coco.getCatIds():
        image2color[cat] = (np.random.random((1, 3)) * 0.7 + 0.3).tolist()[0]

    polygons = []
    colors = []

    for ann in anns:
        color = image2color[ann['category_id']]
        bbox_x, bbox_y, bbox_w, bbox_h = ann['bbox']
        poly = [[bbox_x, bbox_y], [bbox_x, bbox_y + bbox_h],
                [bbox_x + bbox_w, bbox_y + bbox_h], [bbox_x + bbox_w, bbox_y]]
        polygons.append(Polygon(np.array(poly).reshape((4, 2))))
        colors.append(color)

        if show_label_bbox:
            label_bbox = dict(facecolor=color)
        else:
            label_bbox = None

        ax.text(
            bbox_x,
            bbox_y,
            '%s' % (coco.loadCats(ann['category_id'])[0]['name']),
            color='white',
            bbox=label_bbox)

    if is_filling:
        p = PatchCollection(
            polygons, facecolor=colors, linewidths=0, alpha=0.4)
        ax.add_collection(p)
    p = PatchCollection(
        polygons, facecolor='none', edgecolors=colors, linewidths=2)
    ax.add_collection(p)


coco = COCO('train/balloon_train.json')
image_ids = coco.getImgIds()
np.random.shuffle(image_ids)

plt.figure(figsize=(16, 5))

# 只可视化 8 张图片
for i in range(8):
    image_data = coco.loadImgs(image_ids[i])[0]
    image_path = osp.join('train',image_data['file_name'])
    annotation_ids = coco.getAnnIds(
            imgIds=image_data['id'], catIds=[], iscrowd=0)
    annotations = coco.loadAnns(annotation_ids)

    ax = plt.subplot(2, 4, i+1)
    image = Image.open(image_path).convert("RGB")

    # 这行代码很关键,否则可能图片和标签对不上
    image=apply_exif_orientation(image)

    ax.imshow(image)

    show_bbox_only(coco, annotations)

    #plt.title(f"{filename}")
    plt.title(f"balloon")
    plt.xticks([])
    plt.yticks([])

plt.tight_layout()
plt.show()
python visualizersCOCO.py

import json
import re
from collections import defaultdict
import cv2
import os
# 来源https://github.com/CrabBoss-lab/openmmlab-Camp/blob/master/03-mmdetection-task/3-json2coco.ipynb
# 读取JSON文件
with open('train/via_region_data.json') as f:
    annotations = json.load(f)

# 初始化COCO格式字典
coco_dict = defaultdict(list)
coco_dict['info'] = {}
coco_dict['licenses'] = []
coco_dict['categories'] = []
coco_dict['images'] = []
coco_dict['annotations'] = []

# 添加info信息
coco_dict['info']['version'] = '1.0'
coco_dict['info']['description'] = 'Balloon Dataset'
coco_dict['info']['year'] = 2023
coco_dict['info']['contributor'] = 'YUJUNYU'
coco_dict['info']['date_created'] = '2023-06-09'

# 添加categories信息
category_id = 1
category = {'id': category_id, 'name': 'balloon', 'supercategory': 'object'}
coco_dict['categories'].append(category)

# 遍历每个图像的注释信息
annotation_id = 1
for image_id, image_info in annotations.items():
    # 从image_id中提取出正确的图像ID
    match = re.search(r'(\d+)_.*', image_id)
    if match:
        image_id = match.group(1)
    else:
        continue

    # 获取图像的文件名和大小
    filename = image_info['filename']
    size = image_info['size']
    # 获取图像的height和width
    img = cv2.imread(os.path.join('train/', filename))
    height, width, _ = img.shape
    # print(filename,height,width)

    # 添加图像信息
    image = {'id': int(image_id), 'file_name': filename, 'width': width, 'height': height}
    coco_dict['images'].append(image)

    # 获取多边形注释信息
    regions = image_info['regions']
    for region_id, region_info in regions.items():
        # 获取多边形顶点坐标
        x = region_info['shape_attributes']['all_points_x']
        y = region_info['shape_attributes']['all_points_y']
        points = list(zip(x, y))

        # 计算多边形的边界框
        xmin = min(x)
        xmax = max(x)
        ymin = min(y)
        ymax = max(y)
        width = xmax - xmin
        height = ymax - ymin

        # 添加注释信息
        annotation = {'id': annotation_id, 'image_id': int(image_id), 'category_id': category_id, 'segmentation': [points], 'area': width * height, 'bbox': [xmin, ymin, width, height], 'iscrowd': 0}
        coco_dict['annotations'].append(annotation)
        annotation_id += 1

# 保存COCO格式文件
with open('train/balloon_train.json', 'w') as f:
    json.dump(coco_dict, f)

print('success!')
import json
import re
from collections import defaultdict
import cv2
import os
# 来源https://github.com/CrabBoss-lab/openmmlab-Camp/blob/master/03-mmdetection-task/3-json2coco.ipynb
# 读取JSON文件
with open('val/via_region_data.json') as f:
    annotations = json.load(f)

# 初始化COCO格式字典
coco_dict = defaultdict(list)
coco_dict['info'] = {}
coco_dict['licenses'] = []
coco_dict['categories'] = []
coco_dict['images'] = []
coco_dict['annotations'] = []

# 添加info信息
coco_dict['info']['version'] = '1.0'
coco_dict['info']['description'] = 'Balloon Dataset'
coco_dict['info']['year'] = 2023
coco_dict['info']['contributor'] = 'YUJUNYU'
coco_dict['info']['date_created'] = '2023-06-09'

# 添加categories信息
category_id = 1
category = {'id': category_id, 'name': 'balloon', 'supercategory': 'object'}
coco_dict['categories'].append(category)

# 遍历每个图像的注释信息
annotation_id = 1
for image_id, image_info in annotations.items():
    # 从image_id中提取出正确的图像ID
    match = re.search(r'(\d+)_.*', image_id)
    if match:
        image_id = match.group(1)
    else:
        continue

    # 获取图像的文件名和大小
    filename = image_info['filename']
    size = image_info['size']
    # 获取图像的height和width
    img = cv2.imread(os.path.join('val/', filename))
    height, width, _ = img.shape
    # print(filename,height,width)

    # 添加图像信息
    image = {'id': int(image_id), 'file_name': filename, 'width': width, 'height': height}
    coco_dict['images'].append(image)

    # 获取多边形注释信息
    regions = image_info['regions']
    for region_id, region_info in regions.items():
        # 获取多边形顶点坐标
        x = region_info['shape_attributes']['all_points_x']
        y = region_info['shape_attributes']['all_points_y']
        points = list(zip(x, y))

        # 计算多边形的边界框
        xmin = min(x)
        xmax = max(x)
        ymin = min(y)
        ymax = max(y)
        width = xmax - xmin
        height = ymax - ymin

        # 添加注释信息
        annotation = {'id': annotation_id, 'image_id': int(image_id), 'category_id': category_id, 'segmentation': [points], 'area': width * height, 'bbox': [xmin, ymin, width, height], 'iscrowd': 0}
        coco_dict['annotations'].append(annotation)
        annotation_id += 1

# 保存COCO格式文件
with open('val/balloon_val.json', 'w') as f:
    json.dump(coco_dict, f)

print('success!')
# 当前路径位于 mmdetection/tutorials, 配置将写到 mmdetection/tutorials 路径下

_base_ = '../configs/rtmdet/rtmdet_tiny_8xb32-300e_coco.py'

data_root = 'data/balloon_dataset/'

# 非常重要
metainfo = {
    # 类别名,注意 classes 需要是一个 tuple,因此即使是单类,
    # 你应该写成 `cat,` 很多初学者经常会在这犯错
    'classes': ('balloon',),
    'palette': [
        (220, 20, 60),
    ]
}
num_classes = 1

# 训练 40 epoch
max_epochs = 200
# 训练单卡 bs= 12
train_batch_size_per_gpu = 12
# 可以根据自己的电脑修改
train_num_workers = 16

# 验证集 batch size 为 1
val_batch_size_per_gpu = 1
val_num_workers = 16

# RTMDet 训练过程分成 2 个 stage,第二个 stage 会切换数据增强 pipeline
num_epochs_stage2 = 5

# batch 改变了,学习率也要跟着改变, 0.004 是 8卡x32 的学习率
base_lr = 12 * 0.004 / (32*8)

# 采用 COCO 预训练权重
load_from = 'https://download.openmmlab.com/mmdetection/v3.0/rtmdet/rtmdet_tiny_8xb32-300e_coco/rtmdet_tiny_8xb32-300e_coco_20220902_112414-78e30dcc.pth'  # noqa

model = dict(
    # 考虑到数据集太小,且训练时间很短,我们把 backbone 完全固定
    # 用户自己的数据集可能需要解冻 backbone
    backbone=dict(frozen_stages=4),
    # 不要忘记修改 num_classes
    bbox_head=dict(dict(num_classes=num_classes)))

# 数据集不同,dataset 输入参数也不一样
train_dataloader = dict(
    batch_size=train_batch_size_per_gpu,
    num_workers=train_num_workers,
    pin_memory=False,
    dataset=dict(
        data_root=data_root,
        metainfo=metainfo,
        ann_file='balloon/train/balloon_train.json',
        data_prefix=dict(img='balloon/train/')))

val_dataloader = dict(
    batch_size=val_batch_size_per_gpu,
    num_workers=val_num_workers,
    dataset=dict(
        metainfo=metainfo,
        data_root=data_root,
        ann_file='balloon/val/balloon_val.json',
        data_prefix=dict(img='balloon/val/')))

test_dataloader = val_dataloader

# 默认的学习率调度器是 warmup 1000,但是 cat 数据集太小了,需要修改 为 30 iter
param_scheduler = [
    dict(
        type='LinearLR',
        start_factor=1.0e-5,
        by_epoch=False,
        begin=0,
        end=30),
    dict(
        type='CosineAnnealingLR',
        eta_min=base_lr * 0.05,
        begin=max_epochs // 2,  # max_epoch 也改变了
        end=max_epochs,
        T_max=max_epochs // 2,
        by_epoch=True,
        convert_to_iter_based=True),
]
optim_wrapper = dict(optimizer=dict(lr=base_lr))

# 第二 stage 切换 pipeline 的 epoch 时刻也改变了
_base_.custom_hooks[1].switch_epoch = max_epochs - num_epochs_stage2

val_evaluator = dict(ann_file=data_root + 'balloon/val/balloon_val.json')
test_evaluator = val_evaluator

# 一些打印设置修改
default_hooks = dict(
    checkpoint=dict(interval=10, max_keep_ckpts=2, save_best='auto'),  # 同时保存最好性能权重
    logger=dict(type='LoggerHook', interval=5))
train_cfg = dict(max_epochs=max_epochs, val_interval=10)
python tools/train.py data/balloon_rtmdet.py
python tools/test.py data/balloon_rtmdet.py work_dirs/balloon_rtmdet/epoch_200.pth

python tools/test.py data/balloon_rtmdet.py work_dirs/balloon_rtmdet/epoch_200.pth --show-dir results
# 预测结果数据可视化

import os
import matplotlib.pyplot as plt
from PIL import Image

#%matplotlib inline

plt.figure(figsize=(20, 20))

# 你如果重新跑,这个时间戳是不一样的,需要自己修改
root_path='/nvme0/chengcan/openmmlab/mmdetection/work_dirs/balloon_rtmdet/20230611_191752/results/'
image_paths= [filename for filename in os.listdir(root_path)][2:6]

for i,filename in enumerate(image_paths):
    name = os.path.splitext(filename)[0]

    image = Image.open(root_path+filename).convert("RGB")

    plt.subplot(4, 1, i+1)
    plt.imshow(image)
    plt.title(f"{filename}")
    plt.xticks([])
    plt.yticks([])

plt.tight_layout()
plt.show()

python demo/image_demo.py data/balloon_dataset/balloon/test/120853323_d4788431b9_b.jpg data/balloon_rtmdet.py --weights work_dirs/balloon_rtmdet/epoch_200.pth

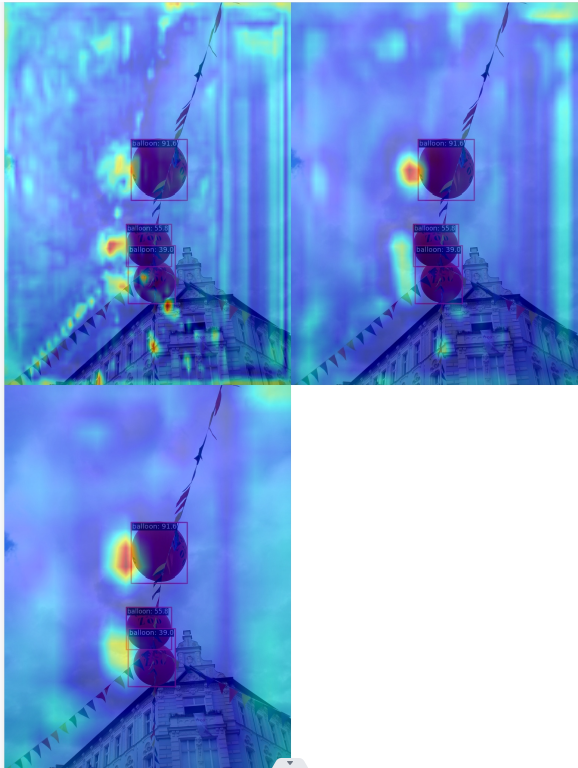
python demo/featmap_vis_demo.py ../mmdetection/data/balloon_dataset/balloon/test/2.jpg ../mmdetection/data/balloon_rtmdet.py ../mmdetection/work_dirs/balloon_rtmdet/epoch_200.pth --target-layers neck --channel-reduction squeeze_mean
