


176
社区成员
 发帖
发帖 与我相关
与我相关 我的任务
我的任务
 分享
分享
In second assignment, our task is to expand more functions comparing to the simple calculator in assignment1, so in this blog I will illustraten more details about the scientific calculator. this scientific calculator is designed by the front-back separated technology, the front end send the request to the backend sever by using the interface and send the data which need to be dealed with, the back end handle with these data, and the result can be back to the front end and be saved in the database, and in this task, I chose to continune to use the web techology(HTML+CSS+JS) to design the calculator UI, for back end, I select the python as the bankend, what's more, This scientific calculator can support some basic functions such as addition, subtraction, multiplication, division and some advanced functions such as radical sign, trigonometric function, log, scientific notation and so on.
| Course for This Assignment | https://bbs.csdn.net/forums/ssynkqtd-04 |
|---|---|
| The Link of Requirement of This Assignment | https://bbs.csdn.net/topics/617378696 |
| Objectives of This Assignment | Design a scientific calculator with front end separation |
| Other reference | ----- |
| MU STU ID and FZU STU ID | 21125376_832102230 |
The github front-end link:https://github.com/hheehehdffrkfjr/EE308-Assignment2-Front-end
The github back-end link:https://github.com/hheehehdffrkfjr/EE308-Assignment2-Back-end
| Personal Software Process Stages | Estimated Time(minutes) | Actual Time(minutes) |
|---|---|---|
| Planning | 45 | 60 |
| • Estimate | 45 | 60 |
| Development | 695 | 833 |
| • Analysis | 105 | 135 |
| • Design Spec | 30 | 40 |
| • Design Review | 30 | 45 |
| • Coding Standard | 60 | 80 |
| • Design | 80 | 102 |
| • Coding | 300 | 364 |
| • Code Review | 40 | 67 |
| • Test | 50 | 100 |
| Reporting | 64 | 100 |
| • Test Repor | 20 | 40 |
| • Size Measurement | 20 | 20 |
| • Postmortem & Process Improvement Plan | 24 | 40 |
| Sum | 804 | 993 |
To design this calculator, there are lots of problems affect me: whether I need to continue with using the HTML+CSS+JS as the front end, which back end is suitable for me to create and how to achieve the connection and communication between the front and back end.
After studying, I know that, if the connection is desired to achieve, for the web front end, it will send the request to the end while carring some data need to be used in the backend, in this task, the ajax technology can help me to achieve it,Ajax allows asynchronous communication between the front-end and back-end, enabling dynamic interactions. The front-end uses JavaScript to create Ajax requests, sends them to the Python back-end, which processes the request and returns response data. The front-end receives the response and updates the user interface accordingly. This approach allows the development of highly interactive web applications without the need to refresh the entire page.
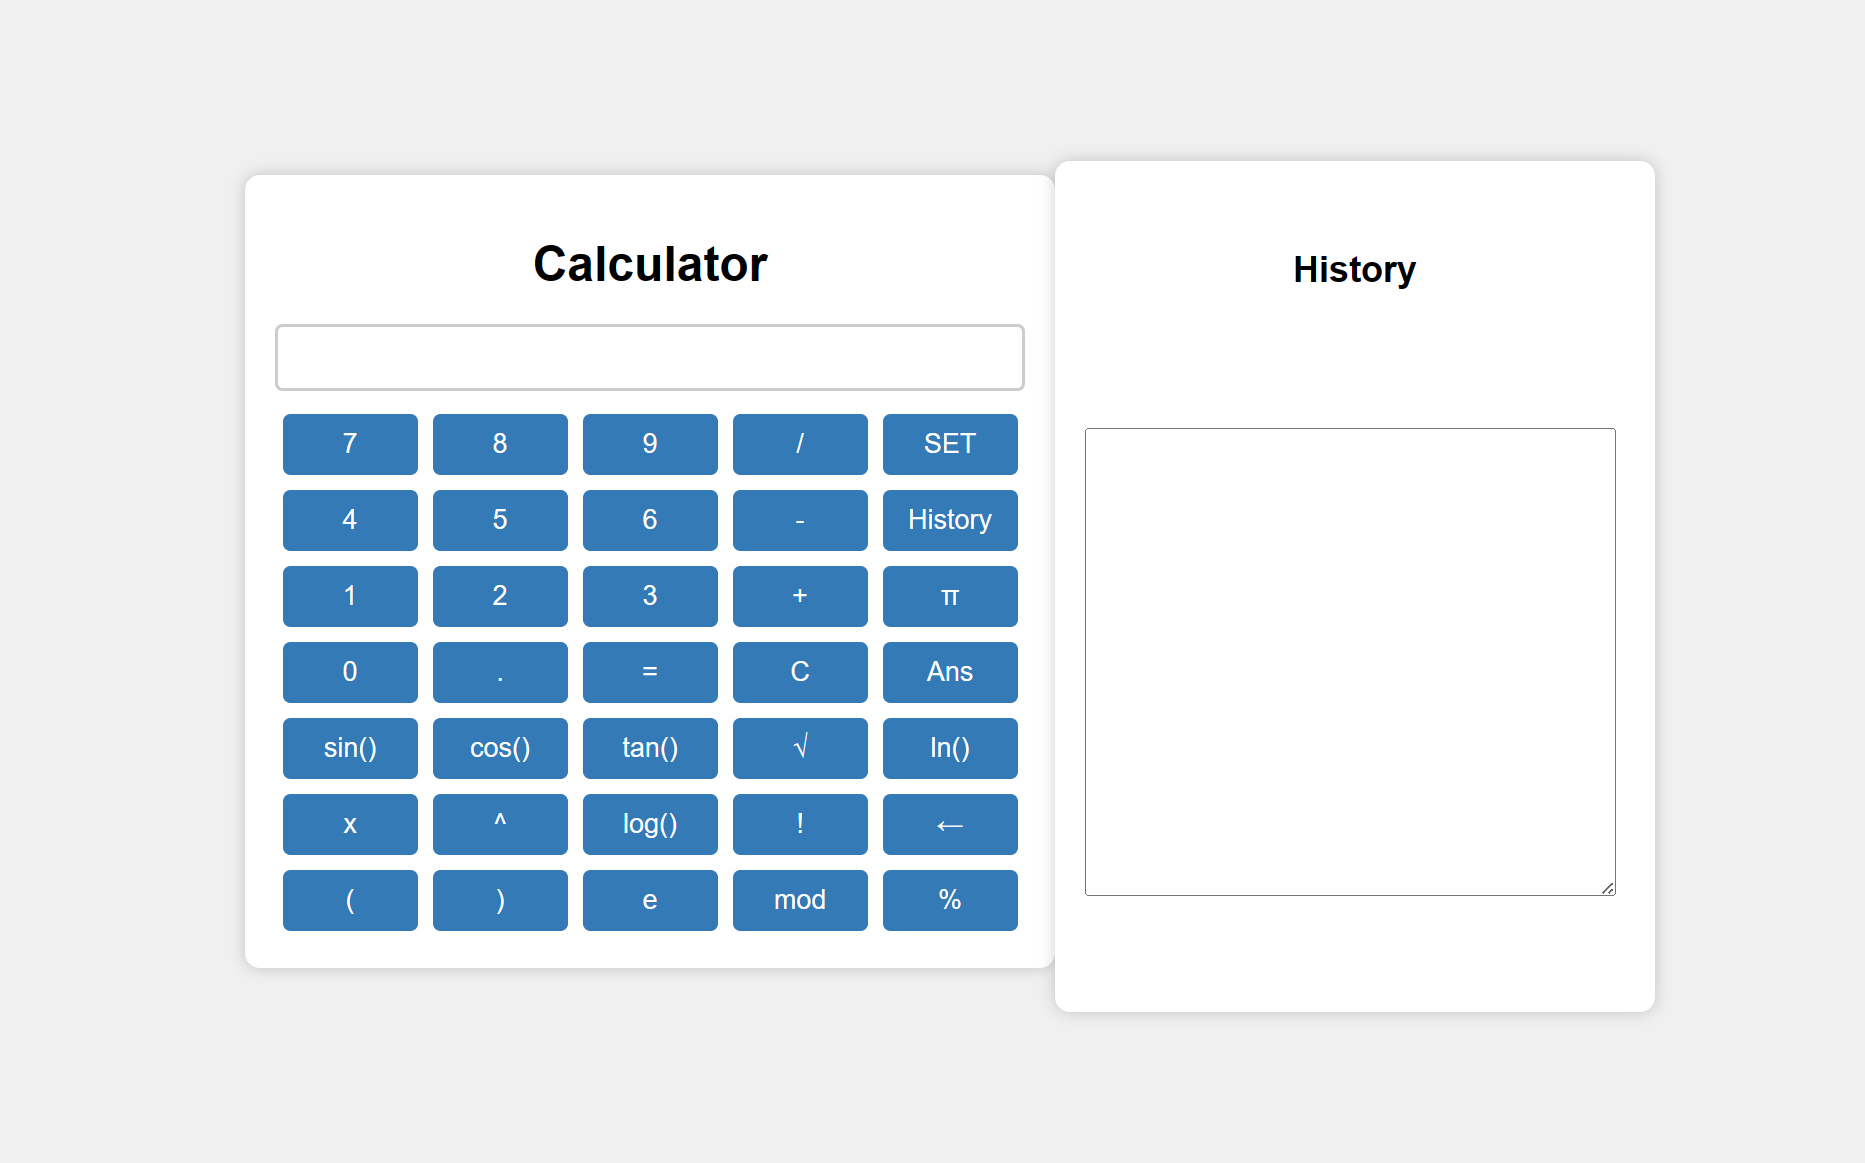
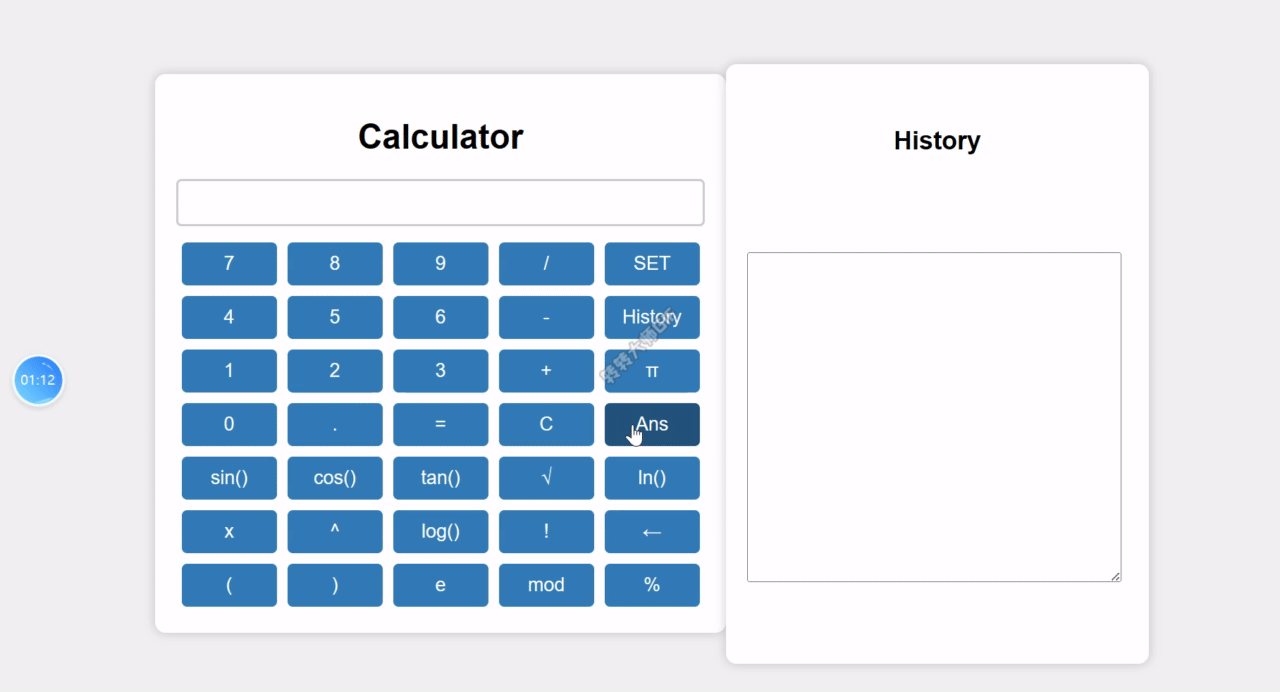
The display of the calculator is below:
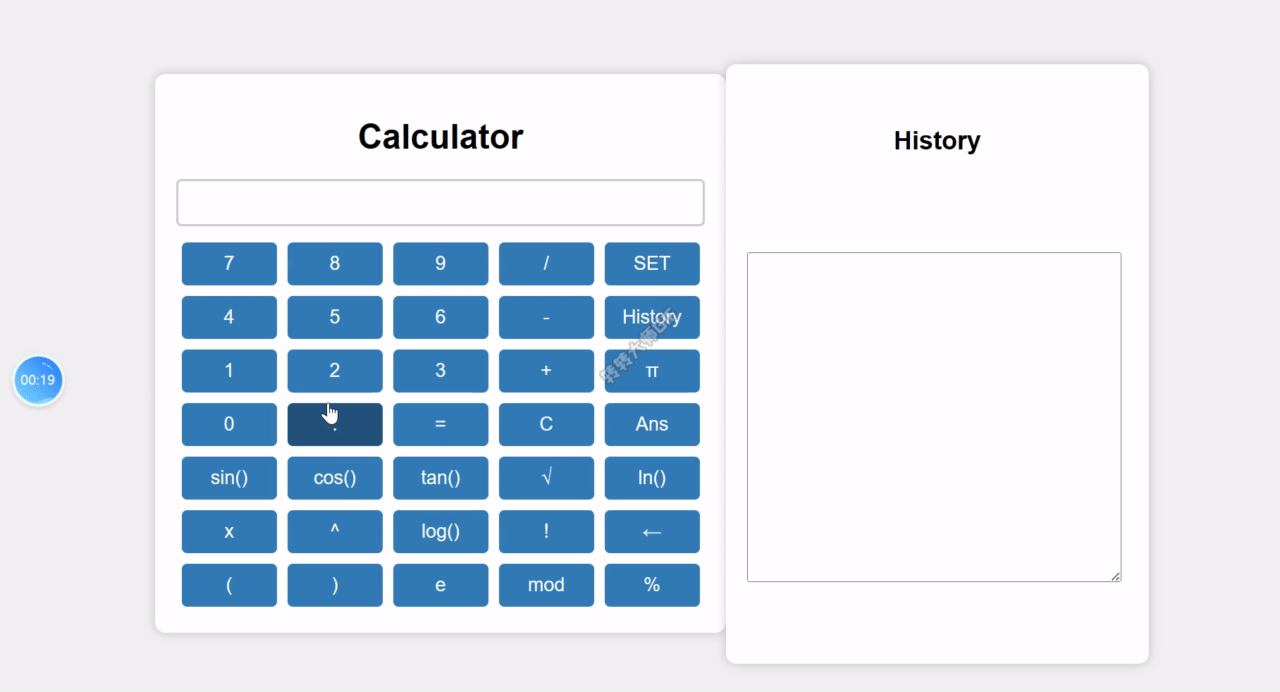
The function chart is below:
When we input the "3+2", then press the "=" button, the result is "5", and the value will be shown on the screen of calculator.

When we input the "3-1", then press the "=" button, the result is "2", and the value will be shown on the screen of calculator.

When we input the "3*2", then press the "=" button, the result is "6", and the value will be shown on the screen of calculator.

When we input the "3/9", then press the "=" button, the result is "0.333333...", and the value will be shown on the screen of calculator.
When we input the "3mod2", then press the "=" button, the result is "1", and the value will be shown on the screen of calculator.

When we input the "cos(0)", then press the "=" button, the result is "1", and the value will be shown on the screen of calculator.

When we input the "log(10)", then press the "=" button, the result is "1", and the value will be shown on the screen of calculator.
When we input the "ln(e)", then press the "=" button, the result is "1", and the value will be shown on the screen of calculator.

When we input the "(3+2)*2", then press the "=" button, the result is "10", and the value will be shown on the screen of calculator.

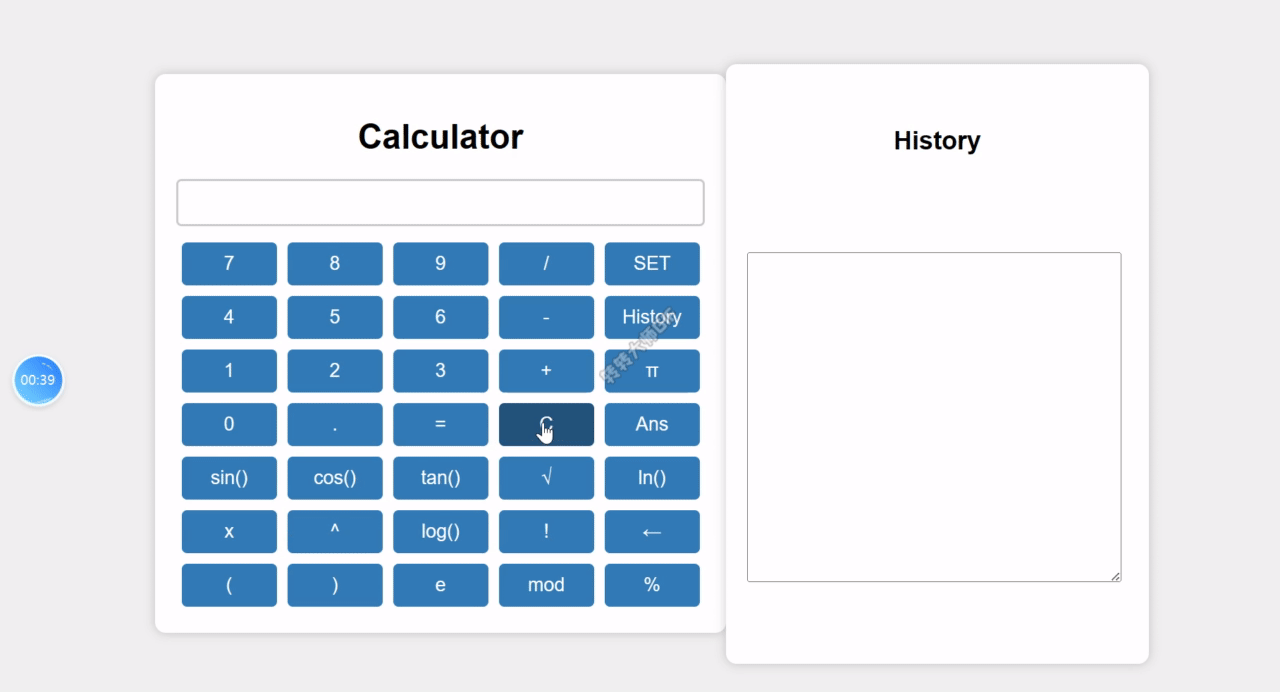
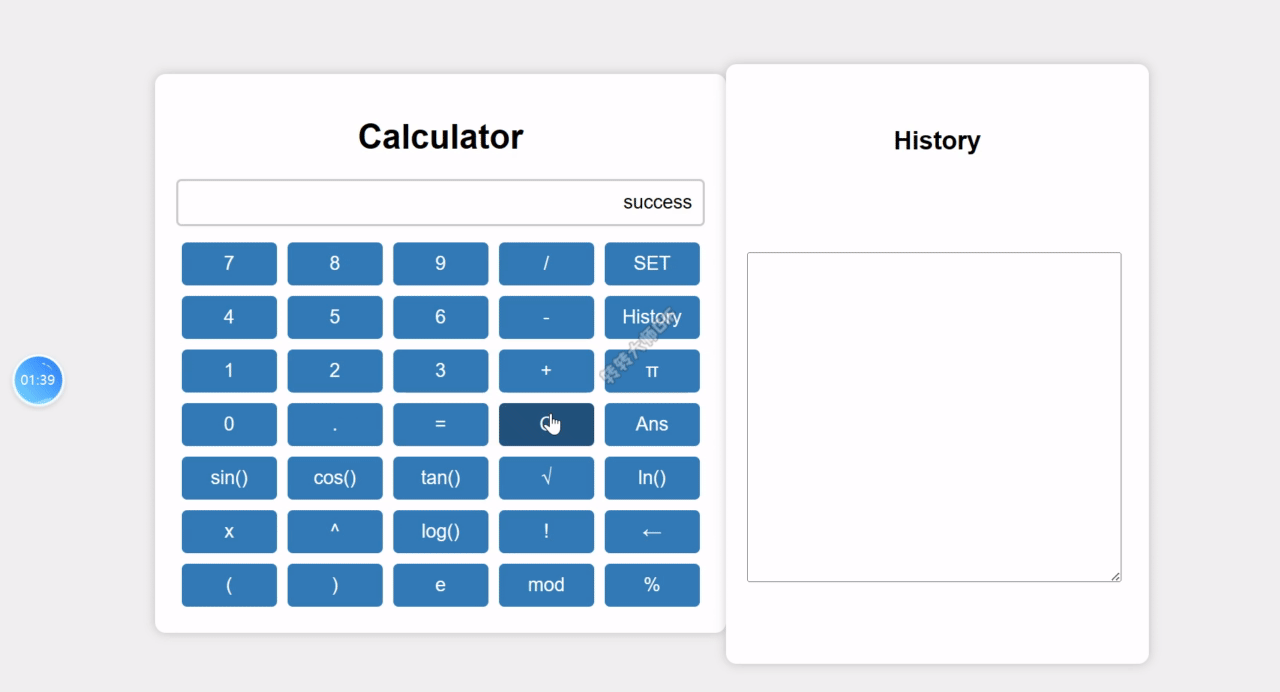
When we input the "(3+2)*2", then press the "=" button, the result is "10", and the value will be shown on the screen of calculator, then we press the "SET" button, the recording will be saved and the screen tells us this operation is successfully.

When we press the "Ans" button, we can find the newst result is "10".
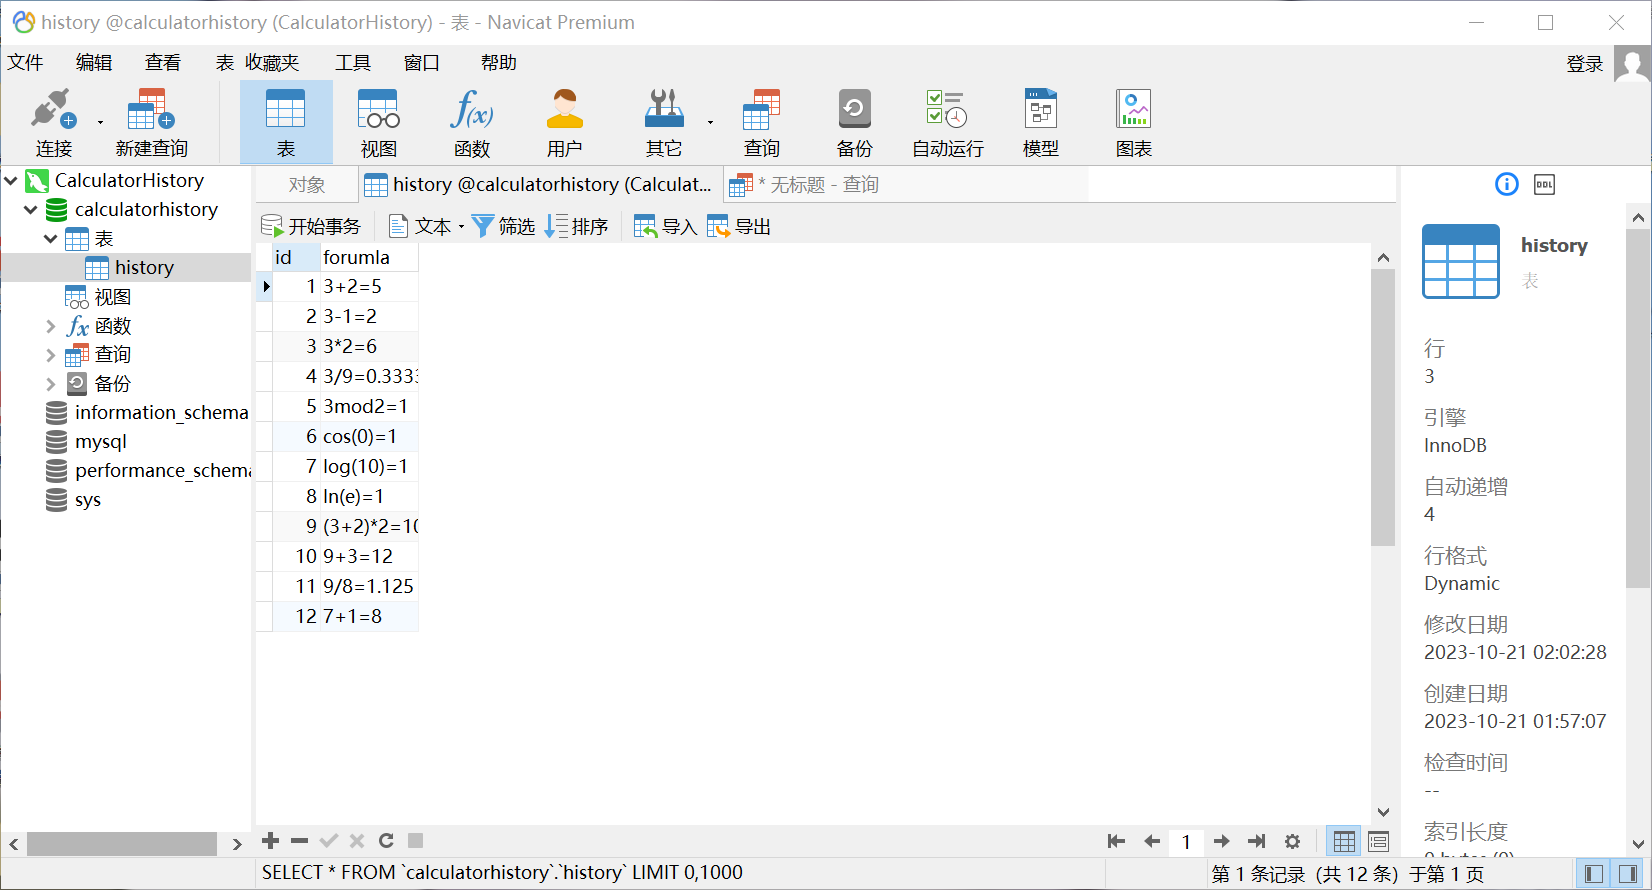
when we press the "History" button, we can find the last ten recordings.
When we input the "3!", then press the "=" button, the result is "6", and the value will be shown on the screen of calculator.

The values we need to save have been put into the database.
First and foremost, I remain the main style of calculator from the first
assignment, but in this calculator I add some new buttons to satisfy more
advIanced functions such as finding the recording of history, this goal is to give a visual UI to the user, users can click the buttons to input the formula which they want to calculate, ensuring responsiveness and user-friendliness. Here’s a key part of the page layout, the main part of calculate is below:
<div id="calculator">
<h1>Calculator</h1>
<input type="text" id="display">
<div class="row">
<button value="7" onclick="appendToDisplay('7')">7</button>
<button value="8" onclick="appendToDisplay('8')">8</button>
<button value="9" onclick="appendToDisplay('9')">9</button>
<button value="/" onclick="appendToDisplay('/')">/</button>
<button value="SET" onclick="setHistory()">SET</button>
</div>
<div class="row">
<button value="4" onclick="appendToDisplay('4')">4</button>
<button value="5" onclick="appendToDisplay('5')">5</button>
<button value="6" onclick="appendToDisplay('6')">6</button>
<button value="-" onclick="appendToDisplay('-')">-</button>
<button value="" onclick="getHistory()">History</button>
</div>
<div class="row">
<button value="1" onclick="appendToDisplay('1')">1</button>
<button value="2" onclick="appendToDisplay('2')">2</button>
<button value="3" onclick="appendToDisplay('3')">3</button>
<button value="+" onclick="appendToDisplay('+')">+</button>
<button value="π" onclick="appendToDisplay('π')">π</button>
</div>
<div class="row">
<button value="0" onclick="appendToDisplay('0')">0</button>
<button value="." onclick="appendToDisplay('.')">.</button>
<button value="=" onclick="getResult()">=</button>
<button value="C" onclick="clearAll()">C</button>
<button value="Ans" onclick="getlast()">Ans</button>
</div>
<div class="row">
<button value="sin" onclick="appendToDisplay('sin(')">sin()</button>
<button value="cos" onclick="appendToDisplay('cos(')">cos()</button>
<button value="tan" onclick="appendToDisplay('tan(')">tan()</button>
<button value="√" onclick="appendToDisplay('√')">√</button>
<button value="ln" onclick="appendToDisplay('ln')">ln()</button>
</div>
<div class="row">
<button value="x" onclick="appendToDisplay('*')">x</button>
<button value="^" onclick="appendToDisplay('^')">^</button>
<button value="log()" onclick="appendToDisplay('log')">log()</button>
<button value="!" onclick="appendToDisplay('!')">!</button>
<button value="←" onclick="DeleteTheLastChar()">←</button>
</div>
<div class="row">
<button value="(" onclick="appendToDisplay('(')">(</button>
<button value=")" onclick="appendToDisplay(')')">)</button>
<button value="e" onclick="appendToDisplay('e')">e</button>
<button value="mod" onclick="appendToDisplay('mod')">mod</button>
<button value="%" onclick="appendToDisplay('*0.01')">%</button>
</div>
</div>
And this below region is called "History", If users choose to check the history, they can click the button "history", and the recordings can be displayed in this region:
<div id="history">
        <h2>History</h2>

        <p>
            <textarea id="recording" cols="50" rows="20"></textarea>
        </p>

    </div>
This is the code for CSS, the funtion of CSS is to give various kinds of color and styles so that giving more comfortable sense to the users
/* CSS styles */
 body {
     font-family: Arial, sans-serif;
     background-color: #f0f0f0;
     display: flex;
     justify-content: center;
     /* Horizontally center align */
     align-items: center;
     /* Vertically center align */
     height: 100vh;
     /* Make the entire page fill the viewport height */
     margin: 0;
 }

 #calculator {
     width: 500px;
     padding: 20px;
     background-color: #fff;
     border-radius: 10px;
     box-shadow: 0 0 10px rgba(0, 0, 0, 0.2);
     margin-bottom: 20px;
 }

 #history {
     width: 360px;
     padding: 20px;
     background-color: #fff;
     border-radius: 10px;
     box-shadow: 0 0 10px rgba(0, 0, 0, 0.2);
     white-space: pre-line;
 }

 #display {
     width: 100%;
     padding: 10px;
     margin-bottom: 10px;
     border: 2px solid #ccc;
     /* Bold border */
     border-radius: 5px;
     font-size: 18px;
     max-width: 100%;
     /* Max width */
     text-align: right;
     /* Right-align text */
     box-sizing: border-box;
     /* Prevent border from adding to width */
 }


 #history h2 {
     text-align: center;
 }

 #calculator h1 {
     text-align: center;
 }

 .row {
     display: flex;
 }

 .row button {
     flex: 1;
     padding: 10px;
     margin: 5px;
     border: none;
     border-radius: 5px;
     background-color: #337ab7;
     color: #fff;
     font-size: 18px;
     cursor: pointer;
 }

 .row button:hover {
     background-color: #23527c;
 }
In the first task, we can achieve some calculating functions in the JavaScript part, but in this type calculator, we need to use the front-back separated technology, so in the javascript part, the main task is to send the request to the server and deliver the data which need to be handled with in the back end, also some other functions will be achieved in this parts: getting the string of formula which input by users, clearing the input, getting the newest result from the history, setting the result into the database, requiring the recent ten recordings from the database. What's more, when users input a mistake character, they can use the delete button to delete the last one.
This part will combine all the numbers and operators we input into the calculator become the string, such as when we input the 3+2 , and the document.getElementById('display').value can be changed into "3+2", this string will be prepared to deliever into the backend later.
function appendToDisplay(value) {
    // Append the user's input value to the display
    const display = document.getElementById('display');
    const startPos = display.selectionStart;
    const endPos = display.selectionEnd;
    const currentValue = display.value;
    const newValue = currentValue.substring(0, startPos) + value +
    currentValue.substring(endPos);
    display.value = newValue;
    display.setSelectionRange(startPos + value.length, startPos + value.length);
    display.focus();
}
This function can clear the content of the input display, when user pressed the 'C' button, the content of display will change into empty.document.getElementById('display').value = ''; means that setting the content of screen of calculator to be empty.According to the id attribute to require the screen.
function clearAll() {
    // Clear the display
    document.getElementById('display').value = '';
}
First of all, the 'temp' is used to store the whole formula string and the 'last' such as when user input the 3+2, then pressing donw the "=" button, the display will show the result in the screen, and the 'temp' will be saved as "3+2=5", and the 'last' will be changed into '5'.
This function also allows the front end send the request to the server and carry the formula which users input to the backend, and in this part, the communication between the front end and the back end is jquery ajax. For this part, I create a formdata which is given by new FormData(), ensuring that I can deliver the formdata from the web page to the server.
In the structure of the 'ajax':
type determines the method of request, the common two ways to request are 'GET' and 'POST' but some other ways also can be used but it may add the OPTIONS reqeust.
'url' determines the address of backend server, In this part, I set the address ('127.0.0.1:8000') to be fixed so that it is convenient for me to test the communicating actions between two parts.
data: the data which we want to deliver will be added into this part.
'success()':I defined a "data" to store the data from the back end, then the main tasks of 'temp' and 'last' be achieved in it, in the end, because the data from the back end is JSON type. so the result of it will be shown in the screen of scientific calculator.
'error:funtion(error)': If the result can't be calculated in the backend or the data can't be sent to the front end, the input screen of calculator will be shown 'Error'.
var temp;
var last;
function getResult() {

  const display = document.getElementById('display');
  const formula = display.value;
  const formData = new FormData();
  formData.append('formula', formula);
  $.ajax({
      type: 'POST',
      url: 'http://127.0.0.1:8000/calculate_result',
      data: { 'formula': formula },
      success: function (data) {
          last = data.result;
          temp = formula + '=' + data.result + ' ';
          document.getElementById('display').value = data.result; // Update the display with the calculated result
      },
      error: function (error) {
          document.getElementById('display').value = 'Error';
      }
  });
And to use the "$ajax", we need to add this one in the head part of HTML page:
<script src="https://code.jquery.com/jquery-3.6.0.min.js"></script>
According to the requirements of task, when users press down the 'Ans', then the input display of will return the last result.For example, when input 3+2 and the result is 5, after I clear the screen then using the 'Ans' button, the 5 will be appreared again.
function getlast() {
    document.getElementById('display').value = last;
}
To extend the various functions, I create a button used for setting the recording into the database in the backend specially. After using the "=" button, finding the result happened on the screen, you can press the "SET" button, and the last recording will be put into the history.
And in this function, I also use the jquery ajax to build the connection of front-back end, the different point is that when the recording will be put into the database successfully, the screen will show "success".
function setHistory() {
    // const display = document.getElementById('display');
    const data = temp;
    const formData = new FormData();
    formData.append('data', data);
    $.ajax({
        type: 'POST',
        url: 'http://127.0.0.1:8000/set_history',
        data: { 'data': data },
        success: function () {
            document.getElementById('display').value = 'success'; // Update the display with the calculated result
        },
        error: function (error) {
            document.getElementById('display').value = 'Error';
        }
    });
}
In the calculator, "History" button can get the history recordings from the back end, and these recordings will be placed in the right part of web page.
function getHistory() {
    const historylist = document.getElementById('history-list');
    $.ajax({
        type: 'POST',
        url: 'http://127.0.0.1:8000/read_history',
        // data: { 'data': data },

        success: function (record) {

            recording.innerHTML = record.result; // Update the display with the calculated result
            recording.innerHTML = recording.innerHTML.replaceAll(" ,", "\n");
        }

    });

}
If users mistakely input the string, they can use the "Ans" button to delete the last character, for example, "3334" will be turnt into "333" after using the button. Using the str to save the original value of screen of calculator, then using the substring(,) function to delete the last character.
function DeleteTheLastChar() {

    var str = document.getElementById('display').value
    document.getElementById('display').value = document.getElementById('display').value.substring(0, str.length - 1)
}
For backend, the first thing I need to do is to consider which frame should be used in this part, in this part, I choose to use the python flask as the back end,the core philosophy of flask is simplicity and lightweightness, and it provides some basic tools and libraries to enable developers to quickly build web applications.the theory of flask are below:
Routing: Flask uses routing to define different pages and endpoints of the application. Developers can specify which function handles specific URL requests using decorators.
View Functions: Each route corresponds to a view function, which handles requests and generates responses. View functions can return HTML pages, JSON data, or other content depending on the application's needs.
Request and Response: Flask encapsulates HTTP request and response objects, allowing developers to easily handle requests sent by clients and return appropriate responses.
Template Engine: Flask integrates the Jinja2 template engine, enabling developers to create dynamically generated HTML pages and insert data into templates.
Plugins and Extensions: The Flask community has developed various plugins and extensions for handling common tasks such as authentication, database connections, and form processing.
'Flask': A micro-framework for creating web applications.
'request': Used for handling HTTP requests in Flask.
'jsonify': Used for returning JSON responses in Flask.
'flask_cors': A Flask plugin for handling cross-origin requests.
're': Module for regular expressions.
'pymysql': A library for interacting with MySQL databases.
'umpy': Used for mathematical operations.
'math': Python's standard math library.
from flask import Flask, request, jsonify
from flask_cors import *
import re
import pymysql
import numpy as np
import math
app = Flask(__name__)
This line initializes a Flask application, allowing you to define routes and handle HTTP requests.
app = Flask(__name__)
Here, a function cors is defined and decorated with @app.after_request. This function configures 'Cross-Origin Resource Sharing (CORS)'' headers to allow any origin ('*'), any HTTP method, and any HTTP headers to make requests to this API. This is important for enabling cross-origin requests from web pages hosted on different domains. It sets permissive headers for origin, methods, and headers to enable communication between different domains.This operation solve the CORS policy, it enable the front end send the connecting request successfully, if no these code, the front page will give the error(455).
@app.after_request
def cors(environ):
    environ.headers['Access-Control-Allow-Origin'] = '*'
    environ.headers['Access-Control-Allow-Method'] = '*'
    environ.headers['Access-Control-Allow-Headers'] = '*'
    return environ
The /calculate_result route listens for POST requests. It extracts the mathematical formula provided in the formula field of the request form.
The formula goes through a series of string replacements to make it suitable for Python evaluation. by using replace(,) function.
eval()' is used to calculate the result of the formula. This function can directly calculate the string as the formula, this function reduce our working pressure greatly.
A JSON response is returned with the calculation result and a success message and the front end will handle with them and put them on the input display of calculator.
This part it can support lots of operations and extending the functions of the scientific calculator.
@app.route('/calculate_result', methods=['POST'])
def get_result():
    data = request.form.get("formula")
    data = data.replace("^", "**")
    data = data.reresultplace("√(", "math.sqrt(")
    data = data.replace("sin(", "np.sin(np.pi/180*")
    data = data.replace("cos(", "np.cos(np.pi/180*")
    data = data.replace("tan(", "np.tan(np.pi/180*")
    data = data.replace("π", "np.pi")
    data = data.replace("e", "np.exp(1)")
    data = data.replace("mod", "%")
    data = data.replace("%", "*0.01")
    data = data.replace("log(", "np.log10(")
    data = data.replace("ln(", "np.log(")
    data = re.sub(
        "(\d+)!", lambda x: "np.math.factorial("+str(x.group(1))+")", data)
    data = eval(data)
    print(data)
    return jsonify({'result': data, 'message': 'success'})
The /set_history route listens for POST requests. It retrieves the "data" field from the form data in the request.
Inside the try block, a connection to a 'MySQL' database is established using the pymysql library. The database credentials are provided in the pymysql.connect call.
A 'cursor (cur)'' is created, and an 'SQL INSERT' statement is prepared to insert the historical data into a table named "history."
The data is inserted into the database using the cursor's execute method, and the changes are committed using conn.commit().
If the operation is successful, a JSON response with a success message is returned and the screen of the calculator will turn to appear "success".
If any errors occur during this process, they are caught in the except block, and an error message is printed to the console (Setting the data FAIL).
The finally block ensures that the database connection is closed, regardless of whether the operation was successful or not.
@app.route('/set_history', methods=['POST'])
def set_history():
   data = request.form.get("data")
   try:
       conn = pymysql.connect(
           host='127.0.0.1', port=3306, user='root', password='1234', db='calculatorhistory'
       )
       print('Setting the data SUCCESSFULLY(设置数据成功)')
       cur = conn.cursor()
       sql = "INSERT INTO history(forumla) VALUES(%s)"
       value = (data)
       cur.execute(sql, value)
       conn.commit()
       return jsonify({'message': 'success'})
   except pymysql.Error as e:
       print('Setting the data FAIL(设置数据失败)'+str(e))

   conn.close()
The /read_history route handles POST requests and aims to retrieve the most recent 10 historical records.
Similar to the /set_history endpoint, it establishes a connection to a 'MySQL' database, creates a cursor, and executes a SELECT SQL query to retrieve historical records.
The query results are fetched using cur.fetchall() and returned as a JSON response with a success message.
Just like in the previous route, any database errors are caught and logged in the except block, and the connection is ensured to be closed in the finally block.
@app.route('/read_history', methods=['POST'])
def read_history():
    try:
        conn = pymysql.connect(
            host='127.0.0.1', port=3306, user='root', password='1234', db='calculatorhistory'
        )
        print('reading the recordings from the history SUCCESSFULLY(数据读取成功)')
        cur = conn.cursor()
        sql = "SELECT * FROM history ORDER BY id DESC LIMIT 0,10"
        cur.execute(sql)
        results = cur.fetchall()

        return jsonify({'result': results, 'message': 'success'})
    except pymysql.Error as e:
        print('reading the recordings from the history FAIL(数据读取失败)'+str(e))
When the script is run directly, it starts the Flask application. The application listens on the local host (127.0.0.1) and port 8000 with debugging enabled. This allows the application to handle HTTP requests and respond.
if __name__ == '__main__':
    app.run(host="127.0.0.1", port=8000, debug=True)
In this task, I choose to use the MySQL database to store the recordings and return them to the front end. These codes are used for building the database:
CREATE TABLE history(
    `id` INT,
        `forumla` VARCHAR(255)

);
alter table user modify id int auto_increment;
"CREATE TABLE history" means create a table whose name is "history";
'id' and 'forumla' are the attributes of the table, "id" is used for recording every results and "forumla" is used to save every results.
"alter table user modify id int auto_increment: " means set the id turn to be increment automatically.
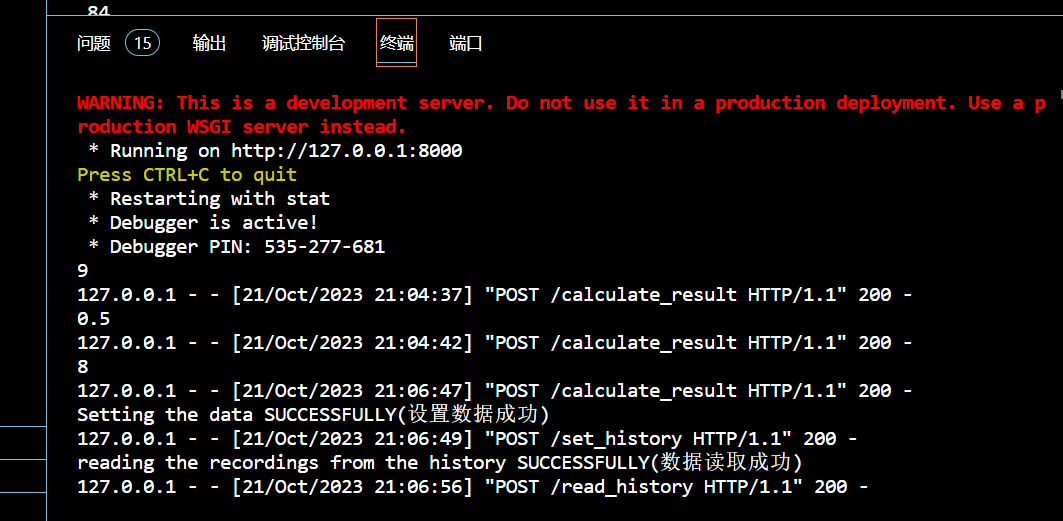
There are some information can illustrate the actions between the frontend and backend, these actions can verify that the connection among the frontend, the backend and database has be built successfully. Here are some examples of displays of console when using this calculator:
This task is basing on the simple calculator of the assignment1, in this task, we were asked to use a common technique of software development: the front end separation pattern, which has the following characteristics:
Front-end and Back-end Separation:
Front-end: The front-end typically encompasses the user interface and user experience of a website or application, usually built using technologies such as HTML, CSS, and JavaScript. Front-end developers are primarily responsible for developing and maintaining these aspects.
Back-end: The back-end is the logical and data processing part of the website or application, including servers, databases, application logic, etc. Back-end developers handle data, security, performance, and more.
Independent Development:
Front-end and back-end developers can work independently with minimal interdependencies, making the development process more efficient as they can focus on their respective areas.
API Integration:
Typically, front-end and back-end communication is achieved through APIs (Application Programming Interfaces). The back-end provides APIs that the front-end uses to fetch data and interact with the back-end. Various communication protocols such as REST, GraphQL, and more can be used.
Security:
Front-end and back-end separation also contributes to improved security. The front-end doesn't handle sensitive data; the back-end is responsible for validating and processing data, reducing the chances of security vulnerabilities.
Team Collaboration:
Front-end and back-end separation facilitates collaboration between multiple teams working on a project simultaneously. Front-end and back-end teams can work in parallel without interfering with each other.
And during this assignment, I learnt how to connect between the front end and the back end, knew some common and useful request techologies such as "jquery ajax", and during the process of design this type calculator, I met the most diffcult problems for me which is how to achieve cross-domain. This problem waste me lots of time, and after researching lots of rescources, I found that setting the proper response header can avoid this problem effectively, what' more, database is a new knowledge for me before starting this task, and I also know the basic theory of database and know some basic operating language of MySQL. However, there are still some things can be improved in the future such as setting the button in the calculation to clear all the history, achieving more advanced functions and so on. And for this target, I will continue to learn more knowledge about the front-back end, and try some other web frame such as Django.
center


