


176
社区成员
 发帖
发帖 与我相关
与我相关 我的任务
我的任务
 分享
分享
This blog is for EE308FZ to show the implementation of Back-end separation calculator programming with addition, subtraction, multiplication, division, zero clearing, power and trigonometric function, exponential function, inverse trigonometric function and ans operations.
| The Link Your Class | https://bbs.csdn.net/forums/ssynkqtd-04 |
|---|---|
| The Link of Requirement of This Assignment | https://bbs.csdn.net/topics/617332156 |
| The Aim of This Assignment | Back-end separation calculator programming |
| MU STU ID and FZU STU ID | 21124868(MU)/832101102(FZU) |
Link to the finished project code:https://github.com/Kev1nForever/Calculator2
| Personal Software Process Stages | Estimated Time(minutes) | Actual Time(minutes) |
|---|---|---|
| Planning | 50 | 60 |
| • Estimate | 50 | 60 |
| Development | 580 | 625 |
| • Analysis | 30 | 30 |
| • Design Spec | 20 | 15 |
| • Design Review | 10 | 15 |
| • Coding Standard | 30 | 35 |
| • Design | 60 | 70 |
| • Coding | 300 | 320 |
| • Code Review | 60 | 75 |
| • Test | 70 | 65 |
| Reporting | 100 | 130 |
| • Test Report | 60 | 80 |
| • Size Measurement | 10 | 10 |
| • Postmortem & Process Improvement Plan | 30 | 40 |
| Sum | 730 | 815 |
This program has implemented:
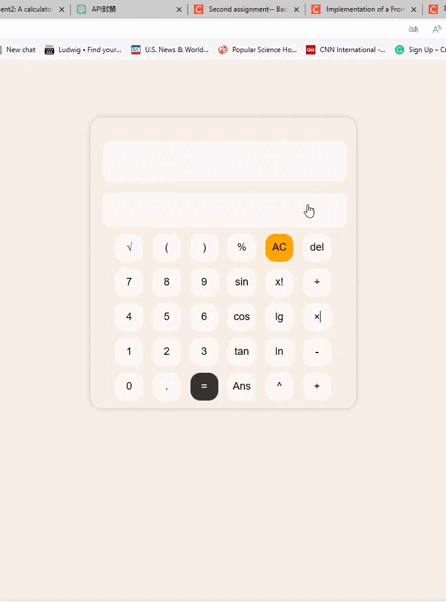
When we click the Ans button, the last ten calculation records are displayed, which can be viewed by scrolling
After calculating in the web calculator, click Refresh, the database synchronizes the data, and the back end is separated

In the front-end of this web calculator, we utilize a combination of HTML, CSS, and JavaScript to create a user-friendly and interactive interface. HTML is employed to structure the web page, creating the layout for the calculator. CSS is used to style the elements, ensuring a visually appealing design. JavaScript is the key to adding functionality, allowing users to input and calculate mathematical expressions.
HTML: It provides the basic structure of the calculator. We use HTML elements like text inputs and buttons to create the user interface. The HTML structure sets the foundation for the user to interact with the calculator.
CSS: CSS is responsible for styling the HTML elements, making the calculator visually appealing and user-friendly. We apply styles like colors, fonts, and layout to create a polished design.
JavaScript: JavaScript brings interactivity to the calculator. It handles user inputs, performs calculations, and displays results in real-time. Through JavaScript, we create event listeners for button clicks, process mathematical expressions, and update the interface dynamically.
On the back-end, Python is the language of choice, and MySQL serves as the database. The back-end is responsible for processing user data, storing historical calculations, and managing user accounts. This separation of front-end and back-end allows for a more organized and scalable system.
Python: Python is used to create the server and handle HTTP requests from the front-end. It processes user input and sends the calculated results back to the front-end. Python also interacts with the MySQL database to store and retrieve user data.
MySQL: MySQL is used as the database management system. It stores historical calculations, user account information, and any other relevant data. When users request their calculation history, Python communicates with MySQL to retrieve the data.
Front-end Development
</head>
<body>
    <div class="calculator">
		<textarea id="display" class="no-scroll" onkeydown="check()"></textarea>
        <input type="text" id="display2" readonly >
        <div class="buttons">
			<button onclick="appendToDisplay('sqrt(')">√</button>
			<button onclick="appendToDisplay('(')">(</button>
			<button onclick="appendToDisplay(')')">)</button>
			<button onclick="appendToDisplay('%')">%</button>
			<button class = "ac" onclick="clearDisplay()">AC</button>
			<button onclick="delToDisplay()">del</button>
			<br>
            <button class="number" onclick="appendToDisplay('7')">7</button>
			<button class="number" onclick="appendToDisplay('8')">8</button>
			<button class="number" onclick="appendToDisplay('9')">9</button>
			<button onclick="appendToDisplay('sin(')">sin</button>
			<button onclick="appendToDisplay('!')">x!</button>
			<button onclick="appendToDisplay('/')">÷</button>

			<br>
            <button class="number" onclick="appendToDisplay('4')">4</button>
			<button class="number" onclick="appendToDisplay('5')">5</button>
			<button class="number" onclick="appendToDisplay('6')">6</button>
			<button onclick="appendToDisplay('cos(')">cos</button>

			<button onclick="appendToDisplay('lg(')">lg</button>

			<button onclick="appendToDisplay('*')">×</button>
			<br>
            <button class="number" onclick="appendToDisplay('1')">1</button>
			<button class="number" onclick="appendToDisplay('2')">2</button>
			<button class="number" onclick="appendToDisplay('3')">3</button>
			<button onclick="appendToDisplay('tan(')">tan</button>

			<button onclick="appendToDisplay('ln(')">ln</button>


			<button onclick="appendToDisplay('-')">-</button>
			<br>
			<button class="number" onclick="appendToDisplay('0')">0</button>
			<button class="number" onclick="appendToDisplay('.')">.</button>
			<button class="equal" onclick="calculateResult()">=</button>
			<button onclick="get_message()">Ans</button>
			<button onclick="appendToDisplay('^')">^</button>
			<button onclick="appendToDisplay('+')">+</button>
		</div>
    </div>
After pressing = or Enter, call calculateResult(),
Create a new XMLHttpRequest object, xhr, to send POST requests to the server.
const xhr = new XMLHttpRequest();
        xhr.open('POST', 'http://localhost:5000/post_history', true);
        xhr.setRequestHeader('Content-type', 'application/json');

        xhr.onreadystatechange = function () {
            if (xhr.readyState === 4 && xhr.status === 200) {
                console.log(xhr.responseText);
            }
        };

        const data = {
        expression: expression,
        result: result
        };
Get the data from the server
const xhr = new XMLHttpRequest();
    xhr.open('GET', 'http://localhost:5000/get', true);
Parse the data into text format, and display it on the page. It is used to fetch compute data from the server and then display this data to the user.
xhr.onreadystatechange = function () {
      if (xhr.readyState === 4) {
        if (xhr.status === 200) {
            Data = JSON.parse(xhr.responseText);
            array = Data['data'];
            let string="";
            for(let i=0;i<array.length;i++){
                string +=array[i][0]+" = "+array[i][1]+"\n";
            }
            document.getElementById('display').value = string;
        } else {
            console.error('获取数据出错: ' + xhr.status);
        }
      }
    };
    xhr.send();
**Back-end Programming Implementation **
Import Flask and pymysql libraries and connect to local databases
from flask import Flask, request, jsonify
from flask_cors import CORS
import pymysql
import datetime

conn = pymysql.connect(
    host = 'localhost',
    port = 3306,
    user = 'root',
    password = 'Hsw123456',
    database = 'caculator'
)
Store expressions and expressions on a local database
data = request.get_json()  # 获取POST请求的JSON数据
        expression = data.get('expression')
        result = data.get('result')

        time = datetime.datetime.now()

        data = (time, expression, result)
        insert = "INSERT INTO history VALUES (%s, %s, %s)" #sql插入语句
        cursor.execute(insert, data)
        conn.commit()
		response_message = "ok"
        return jsonify({"message": response_message})
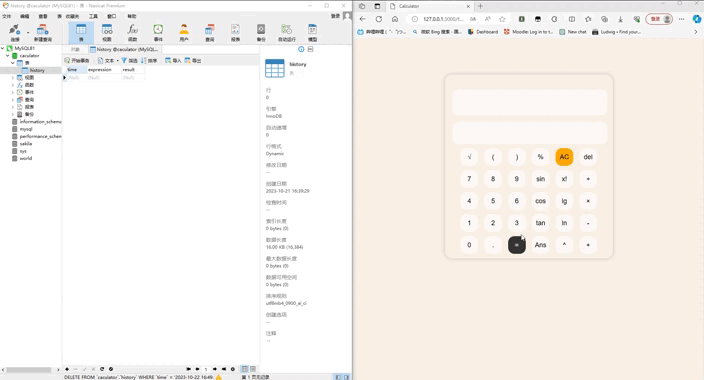
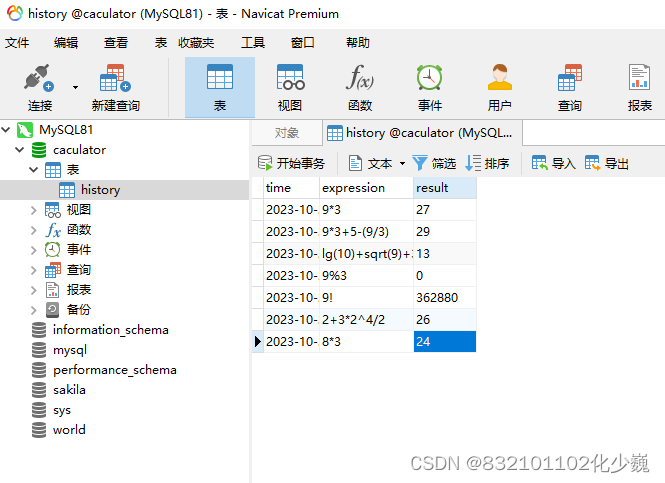
The stored value of the local database is called:
cursor.execute("SELECT expression, result FROM history ORDER BY time DESC LIMIT 10")
        data = cursor.fetchall()
        return jsonify({"data": data})
During this project, I gained a clearer understanding of front-end and back-end interactions and services, and learned how to use databases and information interactions effectively. In the process of development, I have initially mastered the front-end development of HTML, JavaScript, css and the back-end development of flask framework in python, and at the same time, I can use the database for data transmission. In the future, I plan to further improve my front-end and back-end development capabilities.


