


23,642
社区成员
 发帖
发帖 与我相关
与我相关 我的任务
我的任务
 分享
分享EdgeX Foundry (以下统一简称:EdgeX)设备微服务 device-s7 由 YIQISOFT|亿琪软件 贡献给社区,文档也是必不可少的环节,社区要求英文,现翻译成中文,方便国内客户阅读和使用。
该服务的目的是将西门子 S7 PLC 设备连接到 EdgeX。
本页介绍如何将 S7 设备连接到 EdgeX。 在此示例中,我们使用真实设备(例如 S7-1200)。 这提供了一种测试设备服务功能的简单方法。
您可以使用任何可以安装 docker 和 docker-compose 的操作系统。 在本例中,我们使用 Ubuntu 使用 docker 部署 EdgeX。
警告
本页面并不是设置 S7 设备的完整指南,仅介绍了几个重要步骤。
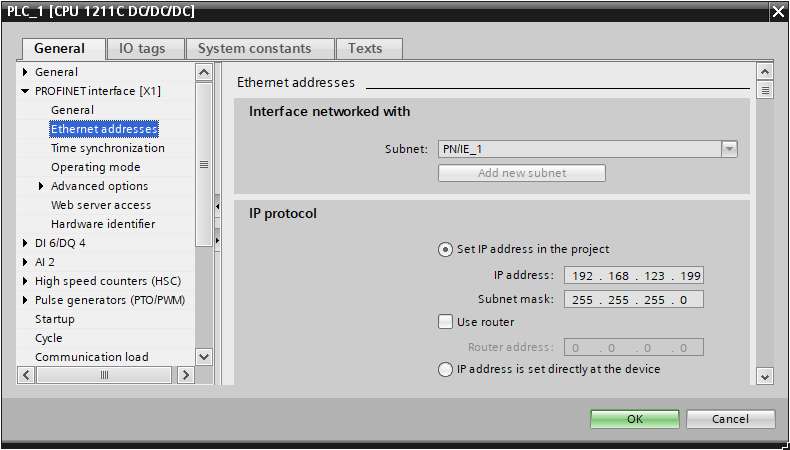
设置 ISO-on-TCP 访问
IP PROTOCOL
设置 Ethernet addresses -> IP protocol, 例如: 192.168.123.199/255.255.255.0
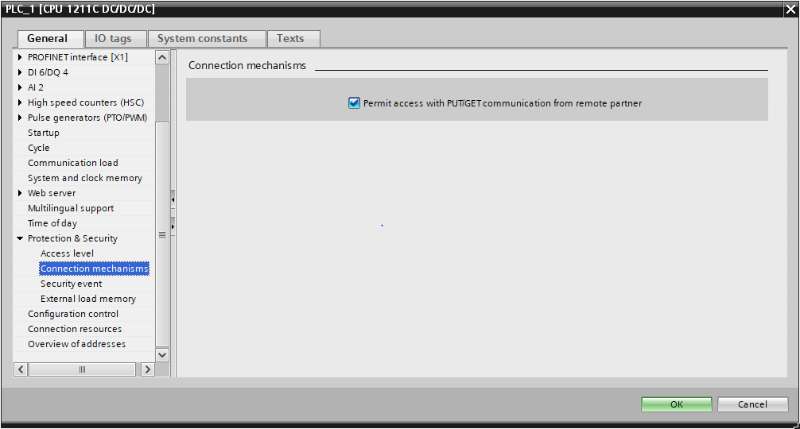
启用 S7 COMMUNICATION 远程访问
启用 Permit access with PUT/GET communication from remote partner.
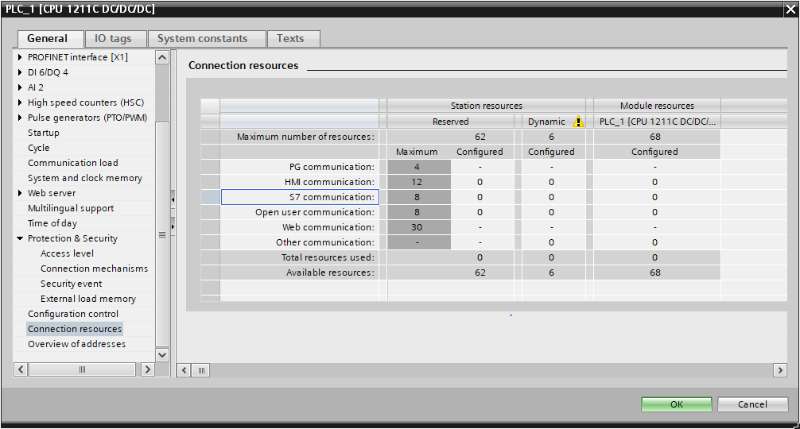
(可选) 保留 S7 COMMUNICATION
S7 Communication 保留和使用的资源数量,“Configured” 为 0,表示 EdgeX 最多可以建立 8 个连接。
提示
重要提示:不要与单个 S7 设备创建超过“6”个连接! 我们需要为 WINCC 保留 “2” 个连接。
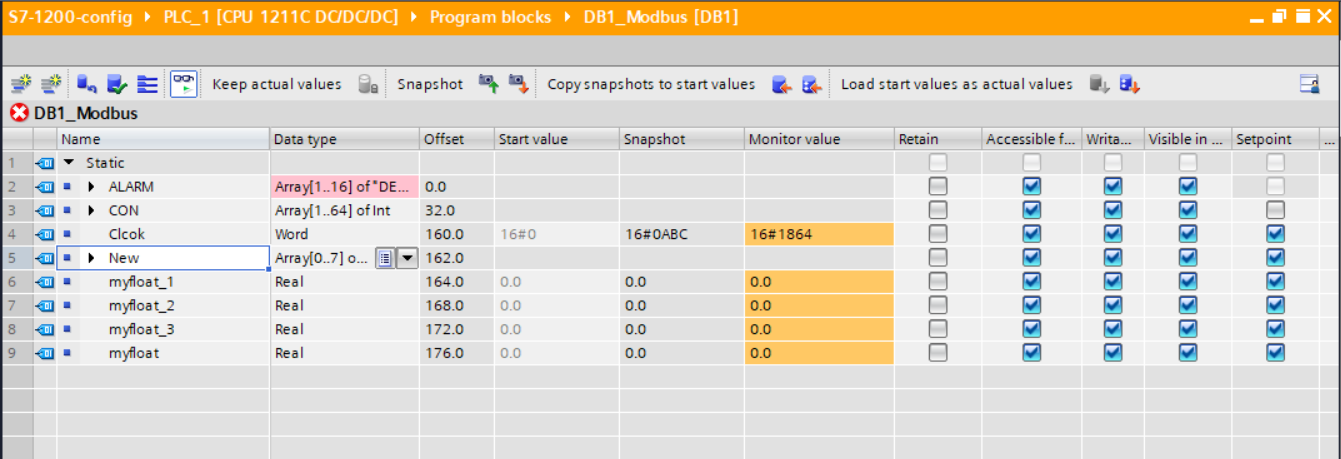
设置数据块 Data Blocks
Data Block 1
在本例子中,只需使用 Clcok 偏移量 160.0 中的进行测试即可。
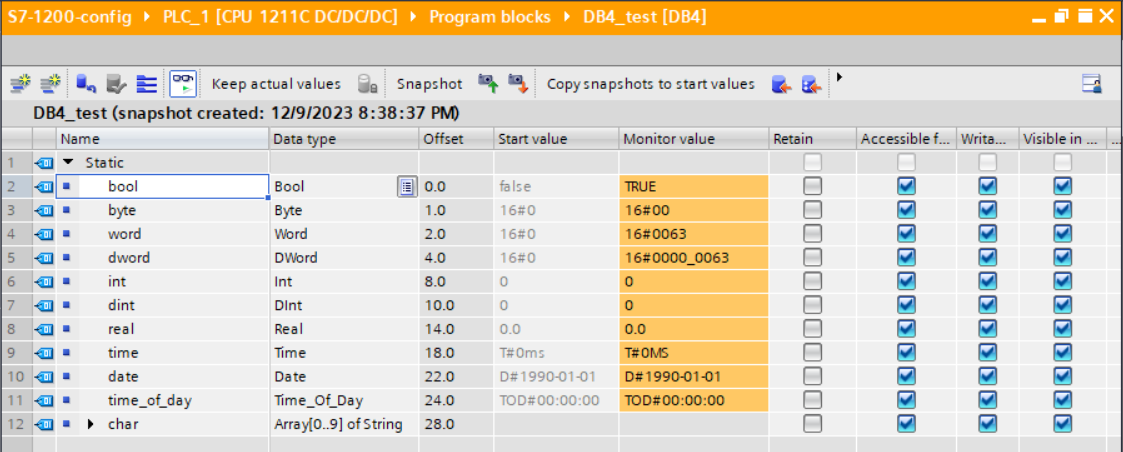
Data Block 4
在本例子中, 使用 bool, byte, word, dword, int, dint, real 作为测试.
以下部分介绍如何在启动服务之前完成设置。
使用预定义的配置进行测试
文件夹中的预定义配置:cmd/res/
预定义 DEVICE PROFILE
设备配置 Device Profile profiles/Simple-Driver.yaml 描述了一个 S7-1200 设备,它包含 8 个资源,如下所示:
name: S7-Device
manufacturer: YIQISOFT
description: Example of S7 Device
model: Siemens S7
labels: [ISO-on-TCP]
deviceResources:
  - name: bool
    description: PLC bool
    isHidden: false
    properties:
      valueType: Bool
      readWrite: RW
    attributes:
      NodeName: DB4.DBX0.0
  - name: byte
    description: PLC byte
    isHidden: false
    properties:
      valueType: Uint8
      readWrite: RW
    attributes:
      NodeName: DB4.DBB1
  - name: word
    description: PLC word
    isHidden: false
    properties:
      valueType: Int16
      readWrite: RW
    attributes:
      NodeName: DB4.DBW2
  - name: dword
    description: PLC dword
    isHidden: false
    properties:
      valueType: Int32
      readWrite: RW
    attributes:
      NodeName: DB4.DBD4
  - name: int
    description: PLC int
    isHidden: false
    properties:
      valueType: Int16
      readWrite: RW
    attributes:
      NodeName: DB4.DBW8
  - name: dint
    description: PLC dint
    isHidden: false
    properties:
      valueType: Int32
      readWrite: RW
    attributes:
      NodeName: DB4.DBW10
  - name: real
    description: PLC real
    isHidden: false
    properties:
      valueType: Float32
      readWrite: RW
    attributes:
      NodeName: DB4.DBD14
  - name: heartbeat
    description: PLC heartbeat
    isHidden: false
    properties:
      valueType: Int16
      readWrite: RW
    attributes:
      NodeName: DB1.DBW160
deviceCommands:
  - name: AllResource
    isHidden: false
    readWrite: RW
    resourceOperations:
      - deviceResource: bool
        defaultValue: 'false'
      - deviceResource: byte
        defaultValue: '0'
      - deviceResource: word
        defaultValue: '0'
      - deviceResource: dword
        defaultValue: '0'
      - deviceResource: int
        defaultValue: '0'
      - deviceResource: dint
        defaultValue: '0'
      - deviceResource: real
        defaultValue: '0'
      - deviceResource: heartbeat
        defaultValue: '0'
该表描述了设备配置文件的每个资源:
| Resource Name | valueType of EdgeX | NodeName | Note(DB: Data Block) |
|---|---|---|---|
| bool | Bool | DB4.DBX0.0 | DB4: DBX0.0: (BOOL) bit 0 of offset 0 |
| byte | Uint8 | DB4.DBB1 | DB4, DBB1: (BYTE) one byte of offset 1 |
| word | Int16 | DB4.DBW2 | DB4, DBW2: (WORD) two bytes of offset 2 |
| dword | Int32 | DB4.DBD4 | DB4, DBD4: (DWORD) four bytes of offset 4 |
| int | Int16 | DB4.DBW8 | DB4, DBW8: (WORD) two bytes of offset 8 |
| dint | Int32 | DB4.DBW10 | DB4, DBW10: (WORD) two bytes of offset 10 |
| real | Float32 | DB4.DBD14 | DB4, DBD14: (REAL) four bytes of offset 14 |
| heartbeat | Int16 | DB1.DBW160 | DB1, DBW160: (WORD) two bytes of offset 160 |
预定义设备配置 DEVICE CONFIGURATION
设备配置 Device Configuration devices/Simple-Device.yaml 描述了如下所示的两种设备。
deviceList:
  - name: S7-Device01
    profileName: S7-Device
    description: Example of S7 Device
    labels: [industrial]
    protocols:
      s7:
        Host: 192.168.123.199
        Port: 102
        Rack: 0
        Slot: 1
        Timeout: 30
        IdleTimeout: 30
    autoEvents:
      - interval: 10s
        onChange: false
        sourceName: AllResource
  - name: S7-Device02
    profileName: S7-Device
    description: Example of S7 Device
    labels: [industrial]
    protocols:
      s7:
        Host: 192.168.123.199
        Port: 102
        Rack: 0
        Slot: 1
        Timeout: 5
        IdleTimeout: 5
    autoEvents:
      - interval: 10s
        onChange: false
        sourceName: heartbeat
设置一个新的配置 Configuration
创建自定义配置文件夹
运行以下命令:
mkdir -p custom-config
设置新的设备配置 DEVICE PROFILE
运行以下命令来创建您的设备配置文件:
cd custom-config
vi new-device-profile.yaml
插入您的设备配置文件定义,这取决于您的 S7 设备配置。
设置设备服务配置 CONFIGURATION
cd custom-config
vi new-device-config.yaml
填写 new-device-config.yaml 文件。
生成 docker compose 文件
git clone https://github.com/edgexfoundry/edgex-compose.git
cd edgex-compose
make gen ds-s7
将自定义配置添加到 docker-compose 文件
将准备好的配置文件添加到 docker-compose 文件中,您可以使用卷挂载它们并更改 device-s7 内部使用的环境。
打开 docker-compose.yml 文件,然后添加卷路径和环境,如下所示:
device-s7:
  ...
  environment:
    ...
    DEVICE_PROFILESDIR: /custom-config
    DEVICE_DEVICESDIR: /custom-config
  volumes:
    ...
    - /path/to/custom-config:/custom-config
由于我们在上一步中生成了 docker-compose.yml 文件,因此我们可以部署 EdgeX,如下所示:
cd edgex-compose/compose-builder
docker compose -p edgex up -d
[+] Running 12/12
 ✔ Container edgex-core-consul                      Started    0.0s
 ✔ Container edgex-ui-go                            Started    0.0s
 ✔ Container edgex-redis                            Started    0.0s
 ✔ Container edgex-core-common-config-bootstrapper  Started    0.1s
 ✔ Container edgex-support-scheduler                Started    0.0s
 ✔ Container edgex-kuiper                           Started    0.0s
 ✔ Container edgex-support-notifications            Started    0.1s
 ✔ Container edgex-core-metadata                    Started    0.1s
 ✔ Container edgex-core-command                     Started    0.0s
 ✔ Container edgex-core-data                        Started    0.0s
 ✔ Container edgex-app-rules-engine                 Started    0.0s
 ✔ Container edgex-device-s7                        Started    0.0s
如果服务已在运行并且您想要添加设备,则可以使用本节中概述的“核心元数据 API”。 如果您按照启动服务之前的设置中的说明设置设备配置文件和服务,则可以跳过此部分。
要在启动服务后添加设备,请完成以下步骤:
curl http://localhost:59881/api/v3/deviceprofile/uploadfile -F "file=@new-device-profile.yml"
确保 S7 设备服务正在运行,如有必要或使用其他设备服务,请调整下面的服务名称以匹配。
使用 POST 将设备添加到 http://localhost:59881/api/v3/device,正文将类似于:
curl http://localhost:59881/api/v3/device -H "Content-Type:application/json" -X POST \
  -d '[
        {
            "apiVersion" : "v3",
            "device": {
                "name": "S7-Device03",
                "description": "Example of S7 Device",
                "adminState": "UNLOCKED",
                "operatingState": "UP",
                "serviceName": "device-s7",
                "profileName": "S7-Device",
                "protocols": {
                    "s7": {
                        "Host": "192.168.123.199",
                        "Port": 102,
                        "Rack": 0,
                        "Slot": 1,
                        "Timeout": 30,
                        "IdleTimeout": 30
                    }
                },
                "autoEvents": [
                    {
                        "interval": "10s",
                        "onChange": false,
                        "sourceName": "AllResource"
                    }
                ]
            }
        }
    ]'
服务名称必须匹配/引用目标设备服务(“device-s7”),并且配置文件名称必须与前面步骤中的设备配置文件名称(“S7-Device”)匹配。
现在我们准备运行一些命令。
查找可执行命令
使用以下查询查找可执行命令:
curl http://localhost:59882/api/v3/device/name/S7-Device03 | json_pp
{
  "apiVersion": "v3",
  "deviceCoreCommand": {
    "coreCommands": [
      {
        "get": true,
        "name": "word",
        "parameters": [
          {
            "resourceName": "word",
            "valueType": "Int16"
          }
        ],
        "path": "/api/v3/device/name/S7-Device03/word",
        "set": true,
        "url": "http://edgex-core-command:59882"
      },
      {
        "get": true,
        "name": "int",
        "parameters": [
          {
            "resourceName": "int",
            "valueType": "Int16"
          }
        ],
        "path": "/api/v3/device/name/S7-Device03/int",
        "set": true,
        "url": "http://edgex-core-command:59882"
      },
      {
        "get": true,
        "name": "real",
        "parameters": [
          {
            "resourceName": "real",
            "valueType": "Float32"
          }
        ],
        "path": "/api/v3/device/name/S7-Device03/real",
        "set": true,
        "url": "http://edgex-core-command:59882"
      },
      {
        "get": true,
        "name": "heartbeat",
        "parameters": [
          {
            "resourceName": "heartbeat",
            "valueType": "Int16"
          }
        ],
        "path": "/api/v3/device/name/S7-Device03/heartbeat",
        "set": true,
        "url": "http://edgex-core-command:59882"
      },
      {
        "get": true,
        "name": "AllResource",
        "parameters": [
          {
            "resourceName": "bool",
            "valueType": "Bool"
          },
          {
            "resourceName": "byte",
            "valueType": "Uint8"
          },
          {
            "resourceName": "word",
            "valueType": "Int16"
          },
          {
            "resourceName": "dword",
            "valueType": "Int32"
          },
          {
            "resourceName": "int",
            "valueType": "Int16"
          },
          {
            "resourceName": "dint",
            "valueType": "Int32"
          },
          {
            "resourceName": "real",
            "valueType": "Float32"
          },
          {
            "resourceName": "heartbeat",
            "valueType": "Int16"
          }
        ],
        "path": "/api/v3/device/name/S7-Device03/AllResource",
        "set": true,
        "url": "http://edgex-core-command:59882"
      },
      {
        "get": true,
        "name": "bool",
        "parameters": [
          {
            "resourceName": "bool",
            "valueType": "Bool"
          }
        ],
        "path": "/api/v3/device/name/S7-Device03/bool",
        "set": true,
        "url": "http://edgex-core-command:59882"
      },
      {
        "get": true,
        "name": "byte",
        "parameters": [
          {
            "resourceName": "byte",
            "valueType": "Uint8"
          }
        ],
        "path": "/api/v3/device/name/S7-Device03/byte",
        "set": true,
        "url": "http://edgex-core-command:59882"
      },
      {
        "get": true,
        "name": "dword",
        "parameters": [
          {
            "resourceName": "dword",
            "valueType": "Int32"
          }
        ],
        "path": "/api/v3/device/name/S7-Device03/dword",
        "set": true,
        "url": "http://edgex-core-command:59882"
      },
      {
        "get": true,
        "name": "dint",
        "parameters": [
          {
            "resourceName": "dint",
            "valueType": "Int32"
          }
        ],
        "path": "/api/v3/device/name/S7-Device03/dint",
        "set": true,
        "url": "http://edgex-core-command:59882"
      }
    ],
    "deviceName": "S7-Device03",
    "profileName": "S7-Device"
  },
  "statusCode": 200
}
执行设置命令
根据url和parameterNames执行 SET 命令,运行 SET 命令时将localhost替换为服务器 IP。
这里我们使用“heartbeat”命令:
curl http://localhost:59882/api/v3/device/name/S7-Device03/heartbeat \
-H "Content-Type:application/json" -X PUT  \
-d '{"heartbeat": "1"}'
{"apiVersion":"v3","statusCode":200}
执行获取命令
运行 GET 命令时,将 localhost 替换为服务器 IP。
这里我们使用“heartbeat”命令:
curl http://localhost:59882/api/v3/device/name/S7-Device03/heartbeat
{
  "apiVersion": "v3",
  "statusCode": 200,
  "event": {
    "apiVersion": "v3",
    "id": "dd56ed66-2874-4d78-af02-753783164b3c",
    "deviceName": "S7-Device03",
    "profileName": "S7-Device",
    "sourceName": "heartbeat",
    "origin": 1702103303160428120,
    "readings": [
      {
        "id": "8324105a-1843-415d-bea7-b61e6d12142c",
        "origin": 1702103303159722671,
        "deviceName": "S7-Device03",
        "resourceName": "heartbeat",
        "profileName": "S7-Device",
        "valueType": "Int16",
        "value": "1"
      }
    ]
  }
}
AutoEvent 在设备定义文件的 autoEvents 部分中定义:
deviceList:
  autoEvents:
    interval: '30s'
    onChange: false
    sourceName: 'heartbeat'
服务启动后,查询 core-data API。 结果显示该服务每“30 秒”自动执行一次命令。
该服务没有设备 SDK 提供的附加配置。 常用设备服务配置请参见设备服务配置部分。
设备 S7 为 ISO-on-TCP 定义以下协议属性。
这些属性位于每个设备定义的协议部分中的“s7”键下。
| Properity | Default value | Note |
|---|---|---|
| Host | N/A | S7 ip address, e.g. 192.168.123.199 |
| Port | N/A | S7 port, e.g. 102 |
| Rack | N/A | Rack number, e.g. 0 |
| Slot | N/A | Slot number, e.g. 1 |
| Timeout | 30 | connect to S7 timeout, seconds |
| IdleTimeout | 30 | connection idle timeout, seconds |
S7 协议属性示例
...
"protocols": {
    "s7": {
        "Host": "192.168.123.199",
        "Port": 102,
        "Rack": 0,
        "Slot": 1,
        "Timeout": 30,
        "IdleTimeout": 30
    }
}
...
该服务继承了 SDK 中的通用设备服务 API API。
Device S7 的源代码可以在 https://github.com/edgexfoundry-holding/device-s7 中找到。
在 S7 设备资源使用带有“Int16”数字的“WORD”数据类型的用例中,“WORD”有两个字节,应转换为整数。
以下来自设备配置文件的摘录将“NodeName”DB4.DBW2 定义为“valueType”Int16:
示例 - 设备配置文件
name: S7-Device
manufacturer: YIQISOFT
description: Example of S7 Device
model: Siemens S7
labels: [ISO-on-TCP]
deviceResources:
    - name: word
    description: PLC word
    isHidden: false
    properties:
        valueType: Int16
        readWrite: RW
    attributes:
        NodeName: DB4.DBW2
读取命令执行如下:
写入命令执行如下:
您通常需要随时转换数据,因为 S7 设备仅接收其特定的数据类型。
支持的转换如下:
From NodeName | Bit(s) | To valueType | Address Sample |
|---|---|---|---|
| Bool | 1 | Bool | DB1.DBX0.0 |
| Byte | 8 | Uint | DB1.DBB1 |
| Word | 16 | Int16 | DB1.DBW2 |
| DWord | 32 | Int32 | DB1.DBD4 |
| Int | 16 | Int16 | DB1.DBW6 |
| DInt | 32 | Int32 | DB1.DBD8 |
| Real | 32 | Float32 | DB1.DBD20 |

