


173
社区成员
 发帖
发帖 与我相关
与我相关 我的任务
我的任务
 分享
分享| Course for This Assignment | 2401_MU_SE_EE308 |
|---|---|
| Student ID | FZU:832201115 MU:22126678 |
| Assignment Requirements | Design a front-end and back-end separated contact |
| Objectives of This Assignment | Exercise independent learning ability and learn the basic knowledge of software development |
| Other References | https://developer.aliyun.com/article/850913 |
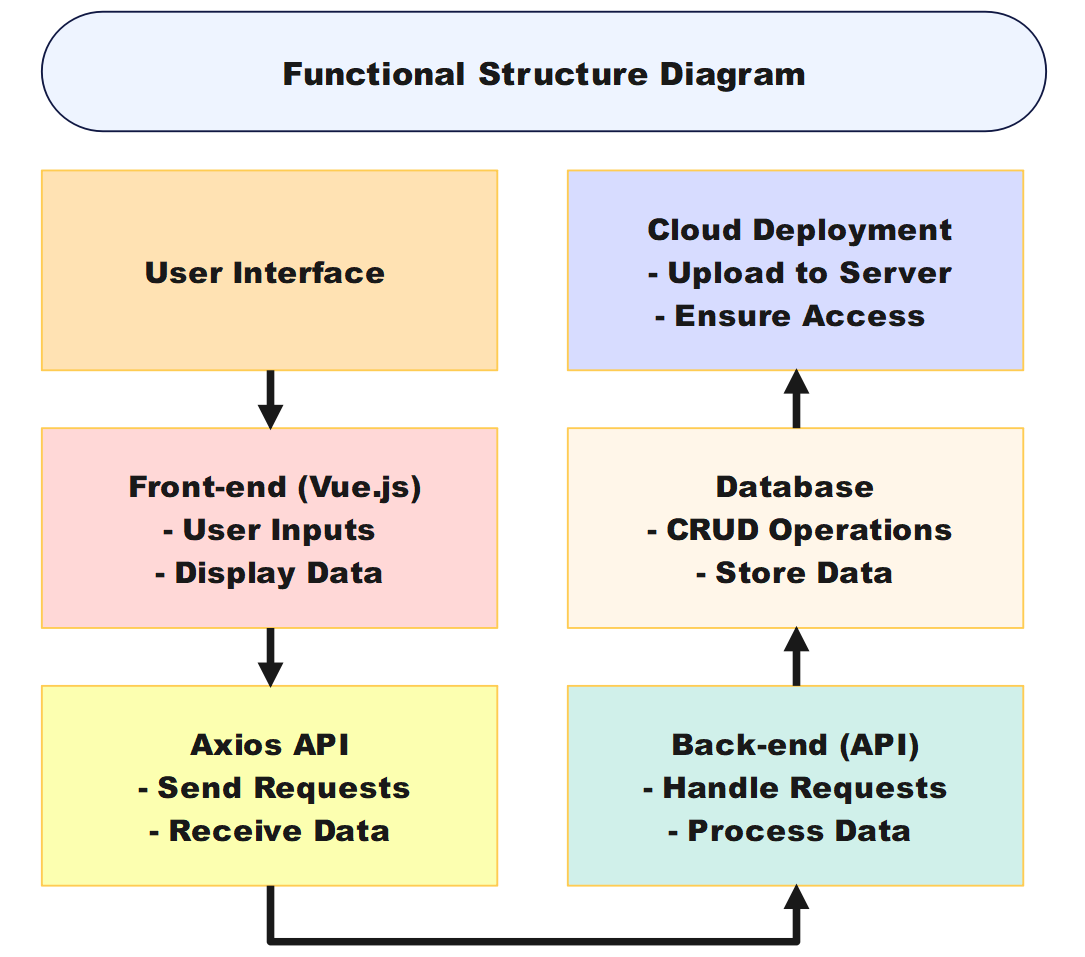
The first assignment for Software Engineering requires the implementation of a front-end and back-end separated address book, which primarily includes three basic functions: first, the contact adding function, which requires adding information such as name and phone number, and storing it in the back-end database; second, when modifying contact information, it must be read from the back-end database, with caching prohibited; finally, when deleting contact information, it must also be processed from the back-end database. After completing the basic functions, the project needs to be deployed to a cloud server.
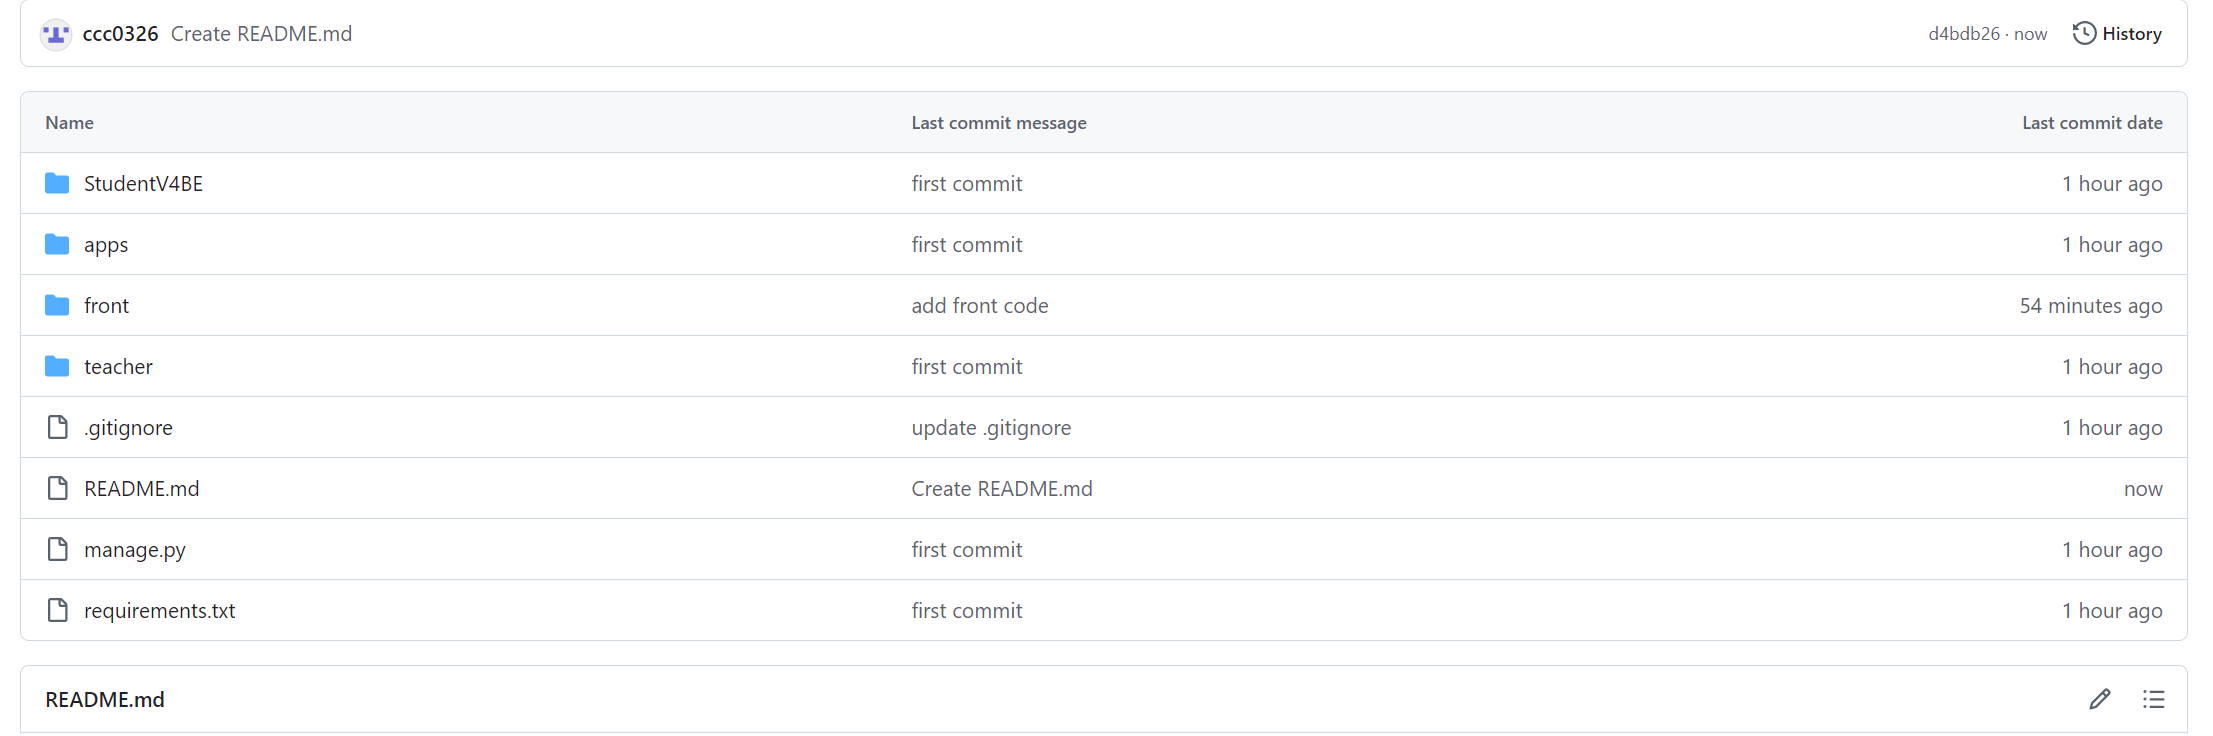
In this blog post, I will provide a detailed overview of my project, including the final product, code design, and implementation process. The code can be found in my repository. Please note that sensitive information, such as passwords, has been hidden, and the front-end code is located in the Front folder of the repository. You can find at 832201115_Concacts_GitHub Repository

Coding Standards Link and Useful Link:
I recorded the estimated and actual time to develop each module of the program in the PSP sheet.
| Modules | Task Description | Estimated Time | Actual Time |
|---|---|---|---|
| Demand Analysis | Determine the requirements of the web page and the functions that can be achieved | 2 hour | 2 hour |
| Database Design | Design database schema, including contact information | 9 hours | 7 hours |
| Backend Development | Create a Spring Boot application and write an interface | 20 hours | 22 hours |
| Front-end Development | Page design, front-end development using JS | 10 hours | 13 hours |
| Test | Test whether the web page meets expectations | 2 hour | 5 hours |
| Deploy | Deploy the application to the server (Alibaba Cloud) | 2 hours | 4 hours |
| Total | 45 hours | 53 hours |
After the project is successfully deployed to the cloud server, you can access the project through the following link: http://121.41.86.73/.
Next, I will demonstrate my project with pictures and text to show its functions.
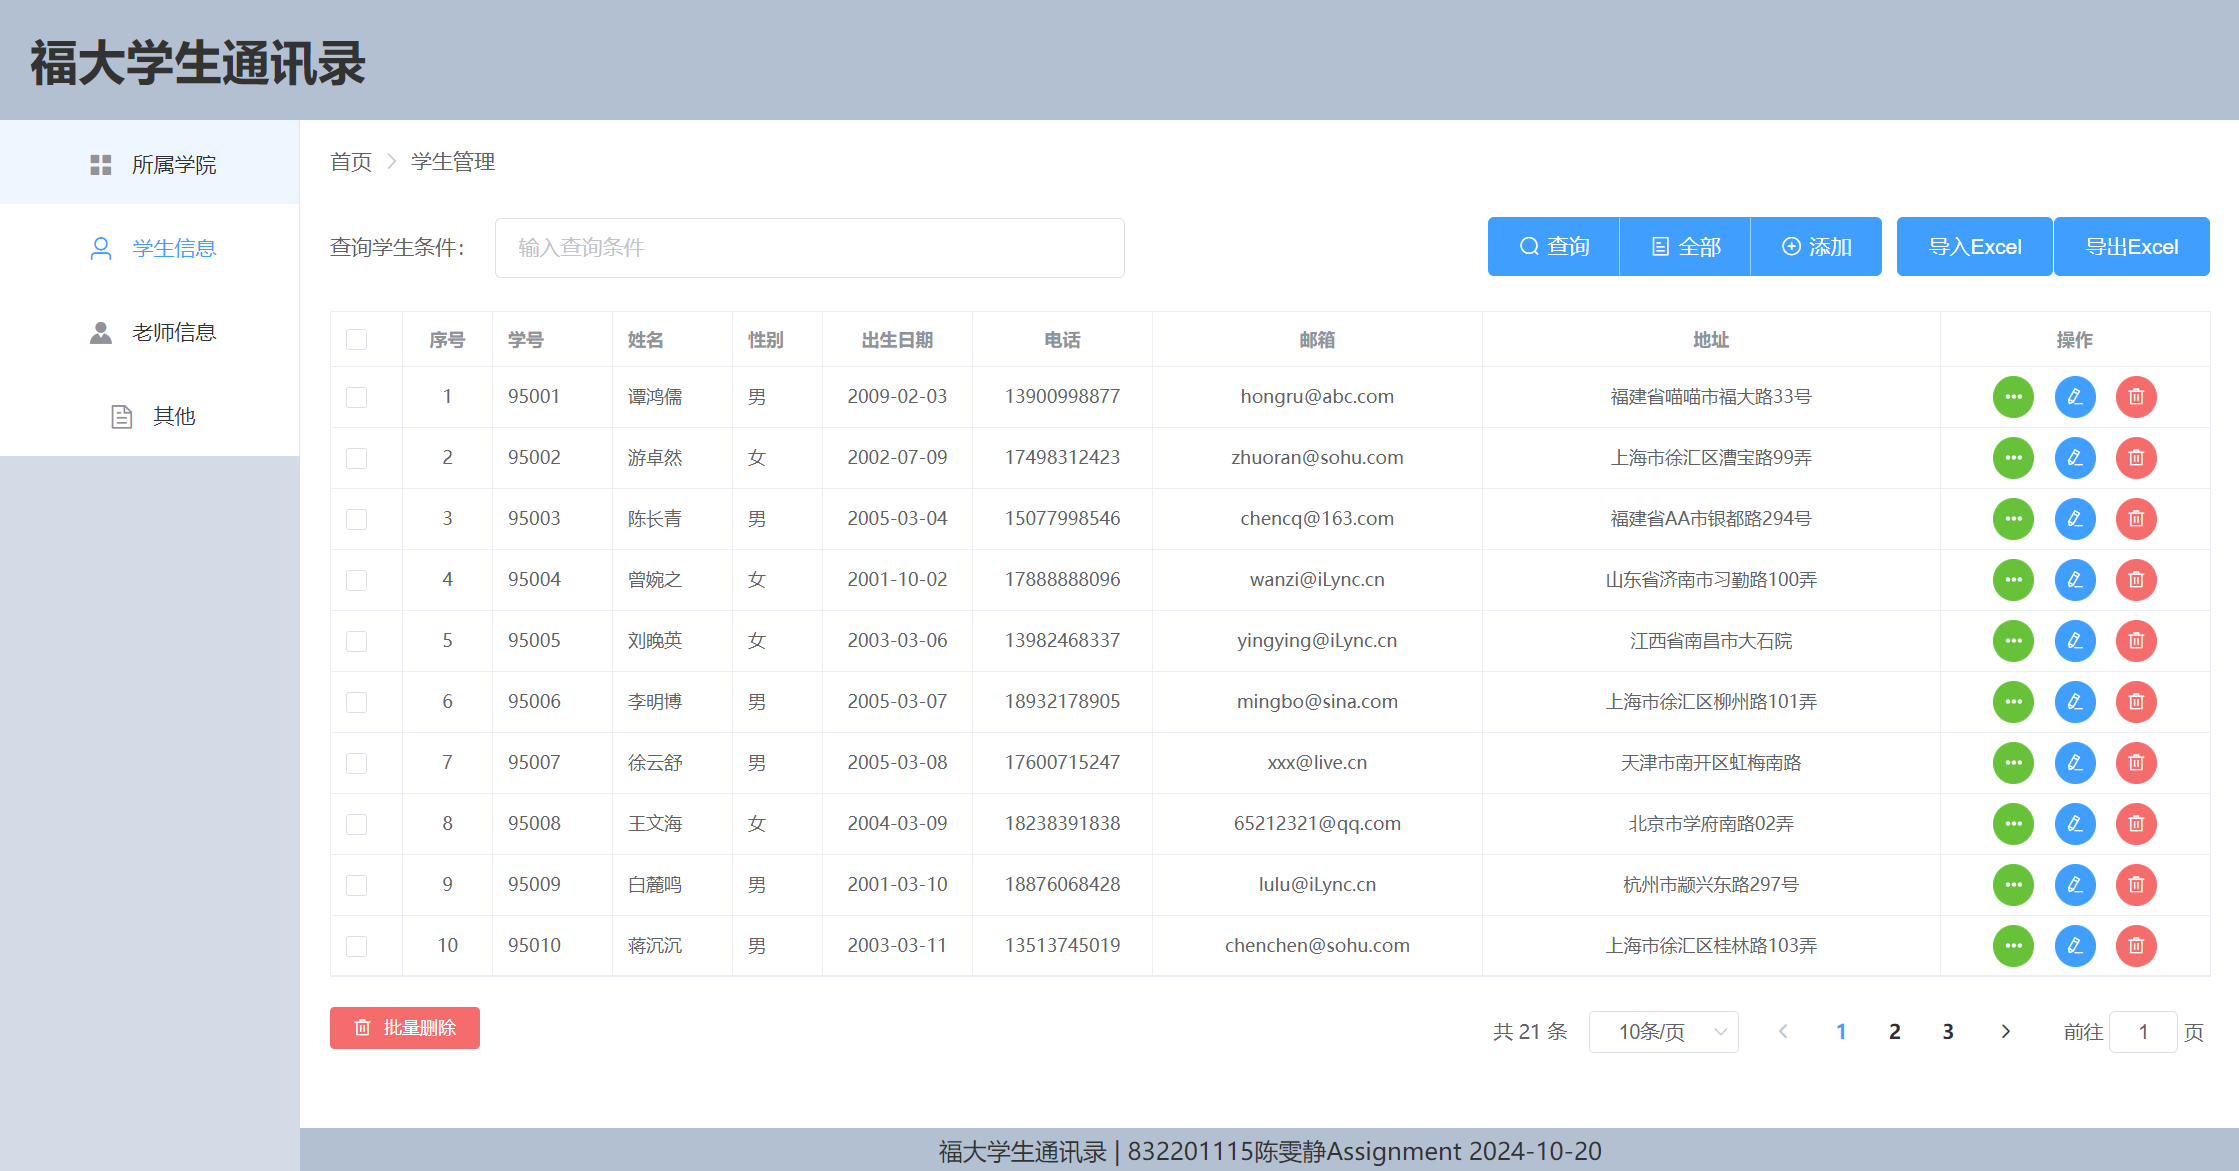
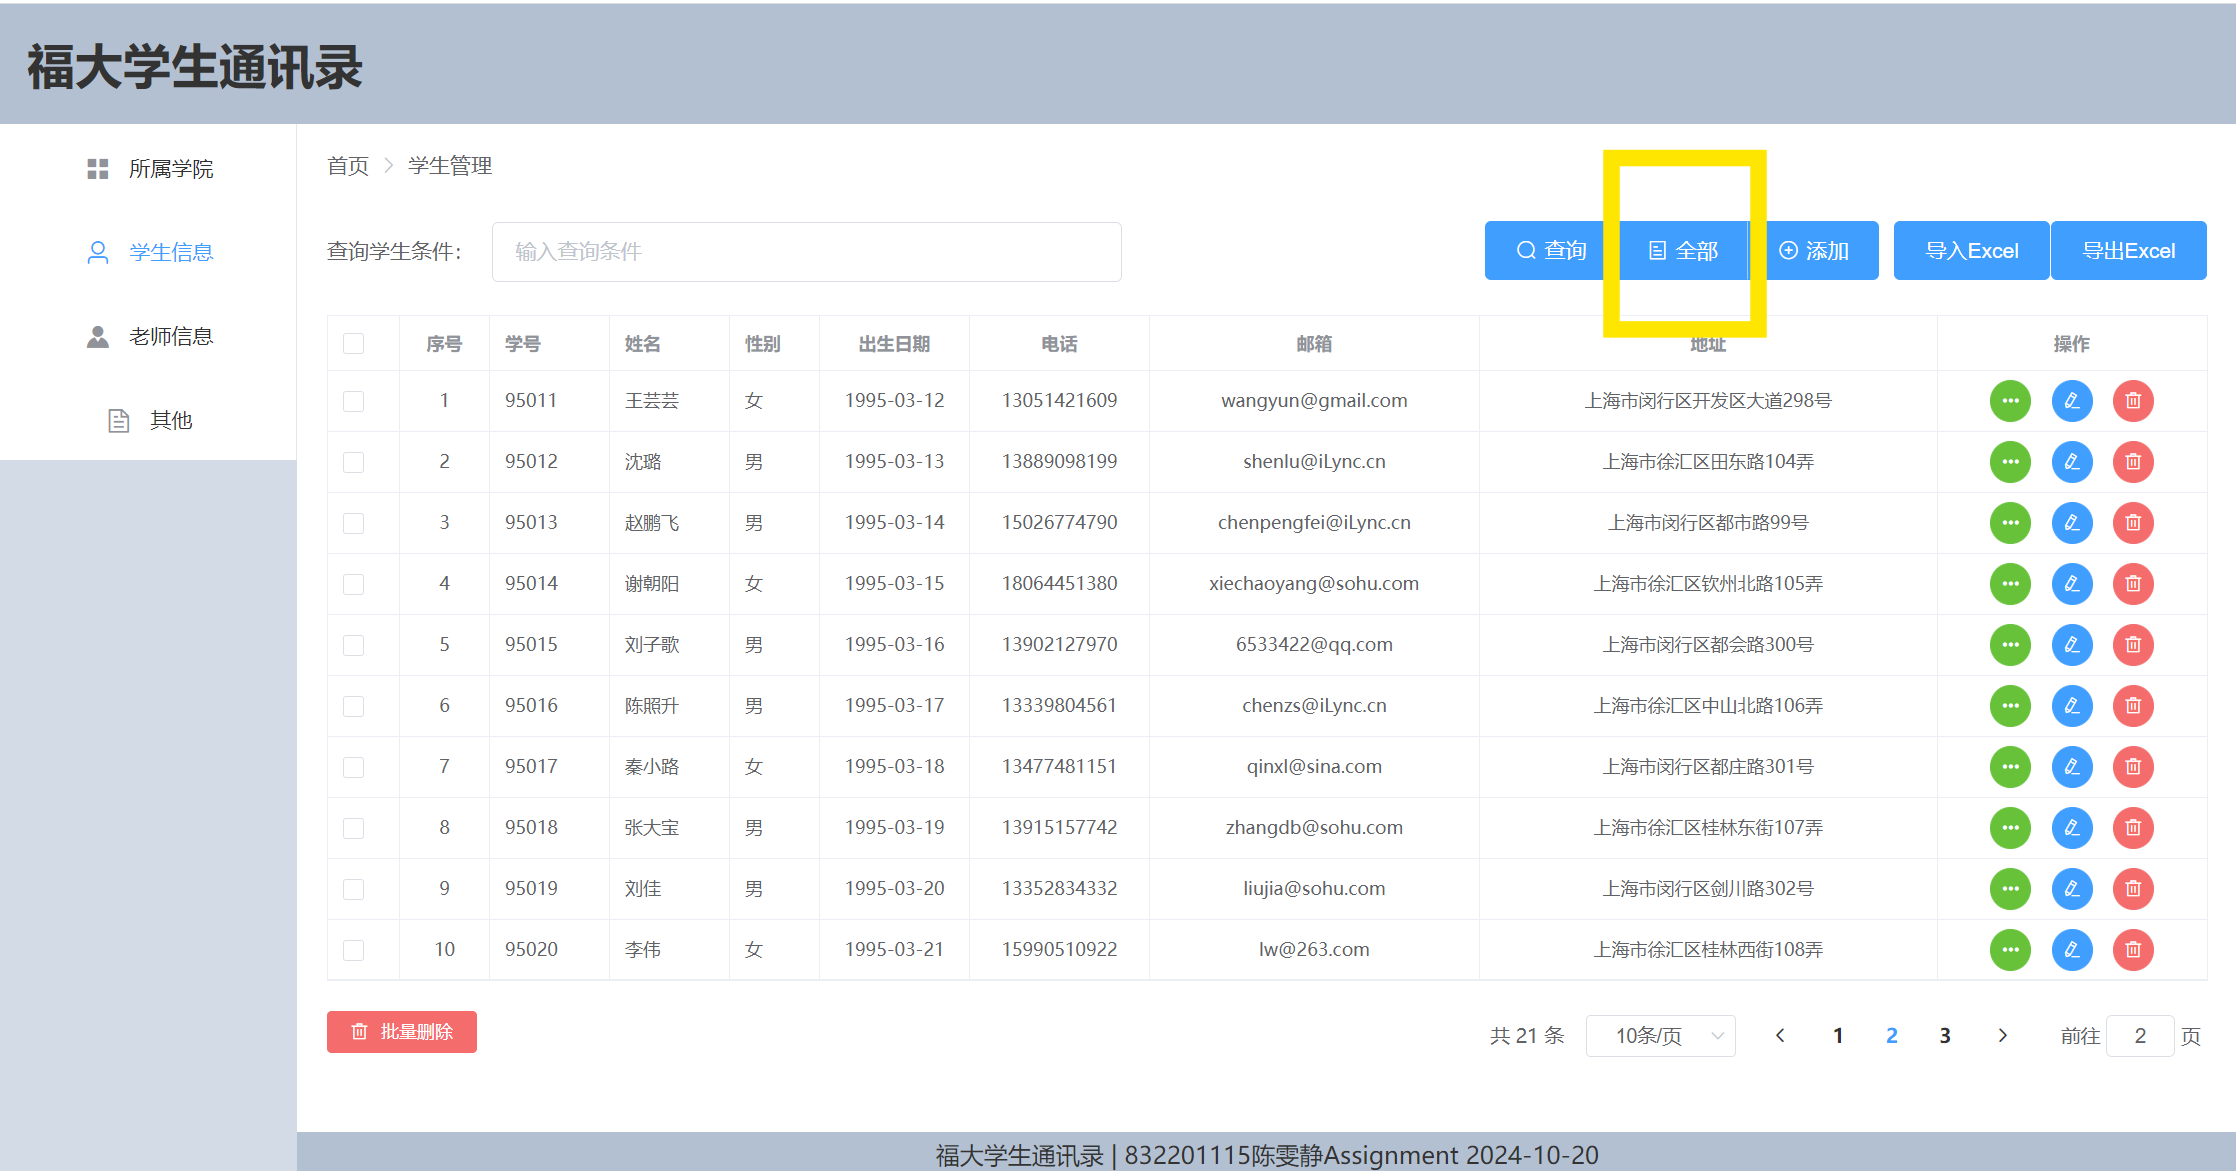
Step 1:User Interface
When you visit http://121.41.86.73/, you will see this interface:
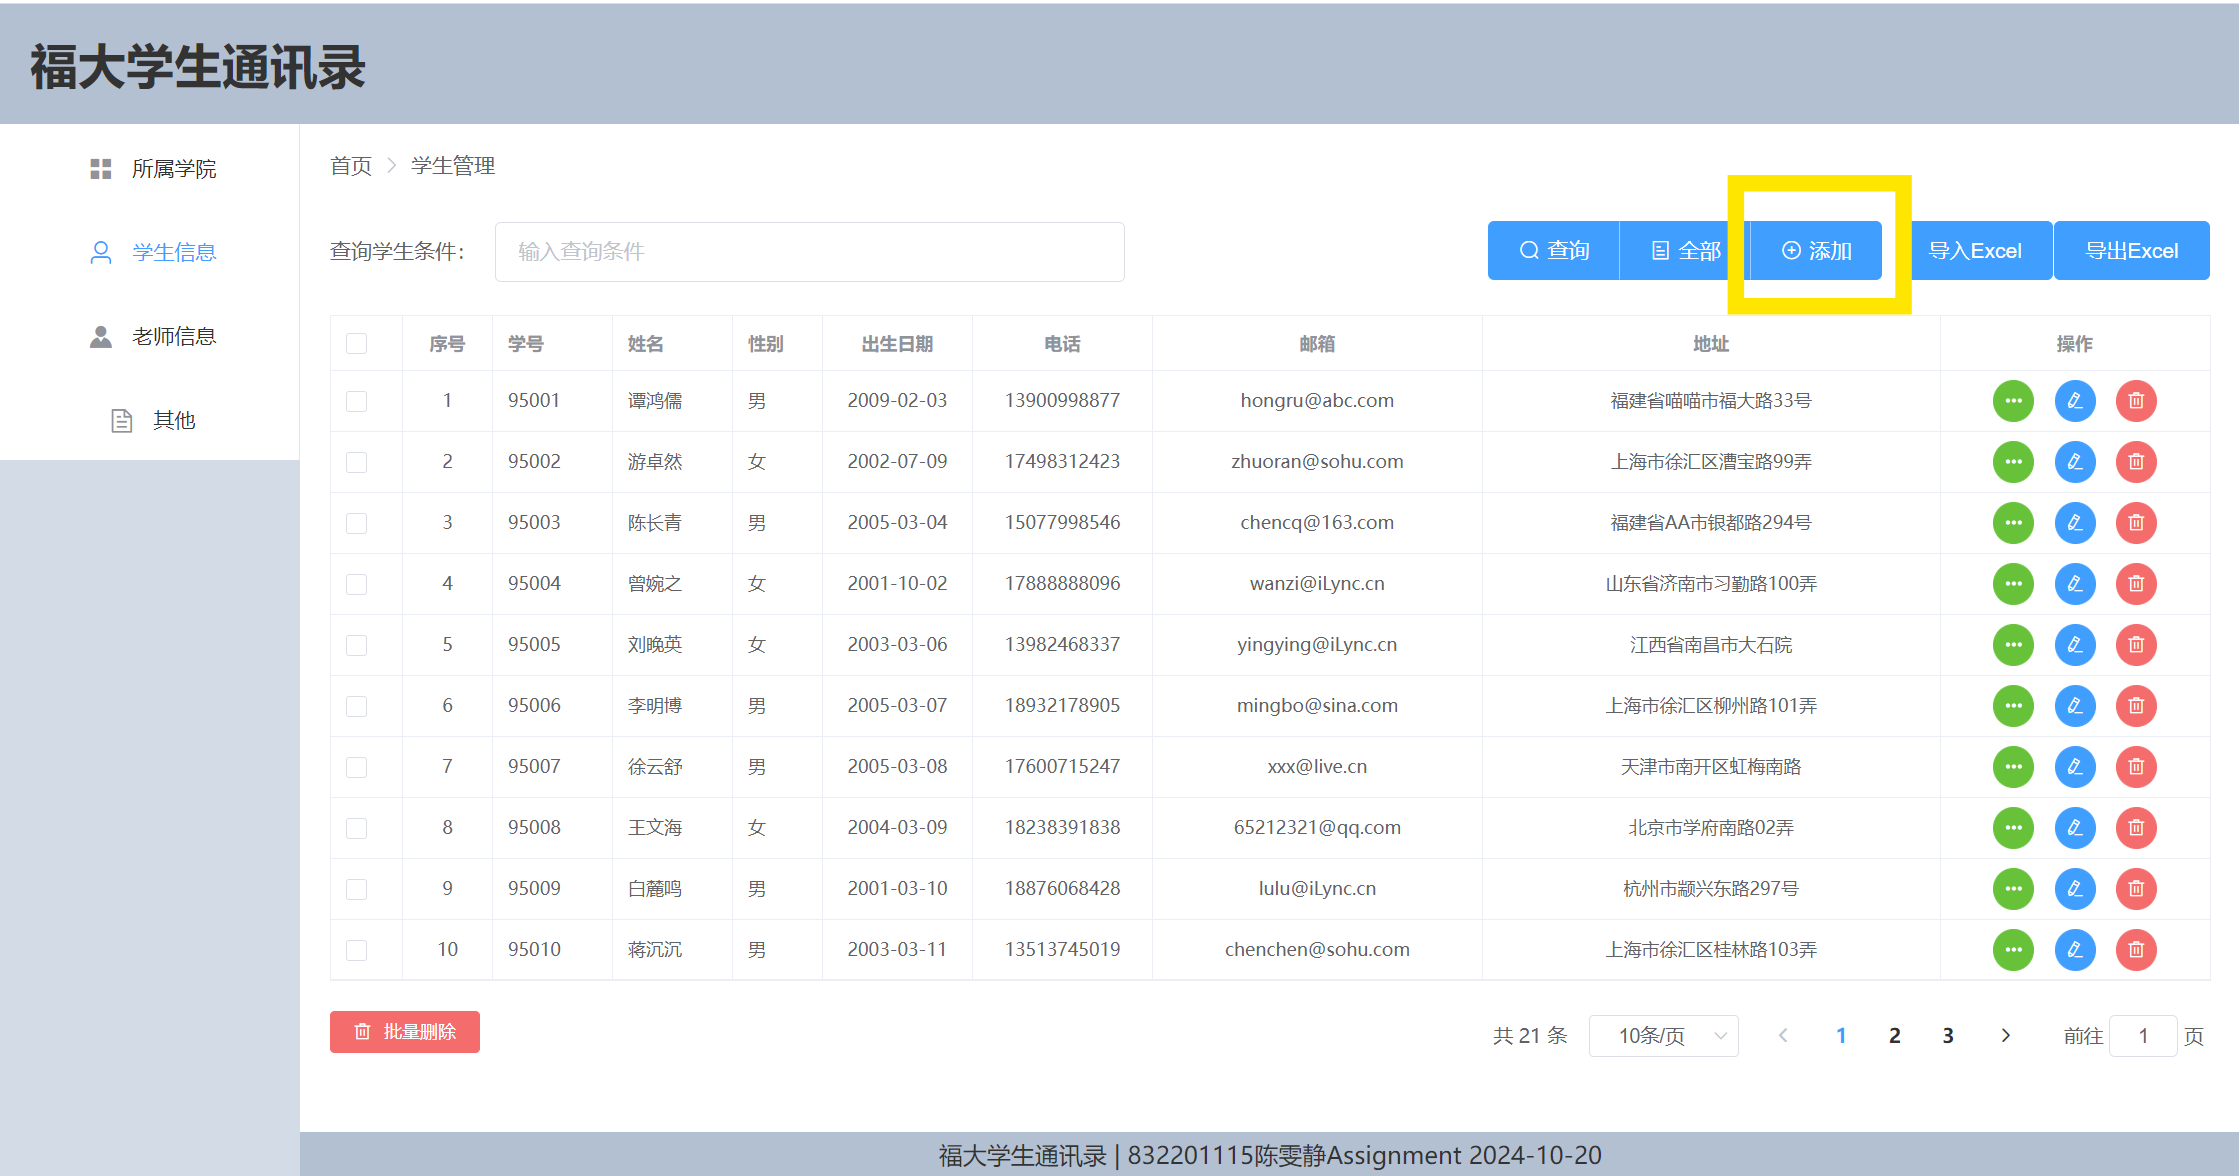
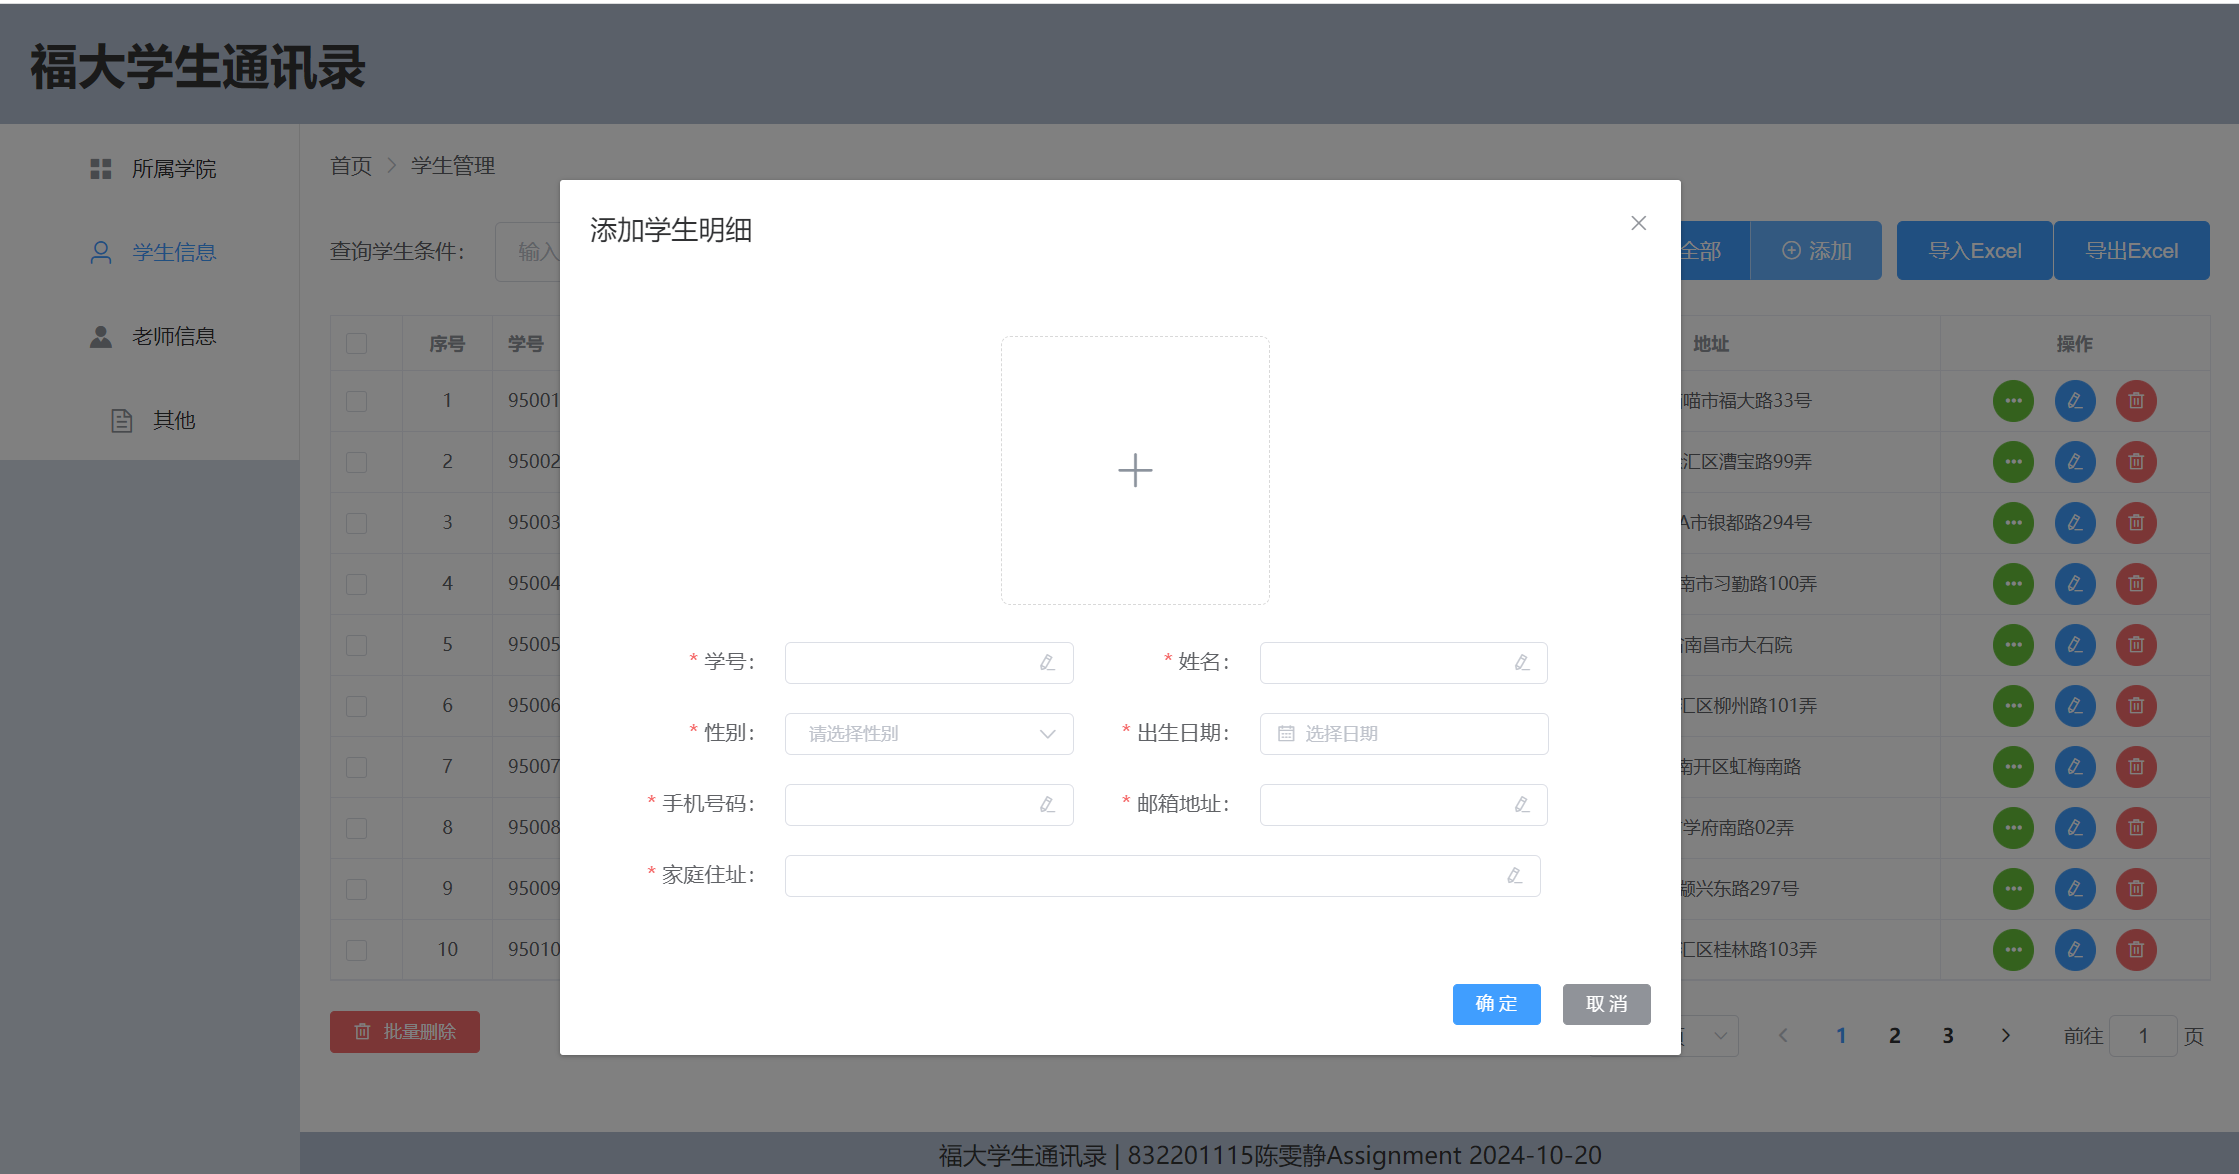
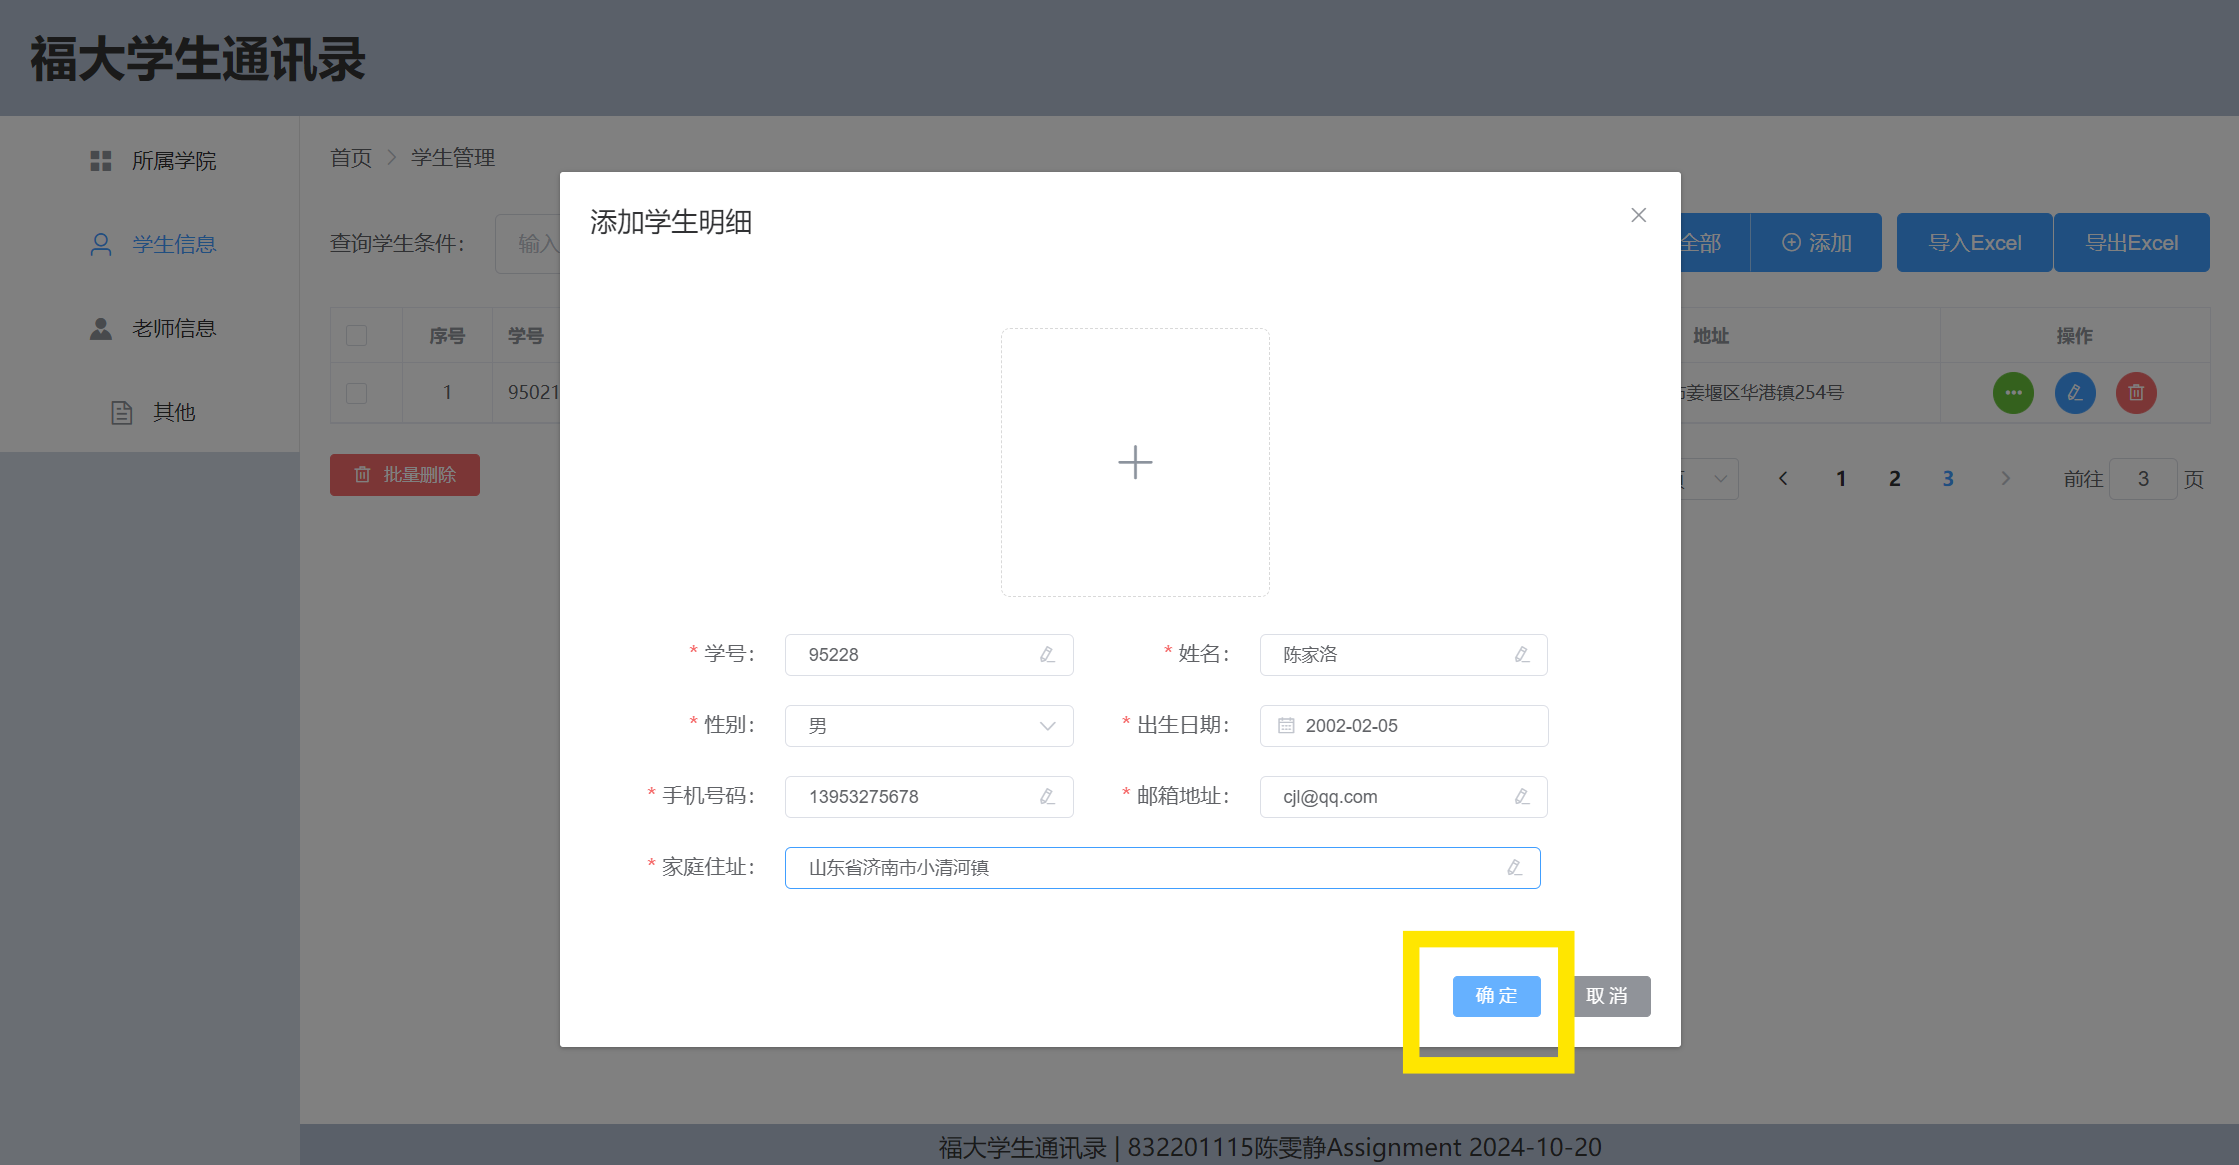
Step 2: Adding
You can add new student information by clicking the "Add" button in the upper right corner. You can enter information to save the contact.
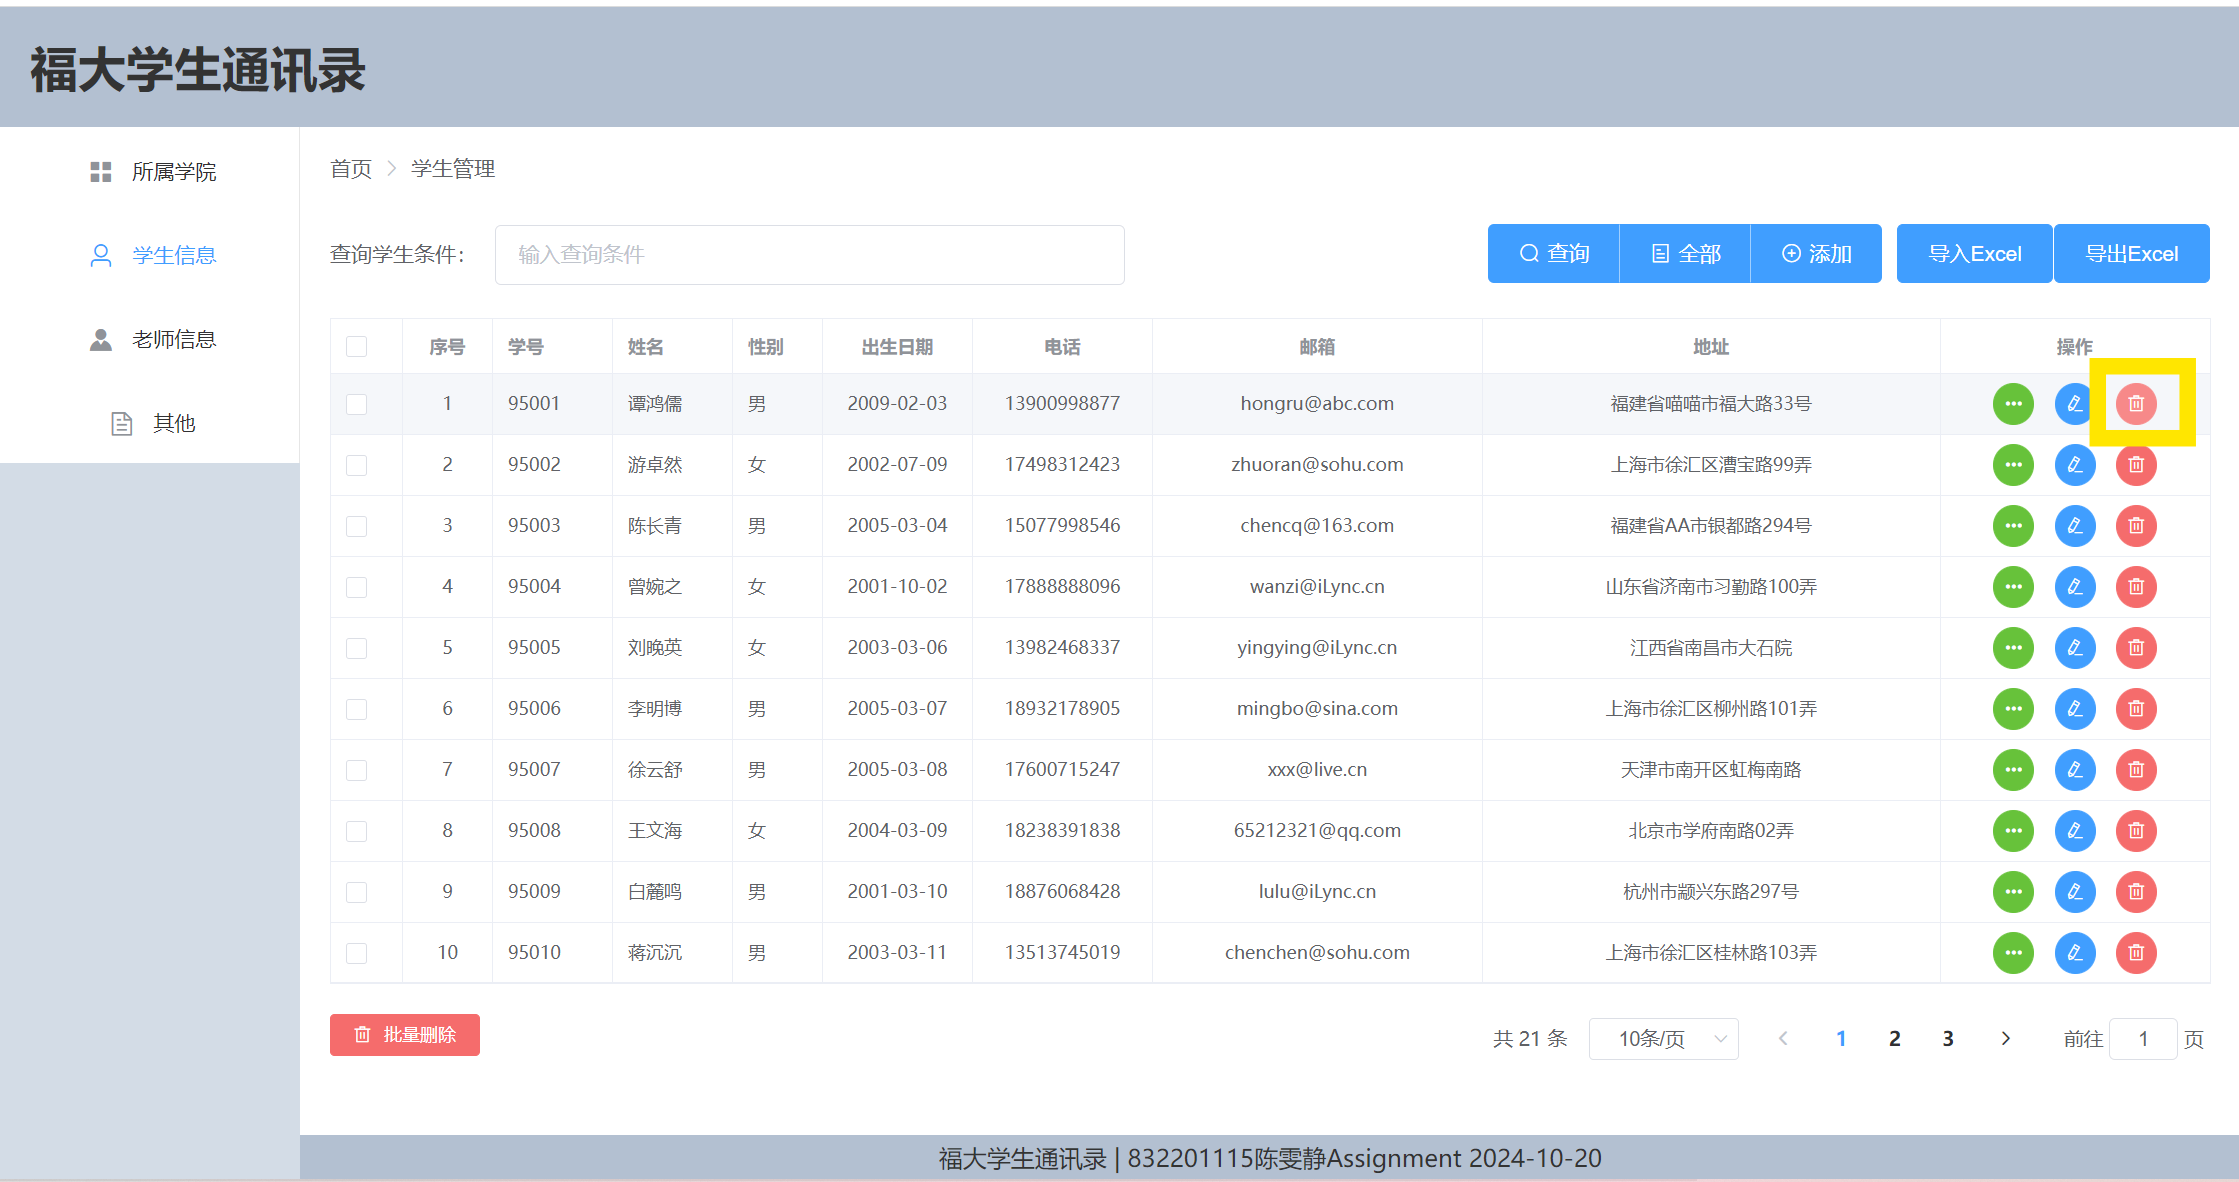
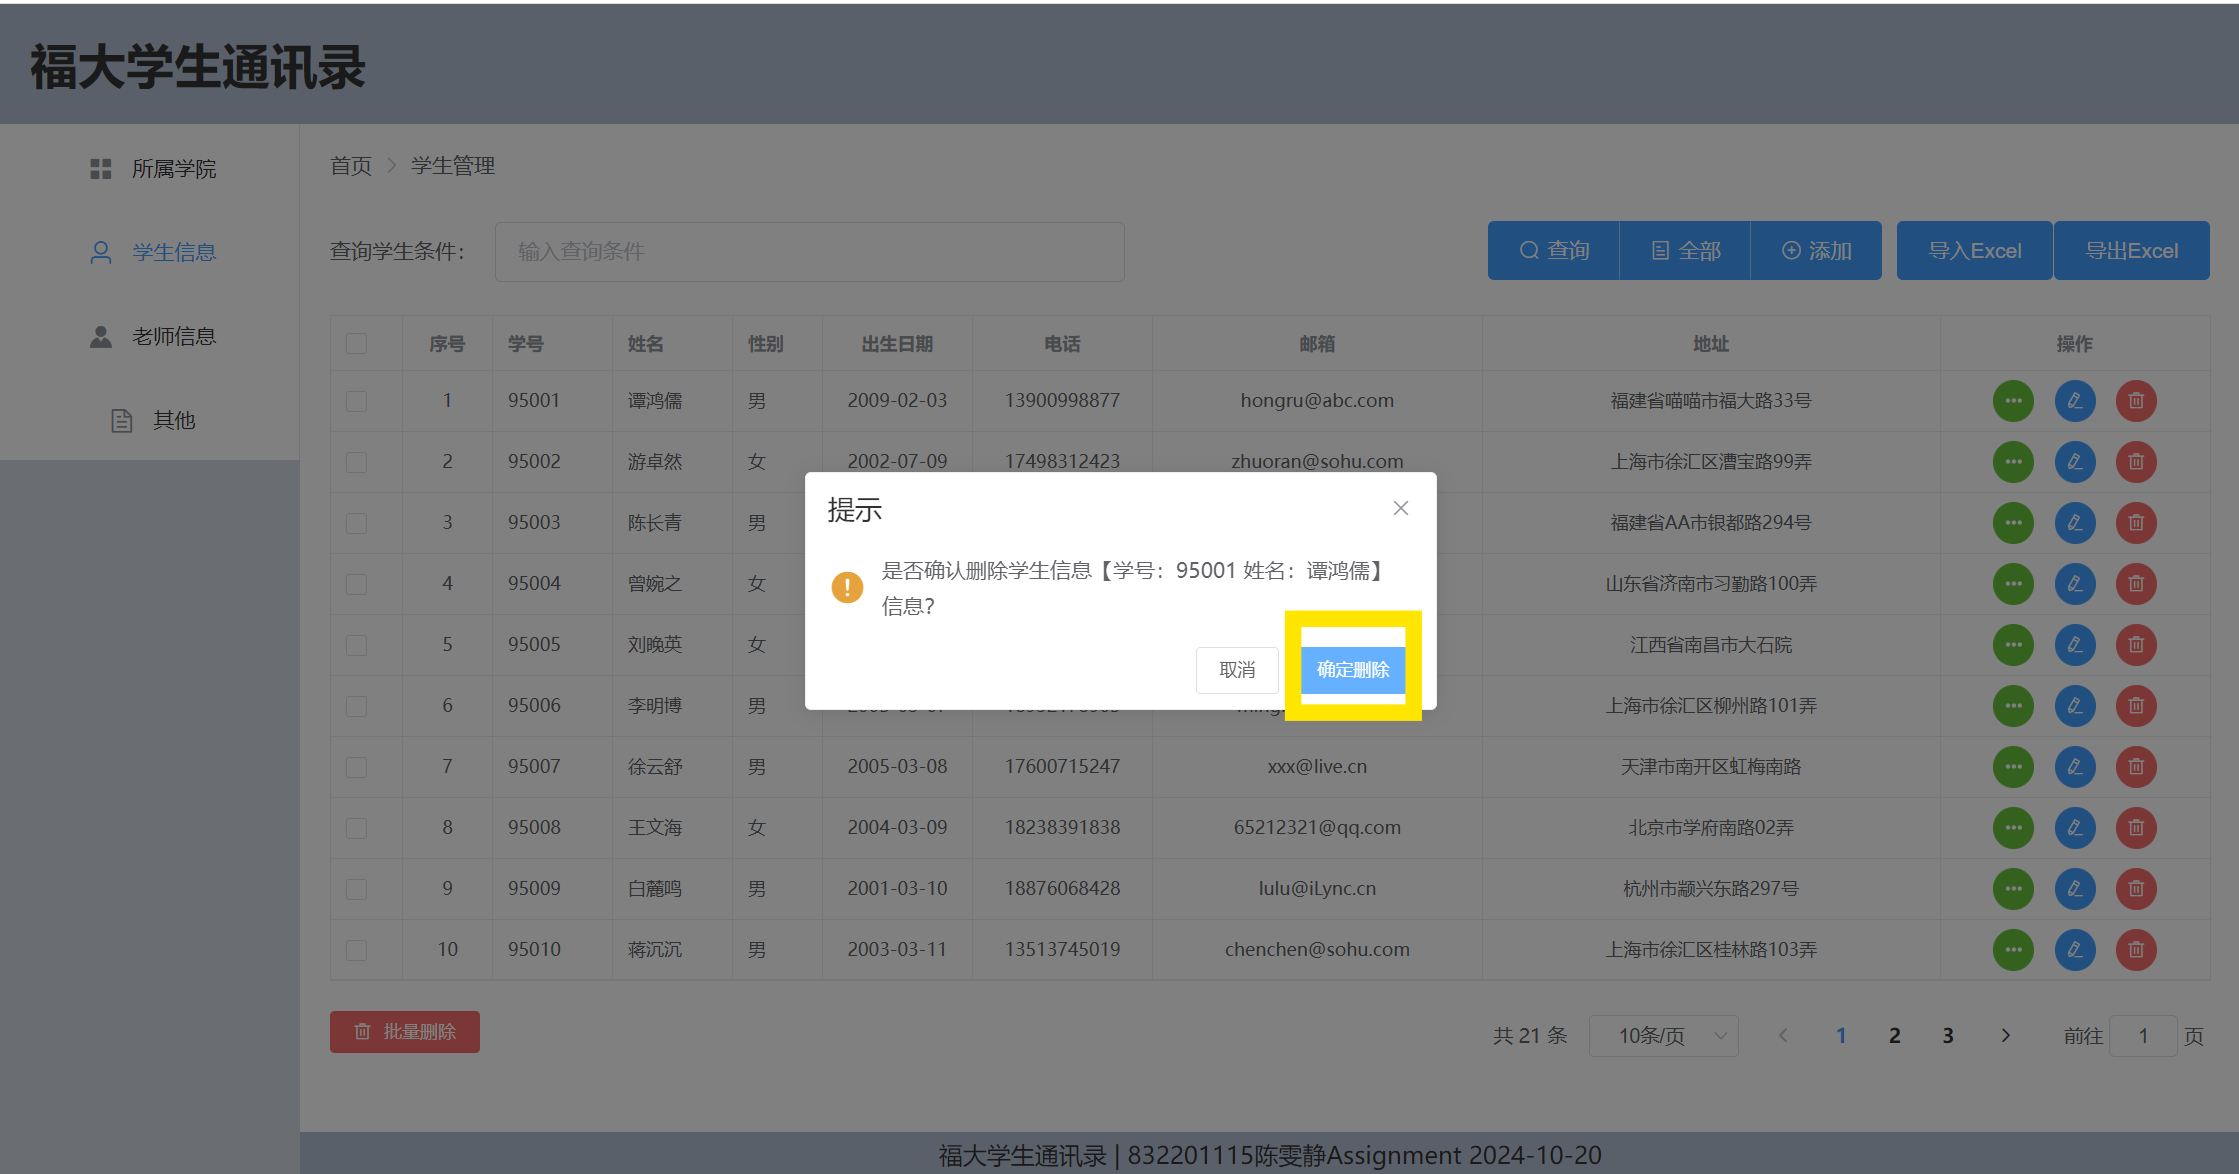
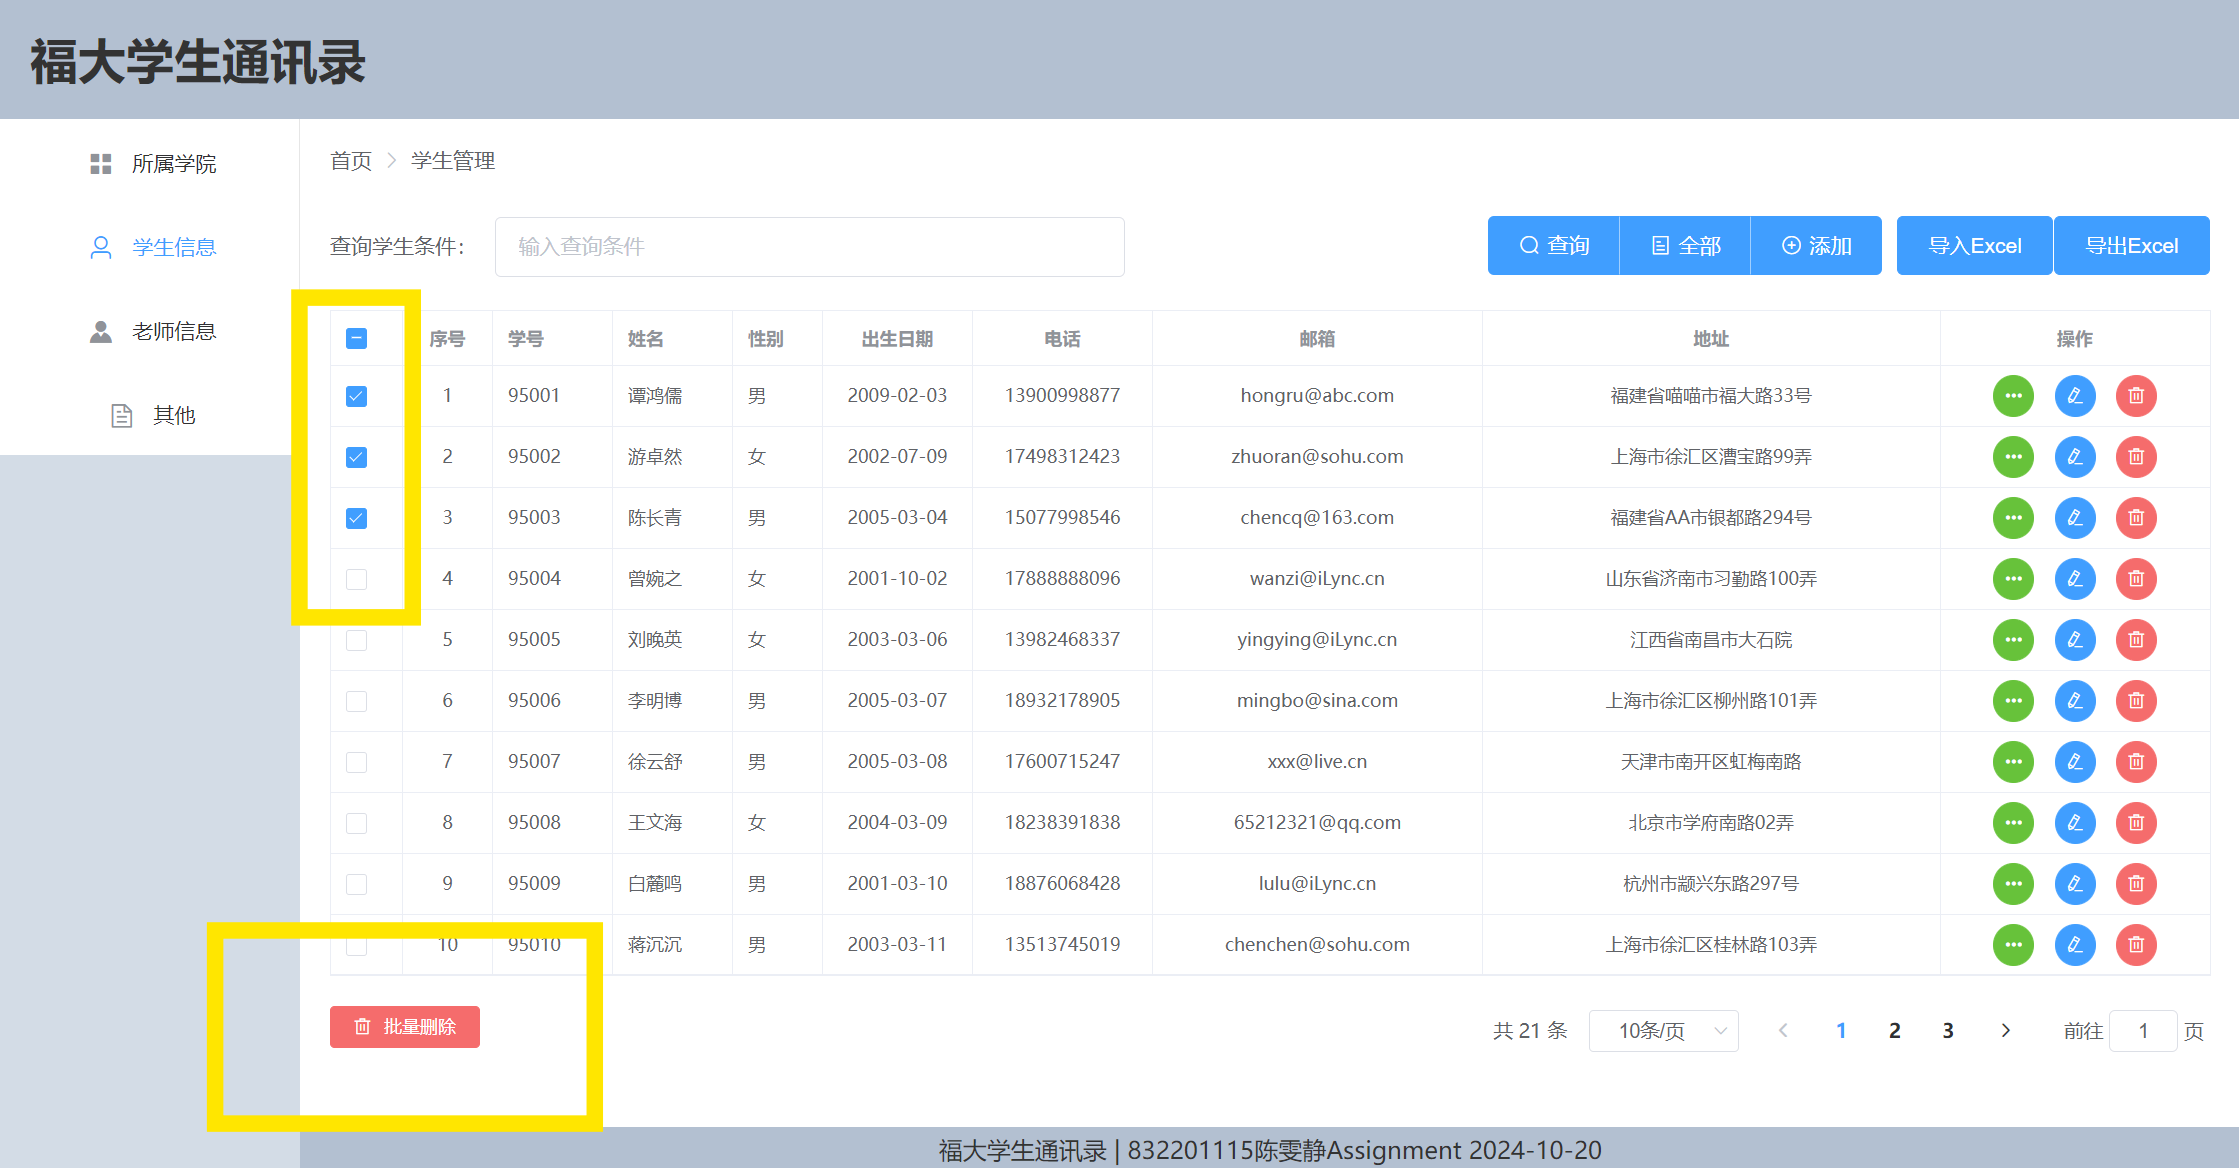
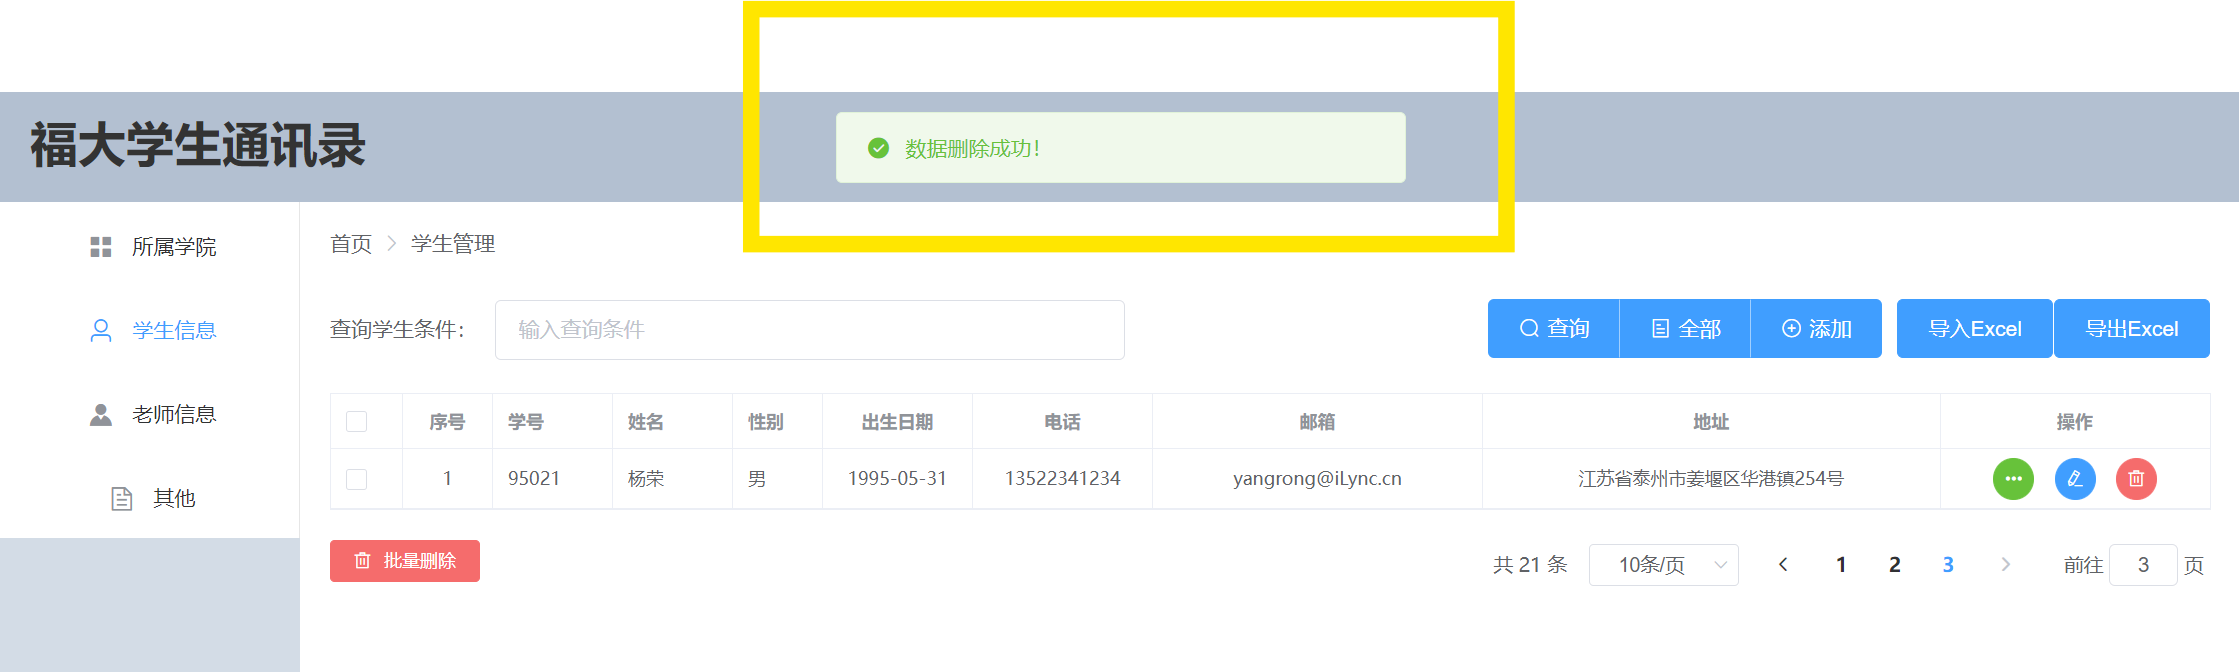
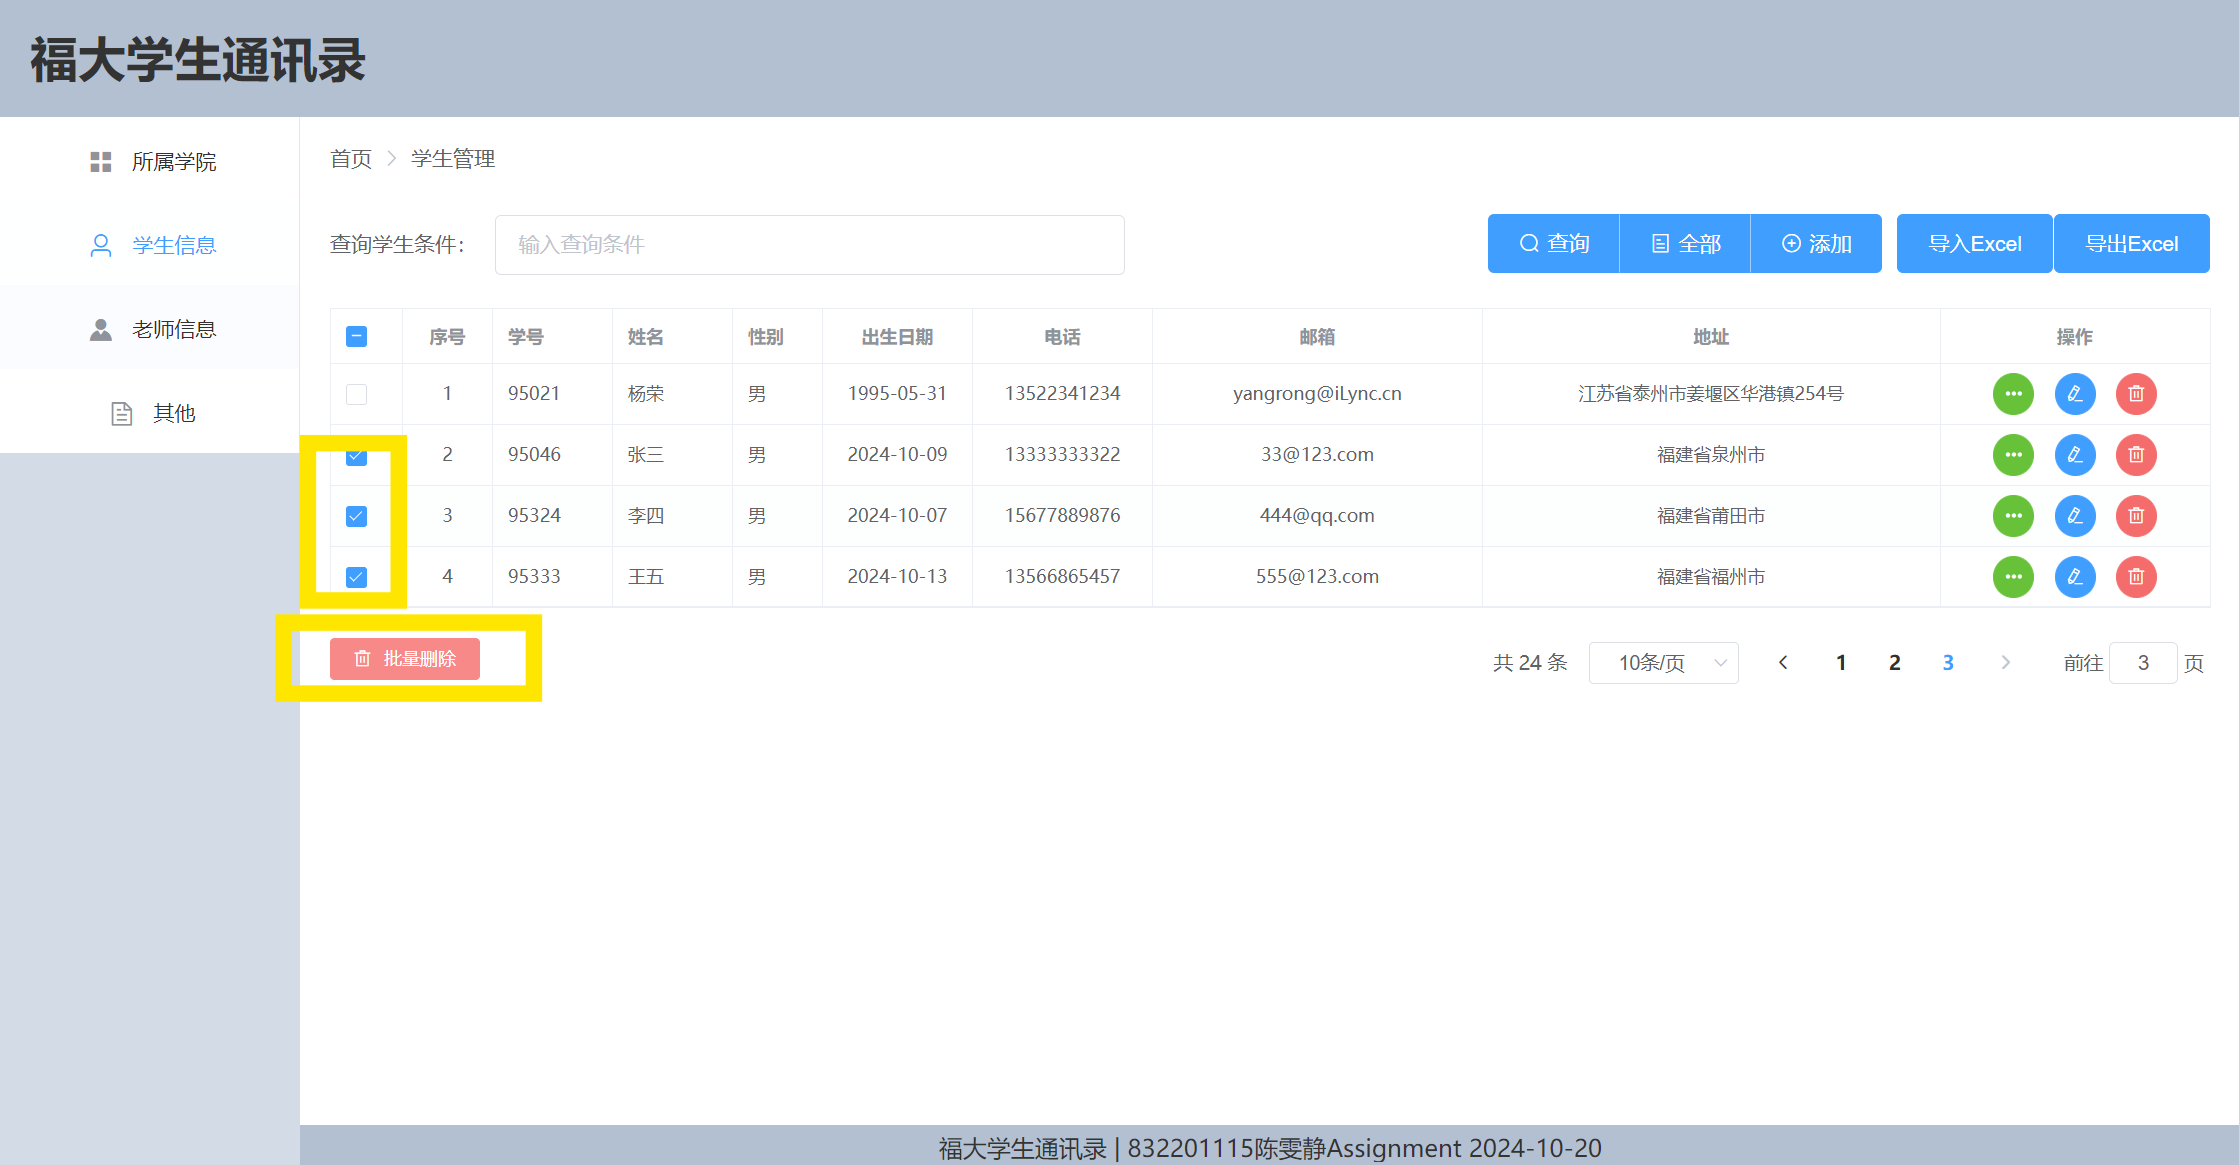
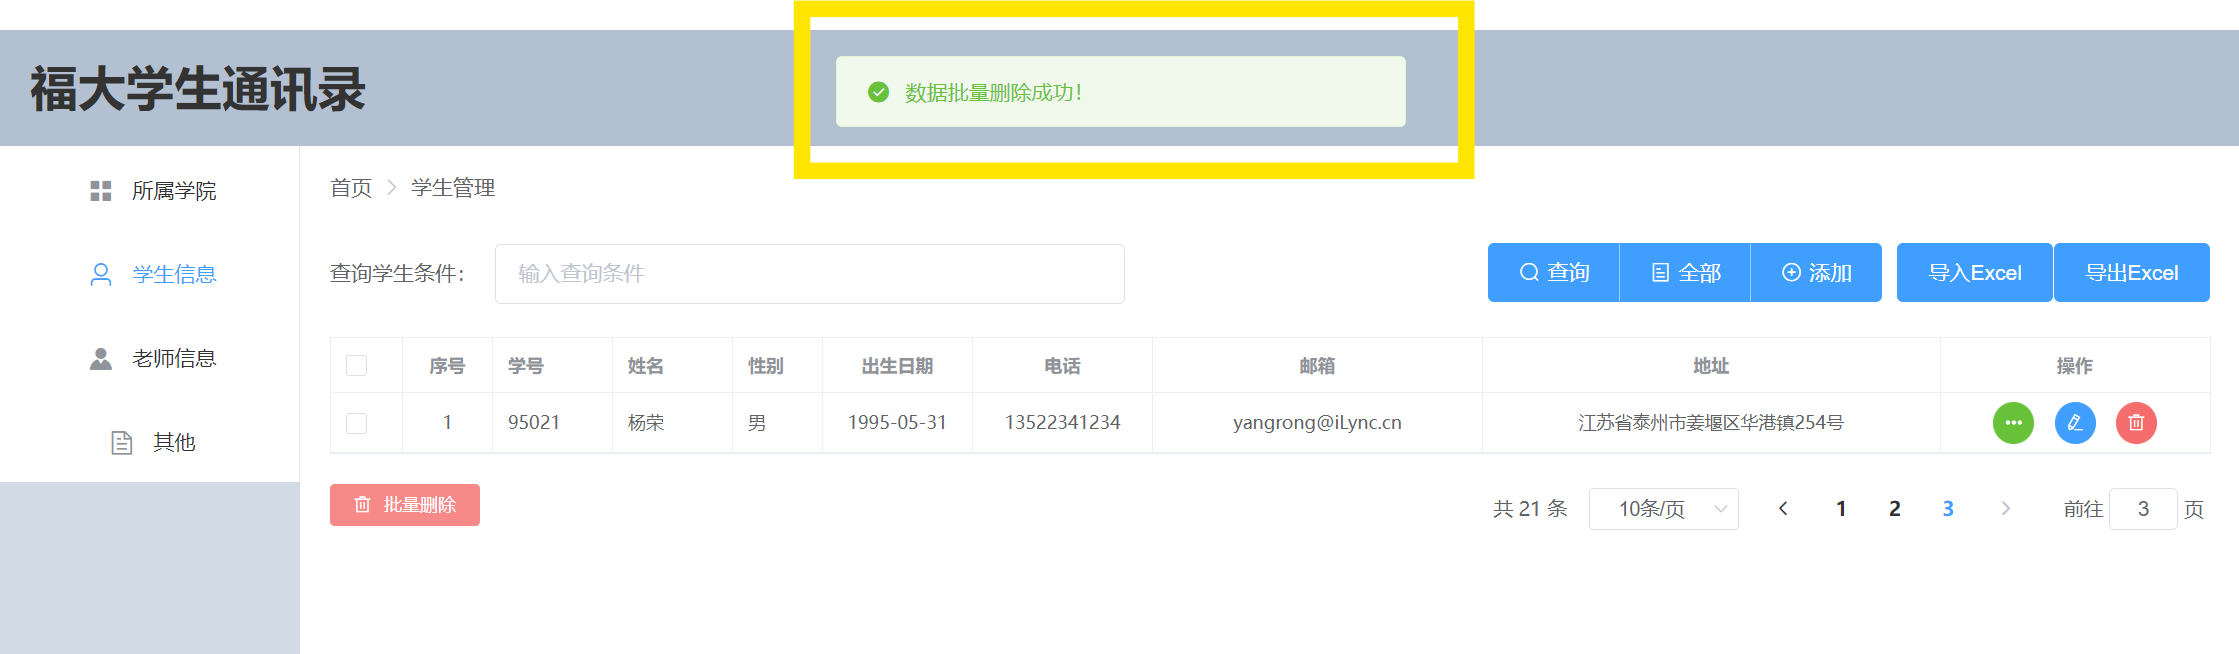
Step 3: Deleting
You can delete a student's information by clicking the red "Delete" button on the far right of their information. Additionally, you can select multiple student records by checking the boxes in front of them and then clicking the "Batch Delete" button in the lower left corner to delete several records at once.
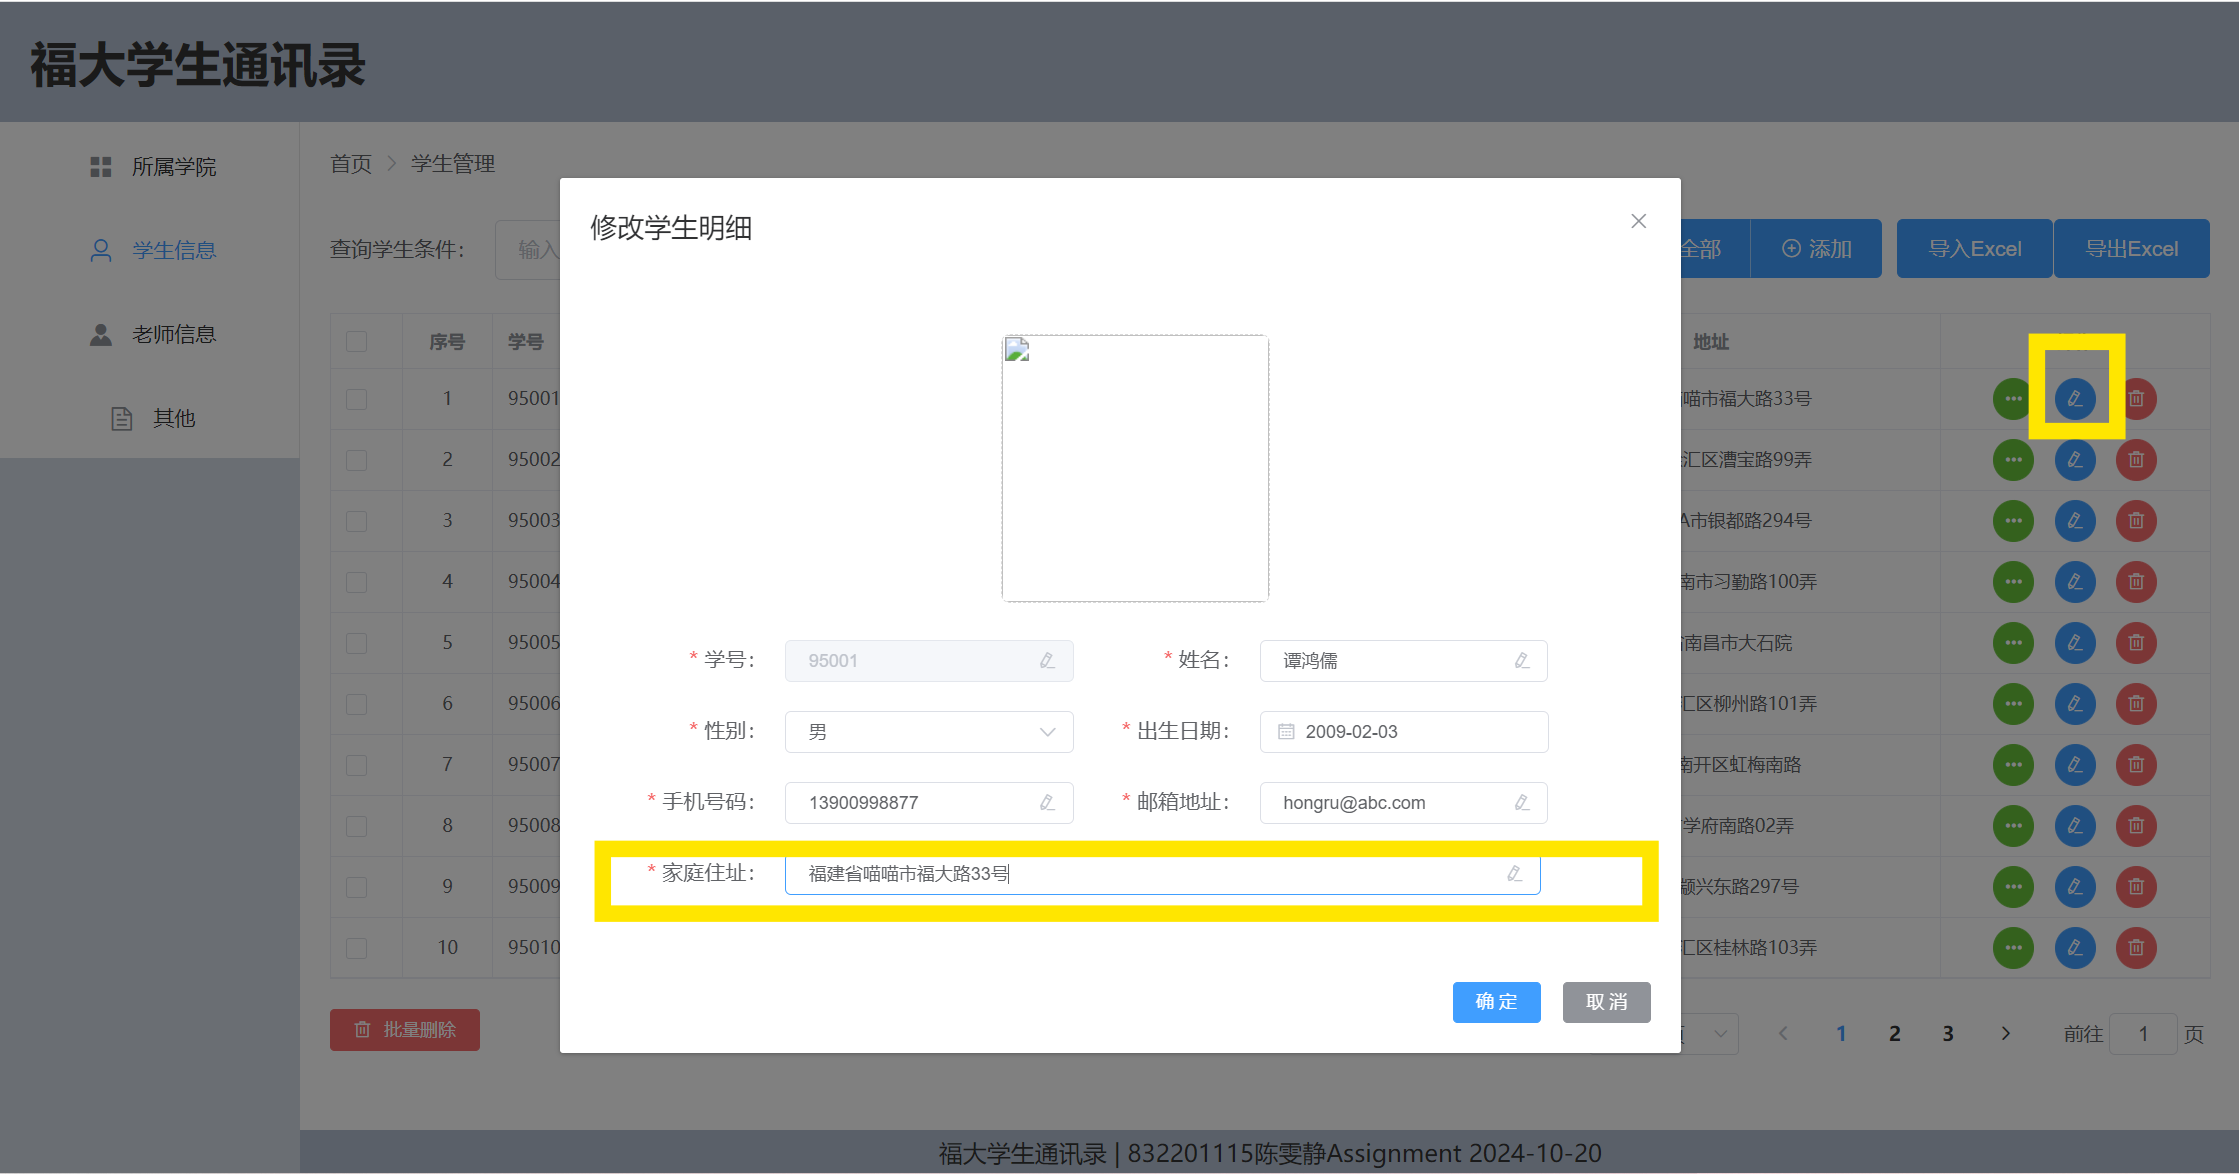
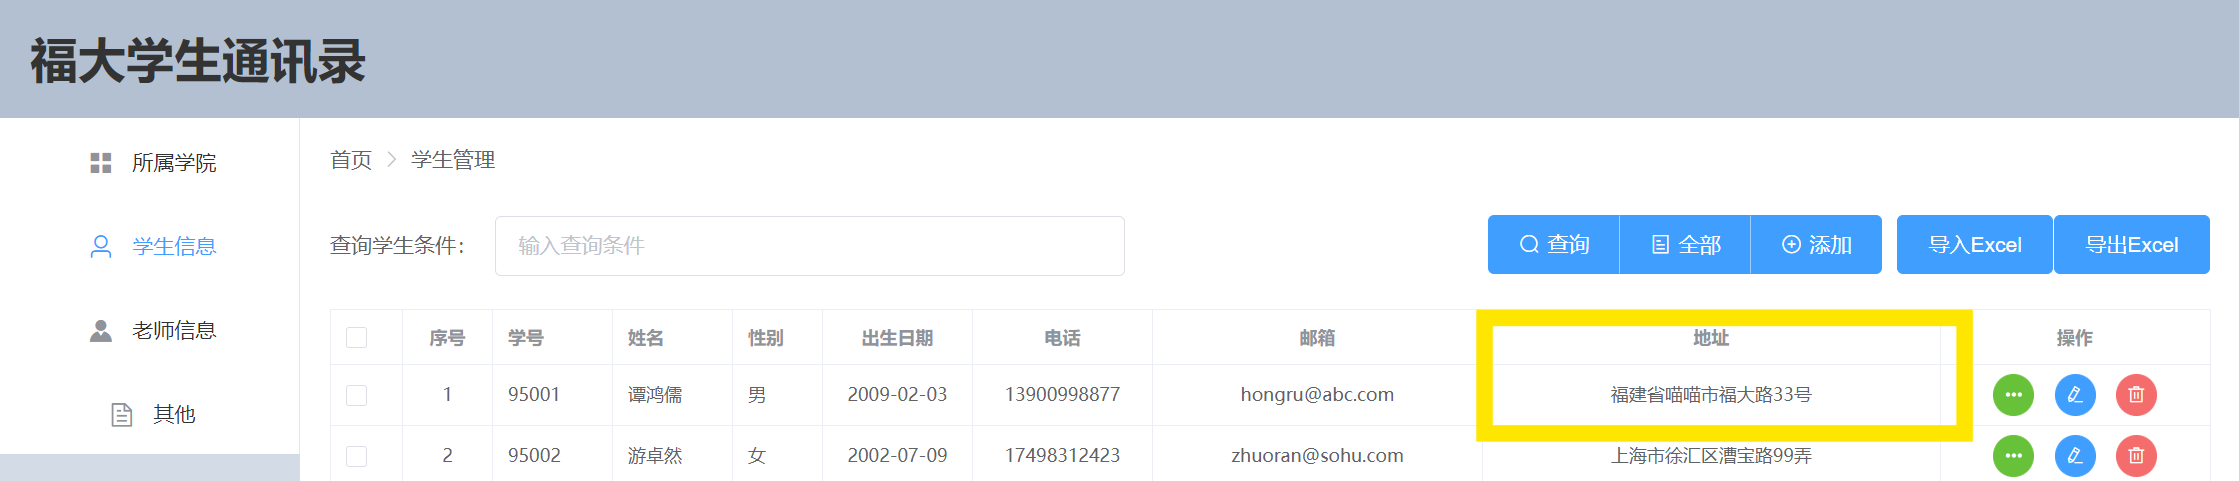
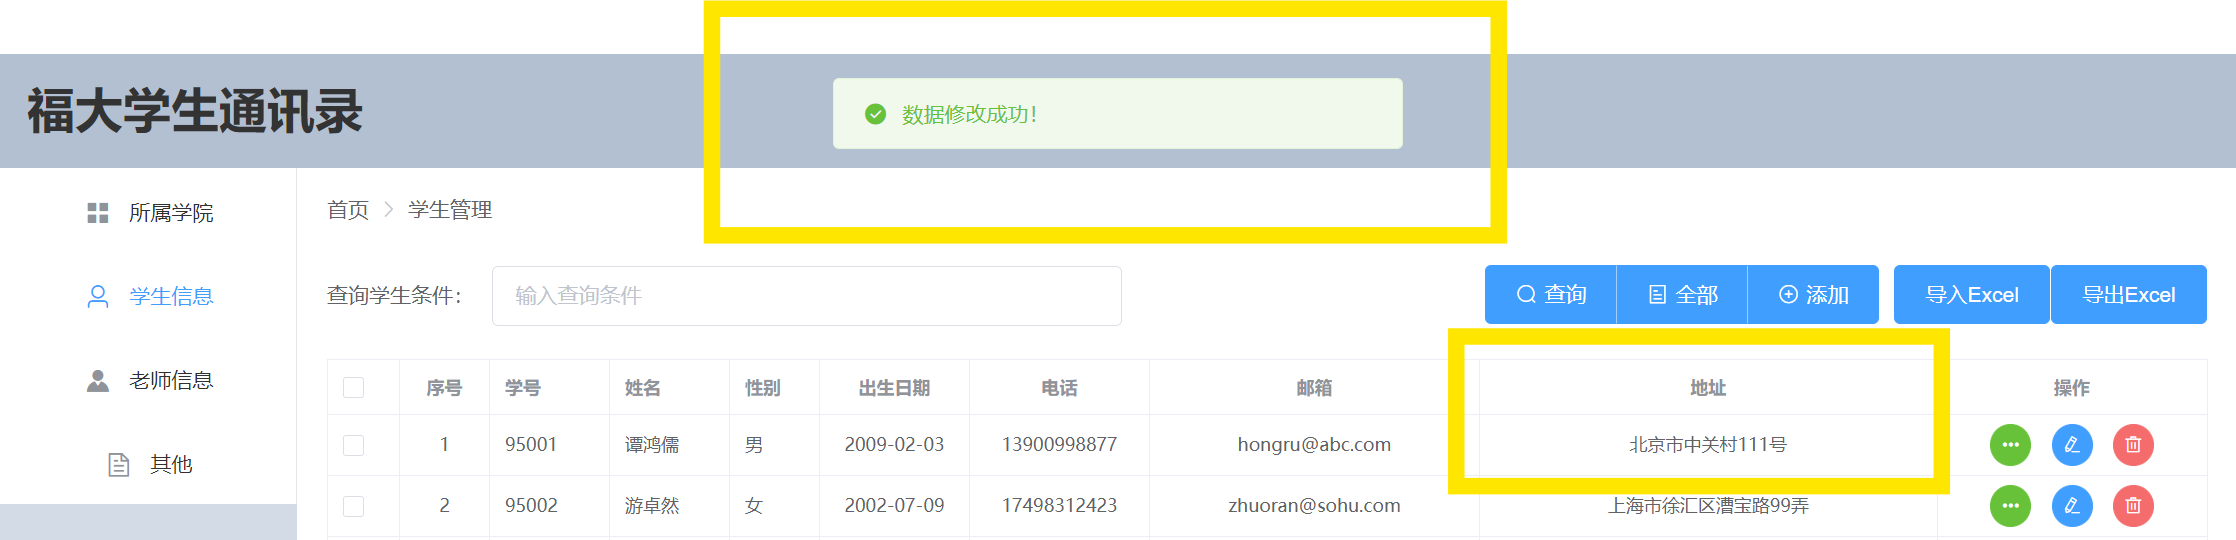
Step 4: Modifying
You can edit any student's information, including their name, phone number, email, and home address, by clicking the blue "Edit" button on the right.
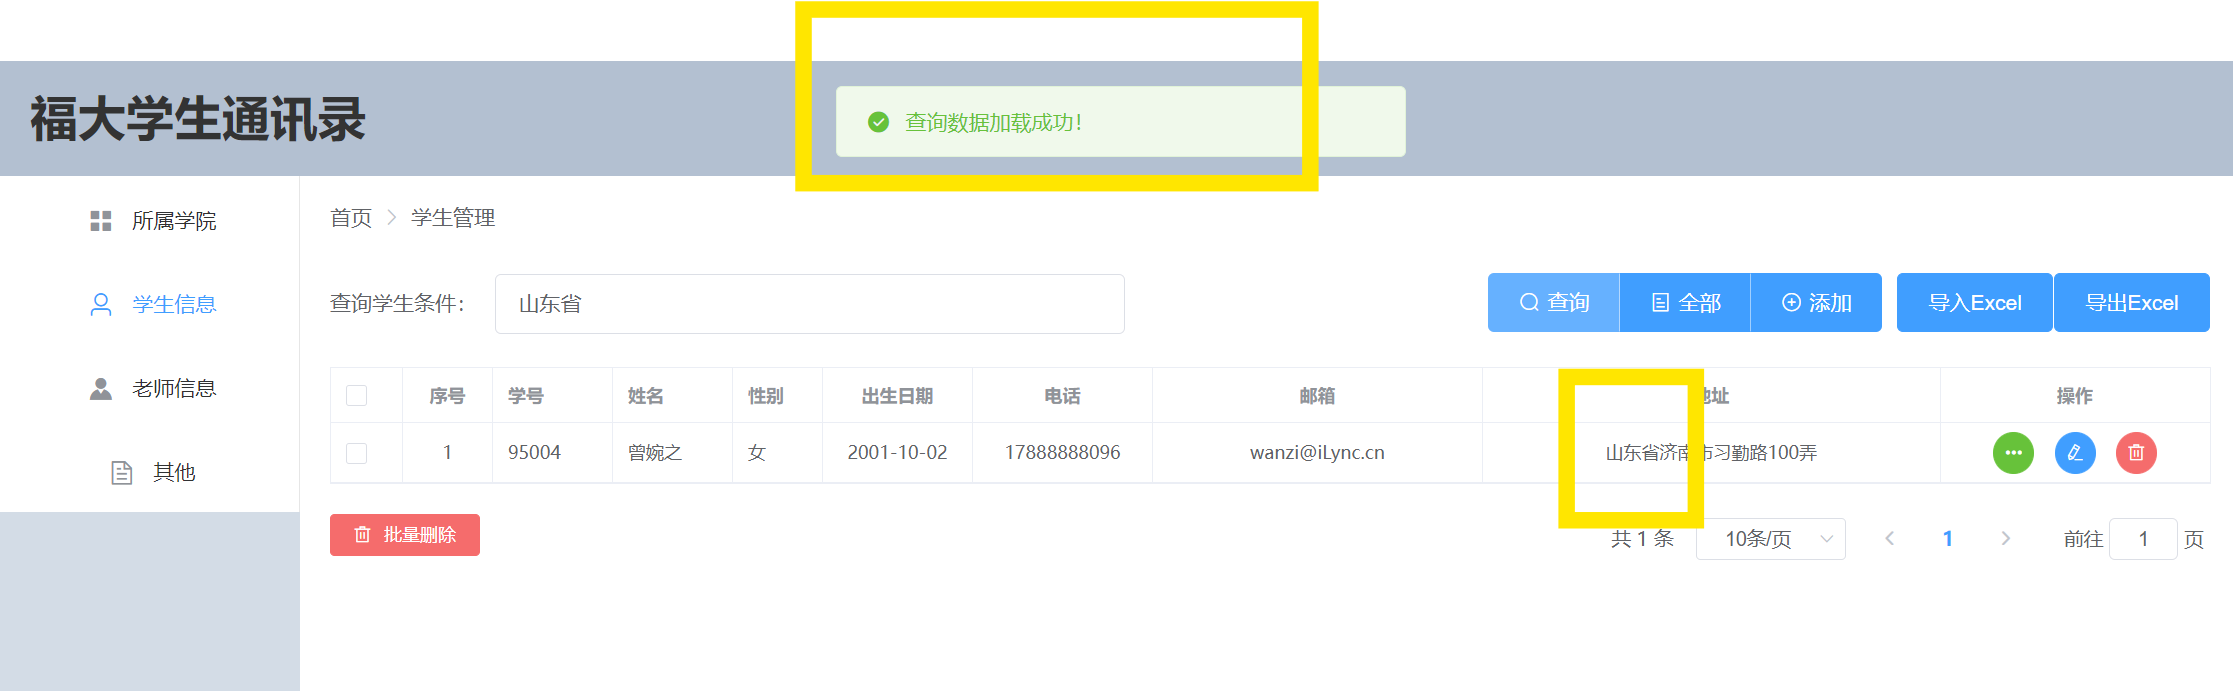
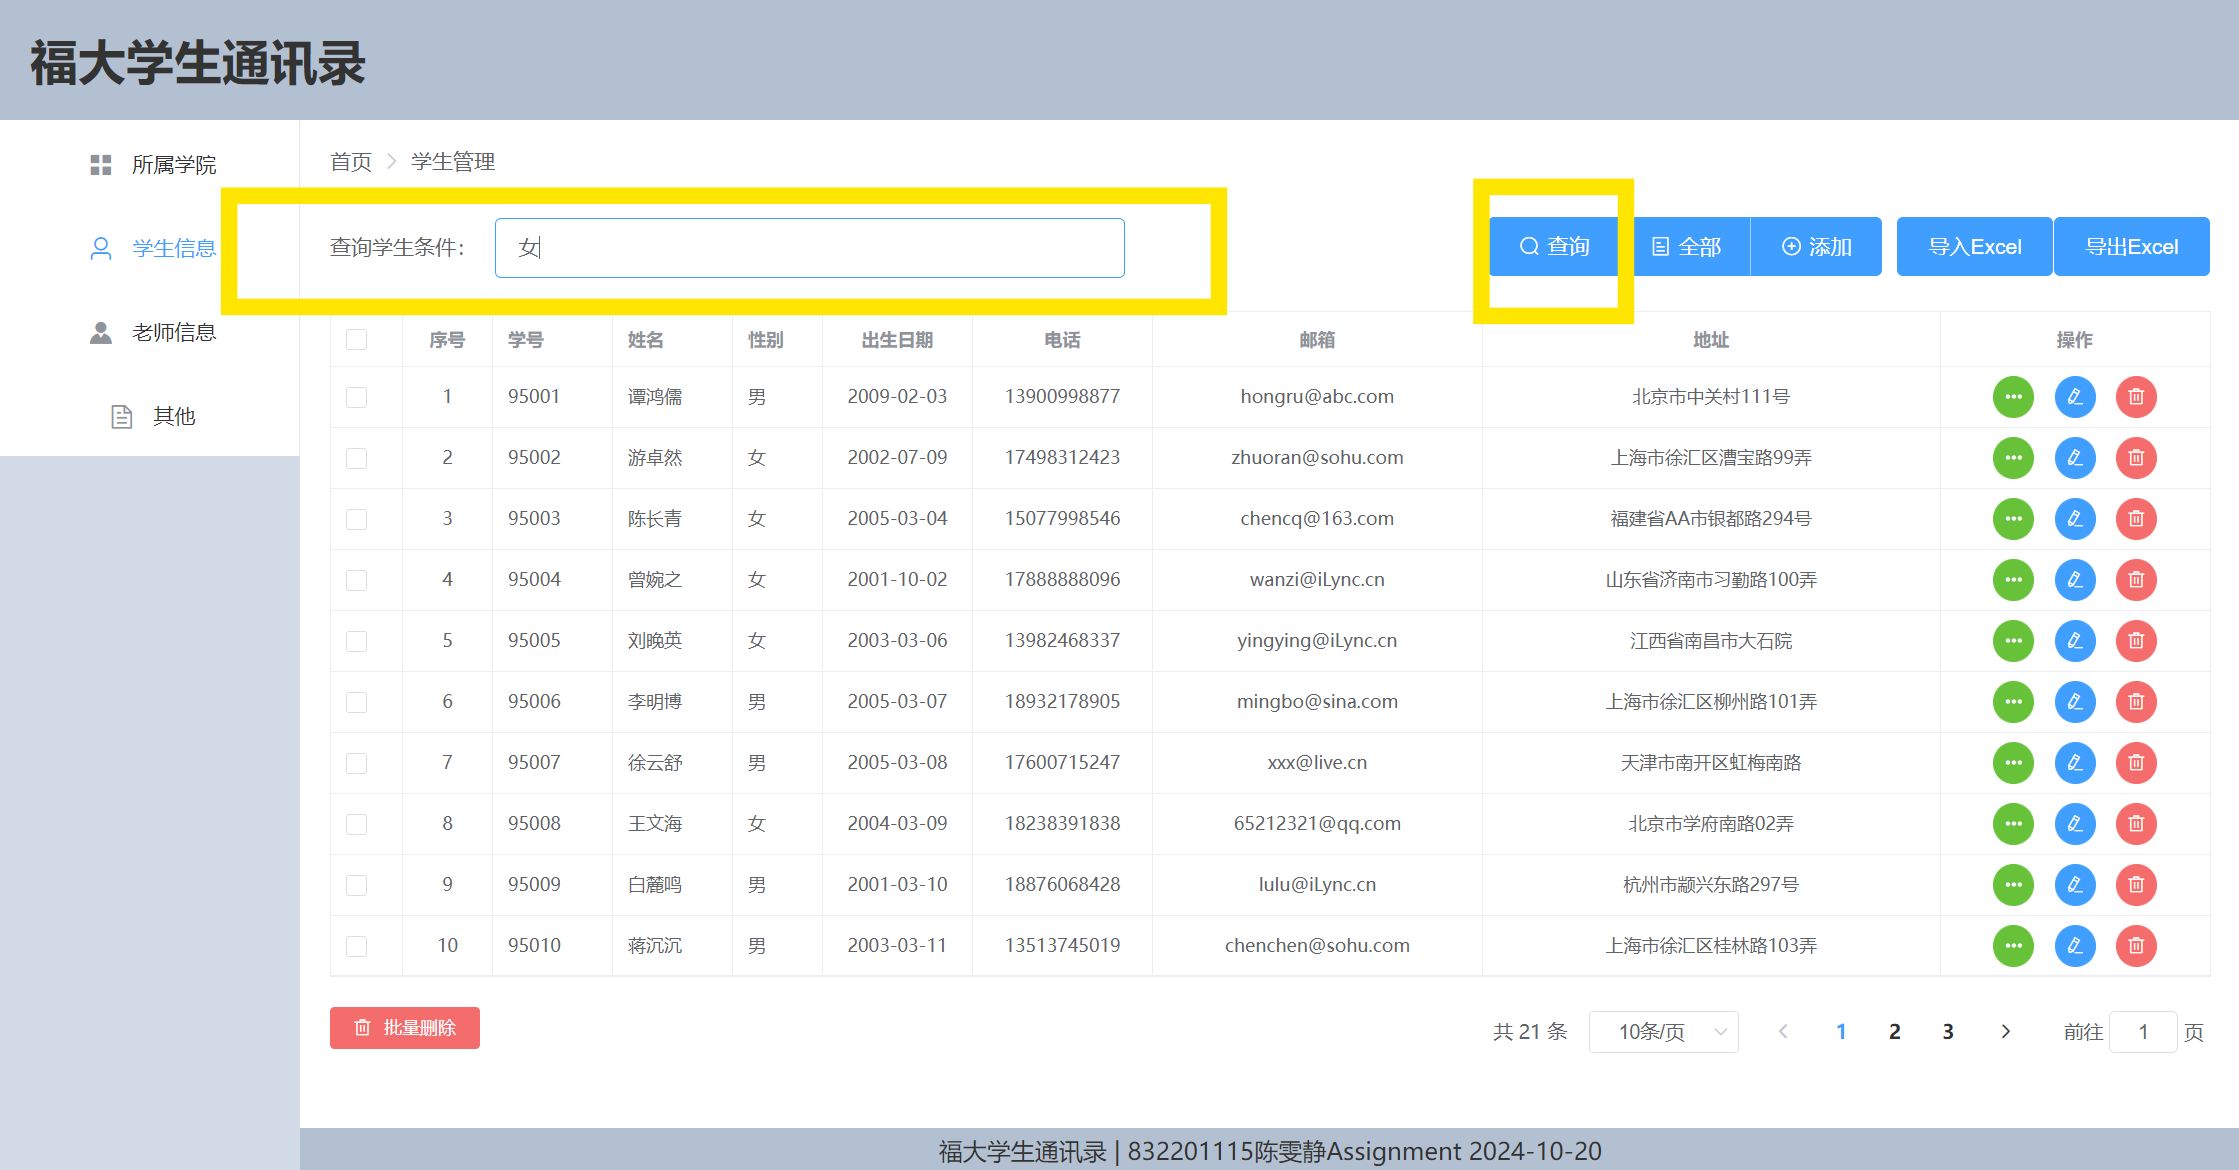
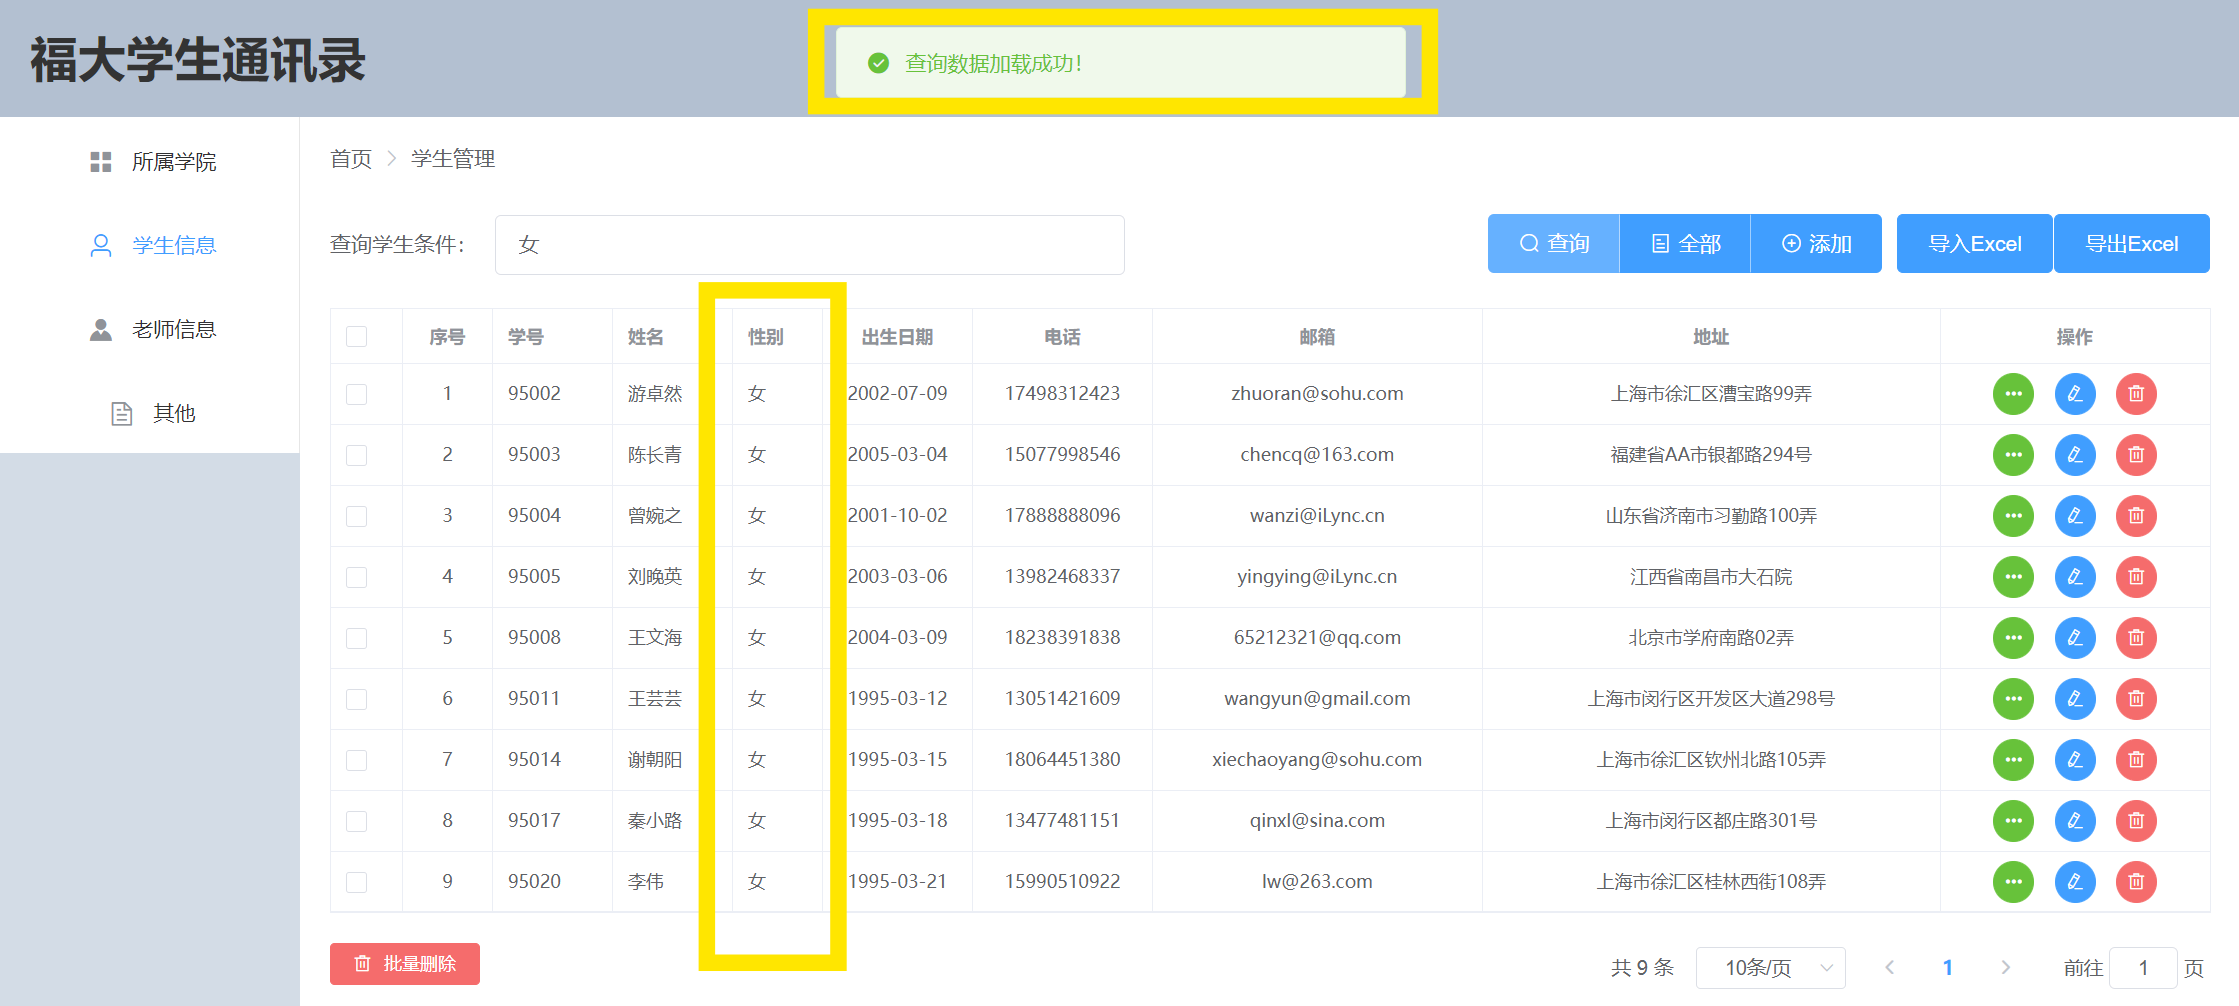
Step 5: Querying
You can search for students that meet specific criteria by entering your query conditions at the top of the screen and clicking the button on the right. For example, you can input "Shandong Province" as a filter.

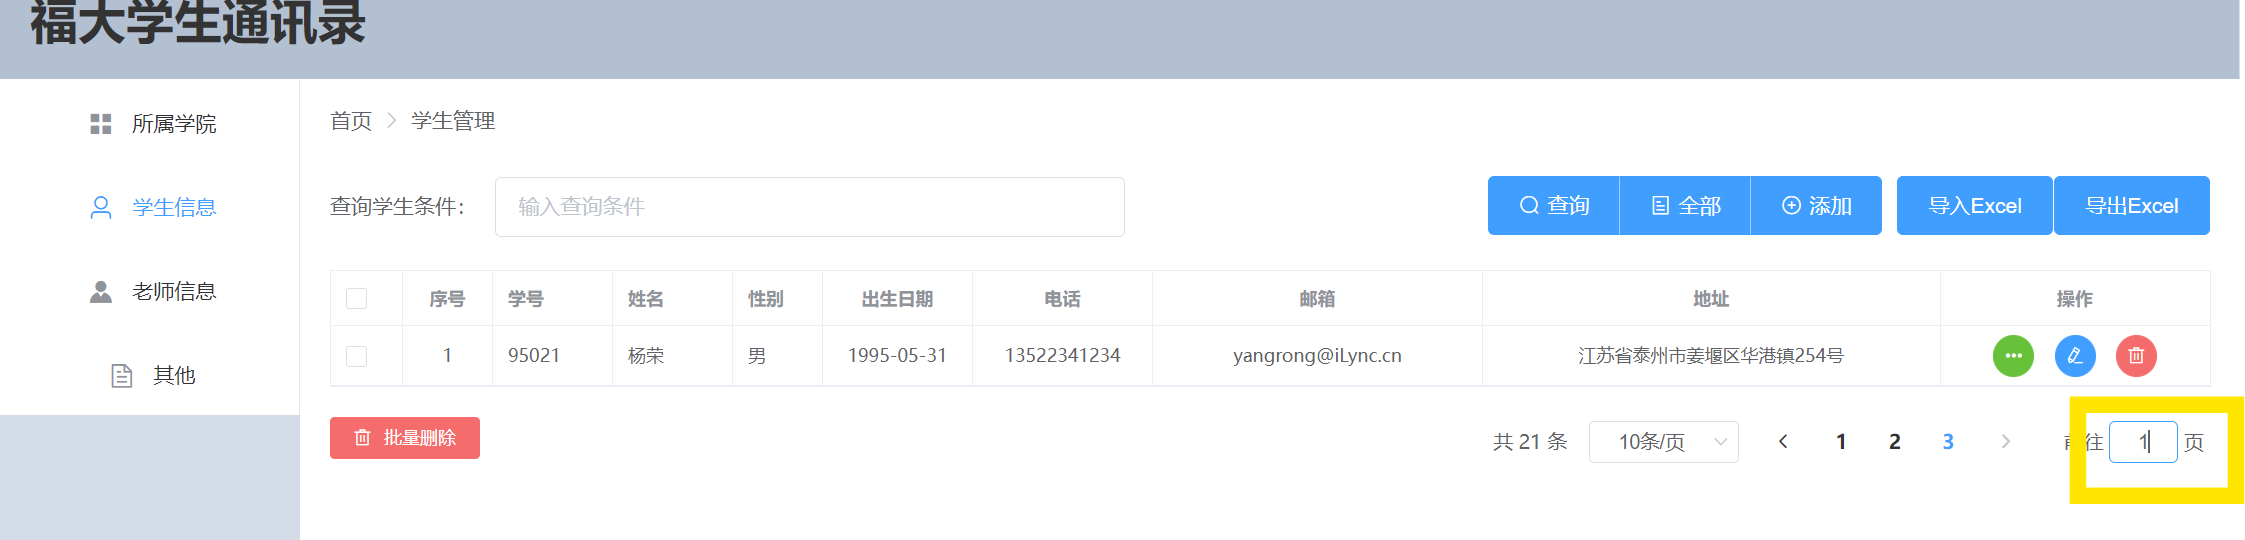
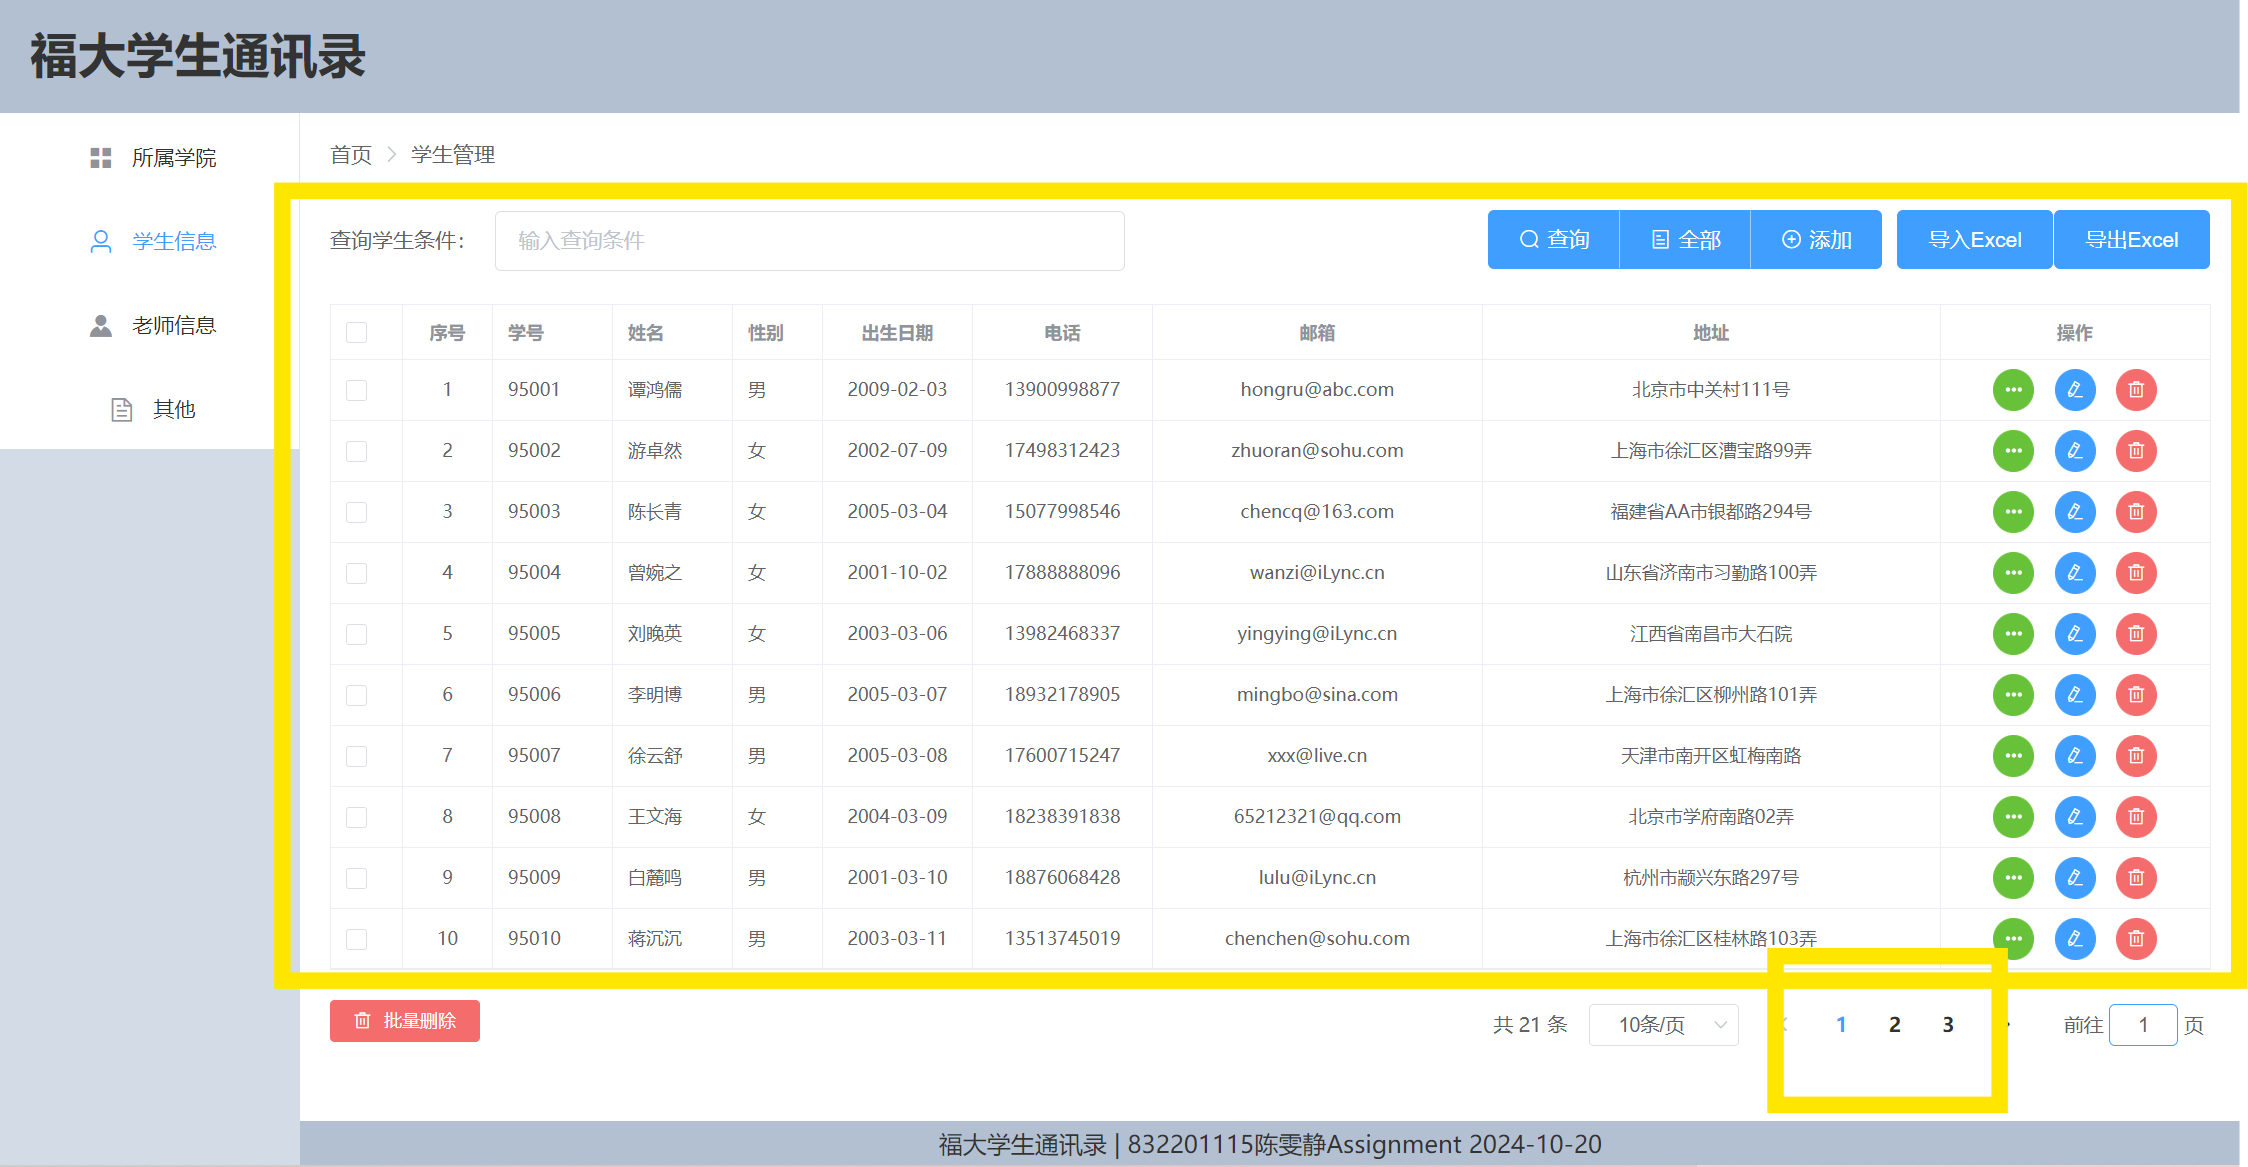
Step 6: Pagination Feature
After the query, you can return to all entries in the address book by clicking the "All" button. Additionally, you can navigate to other pages by clicking on the page numbers in the lower right corner. I've set it up to display 10 student records per page, with a total of 3 pages for 21 student records.

My first assignment, the FZU Student Address Book aims to provide a convenient platform for managing student information, utilizing modern front-end and back-end separation technology. It enables the display of student data from the database on web pages, as well as the ability to add, modify, and delete information through the interface.
This project simplifies the process for administrators and students to manage student information through a user-friendly web interface. The use of a front-end and back-end separated architecture not only improves system responsiveness and user experience but also makes the system easier to maintain and expand.
When designing the address book application, I considered the following functional modules:
Environment Setup:
Function1: Adding Student Information:

Function2: Deleting Student Information:

Function3: Modifying Student Information:

Function4: Querying Student Information:
Extended Feature 1: Batch Deletion:

Extended Feature 2: Data Pagination on the Front End:
Rent an Alibaba Cloud server to deploy the web page, use the LAMP stack, and develop on port 8080 as a platform for running the web page. Upload files, configure the Spring Boot framework on the server, and run the Spring Boot application.
Step 1: First, I signed a free Alibaba cloud server and chose the Linux system (Ubuntu).
Step 2: Checked the public IP of my cloud server.
Step 3: Used an SSH connection tool; I used Xshell to connect to the cloud server.
Step 4: Installed Nginx.
Step 5: Installed Xftp (for file uploads).
Step 6: Added the Nginx configuration file with vim /etc/nginx/conf.d/xxx.conf, containing the following:
server {
listen 80;
server_name 121.41.86.73
root /apps/student;
index index.html;
}
Step 7: Restarted Nginx and checked if the configuration took effect: systemctl restart nginx. (Access via browser at http://. If it fails, check if the cloud server's security group allows port 80, and if the firewall is enabled, ensure the port is open.)
Step 8: Installed Python 3; since Ubuntu 22 comes with Python 3.10, I didn't install it separately.
Step 9: Installed the built-in Python 3 venv environment with apt install python3.10-venv.
Step 10: Created a virtual environment using python3 -m venv .
Step 11: Activated the virtual environment with source /bin/activate.
Step 12: Installed Python third-party packages: pip install -r requirements.txt.
Step 13: Installed MySQL: apt install mysql-server.
Step 14: Set the root password for MySQL, following instructions from https://zhuanlan.zhihu.com/p/698532008.
Step 15: Created a database in MySQL: create database .
Step 16: Migrated the database to generate the corresponding tables: python manage.py migrate.
Step 17: Imported contact database records.
Step 18: Started the server with python manage.py runserver 0.0.0.0:8080.
Perform unit and integration tests on the API to ensure the correctness of each module.
One of the main difficulties I faced was my lack of experience in deploying projects to the cloud. The methods I found online for network penetration were not functional, leaving me feeling lost.
To resolve this, I took the following steps:

<body>
    <div id="app">
        <el-container>
            <el-header style="height: 80px;">福大学生通讯录</el-header>
            <el-container>
                <!-- 侧边栏 -->
                <el-aside width="200px">
                    <el-menu default-active="2" class="el-menu-vertical-demo">
                        <el-menu-item index="1">
                            <i class="el-icon-menu"></i>
                            <span slot="title">所属学院</span>
                        </el-menu-item>
                        <el-menu-item index="2">
                            <i class="el-icon-user"></i>
                            <span slot="title">学生信息</span>
                        </el-menu-item>
                        <el-menu-item index="3">
                            <i class="el-icon-s-custom"></i>
                            <span slot="title">老师信息</span>
                        </el-menu-item>
                        <el-menu-item index="4">
                            <i class="el-icon-document"></i>
                            <span slot="title">其他</span>
                        </el-menu-item>
                    </el-menu>
                </el-aside>
                <el-container>
                    <!-- 主窗体 -->
                    <el-main>
                        <!-- 面包屑导航 -->
                        <el-breadcrumb separator-class="el-icon-arrow-right">
                            <el-breadcrumb-item>首页</el-breadcrumb-item>
                            <el-breadcrumb-item>学生管理</el-breadcrumb-item>
                        </el-breadcrumb>
                        <!-- 表单 -->
                        <el-form :inline="true" style="margin-top:30px;">
                            <el-row>
                                <el-col :span="12">
                                    <el-form-item label="查询学生条件:">
                                        <el-input v-model="inputStr" placeholder="输入查询条件" style="width: 420px;">
                                        </el-input>
                                    </el-form-item>
                                </el-col>
                                <el-col :span="8" style="text-align: right;padding-right:10px;">
                                    <el-button-group>
                                        <el-button type="primary" icon="el-icon-search" @click="queryStudents()">查询
                                        </el-button>
                                        <el-button type="primary" icon="el-icon-tickets" @click="getAllStudents()">全部
                                        </el-button>
                                        <el-button type="primary" icon="el-icon-circle-plus-outline"
                                            @click="addStudent()">添加</el-button>
                                    </el-button-group>
                                </el-col>
                                <el-col :span="2">
                                    <el-upload :show-file-list="false" :http-request="uploadExcelPost">
                                        <el-button type="primary">导入Excel</el-button>
                                    </el-upload>
                                </el-col>
                                <el-col :span="2">
                                    <el-button type="primary" @click="exportToExcel()">导出Excel</el-button>
                                </el-col>
                            </el-row>
                        </el-form>
                        <!-- 表格 -->
                        <el-table :data="pageStudents" border style="width: 100%" size="mini"
                            @selection-change="handleSelectionChange">
                            <el-table-column type="selection">
                            </el-table-column>
                            <el-table-column type="index" label="序号" align="center" width="60">
                            </el-table-column>
                            <el-table-column prop="sno" label="学号" width="80">
                            </el-table-column>
                            <el-table-column prop="name" label="姓名" width="80">
                            </el-table-column>
                            <el-table-column prop="gender" label="性别" width="60">
                            </el-table-column>
                            <el-table-column prop="birthday" label="出生日期" align="center" width="100">
                            </el-table-column>
                            <el-table-column prop="mobile" label="电话" align="center" width="120">
                            </el-table-column>
                            <el-table-column prop="email" label="邮箱" align="center" width="220">
                            </el-table-column>
                            <el-table-column prop="address" label="地址" align="center">
                            </el-table-column>
                            <el-table-column label="操作" width="180" align="center">
                                <template slot-scope="scope">
                                    <el-button type="success" icon="el-icon-more" size="mini" circle
                                        @click="viewStudent(scope.row)"></el-button>
                                    <el-button type="primary" icon="el-icon-edit" size="mini" circle
                                        @click="updateStudent(scope.row)"></el-button>
                                    <el-button type="danger" icon="el-icon-delete" size="mini" circle
                                        @click="deleteStudent(scope.row)"></el-button>
                                </template>
                            </el-table-column>
                        </el-table>
                        <!-- 分页 -->
                        <el-row style="margin-top: 20px;">
                            <el-col :span="8" style="text-align: left">
                                <el-button type="danger" icon="el-icon-delete" size="mini" @click="deleteStudents()">
                                    批量删除</el-button>
                            </el-col>
                            <el-col :span="16" style="text-align: right">
                                <el-pagination @size-change="handleSizeChange" @current-change="handleCurrentChange"
                                    :current-page="currentpage" :page-sizes="[5, 10, 50, 100]" :page-size="pagesize"
                                    layout="total, sizes, prev, pager, next, jumper" :total="total">
                                </el-pagination>
                            </el-col>
                        </el-row>
                        <!-- 弹出框的学生明细表单 -->
                        <el-dialog :title="dialogTitle" :visible.sync="dialogVisible" width="50%"
                            @close="closeDialogForm('studentForm')">
                            <el-form :model="studentForm" :rules="rules" ref="studentForm" :inline="true"
                                style="margin-left: 20px;" label-width="110px" label-position="right" size="mini">
                                <el-upload class="avatar-uploader"
                                    :show-file-list="false" :http-request="uploadPicturePost" :disabled="isView"  style="text-align: center;margin:20px;" >
                                    <img v-if="studentForm.image" :src="studentForm.imageUrl" class="avatar">
                                    <i v-else class="el-icon-plus avatar-uploader-icon"></i>
                                </el-upload>
                                <el-form-item label="学号:" prop="sno">
                                    <el-input v-model="studentForm.sno" :disabled="isEdit||isView"
                                        suffix-icon="el-icon-edit"></el-input>
                                </el-form-item>
                                <el-form-item label="姓名:" prop="name">
                                    <el-input v-model="studentForm.name" :disabled="isView" suffix-icon="el-icon-edit">
                                    </el-input>
                                </el-form-item>
                                <el-form-item label="性别:" prop="gender">
                                    <el-select v-model="studentForm.gender" :disabled="isView" placeholder="请选择性别">
                                        <el-option value="男"></el-option>
                                        <el-option value="女"></el-option>
                                    </el-select>
                                </el-form-item>
                                <el-form-item label="出生日期:" prop="birthday">
                                    <el-date-picker v-model="studentForm.birthday" value-format="yyyy-MM-dd"
                                        :disabled="isView" type="date" placeholder="选择日期" style="width:93% ">
                                    </el-date-picker>
                                </el-form-item>
                                <el-form-item label="手机号码:" prop="mobile">
                                    <el-input v-model="studentForm.mobile" :disabled="isView"
                                        suffix-icon="el-icon-edit"></el-input>
                                </el-form-item>
                                <el-form-item label="邮箱地址:" prop="email">
                                    <el-input v-model="studentForm.email" :disabled="isView" suffix-icon="el-icon-edit">
                                    </el-input>
                                </el-form-item>
                                <el-form-item label="家庭住址:" prop="address">
                                    <el-input v-model="studentForm.address" :disabled="isView"
                                        suffix-icon="el-icon-edit" style="width:262%"></el-input>
                                </el-form-item>
                            </el-form>
                            <span slot="footer" class="dialog-footer">
                                <el-button type="primary" size="mini" v-show="!isView"
                                    @click="submitStudentForm('studentForm')">确 定</el-button>

                                <el-button type="info" size="mini" @click="closeDialogForm('studentForm')">取 消
                                </el-button>
                            </span>
                        </el-dialog>
                    </el-main>
                    <el-footer style="height: 30px;">福大学生通讯录 | 832201115陈雯静Assignment 2024-10-20</el-footer>
                </el-container>
            </el-container>
        </el-container>
    </div>
</body>
def get_students(request):
    """获取所有学生的信息"""
    try:
        # 使用ORM获取所有学生信息 并把对象转为字典格式
        obj_students = Student.objects.all().values()
        # 把外层的容器转为List
        students = list(obj_students)
        # 返回
        return JsonResponse({'code':1, 'data':students})
    except Exception as e:
        # 如果出现异常,返回
        return JsonResponse({'code': 0, 'msg': "获取学生信息出现异常,具体错误:" + str(e)})


def query_students(request):
    """查询学生信息"""
    # 接收传递过来的查询条件--- axios默认是json --- 字典类型('inputstr')-- data['inputstr']
    data = json.loads(request.body.decode('utf-8'))
    try:
        # 使用ORM获取满足条件的学生信息 并把对象转为字典格式
        obj_students = Student.objects.filter(Q(sno__icontains=data['inputstr']) | Q(name__icontains=data['inputstr']) |
                                              Q(gender__icontains=data['inputstr']) | Q(mobile__icontains=data['inputstr'])
                                              | Q(email__icontains=data['inputstr']) | Q(address__icontains=data['inputstr'])).values()
        # 把外层的容器转为List
        students = list(obj_students)
        # 返回
        return JsonResponse({'code': 1, 'data': students})
    except Exception as e:
        # 如果出现异常,返回
        return JsonResponse({'code': 0, 'msg': "查询学生信息出现异常,具体错误:" + str(e)})

def add_student(request):
    """添加学生到数据库"""
    # 接收前端传递过来的值
    data = json.loads(request.body.decode("utf-8"))
    try:
        # 添加到数据库
        obj_student = Student(sno=data['sno'],name=data['name'],gender=data['gender'],
                              birthday=data['birthday'],mobile=data['mobile'],
                              email= data['email'], address=data['address'],image=data['image'])
        # 执行添加
        obj_student.save()
        # 使用ORM获取所有学生信息 并把对象转为字典格式
        obj_students = Student.objects.all().values()
        # 把外层的容器转为List
        students = list(obj_students)
        # 返回
        return JsonResponse({'code': 1, 'data': students})
    except Exception as e:
        return JsonResponse({'code':0 , 'msg': "添加到数据库出现异常,具体原因:" + str(e)})


def update_student(request):
    """修改学生到数据库"""
    # 接收前端传递过来的值
    data = json.loads(request.body.decode("utf-8"))
    try:
        # 查找到要修改的学生信息
        obj_student = Student.objects.get(sno=data['sno'])
        # 依次修改
        obj_student.name = data['name']
        obj_student.gender = data['gender']
        obj_student.birthday = data['birthday']
        obj_student.mobile = data['mobile']
        obj_student.email = data['email']
        obj_student.address = data['address']
        obj_student.image = data['image']
        # 保存
        obj_student.save()
        # 使用ORM获取所有学生信息 并把对象转为字典格式
        obj_students = Student.objects.all().values()
        # 把外层的容器转为List
        students = list(obj_students)
        # 返回
        return JsonResponse({'code': 1, 'data': students})
    except Exception as e:
        return JsonResponse({'code':0 , 'msg': "修改保存到数据库出现异常,具体原因:" + str(e)})


def delete_student(request):
    """删除一条学生信息"""
    # 接收前端传递过来的值
    data = json.loads(request.body.decode("utf-8"))
    try:
        # 查找到要修改的学生信息
        obj_student = Student.objects.get(sno=data['sno'])
        # 删除
        obj_student.delete()
        # 使用ORM获取所有学生信息 并把对象转为字典格式
        obj_students = Student.objects.all().values()
        # 把外层的容器转为List
        students = list(obj_students)
        # 返回
        return JsonResponse({'code': 1, 'data': students})
    except Exception as e:
        return JsonResponse({'code': 0, 'msg': "删除学生信息写入数据库出现异常,具体原因:" + str(e)})


def delete_students(request):
    """批量删除学生信息"""
    # 接收前端传递过来的值
    data = json.loads(request.body.decode("utf-8"))
    try:
        # 遍历传递的集合
        for one_student in data['student']:
            # 查询当前记录
            obj_student = Student.objects.get(sno=one_student['sno'])
            # 执行删除
            obj_student.delete()
        # 使用ORM获取所有学生信息 并把对象转为字典格式
        obj_students = Student.objects.all().values()
        # 把外层的容器转为List
        students = list(obj_students)
        # 返回
        return JsonResponse({'code': 1, 'data': students})
    except Exception as e:
        return JsonResponse({'code': 0, 'msg': "批量删除学生信息写入数据库出现异常,具体原因:" + str(e)})
Provides CRUD operations: add contact (POST), get all contacts (GET), update contact (PUT), and delete contact (DELETE).
In this assignment, I have learned:
Thanks to our tutors, Professor Lin and teaching assistants Wu, Kong, and Liu for their patient explanation and guidance!!!
Thank you for reaching this point! Feel free to share any valuable feedback or suggestions at any time.
