


170
社区成员
 发帖
发帖 与我相关
与我相关 我的任务
我的任务
 分享
分享| Course for This Assignment | 2401_MU_SE_FZU |
|---|---|
| Student ID | FZU:832201223 MU:22124705 |
| Assignment Requirements | Design a front-end and back-end separated contact |
| Objectives of This Assignment | Exercise independent learning ability and learn the basic knowledge of software development |
| Other References |
The first Software Engineering assignment involves creating a separated front-end and back-end address book application. The project includes three core functions: first, an add contact feature that collects information like name and phone number, storing it in the back-end database; second, a contact modification feature, where contact information is retrieved directly from the back-end database, with no caching allowed; and third, a delete contact feature that also processes the deletion in the back-end database. Upon completing these basic functions, the project must be deployed to a cloud server.
In this blog post, I'll offer an in-depth look at my project, covering the final product, code design, and implementation process. The code is available in my repository, with sensitive information like passwords concealed. The front-end code is located in the "Front" folder within the repository.
You can find back-end at:
https://github.com/NoSadAnyMore/EE308
front-end at:
https://github.com/NoSadAnyMore/First-Assignment
| Modules | Task Description | Estimated Time | Actual Time |
|---|---|---|---|
| Demand Analysis | Determine the requirements of the web page and the functions that can be achieved | 3 hour | 3 hour |
| Database Design | Design database schema, including contact information | 20 hours | 10 hours |
| Backend Development | Create a Spring Boot application and write an interface | 20 hours | 22 hours |
| Front-end Development | Page design, front-end development using Vue | 20 hours | 25 hours |
| Test | Test whether the web page meets expectations | 5 hour | 5 hours |
| Deploy | Deploy the application to the server | 5 hours | 4 hours |
| Total | 73 hours | 69 hours |
Here is the Link: http://43.139.217.145/
Next, I'll showcase my project with images and descriptions to illustrate its functionality.
Step 1:User Interface
When you visit http://43.139.217.145/ , you will see this interface:
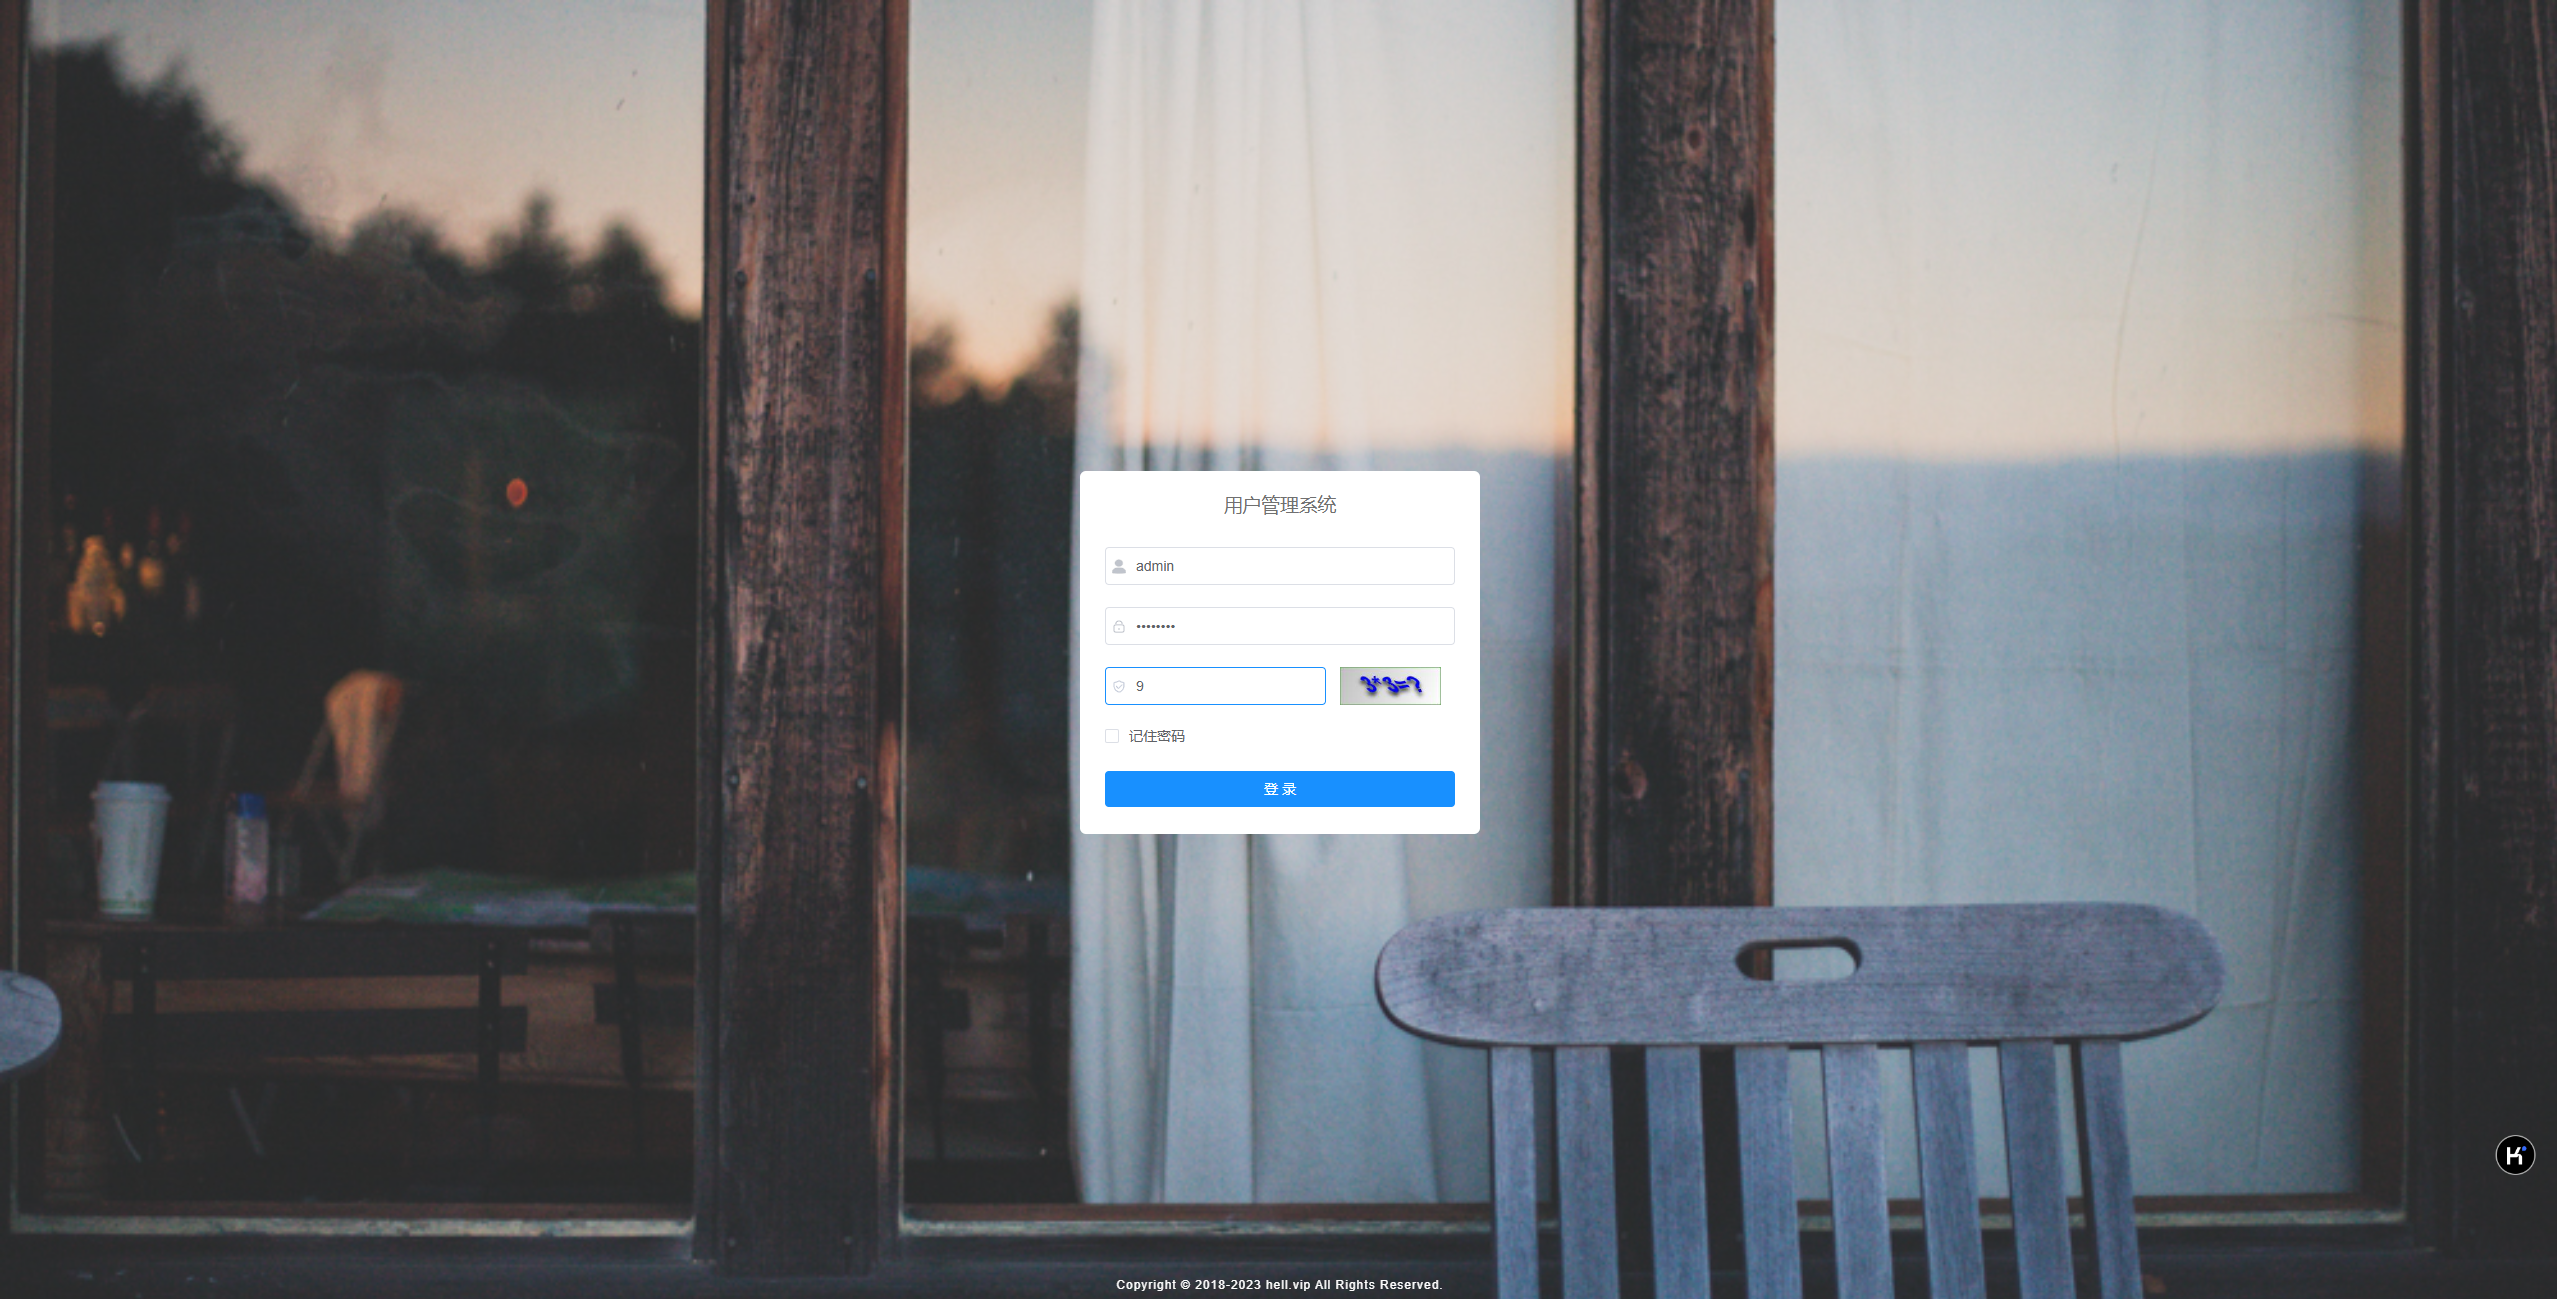
This is a login page, I added a captcha function, but only the simplest calculation, and I can not correctly display the calculation symbol of multiplication and division, this function still needs to be improved. At present, the account displayed on the page is the super administrator account in my own database, and the password does not have a display function, but I think this function is not necessary for this page.
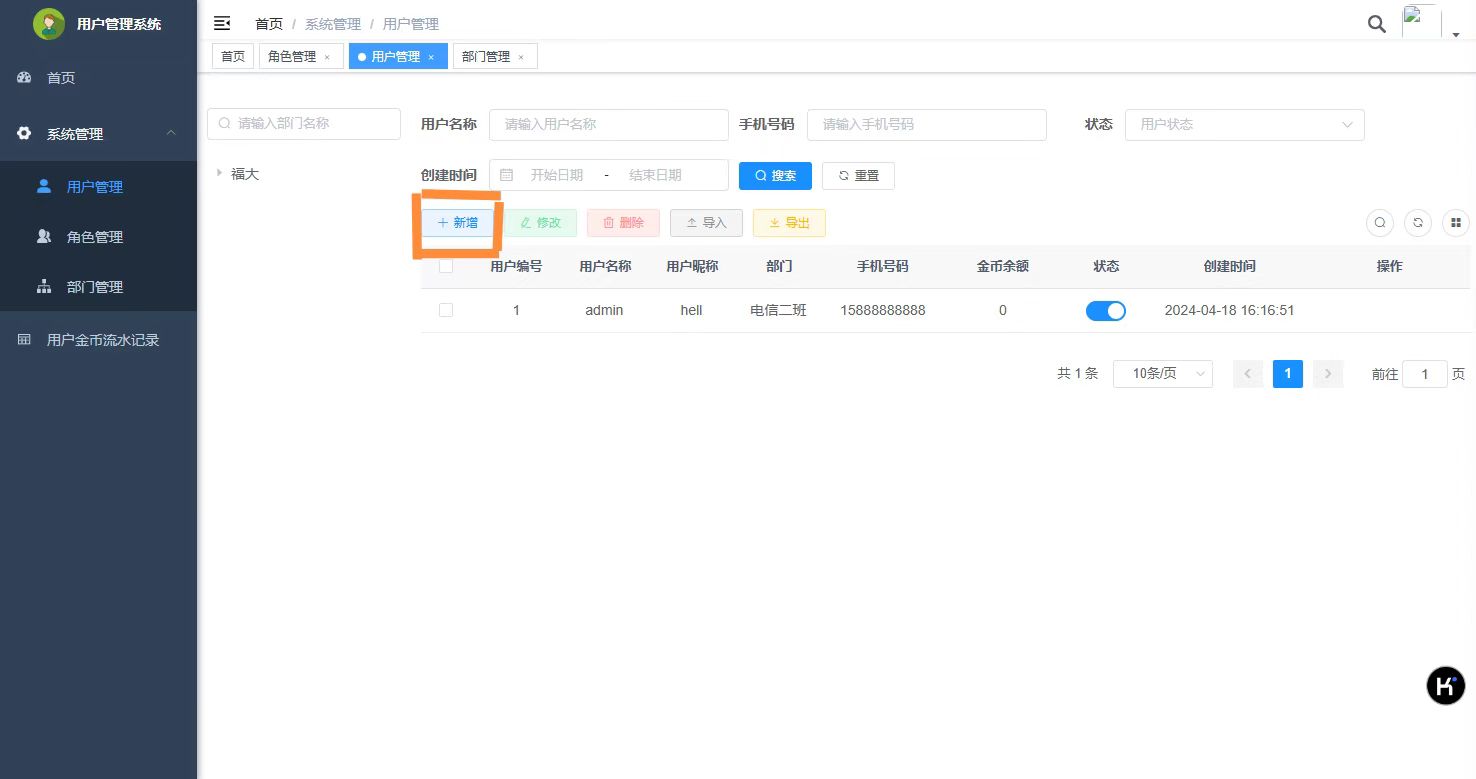
Step 2: Adding
You can add regular user information to this page.
You can fill in the information shown in the image below
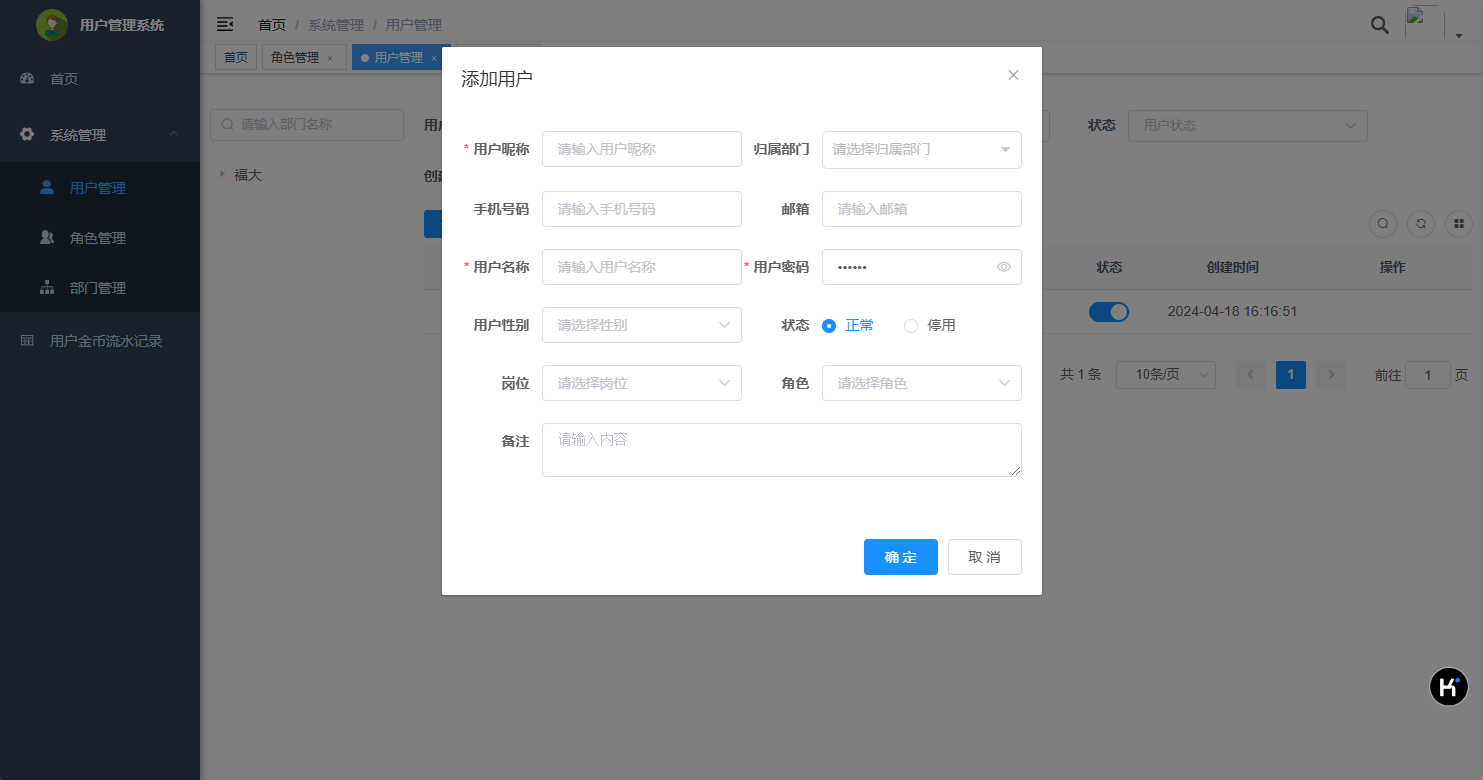
Click the OK button to save all the information
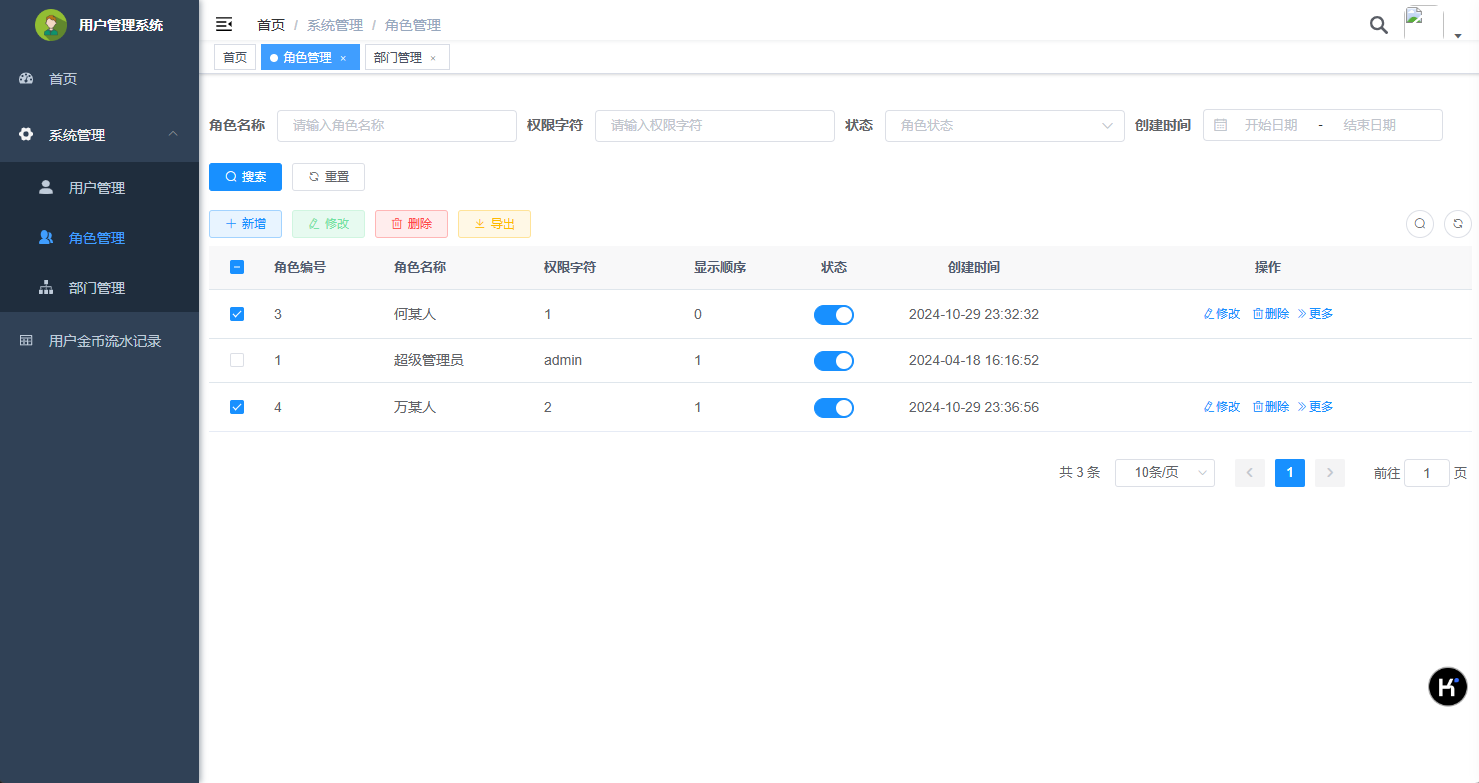
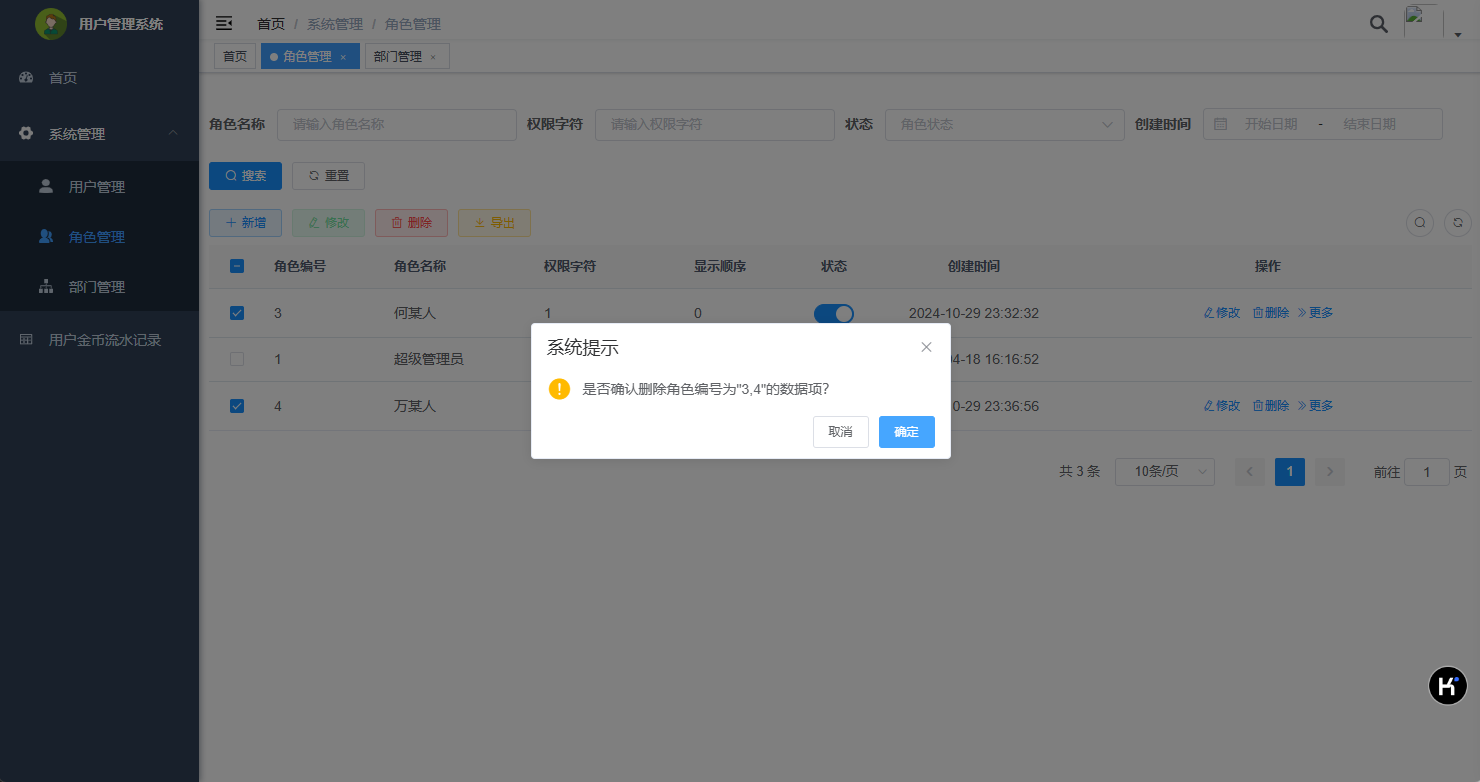
Step 3: Deleting
On the role management page, you can delete the user information by clicking Delete at the bottom of the operation bar
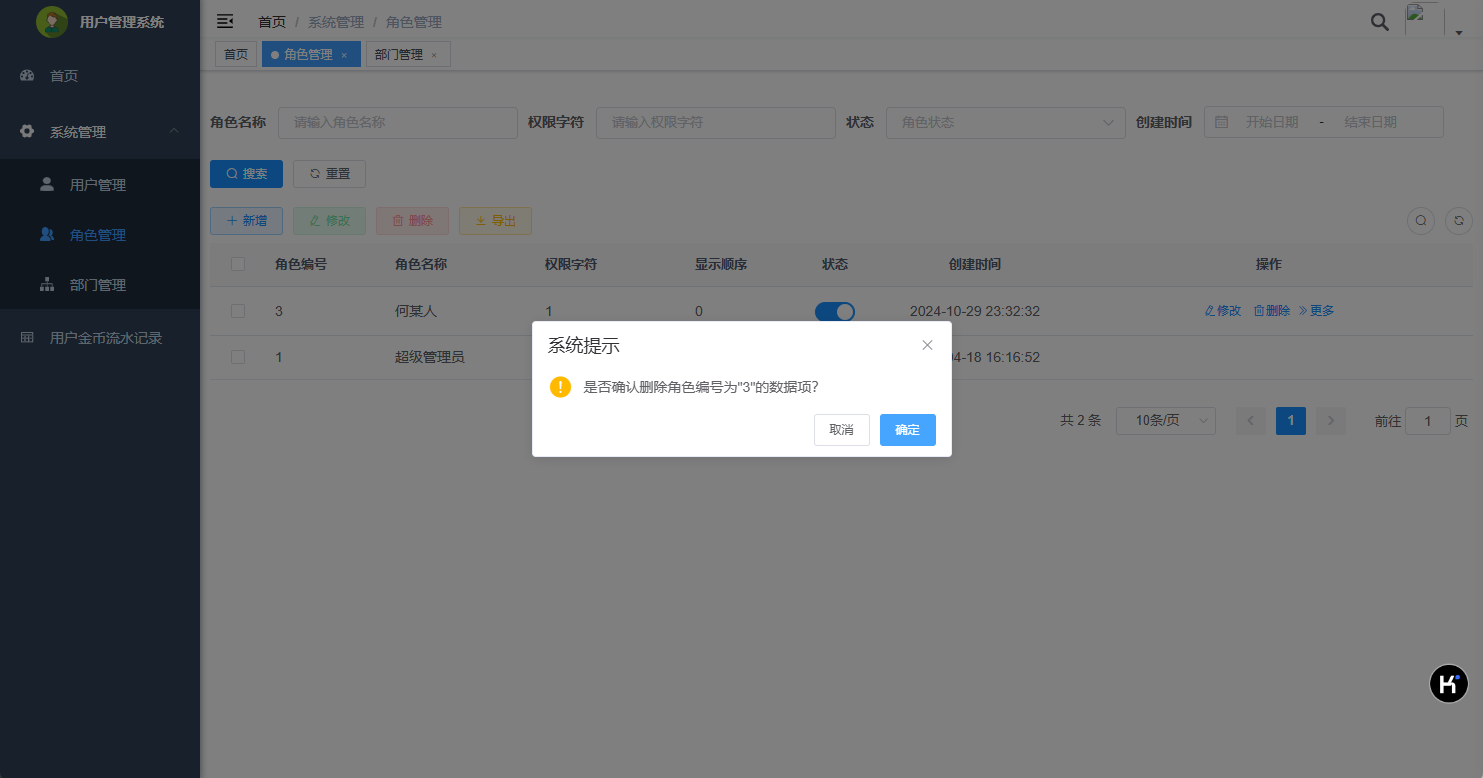
You can also delete information about multiple roles by selecting the check box before the role number
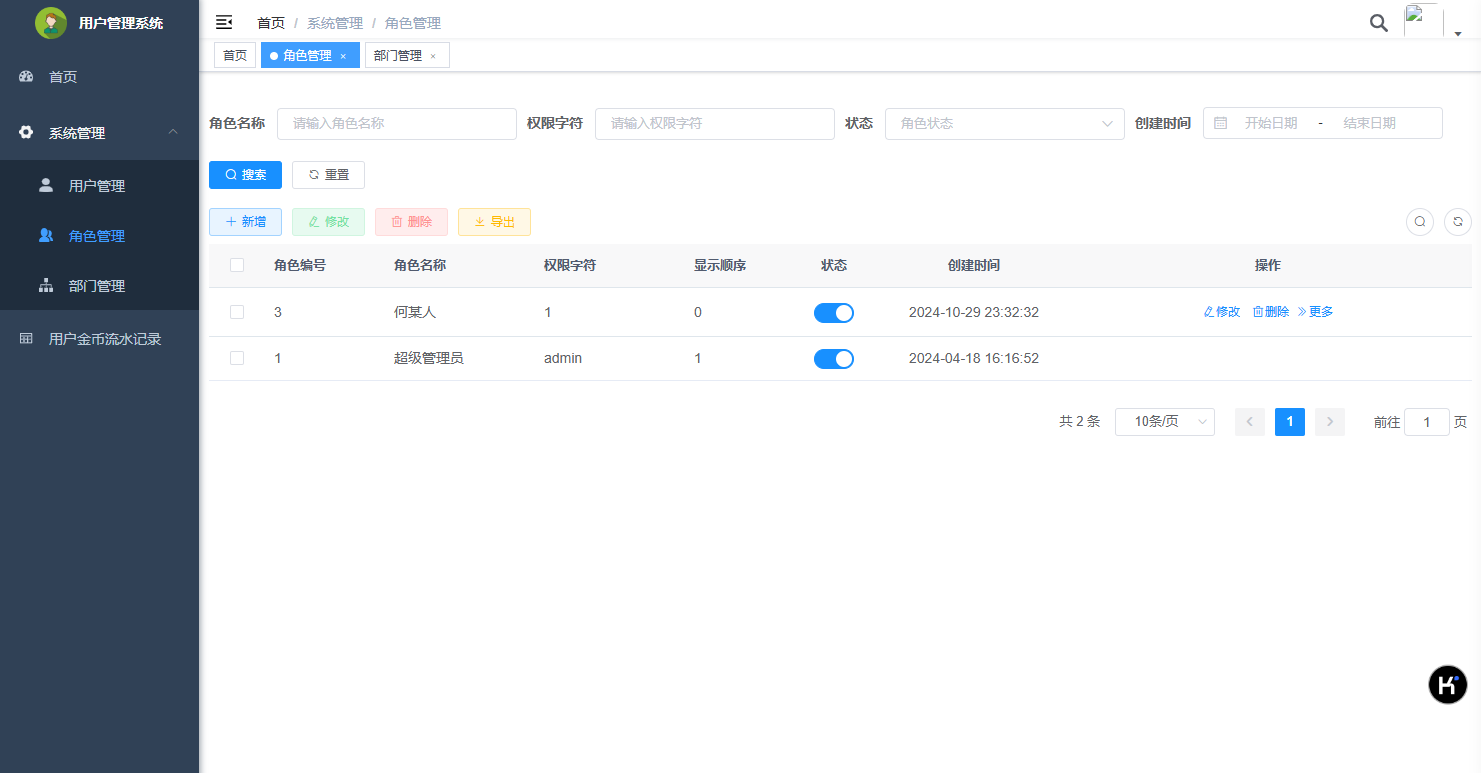
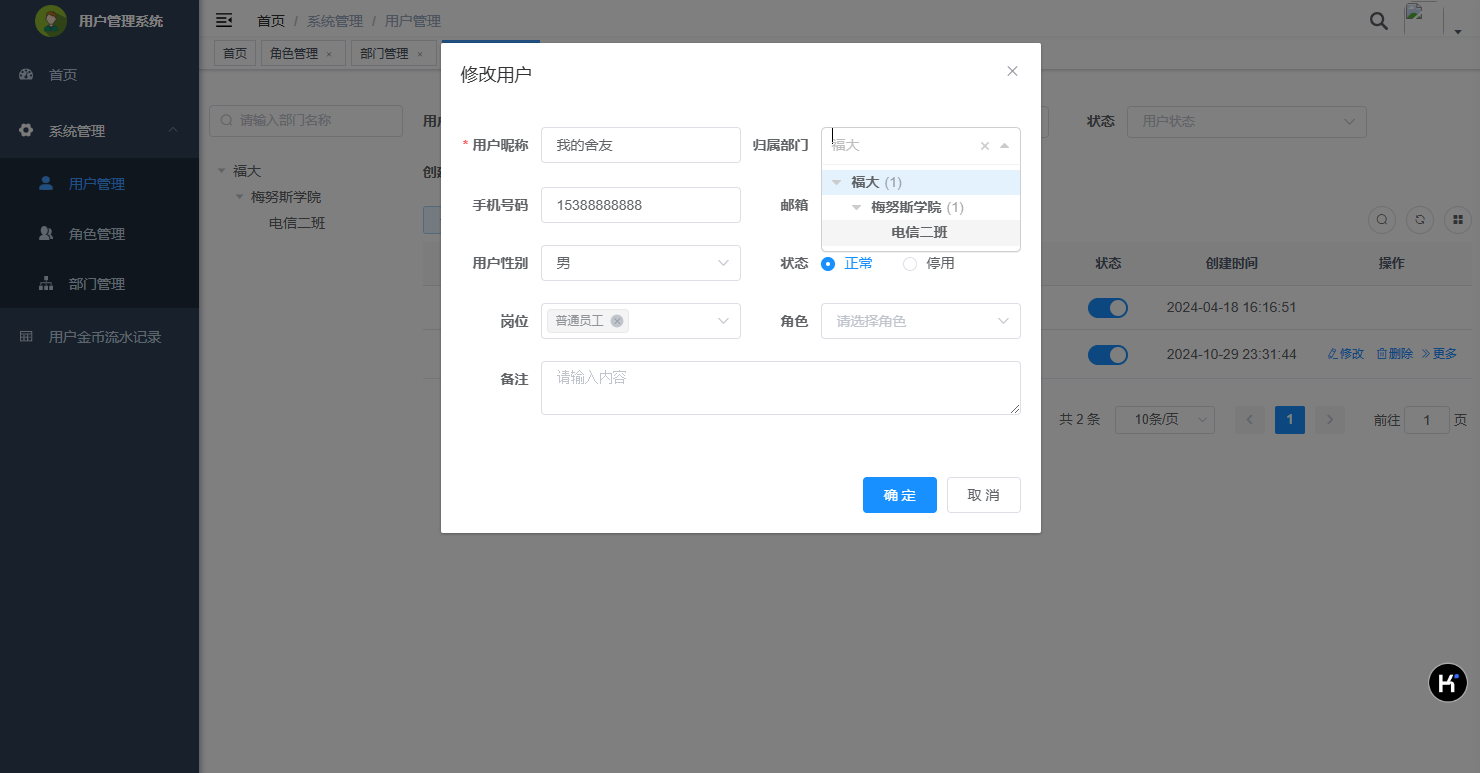
Step 4: Modifying
You can edit any character's information, including their name, phone number, email, and make changes to their information by clicking on the changes after each user below the action bar.
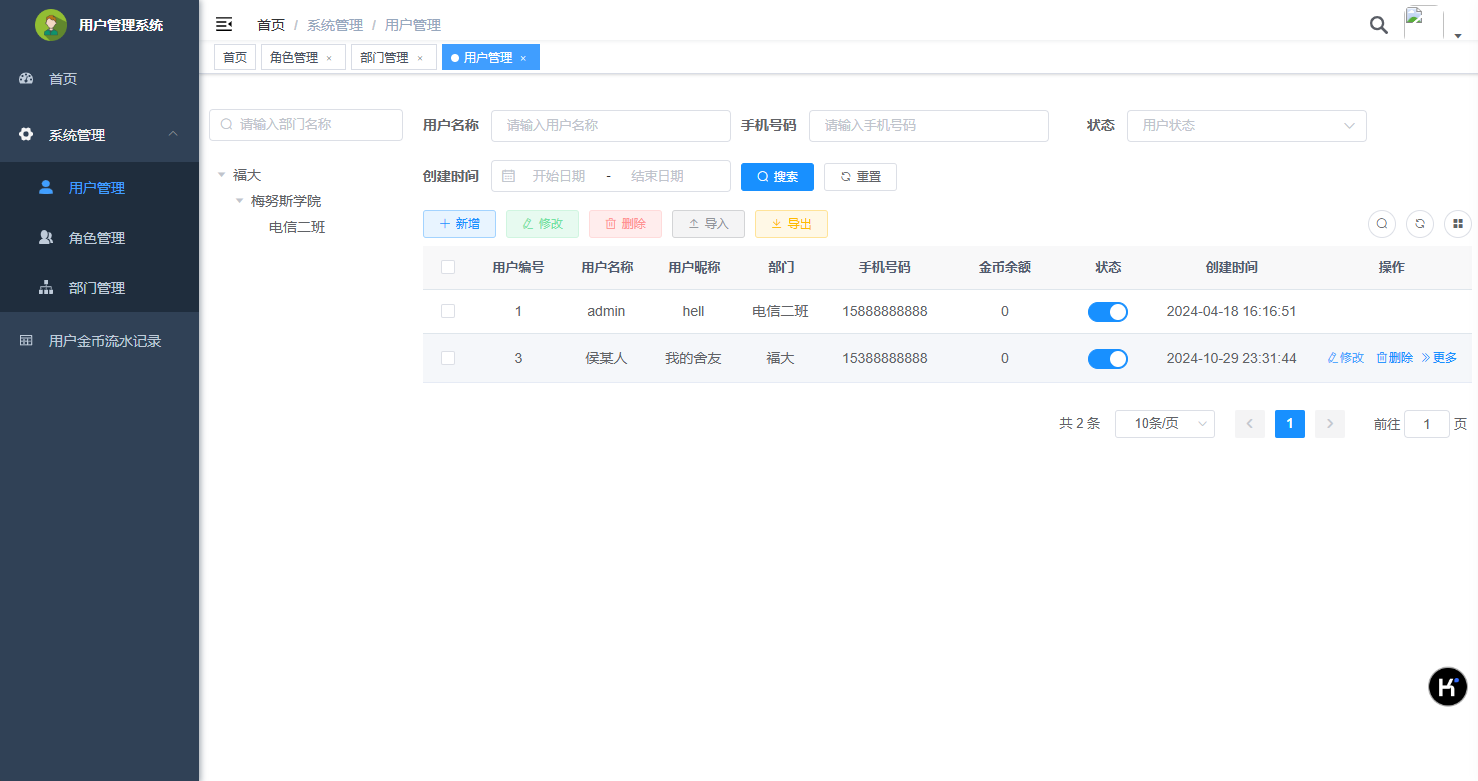
In the owning department, users can be classified to a multi-level classification.
Step 5: Querying
You can search for users who meet specific criteria by entering the query criteria at the top of the screen and clicking the button on the right. For example, you can enter "侯" as a filter.
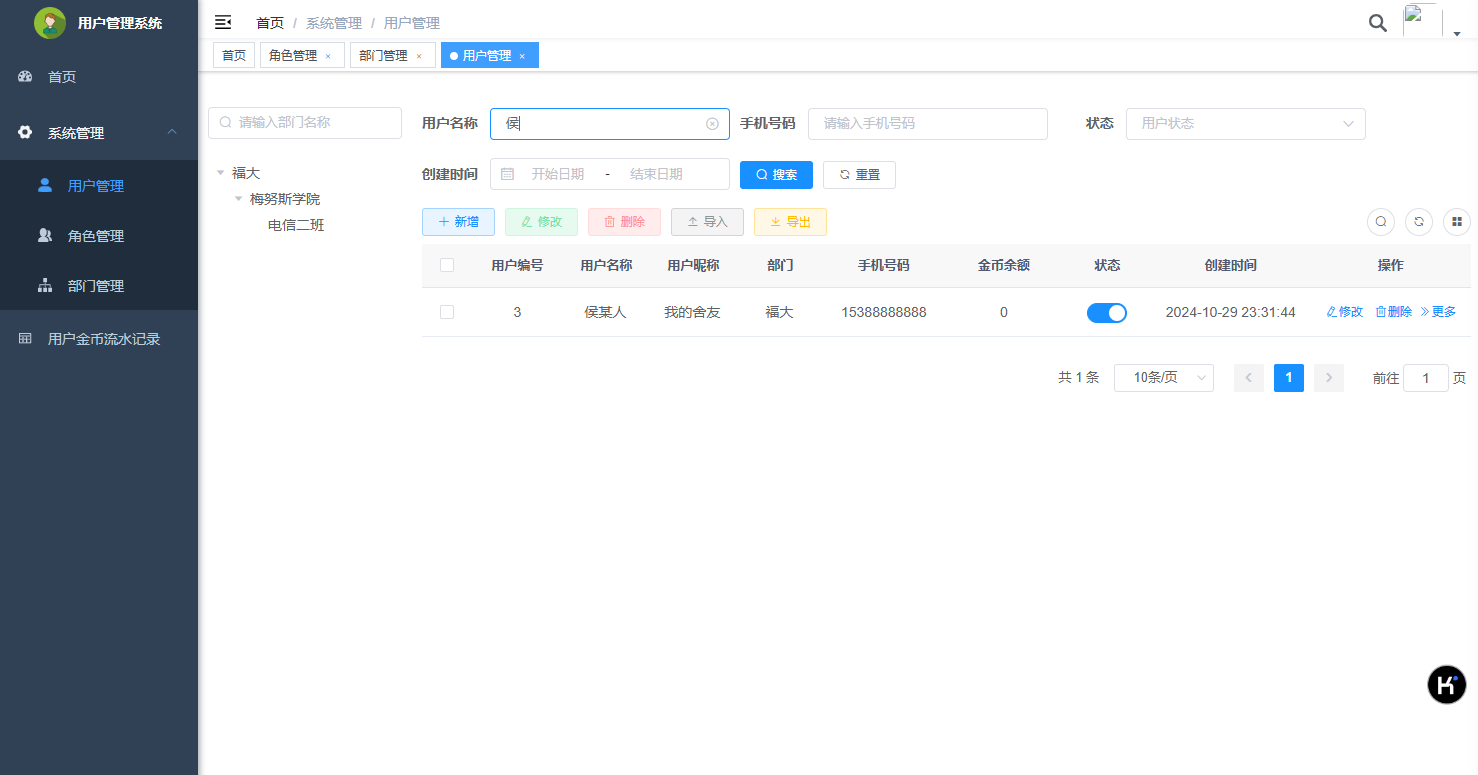
(This is already the result of a successful query.)
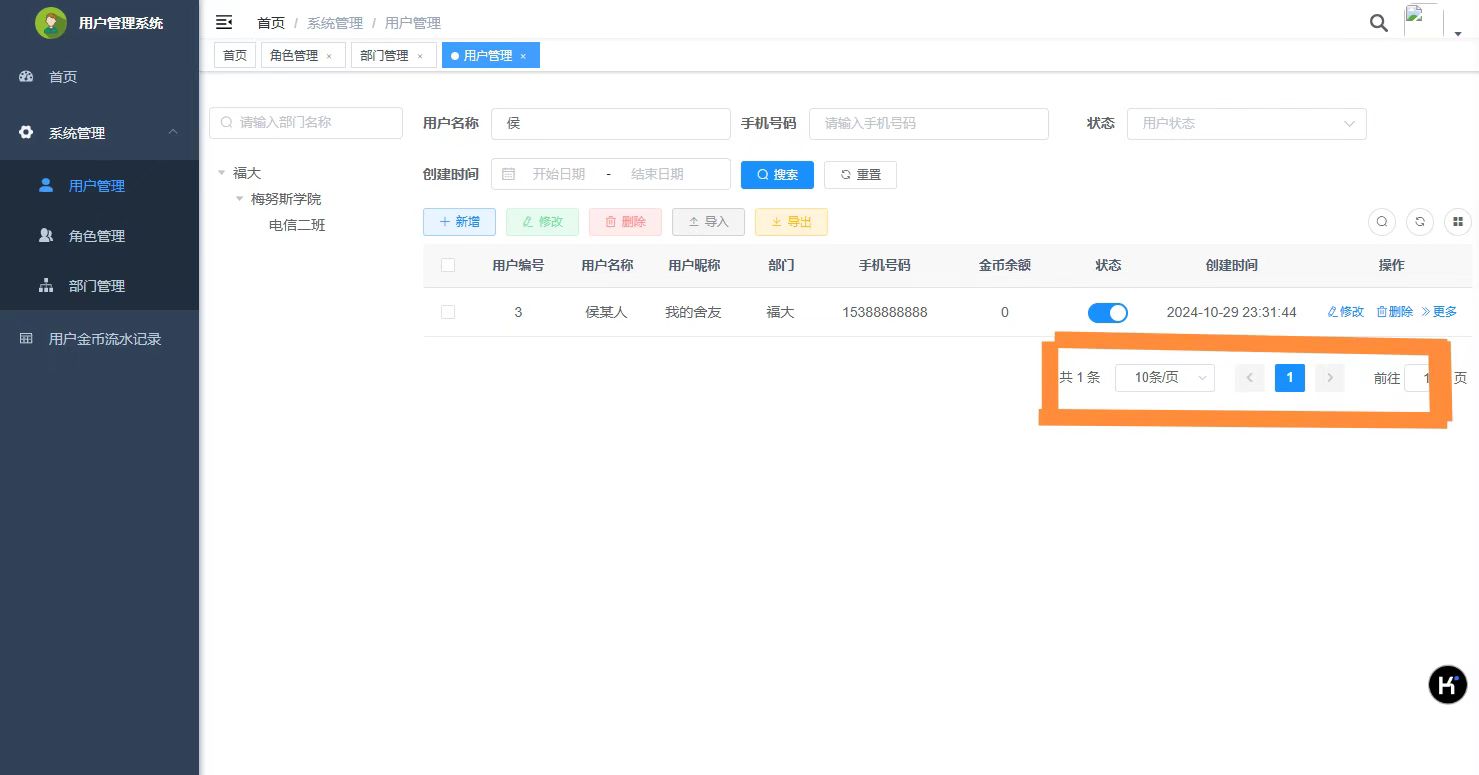
Step 6: Pagination Feature
This page actually has the function of paging, but I did not fill so many user information, if fill enough user information is able to achieve paging function.
For the first task of software engineering, The User Management System is a front-end and back-end separated system based on Spring Boot and Vue. The project adopts a multi-module layered architecture, supports RBAC (Role-Based Access Control) for permission management, and implements functionalities for managing users, roles, permissions, as well as related CRUD operations and backend features for user coins management.
Overall architecture
Frontend: Built with the Vue framework, primarily relying on Vue CLI, Vue Router, Vuex, and Axios as the technology stack for view layer presentation and page navigation.
Backend: Built with Spring Boot, Spring Security, and MyBatis, providing RESTful API and database interaction support.
Backend Environment:
Frontend Environment:
Front end
Use the popup in elementUI as a new addition
This code implements a User Configuration Dialog for adding or modifying user information on the interface, built using the Element UI framework. Below is an analysis of the main sections and functionalities of the code:
<el-dialog :title="title" :visible.sync="open" width="600px" append-to-body>
  <el-form ref="form" :model="form" :rules="rules" label-width="80px">
    <el-row>
      <el-col :span="12">
        <el-form-item label="用户昵称" prop="nickName">
          <el-input v-model="form.nickName" placeholder="请输入用户昵称" maxlength="30" />
        </el-form-item>
      </el-col>
      <el-col :span="12">
        <el-form-item label="归属部门" prop="deptId">
          <treeselect v-model="form.deptId" :options="deptOptions" :show-count="true" placeholder="请选择归属部门" />
        </el-form-item>
      </el-col>
    </el-row>
    <el-row>
      <el-col :span="12">
        <el-form-item label="手机号码" prop="phonenumber">
          <el-input v-model="form.phonenumber" placeholder="请输入手机号码" maxlength="11" />
        </el-form-item>
      </el-col>
      <el-col :span="12">
        <el-form-item label="邮箱" prop="email">
          <el-input v-model="form.email" placeholder="请输入邮箱" maxlength="50" />
        </el-form-item>
      </el-col>
    </el-row>
    <el-row>
      <el-col :span="12">
        <el-form-item v-if="form.userId == undefined" label="用户名称" prop="userName">
          <el-input v-model="form.userName" placeholder="请输入用户名称" maxlength="30" />
        </el-form-item>
      </el-col>
      <el-col :span="12">
        <el-form-item v-if="form.userId == undefined" label="用户密码" prop="password">
          <el-input v-model="form.password" placeholder="请输入用户密码" type="password" maxlength="20" show-password/>
        </el-form-item>
      </el-col>
    </el-row>
    <el-row>
      <el-col :span="12">
        <el-form-item label="用户性别">
          <el-select v-model="form.sex" placeholder="请选择性别">
            <el-option
              v-for="dict in dict.type.sys_user_sex"
              :key="dict.value"
              :label="dict.label"
              :value="dict.value"
            ></el-option>
          </el-select>
        </el-form-item>
      </el-col>
      <el-col :span="12">
        <el-form-item label="状态">
          <el-radio-group v-model="form.status">
            <el-radio
              v-for="dict in dict.type.sys_normal_disable"
              :key="dict.value"
              :label="dict.value"
            >{{dict.label}}</el-radio>
          </el-radio-group>
        </el-form-item>
      </el-col>
    </el-row>
    <el-row>
      <el-col :span="12">
        <el-form-item label="岗位">
          <el-select v-model="form.postIds" multiple placeholder="请选择岗位">
            <el-option
              v-for="item in postOptions"
              :key="item.postId"
              :label="item.postName"
              :value="item.postId"
              :disabled="item.status == 1"
            ></el-option>
          </el-select>
        </el-form-item>
      </el-col>
      <el-col :span="12">
        <el-form-item label="角色">
          <el-select v-model="form.roleIds" multiple placeholder="请选择角色">
            <el-option
              v-for="item in roleOptions"
              :key="item.roleId"
              :label="item.roleName"
              :value="item.roleId"
              :disabled="item.status == 1"
            ></el-option>
          </el-select>
        </el-form-item>
      </el-col>
    </el-row>
    <el-row>
      <el-col :span="24">
        <el-form-item label="备注">
          <el-input v-model="form.remark" type="textarea" placeholder="请输入内容"></el-input>
        </el-form-item>
      </el-col>
    </el-row>
  </el-form>
  <div slot="footer" class="dialog-footer">
    <el-button type="primary" @click="submitForm">确 定</el-button>
    <el-button @click="cancel">取 消</el-button>
  </div>
</el-dialog>
Overall Structure
el-dialog: Root container for the dialog, defining the title and width.el-form: Used for the form structure, defining the data binding model (form) and form validation rules (rules).el-row and el-col elements manage layout, arranging form items in two columns.User Information Fields
The el-form-item elements contain several input fields that allow users to enter relevant information:
nickName): Uses el-input component, limited to 30 characters.deptId): Uses the treeselect component for department selection, with a count display.phonenumber) and Email (email): Simple text input fields with character limits of 11 and 50, respectively.userName) and Password (password): Shown only when the user is undefined (for new user creation), with password input set to type="password" and show-password for toggling visibility.sex): Implemented via an el-select dropdown, with options sourced from dict.type.sys_user_sex.status): Uses el-radio-group for a radio button group, with options from dict.type.sys_normal_disable.User Permission Settings
postIds): A multi-select dropdown with options provided by postOptions. Options are disabled if their status is inactive (item.status == 1).roleIds): Another multi-select dropdown with roles sourced from roleOptions, with options disabled based on their status.Additional Information
remark): Textarea input field for additional comments, supporting multiline input.Action Buttons
slot="footer": Defines action buttons at the bottom of the dialog.submitForm method to submit form data.cancel method to close the dialog or reset actions.Key Features Summary
v-model provides two-way binding between user input and the form object fields.rules attribute provides validation for the form, ensuring data meets requirements.el-row and el-col create a two-column layout within the dialog, enhancing readability and organization.Back-end part of the code
Controller
/**
 * 新增用户
 */
@PreAuthorize("@ss.hasPermi('system:user:add')")
@ApiOperation("新增用户")
@Log(title = "用户管理", businessType = BusinessType.INSERT)
@PostMapping
public AjaxResult add(@Validated @RequestBody SysUser user) {
    // Check if the username is unique
    if (!userService.checkUserNameUnique(user)) {
        return error("新增用户'" + user.getUserName() + "'失败,登录账号已存在");
    }
    // Check if the phone number is unique
    else if (StringUtils.isNotEmpty(user.getPhonenumber()) && !userService.checkPhoneUnique(user)) {
        return error("新增用户'" + user.getUserName() + "'失败,手机号码已存在");
    }
    // Check if the email is unique
    else if (StringUtils.isNotEmpty(user.getEmail()) && !userService.checkEmailUnique(user)) {
        return error("新增用户'" + user.getUserName() + "'失败,邮箱账号已存在");
    }

    // Set creator and encrypt the password
    user.setCreateBy(getUsername());
    user.setPassword(SecurityUtils.encryptPassword(user.getPassword()));

    // Insert user and return the result
    return toAjax(userService.insertUser(user));
}
Service
/**
     * 新增保存用户信息
     *
     * @param user 用户信息
     * @return 结果
     */
    @Override
    @Transactional
    public int insertUser(SysUser user)
    {
        // 新增用户信息
        int rows = userMapper.insertUser(user);
        // 新增用户岗位关联
        insertUserPost(user);
        // 新增用户与角色管理
        insertUserRole(user);
        return rows;
    }
Mapper.xml
<insert id="insertUser" parameterType="SysUser" useGeneratedKeys="true" keyProperty="userId">
         insert into sys_user(
             <if test="userId != null and userId != 0">user_id,</if>
             <if test="deptId != null and deptId != 0">dept_id,</if>
             <if test="userName != null and userName != ''">user_name,</if>
             <if test="nickName != null and nickName != ''">nick_name,</if>
             <if test="email != null and email != ''">email,</if>
             <if test="avatar != null and avatar != ''">avatar,</if>
             <if test="phonenumber != null and phonenumber != ''">phonenumber,</if>
             <if test="sex != null and sex != ''">sex,</if>
             <if test="password != null and password != ''">password,</if>
             <if test="status != null and status != ''">status,</if>
             <if test="createBy != null and createBy != ''">create_by,</if>
             <if test="remark != null and remark != ''">remark,</if>
             create_time
         )values(
             <if test="userId != null and userId != ''">#{userId},</if>
             <if test="deptId != null and deptId != ''">#{deptId},</if>
             <if test="userName != null and userName != ''">#{userName},</if>
             <if test="nickName != null and nickName != ''">#{nickName},</if>
             <if test="email != null and email != ''">#{email},</if>
             <if test="avatar != null and avatar != ''">#{avatar},</if>
             <if test="phonenumber != null and phonenumber != ''">#{phonenumber},</if>
             <if test="sex != null and sex != ''">#{sex},</if>
             <if test="password != null and password != ''">#{password},</if>
             <if test="status != null and status != ''">#{status},</if>
             <if test="createBy != null and createBy != ''">#{createBy},</if>
             <if test="remark != null and remark != ''">#{remark},</if>
             sysdate()
         )
    </insert>
In this assignment, I have learned:
Back End:
Developed a foundational understanding of various Java annotations and statements, gaining proficiency in the Spring Boot framework. I learned how to manage user permissions, validate input data, and implement CRUD operations effectively.
Front End:
Systematically learned the structure and fundamental applications of Vue.js, applying this knowledge to practical examples. I became familiar with the use of Element UI, mastering the creation of user configuration dialogs, handling form validations, managing dynamic form layouts, and implementing user feedback through alerts and notifications. Additionally, I learned how to interact with backend APIs to enhance the overall functionality of the application.

