


173
社区成员
 发帖
发帖 与我相关
与我相关 我的任务
我的任务
 分享
分享
| Course for This Assignment | 2401_MU_SE_EE308 |
|---|---|
| Student FZU ID | 832201118 |
| Student MU lD | 22125345 |
| Student Name | Wentao Yue |
| Assignment Requirements | Design a front-end and back-end separated contact |
| Objectives of This Assignment | Learn software development |
The Contact Management System is a front-end and back-end separated project designed to manage basic contact information, such as adding, editing, deleting, and viewing contacts. This project adopts a RESTful architecture to facilitate smooth and efficient interaction between users and the contact data, achieved through the coordinated efforts of the front end and back end.
In this system, users can manage contact information through an interactive front-end interface, where they can input details like the contact’s name, an 11-digit phone number, and an email address. The system includes data validation to ensure the accuracy of each field, with strict format checks for phone numbers, ensuring consistency and data integrity.
Front-end: Built using HTML, CSS, and JavaScript. The front-end page offers an intuitive and visually appealing interface, with form validation and error prompts to enhance user experience. JavaScript handles API requests to the back end, enabling asynchronous data fetching and form submission for real-time page updates.
Back-end: Developed with the Spring Boot framework, the back end provides a reliable RESTful API. Supported by Spring Data JPA, it handles data interaction with the MySQL database. Core back-end functionalities include CRUD operations on contact data, and data validation is enforced through annotations to ensure compliance with data integrity requirements.
Database: MySQL is used for data storage to maintain contact information, with Hibernate ORM facilitating object-relational mapping between entity classes and database tables. JPA’s auto-configuration simplifies database operations.
Dependency Management: The project utilizes Maven for dependency management, incorporating libraries such as Spring Boot’s Web and JPA modules, MySQL connector, etc. Maven also integrates Spring Boot DevTools to streamline development and supports unit testing frameworks for future testing needs.
The following PSP (Personal Software Process) table details the estimated and actual time spent on each stage of development, providing a clear breakdown of the time allocated to different tasks:
| Phase | Estimated Time(hours) | Actual Time(hours) |
|---|---|---|
| Requirement Analysis | 1 | 2 |
| Design | 3 | 4 |
| Frontend Development | 3 | 3 |
| Backend Development | 5 | 8 |
| Testing | 5 | 8 |
| Deployment and Presentation | 3 | 5 |
| Total | 20 | 30 |
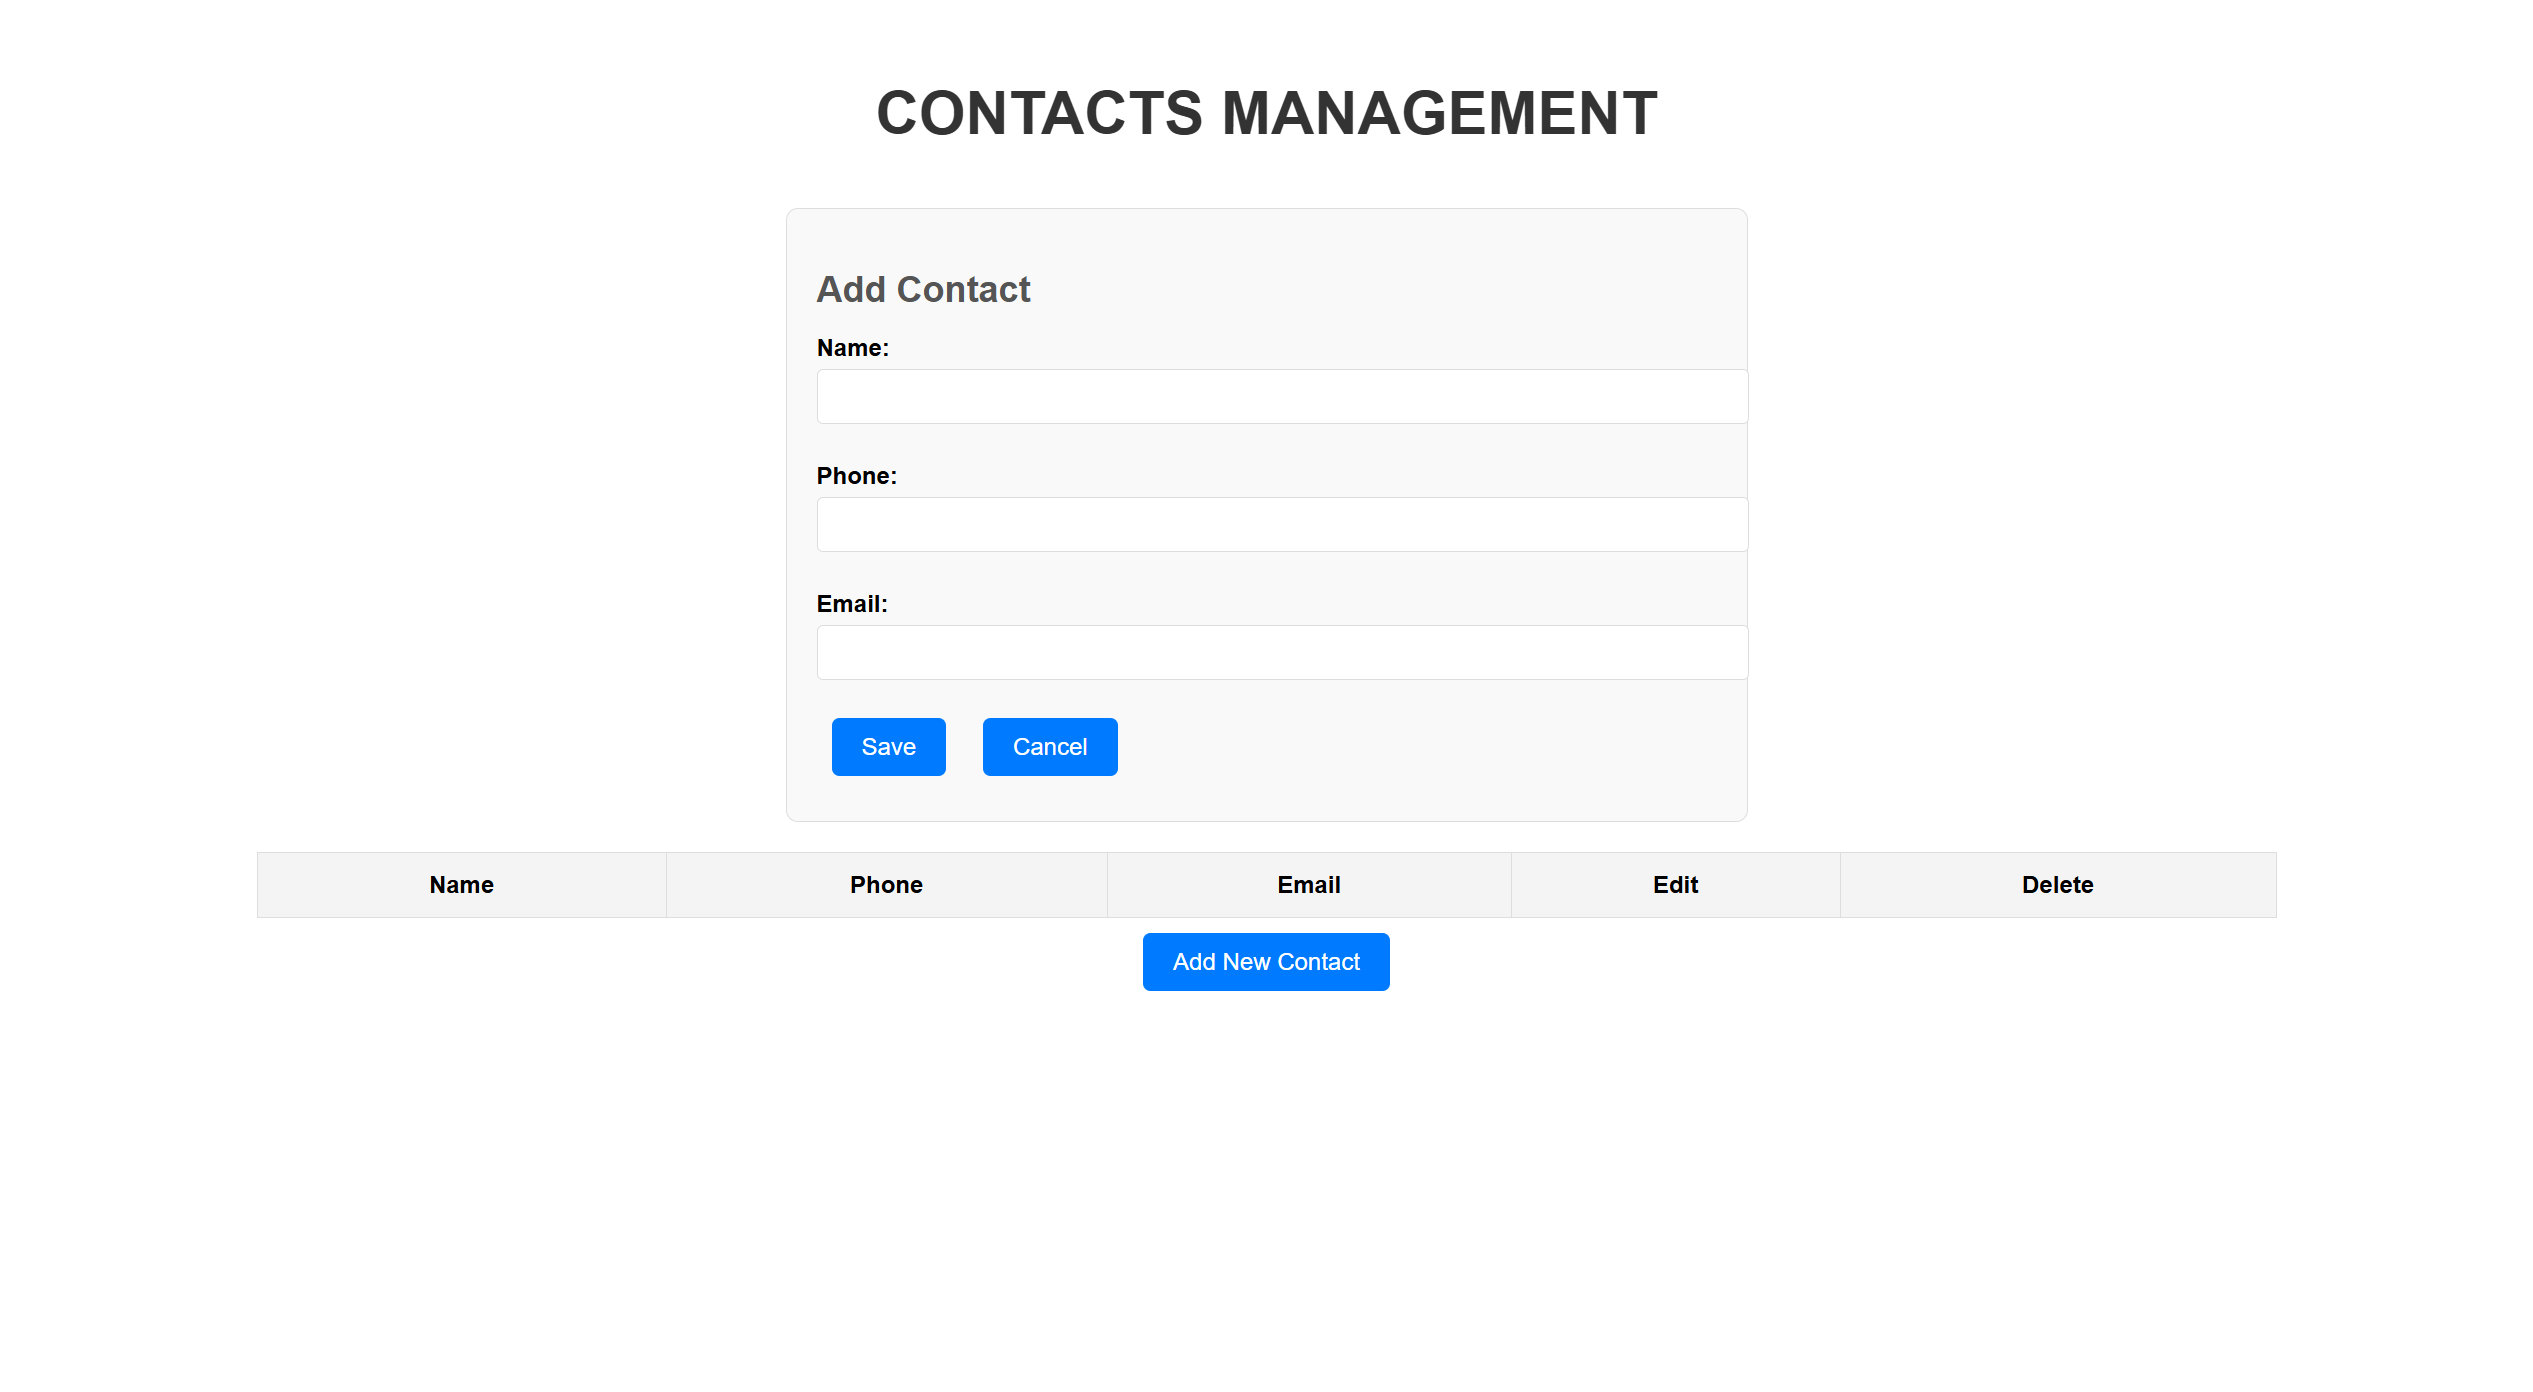
The following sections demonstrate each primary feature of the Contact Management System, along with animated GIFs to illustrate their functionality:
Users can click the "Add New Contact" button to open a form, where they input the contact’s name, 11-digit phone number, and email. After filling out the form, clicking "Save" adds the new contact to the contact list displayed on the page.
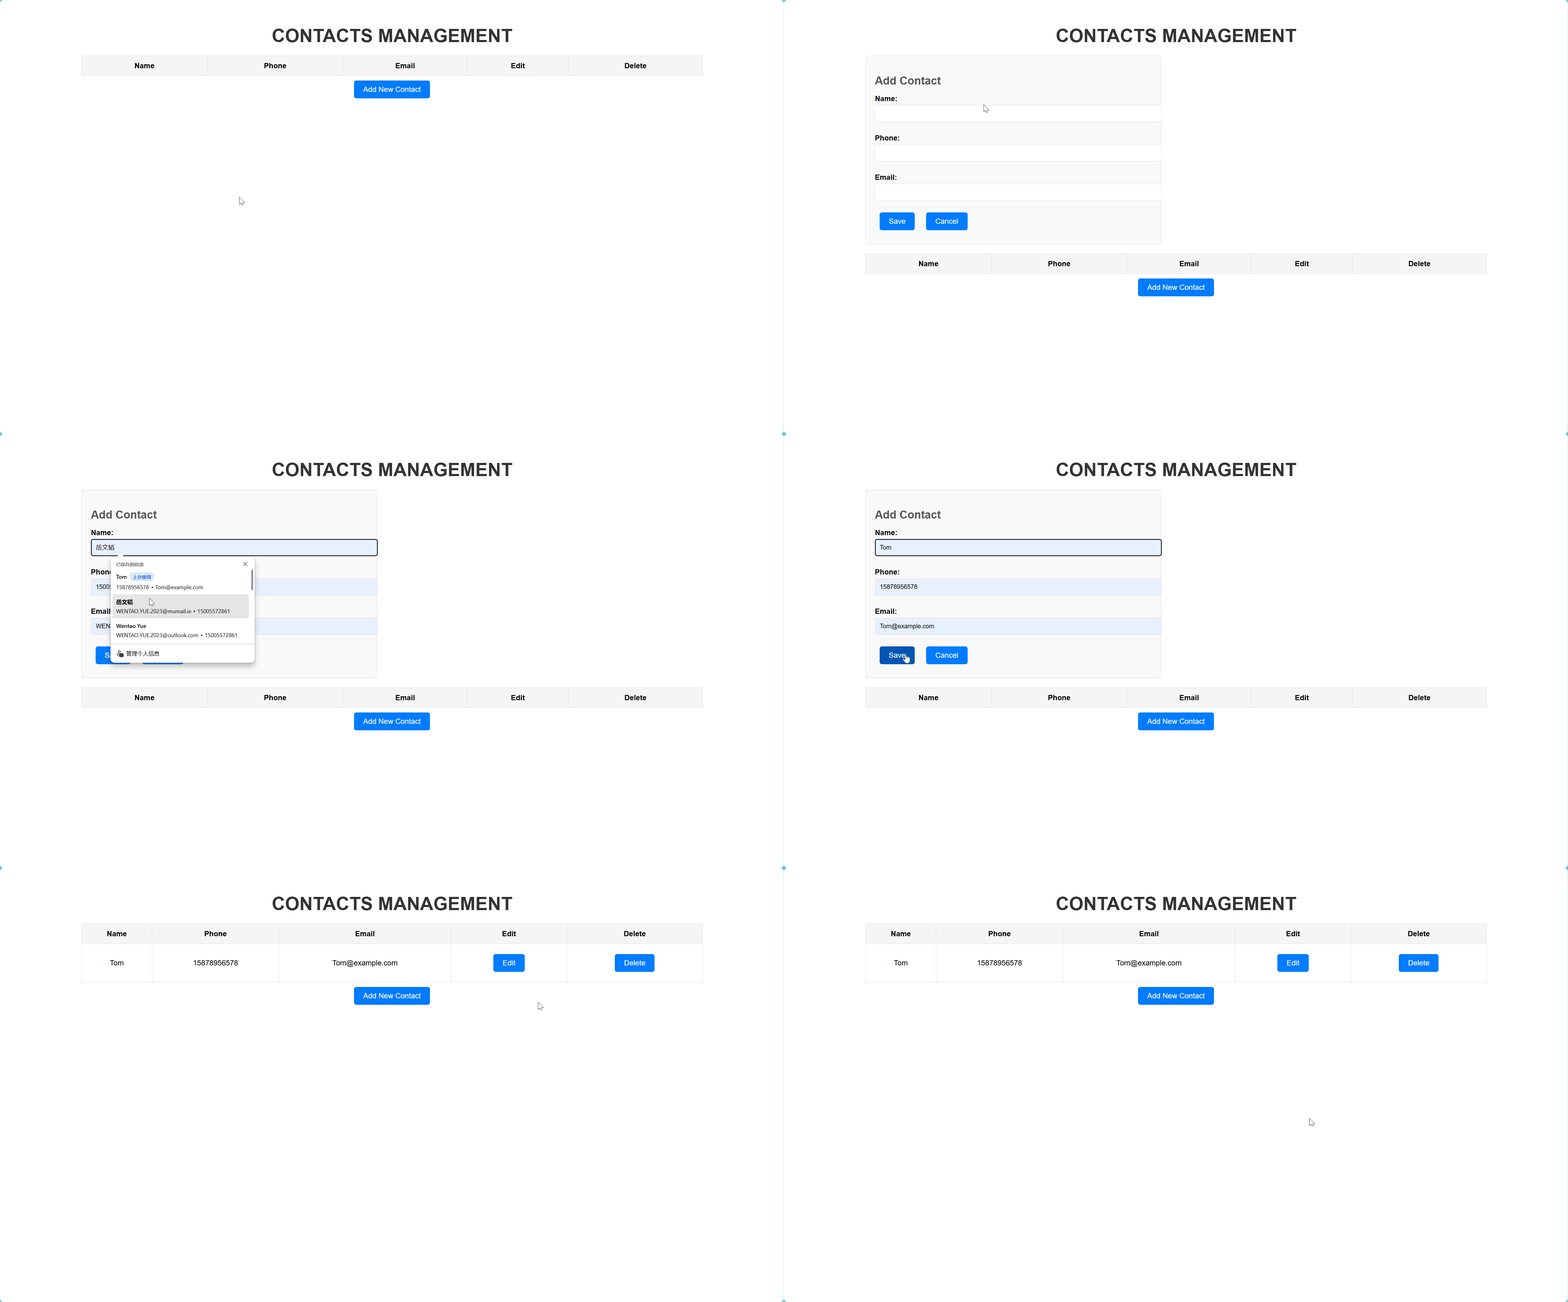
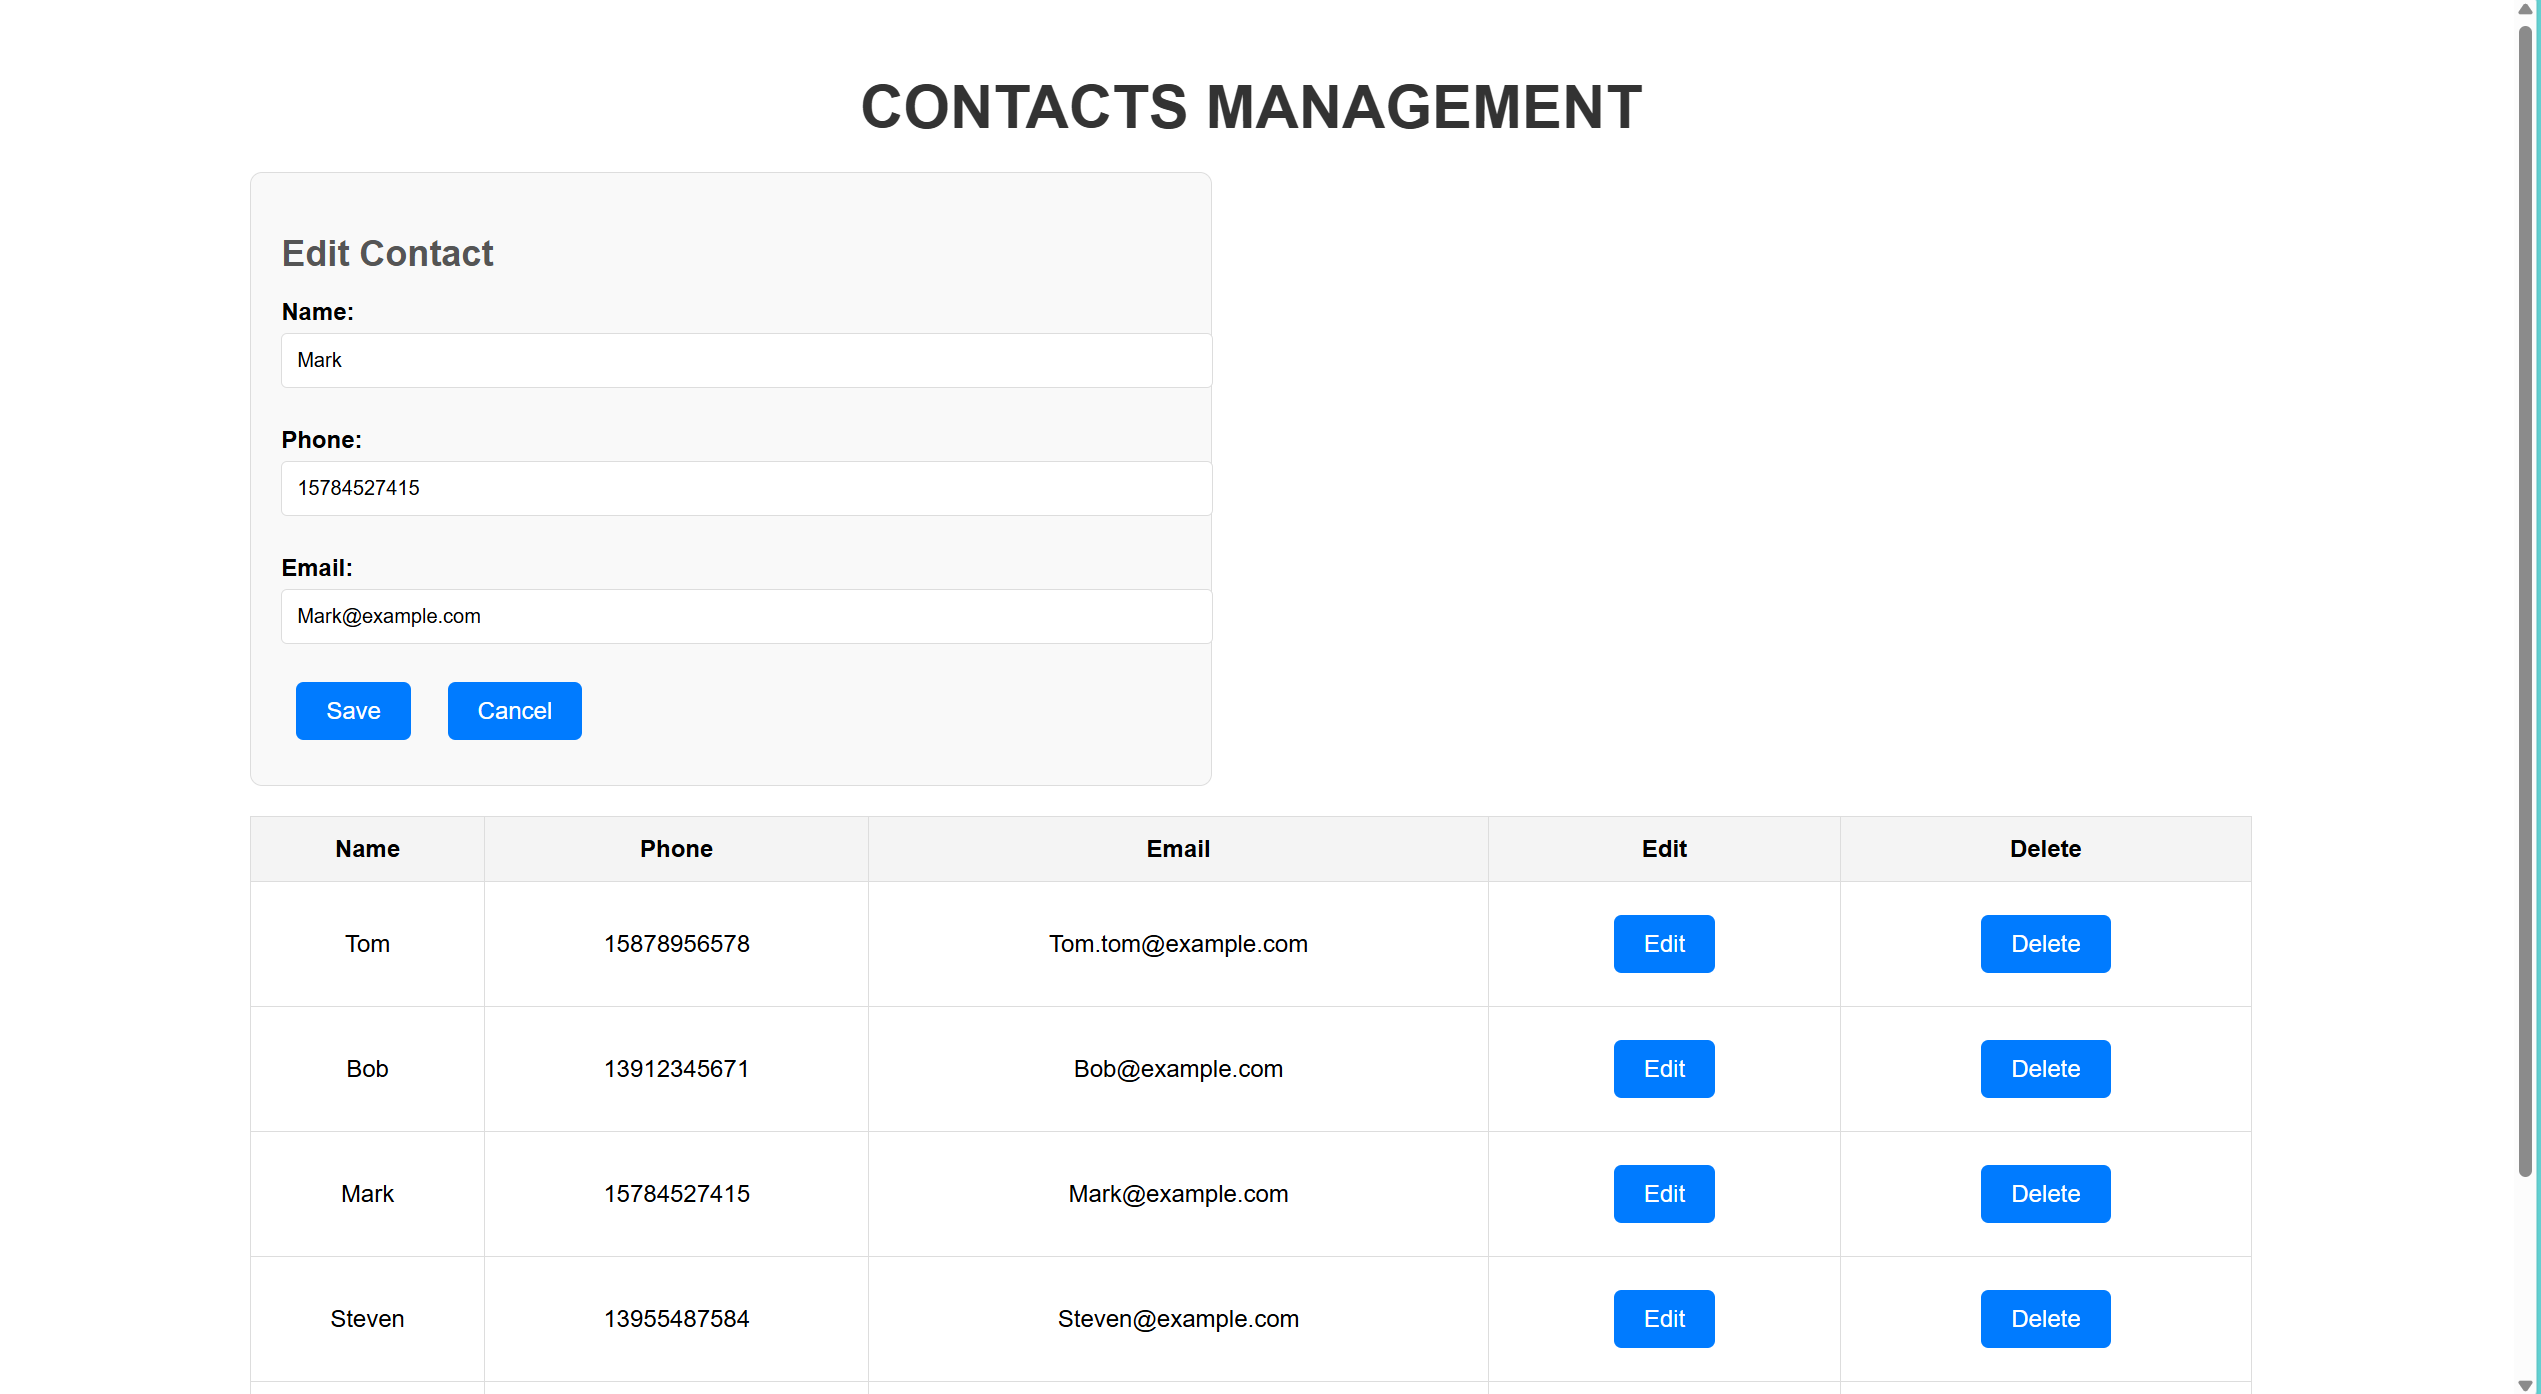
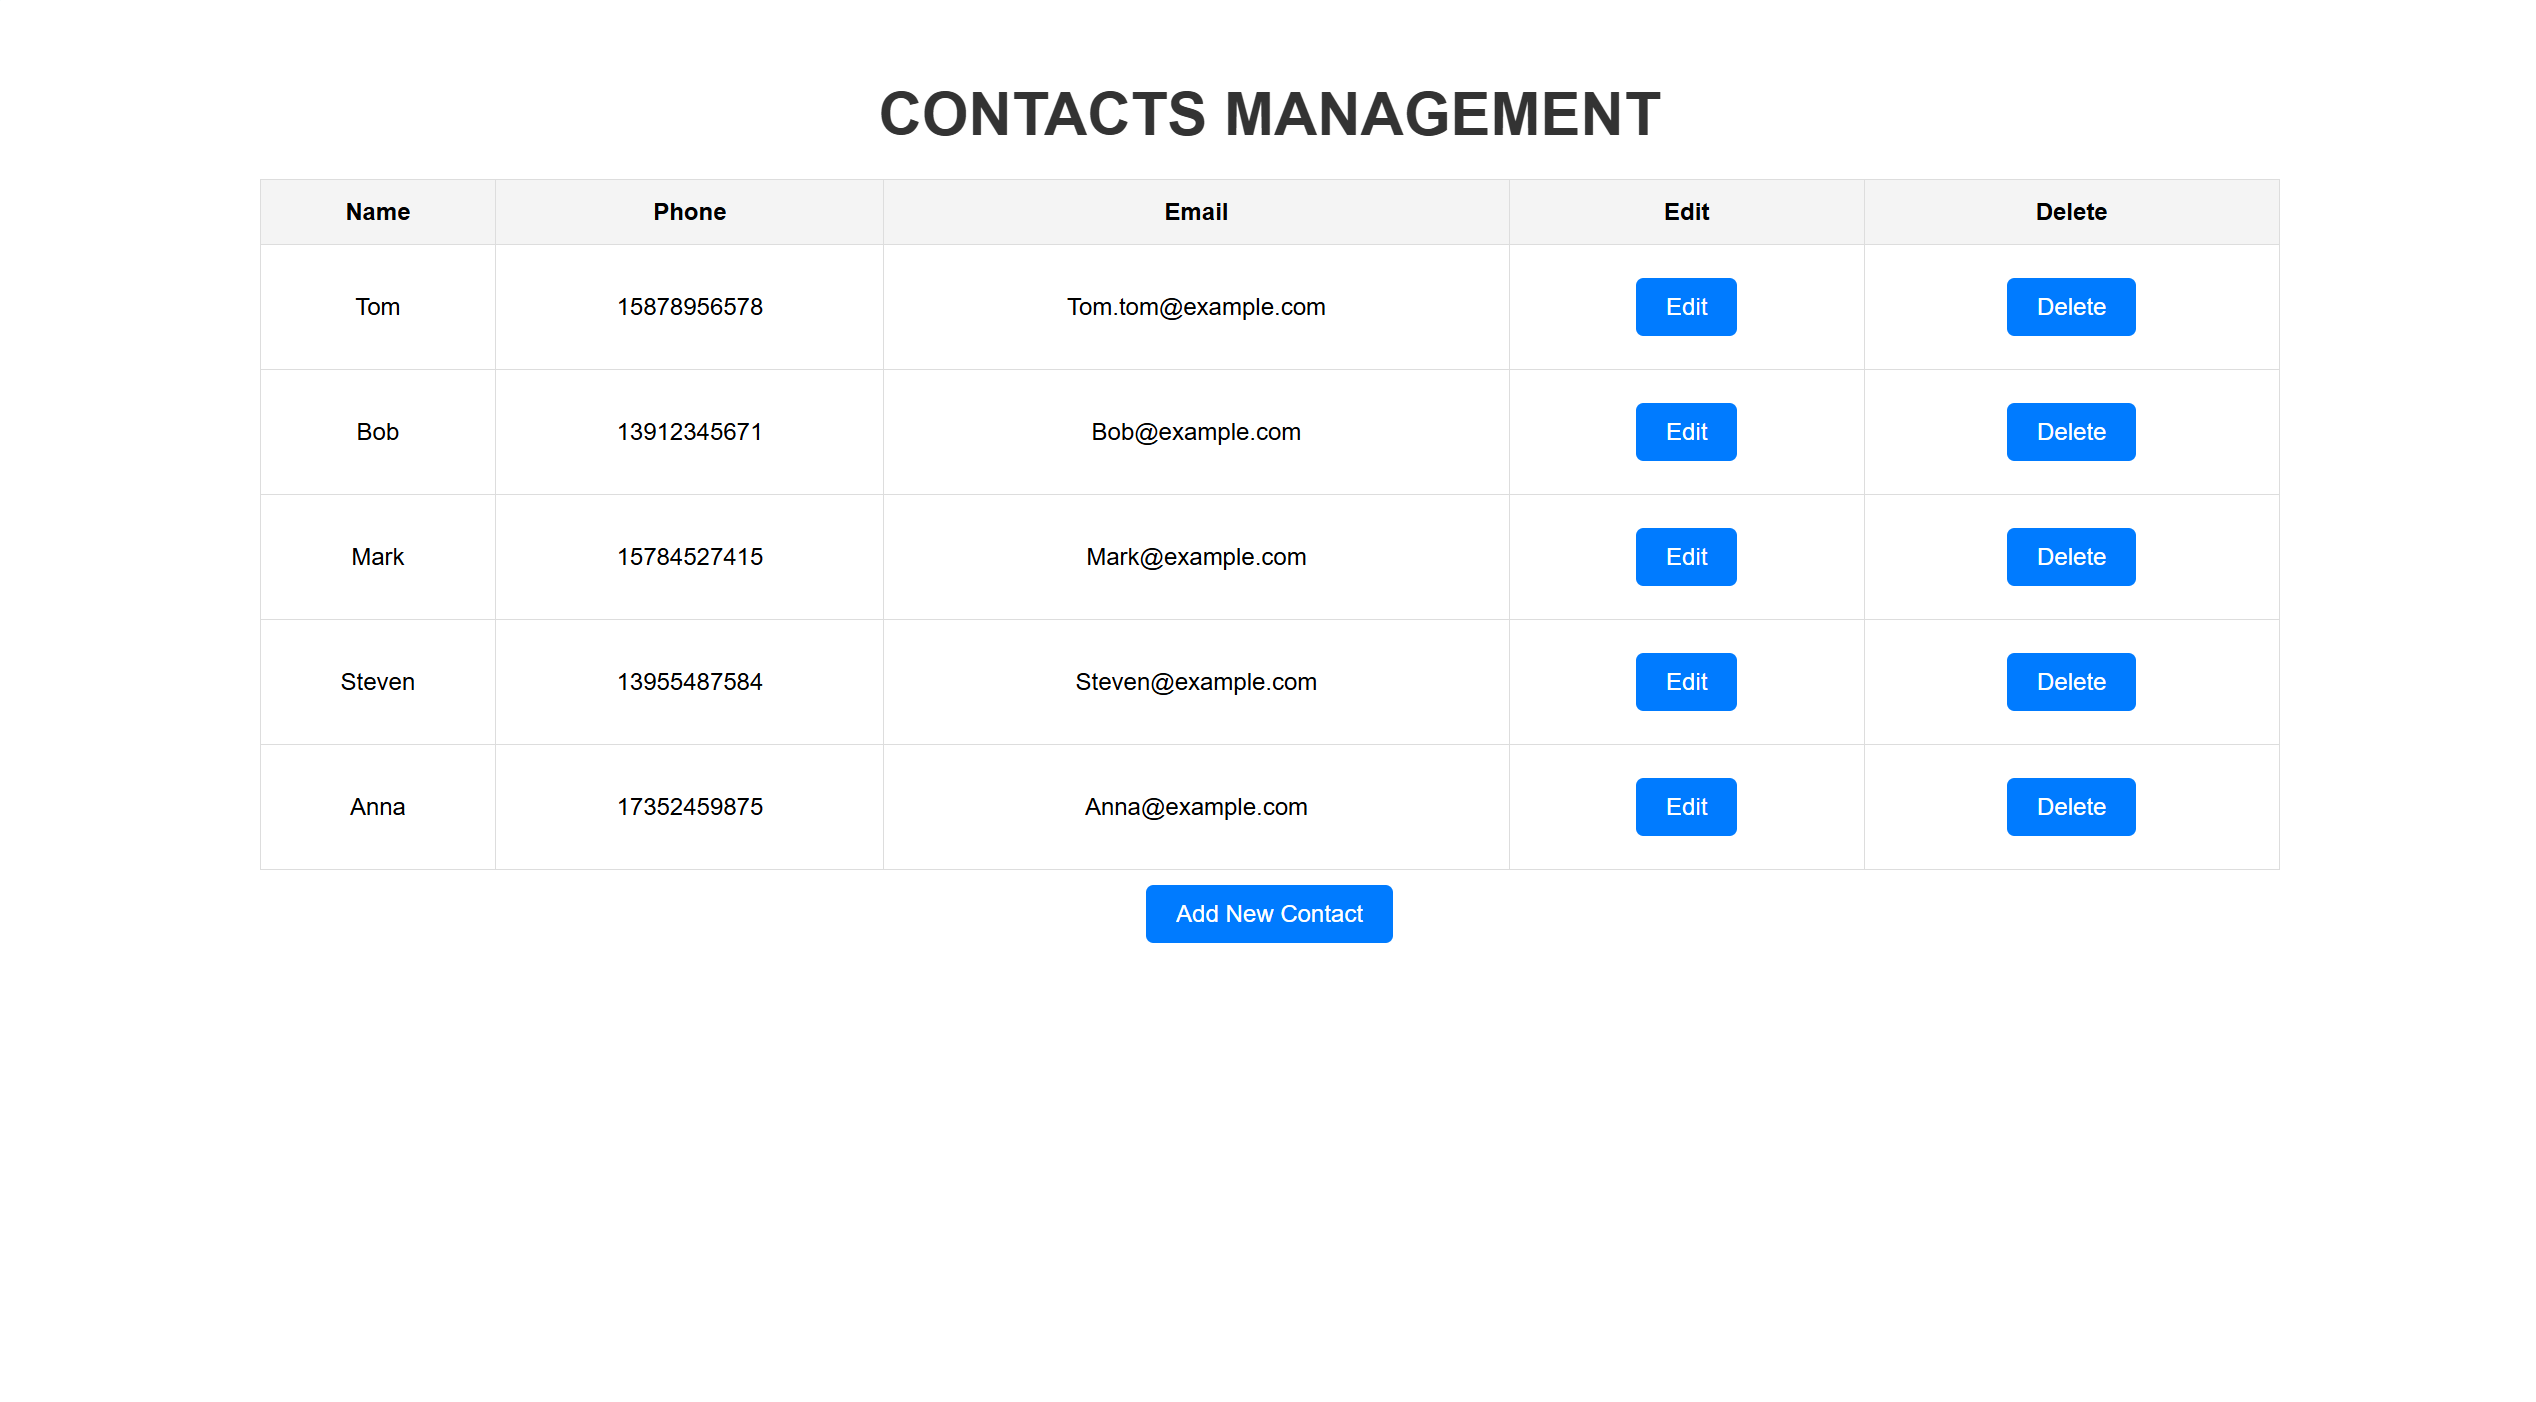
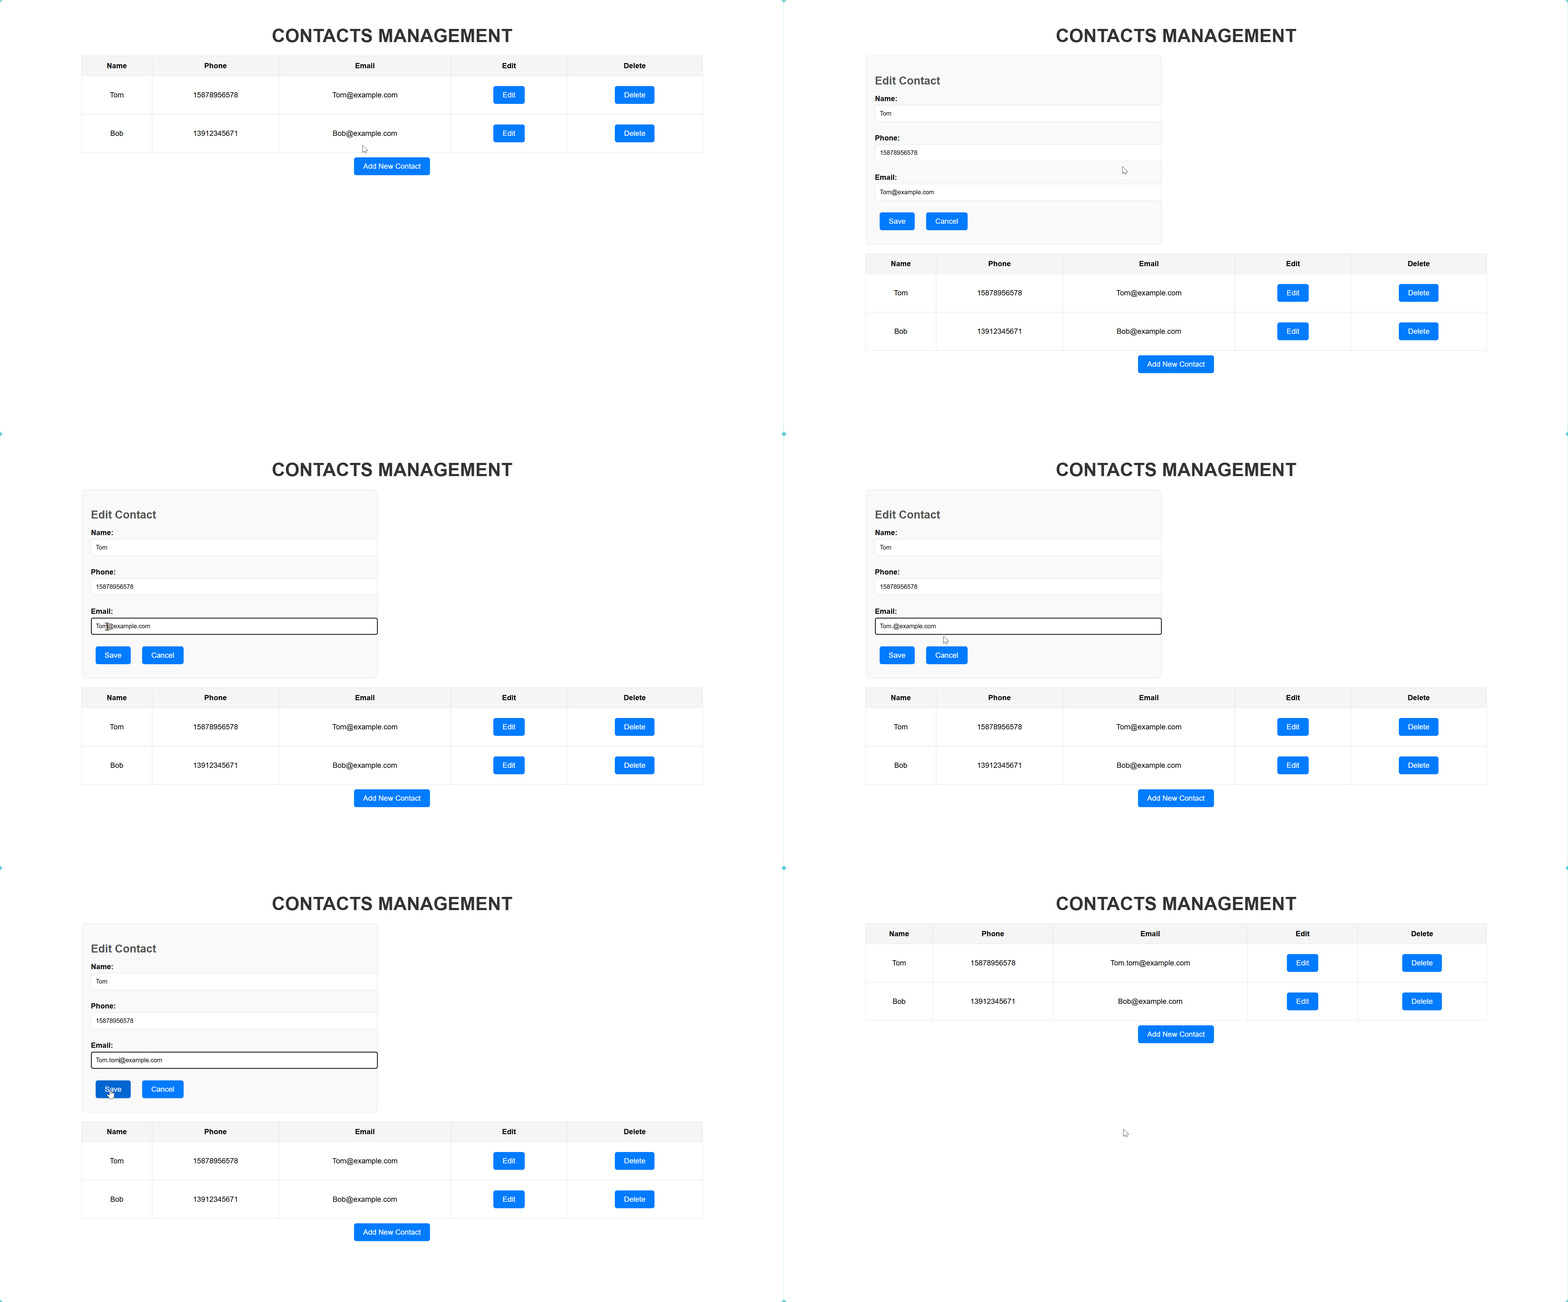
Clicking the "Edit" button next to any contact opens an edit form, allowing users to update contact details. After making changes, users click "Save" to update the information in the list.
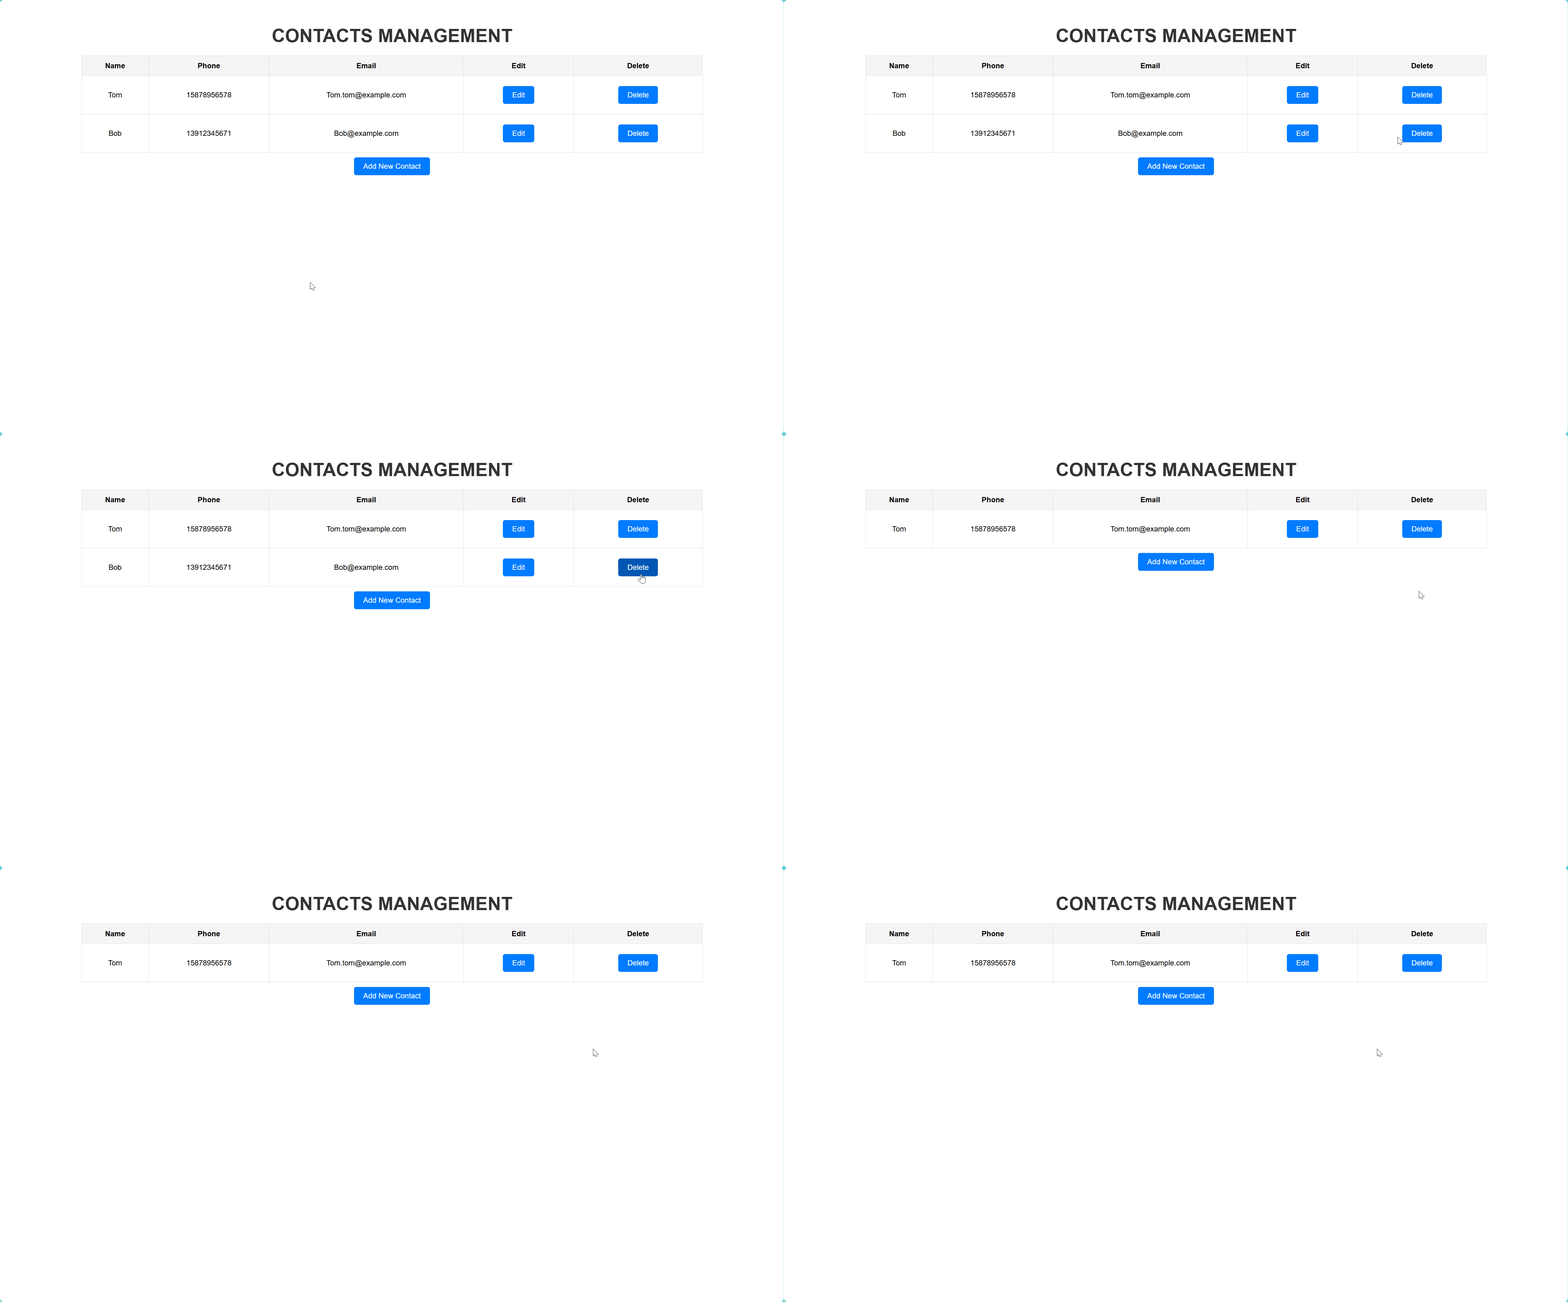
The "Delete" button enables users to remove a contact from the list. Once deleted, the contact is no longer displayed in the contact list.
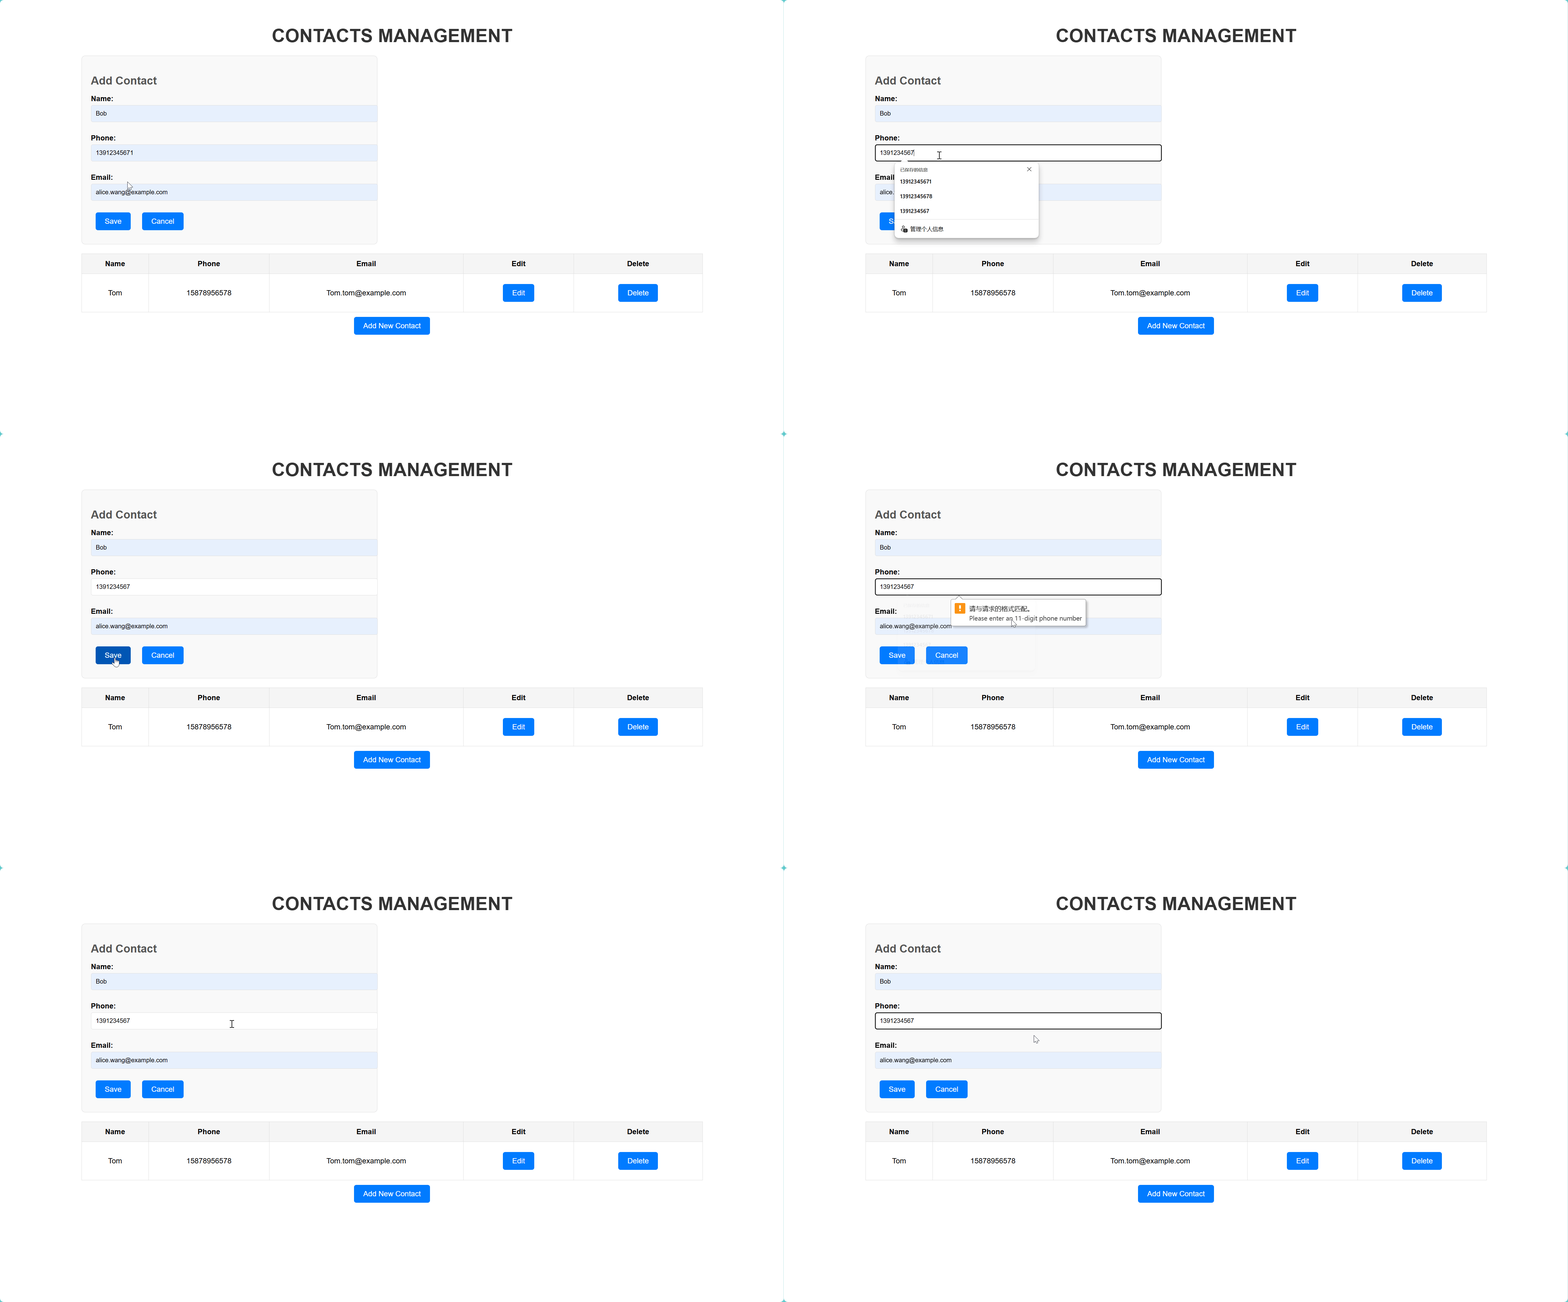
The system validates the phone number format during the add or edit operations to ensure it consists of exactly 11 digits. If the phone number format is incorrect, an error message is displayed, and the submission is blocked until the issue is resolved.
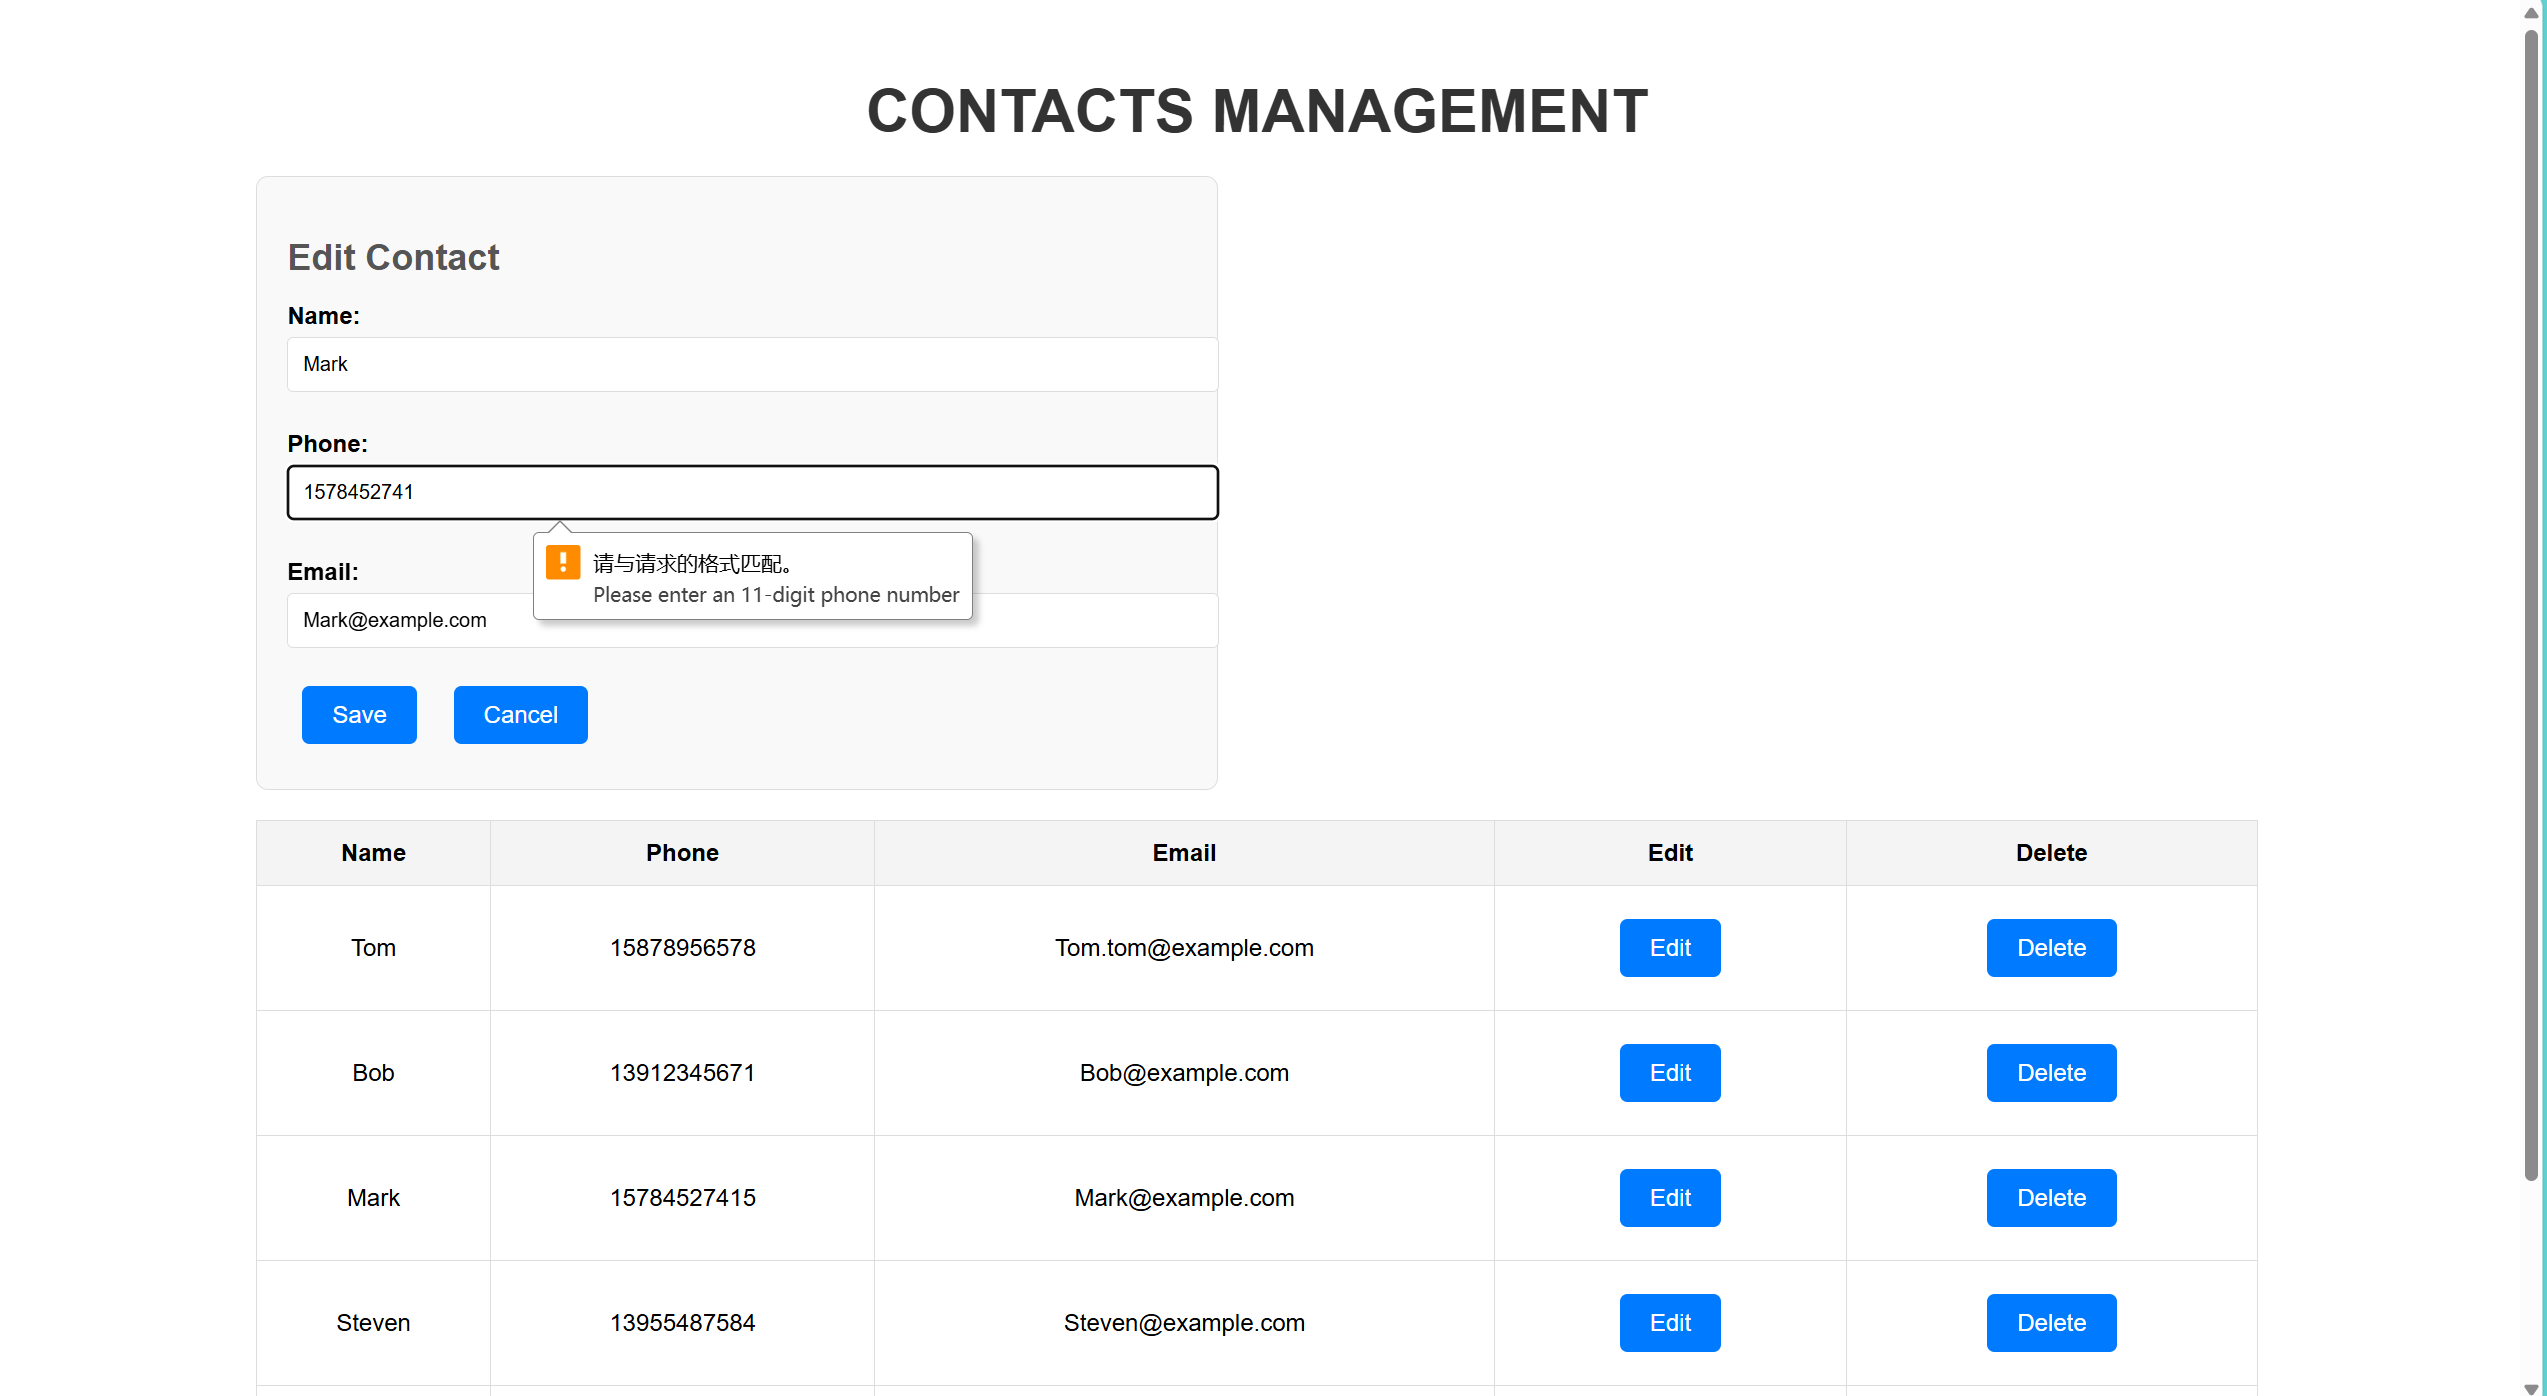
The system requires all fields to be filled out before submitting contact information. If any field is left empty, an error prompt appears to prevent incomplete data from being stored in the system.
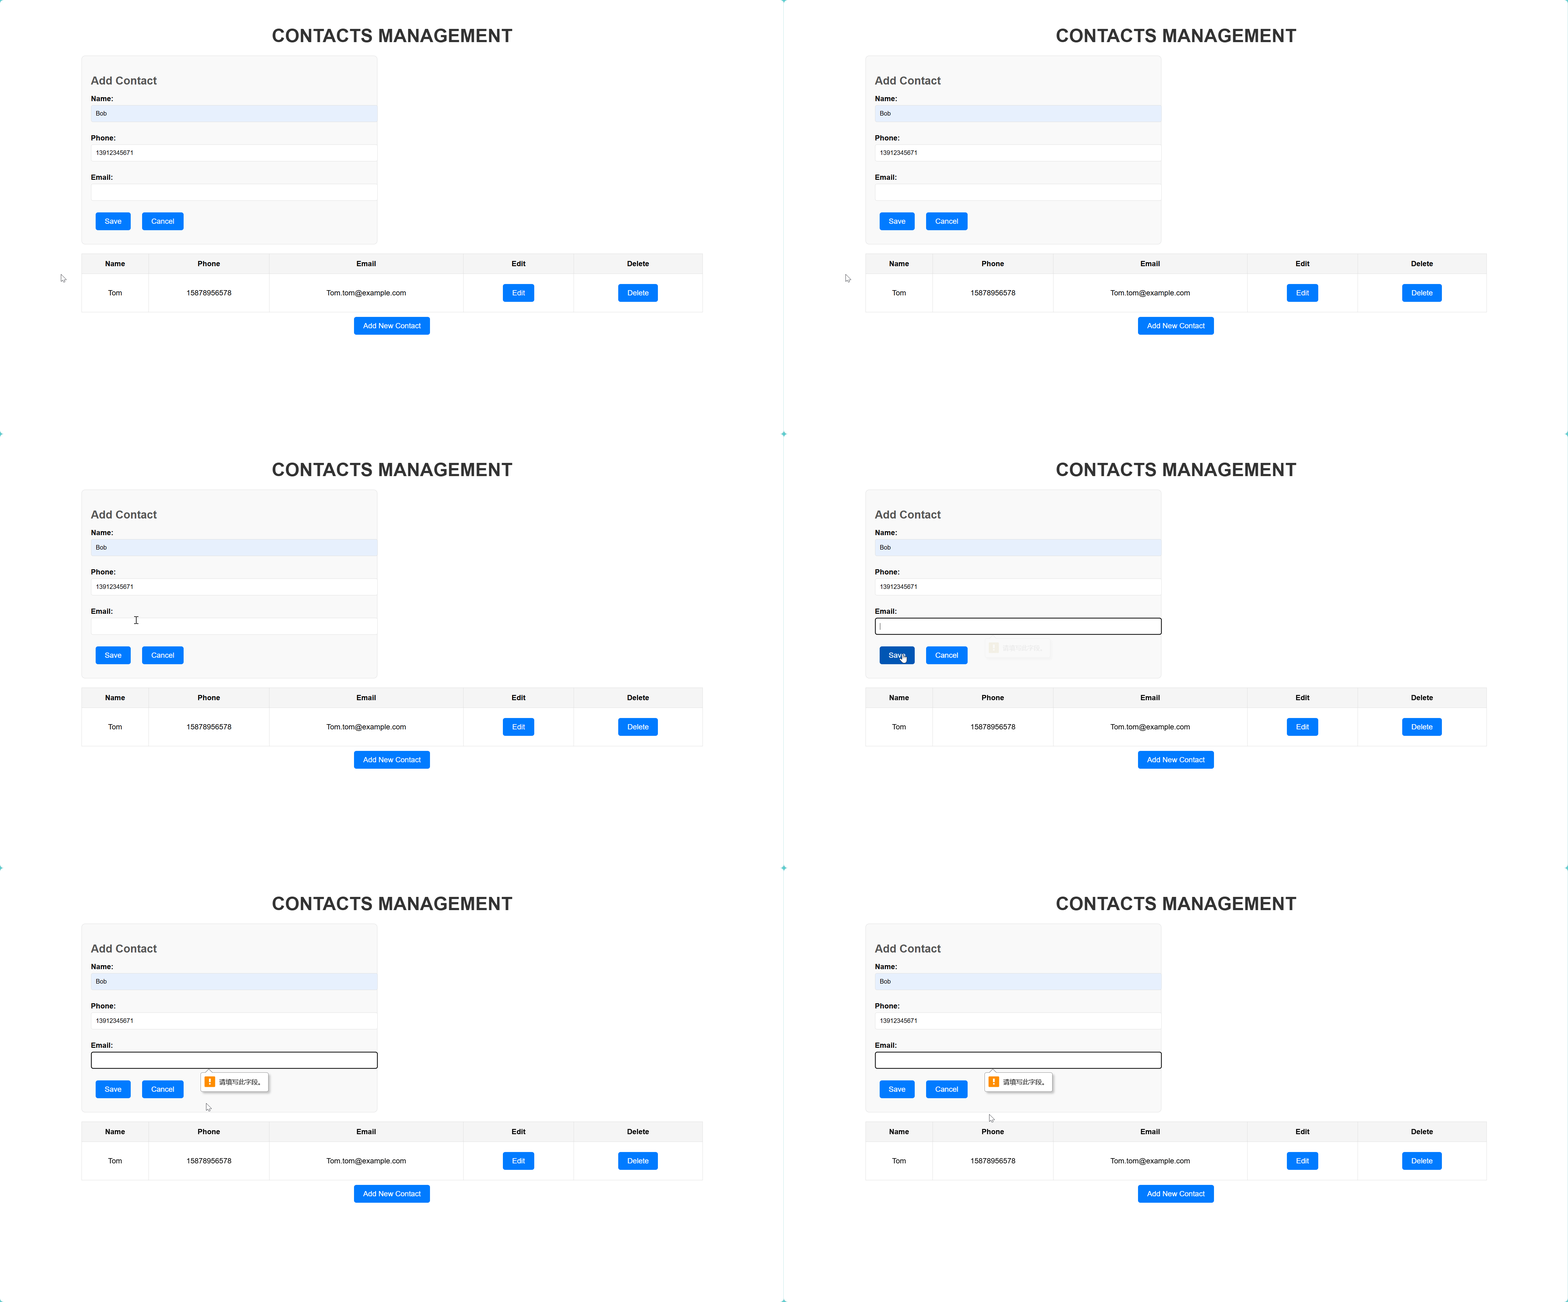
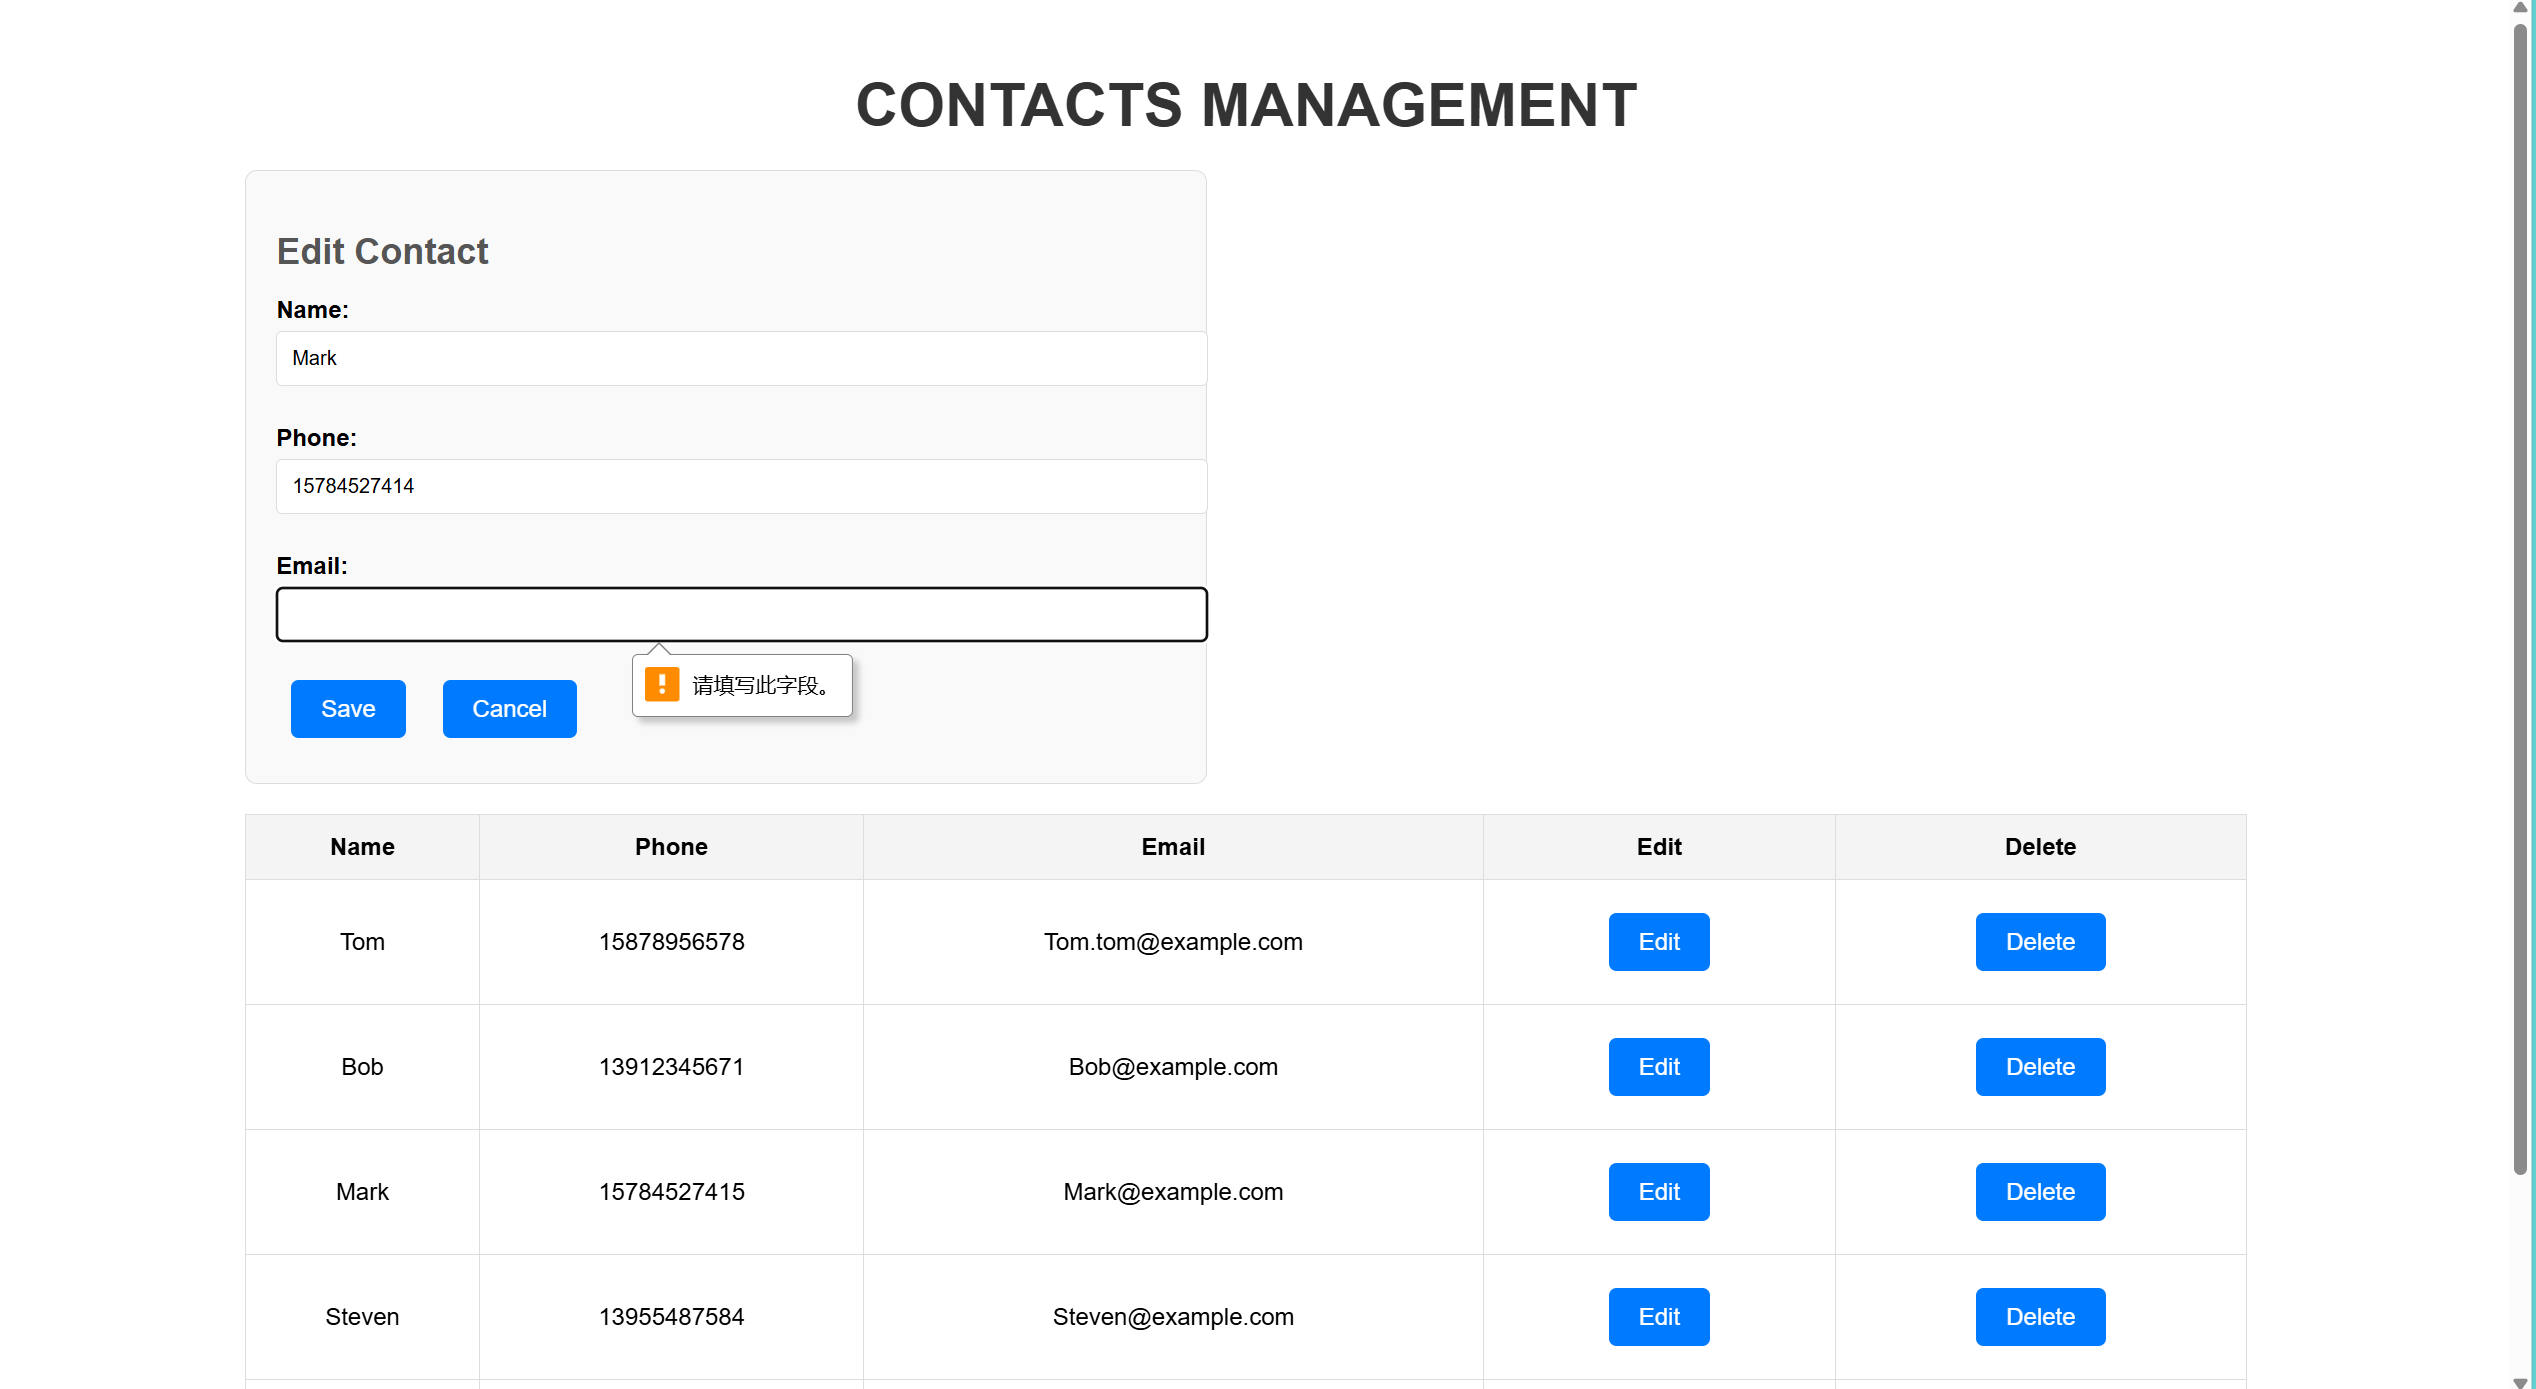
Contacts.html: This HTML file serves as the main page layout, containing a table to display the contact list and an "Add New Contact" button to open the form for adding contact details (name, phone, email). The form includes "Save" and "Cancel" buttons for user interaction.
Contacts.css: This CSS file styles the page elements to ensure a clean and consistent layout. Button hover effects, error prompt colors, and general design choices aim to create a visually pleasing and user-friendly interface.
Contacts.js: The JavaScript file manages front-end functionality and handles interaction with the back end. Key functions include:
loadContacts(): Fetches contact data from the back-end API and displays it in the table.saveContact(): Handles form submission for creating or updating a contact based on the existence of a contact-id.editContact(id): Loads specific contact details into the form for editing.deleteContact(id): Sends a request to delete a contact from the list.ContactController: This main controller class defines REST API endpoints and handles HTTP requests from the front end.
getAllContacts(): Returns a list of all contacts.getContactById(Long id): Retrieves specific contact data based on its ID or returns a 404 error if not found.addContact(Contact contact): Processes the addition of new contacts with validation to ensure data compliance.updateContact(Long id, Contact updatedContact): Updates a contact’s details based on its ID or returns an error if not found.deleteContact(Long id): Deletes a specified contact.ContactService: Contains business logic, separating controller operations from the data layer. It interacts with ContactRepository to perform CRUD operations, making the code modular and easy to maintain.
Contact Entity: Defines the properties of a contact (id, name, phone, email) and maps these to the database table. Validation annotations such as @NotBlank, @Pattern, and @Email ensure that each field adheres to the required format.
ContactRepository: This repository extends JpaRepository, which provides default CRUD methods like findAll(), save(), and deleteById(), simplifying access to the database.
addContact MethodThe addContact method in ContactController handles requests to add a new contact. It uses @Valid annotations for data validation, ensuring that the input meets the criteria defined in the Contact entity (e.g., the phone number is 11 digits, and the email is valid). If validation fails, a 400 Bad Request response is automatically generated with relevant error messages.
@PostMapping
public ResponseEntity<Contact> addContact(@Valid @RequestBody Contact contact) {
    return ResponseEntity.status(HttpStatus.CREATED).body(contactService.addContact(contact));
}
saveContact FunctionThis function handles form submissions on the front end, determining if a contact should be added or updated.
function saveContact(event) {
    event.preventDefault();
    const id = document.getElementById('contact-id').value;
    const name = document.getElementById('name').value.trim();
    const phone = document.getElementById('phone').value.trim();
    const email = document.getElementById('email').value.trim();
    const errorMessage = document.getElementById('error-message');

    if (!name || !phone || !email) {
        errorMessage.textContent = "Please fill in all fields!";
        return;
    }

    if (phone.length !== 11 || isNaN(phone)) {
        errorMessage.textContent = "The phone number must be 11 digits!";
        return;
    }

    const contact = { name, phone, email };
    const method = id ? 'PUT' : 'POST';
    const url = id ? `${API_URL}/${id}` : API_URL;

    fetch(url, {
        method: method,
        headers: { 'Content-Type': 'application/json' },
        body: JSON.stringify(contact)
    })
    .then(() => {
        closeForm();
        loadContacts();
    })
    .catch(error => console.error('Error saving contact:', error));
}
contact-id is present, it determines whether to make a POST (for new contacts) or PUT (for updates) request.loadContacts FunctionThe loadContacts function retrieves the list of contacts from the back end and displays it in a table format on the front end.
function loadContacts() {
    fetch(API_URL)
    .then(response => response.json())
    .then(contacts => {
        const list = document.getElementById('contacts-list');
        list.innerHTML = '';
        contacts.forEach(contact => {
            const row = document.createElement('tr');
            row.innerHTML = `
                <td>${contact.name}</td>
                <td>${contact.phone}</td>
                <td>${contact.email}</td>
                <td><button onclick="editContact(${contact.id})">Edit</button></td>
                <td><button onclick="deleteContact(${contact.id})">Delete</button></td>
            `;
            list.appendChild(row);
        });
    })
    .catch(error => console.error('Error loading contacts:', error));
}
fetch to make a GET request to the API and retrieve contact data.deleteContact FunctionThe deleteContact function allows users to delete a contact from the database by clicking the "Delete" button. It sends a DELETE request to the API with the contact's ID.
function deleteContact(id) {
    fetch(`${API_URL}/${id}`, { method: 'DELETE' })
    .then(() => loadContacts())
    .catch(error => console.error('Error deleting contact:', error));
}
loadContacts upon success to refresh the list, so the user sees the changes immediately.server.port=8080
spring.datasource.url=jdbc:mysql://localhost:3306/contacts_db?useSSL=false&serverTimezone=UTC
spring.datasource.username=root
spring.datasource.password=123456
spring.datasource.driver-class-name=com.mysql.cj.jdbc.Driver
spring.jpa.hibernate.ddl-auto=update
spring.jpa.show-sql=true
8080.The pom.xml file manages project dependencies in a Maven-based Spring Boot project.
<dependencies>
    <dependency>
        <groupId>org.springframework.boot</groupId>
        <artifactId>spring-boot-starter-data-jpa</artifactId>
    </dependency>
    <dependency>
        <groupId>org.springframework.boot</groupId>
        <artifactId>spring-boot-starter-web</artifactId>
    </dependency>
    <dependency>
        <groupId>com.mysql</groupId>
        <artifactId>mysql-connector-j</artifactId>
        <scope>runtime</scope>
    </dependency>
    <dependency>
        <groupId>org.springframework.boot</groupId>
        <artifactId>spring-boot-starter-validation</artifactId>
    </dependency>
</dependencies>
This project provided a comprehensive understanding of developing a full-stack application with front-end and back-end separation, enhancing my ability to handle integration effectively. Key learnings include gaining a better understanding of decoupling front-end and back-end responsibilities, implementing Cross-Origin Resource Sharing (CORS) to enable seamless communication between the two sides, and using validation annotations to ensure data integrity and robust form handling. Overall, this experience has significantly improved my skills in managing efficient and error-free data handling across systems.

