172
社区成员
 发帖
发帖 与我相关
与我相关 我的任务
我的任务 分享
分享| Course for assignment | EE308FZ |
|---|---|
| Name and Student ID | 方舒仪-Shuyi Fang-832201204 |
| The objective of this assignment | 1. Front-end and Back-end Separation;2. Deployment and Functionality; 3. Code Quality and Documentation |
| Reference | 1 Method of Consturction ;2 Java web |
| Upload website | http://8.136.119.237/#/home |
|---|---|
| Repository on GitHub front-end | https://github.com/18050257682/txl-front |
| Repository on GitHub back-end | https://github.com/18050257682/txl-backend/tree/master |
The focus of this task is to develop a contact management application that demonstrates the separation of front-end and back-end technologies. The application must implement core functions such as adding, modifying, and deleting contacts, while storing information in the backend database. You can choose any visualization technology, including web applications, Android or WeChat mini programs, as long as the architecture meets the requirements of front-end and back-end separation.
This task includes the following key components:
Implement the main functions of managing contacts, including:
Add: Enable users to input contact information such as name and phone number, and securely store this information in the backend database.
Modification: Allow users to update existing contact information by directly retrieving data from the backend database without the need for caching.
Delete: Provide users with the ability to delete contacts from the database.
Encourage students to implement additional features of the enhanced application, which can earn them extra credits. A detailed descrition of any extended functionality should be included in the blog post.
Students should use recognized web frameworks such as Flask, Spring, or Express to develop applications and ensure cross platform compatibility of the technologies used.
| Modules | Description | Estimated Time | Actual Time |
|---|---|---|---|
| Set up development environment | Version does not match computer, or installation is missing | 1hour | 2hours |
| Learn Vue.js and Spring Boot,Git etc | Due to the lack of prior JavaScript foundation, more time is needed to establish concepts | 15hours | 20hours |
| Design front-end structure | Entangled on how to optimize rendering performance, reduce unnecessary rendering and redrawing, and handle rendering of large lists and data to improve performance. | 1.5hours | 2hours |
| Implement front-end | Encountered issues managing components in complex states | 6hours | 7hours |
| Design and Implement back-end | 1. Incompatible dependency package versions: The dependency package versions used in the project are incompatible, which can cause startup failures or strange issues.2. The property modification in the configuration file did not take effect: it may be due to issues with the writing format and correctness of the properties.3. Automatic configuration effective conditions: When using the automatic configuration function of Spring Boot, the corresponding effective conditions were not clearly understood4. Log configuration issue: Improper logging configuration or low logging level can cause logging issues. It is necessary to configure logging correctly and select the appropriate logging level. | 10hours | 10hours |
| Set database | Improper configuration of database connection pool | 1hour | 1hour |
| Testing and integration front-end and back-end | Interaction verification between modules in integration testing | 2hours | 2.5hours |
| Complete cloud server deployment | Interaction verification between modules in integration testing | 2hours | 2hours |
| Write a blog | Format issues | 1hour | 1hour |
| Finish all the homework | 39.5hours | 47.5hours |
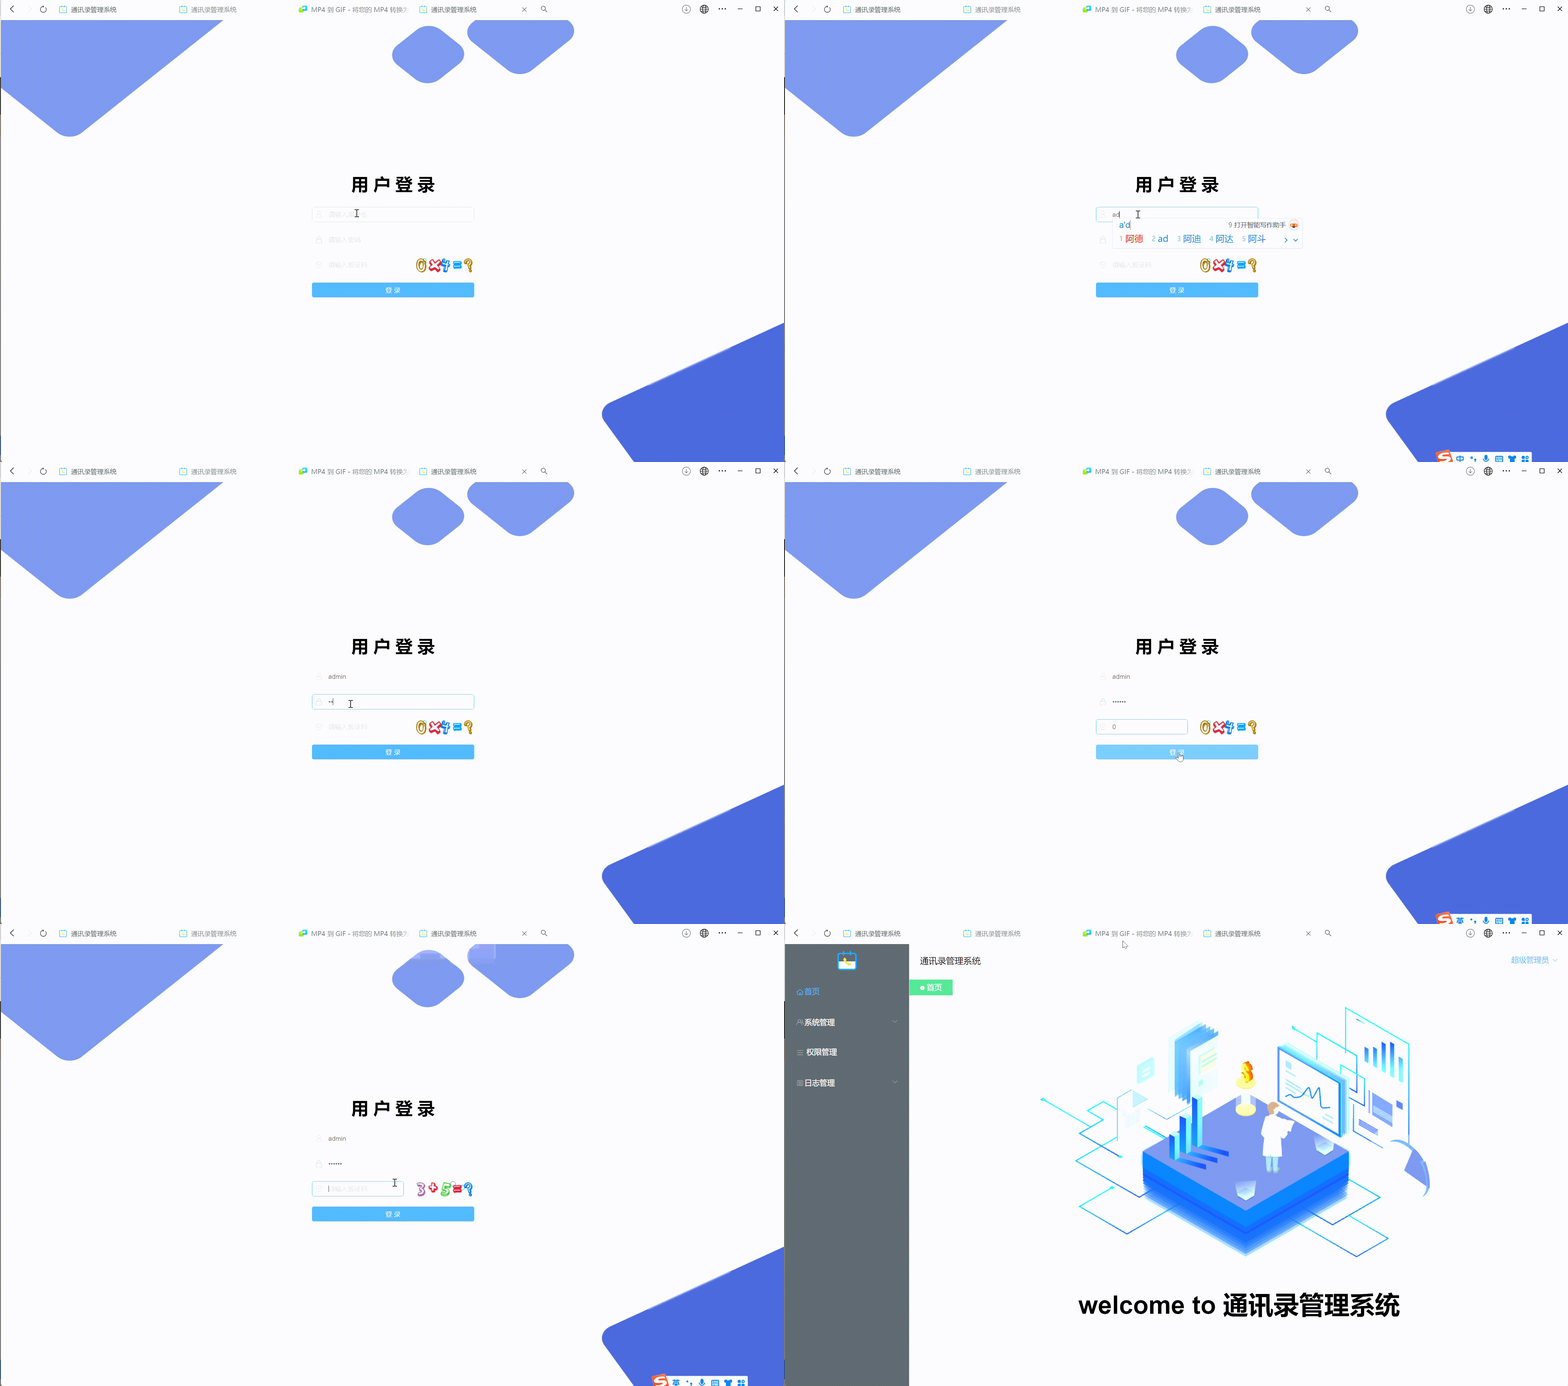
Enter the username and password set in the code on the login interface, and set a random verification code to ensure the security of the system
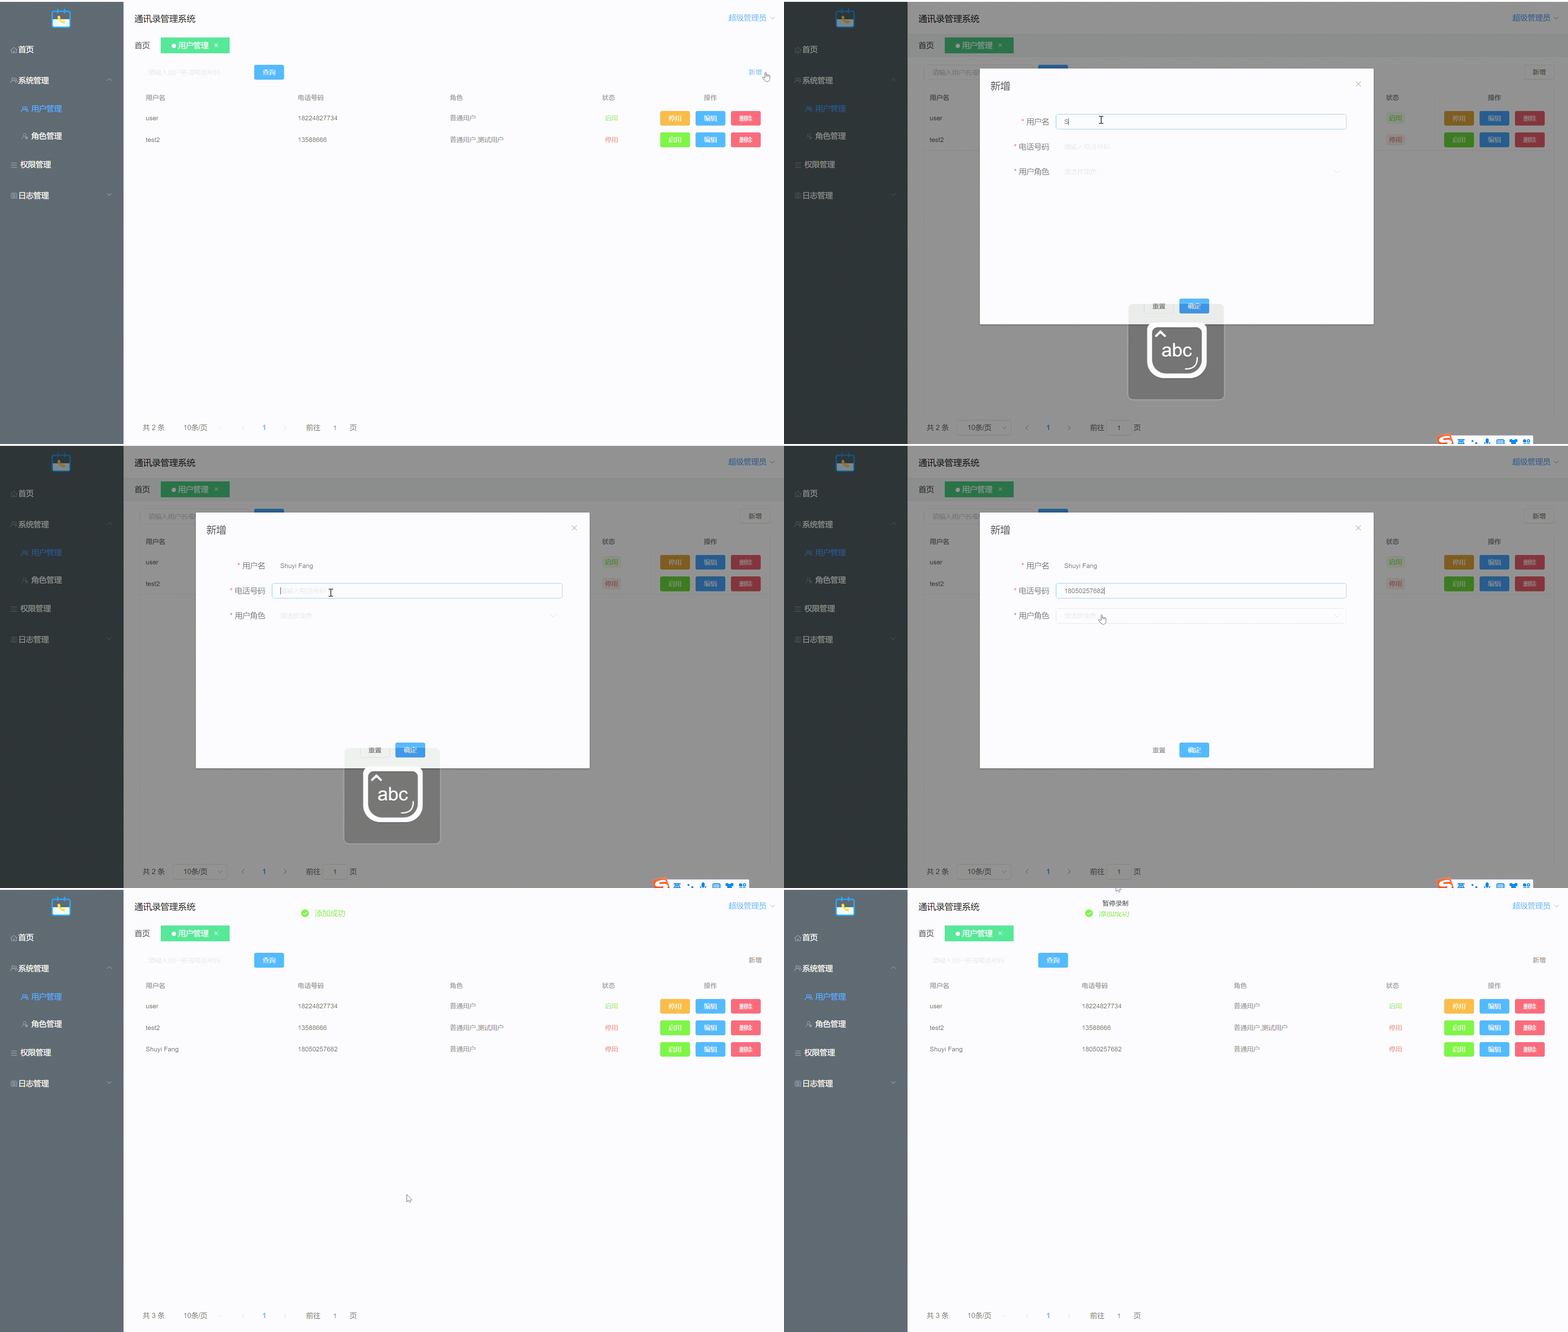
Click the add button in the upper right corner, and you can enter the information of the new contact in the pop-up window.In addition, buttons for enabling and disabling each contact have been set up, similar to a blacklist, where you can choose to reject any call from anyone

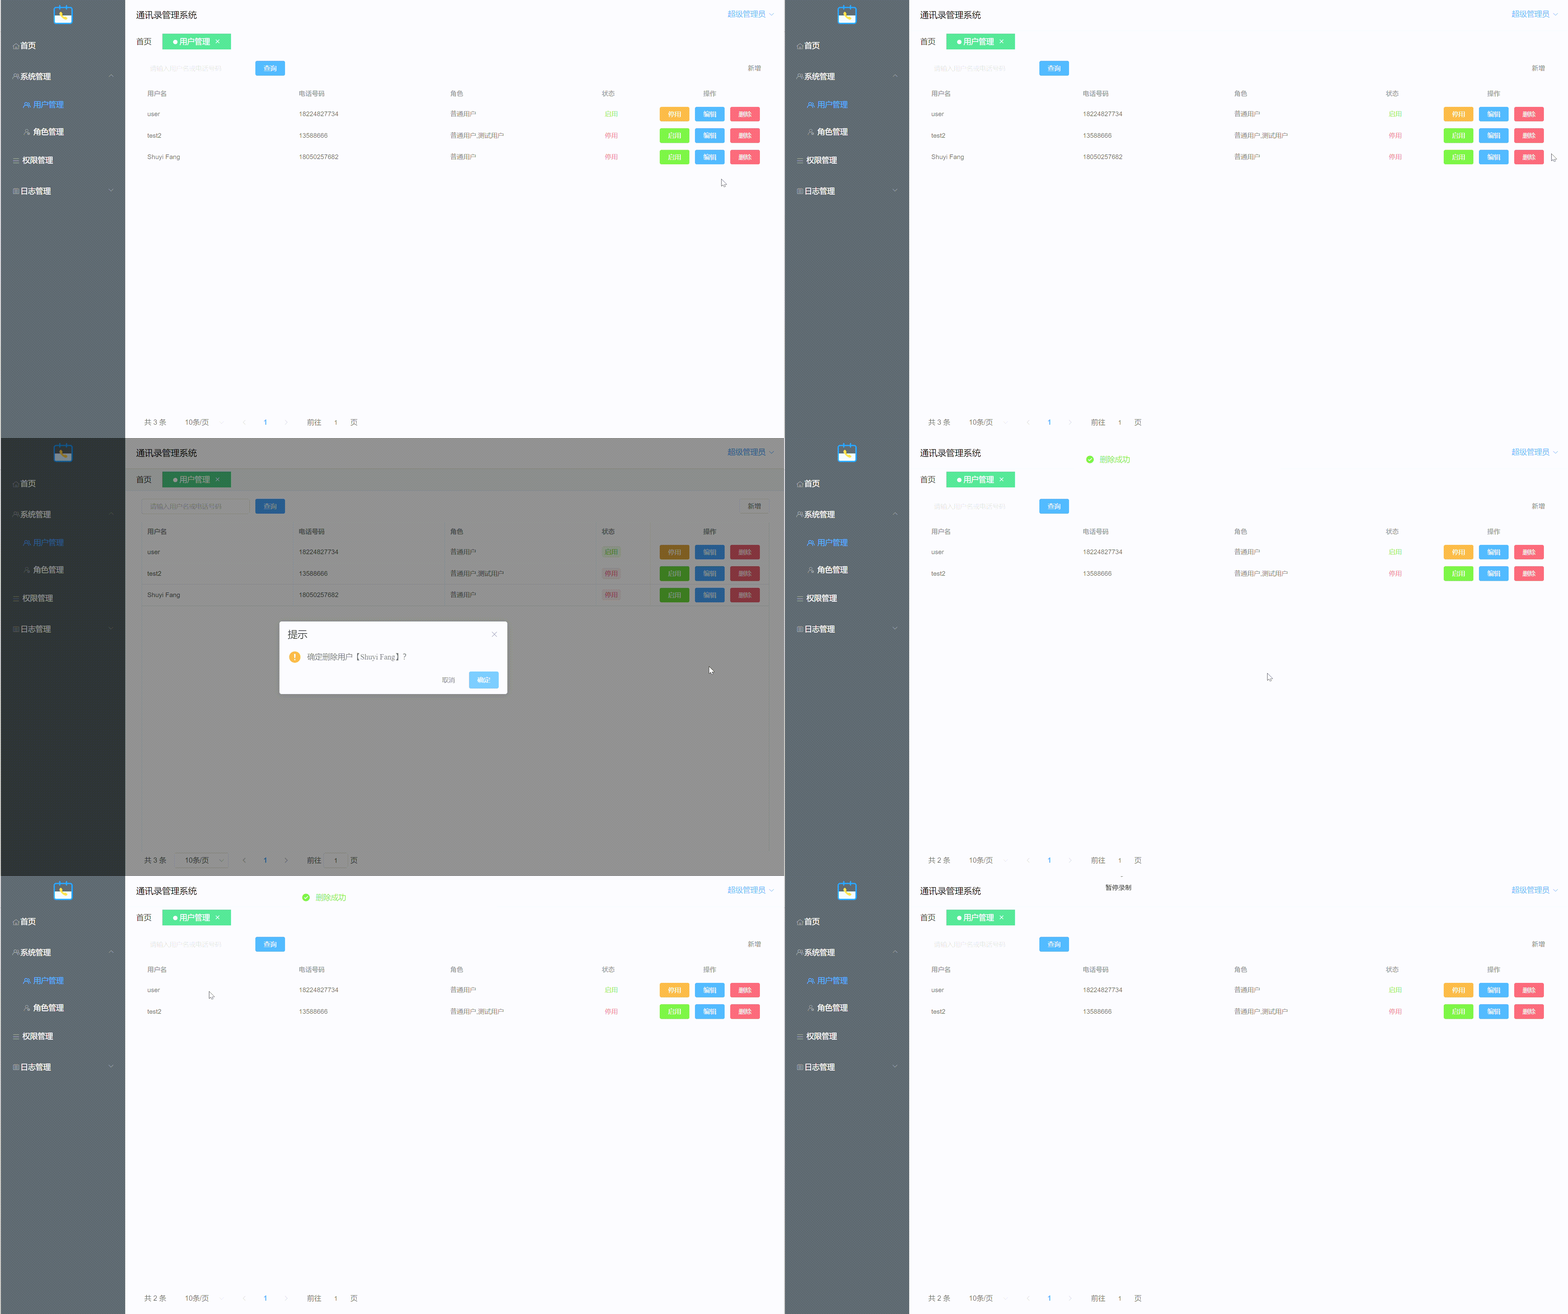
Press the red delete button on the right side of the interface to successfully delete the contact
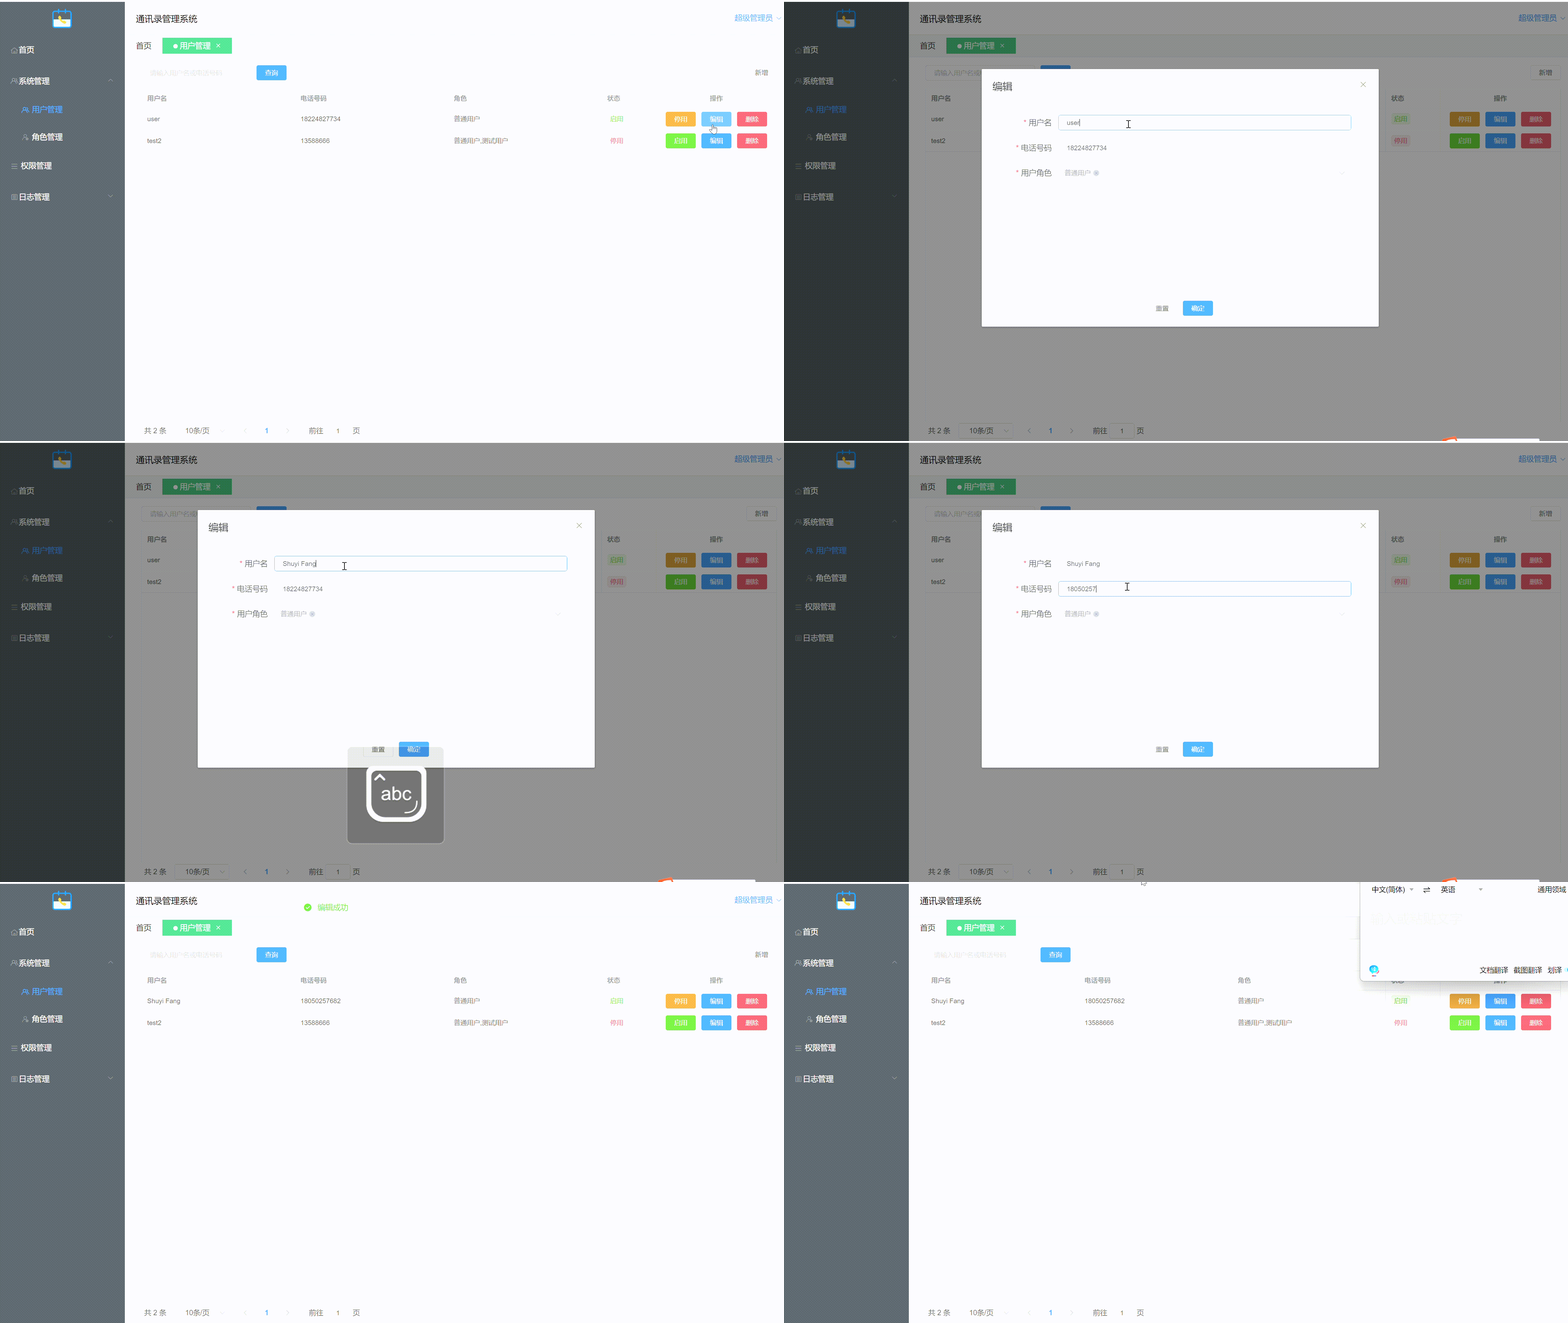
Press the blue edit button to edit the contact's identity information
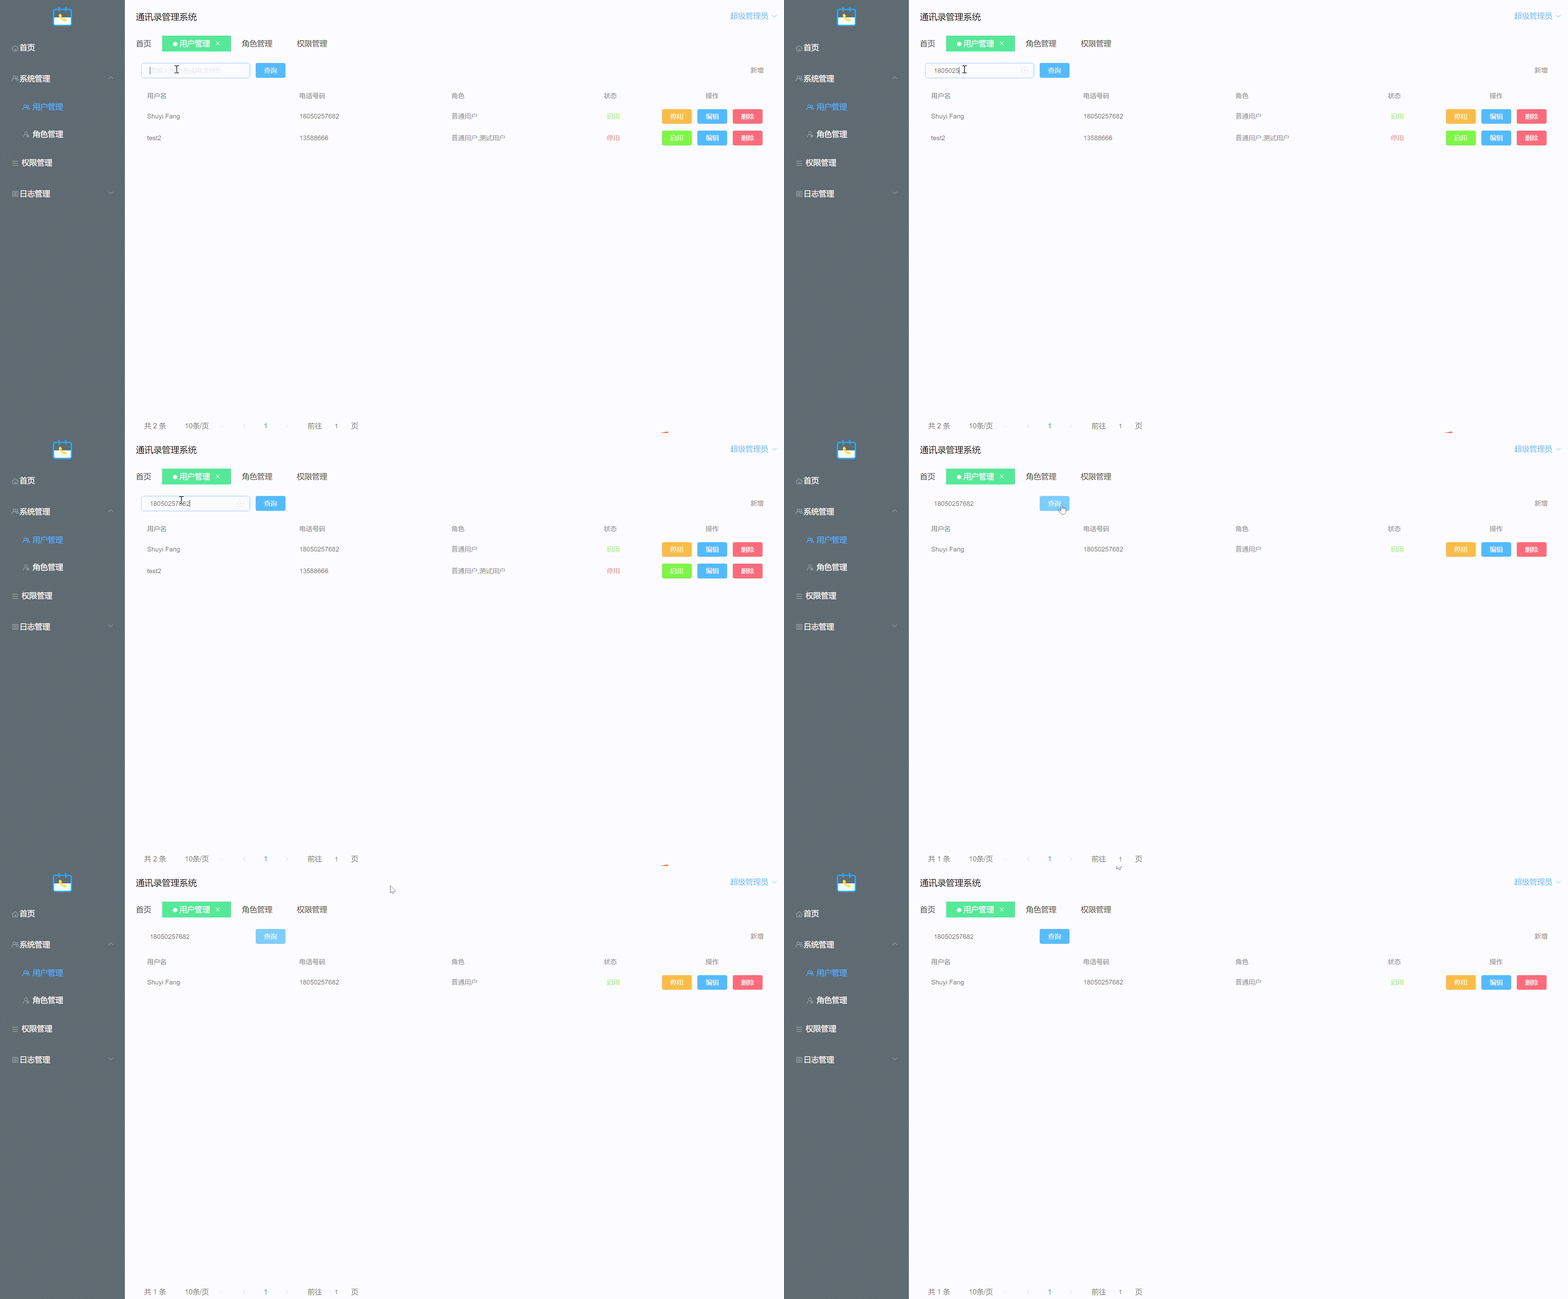
Enter the contact's name or phone number in the search bar, and the system will automatically pop up the corresponding contact
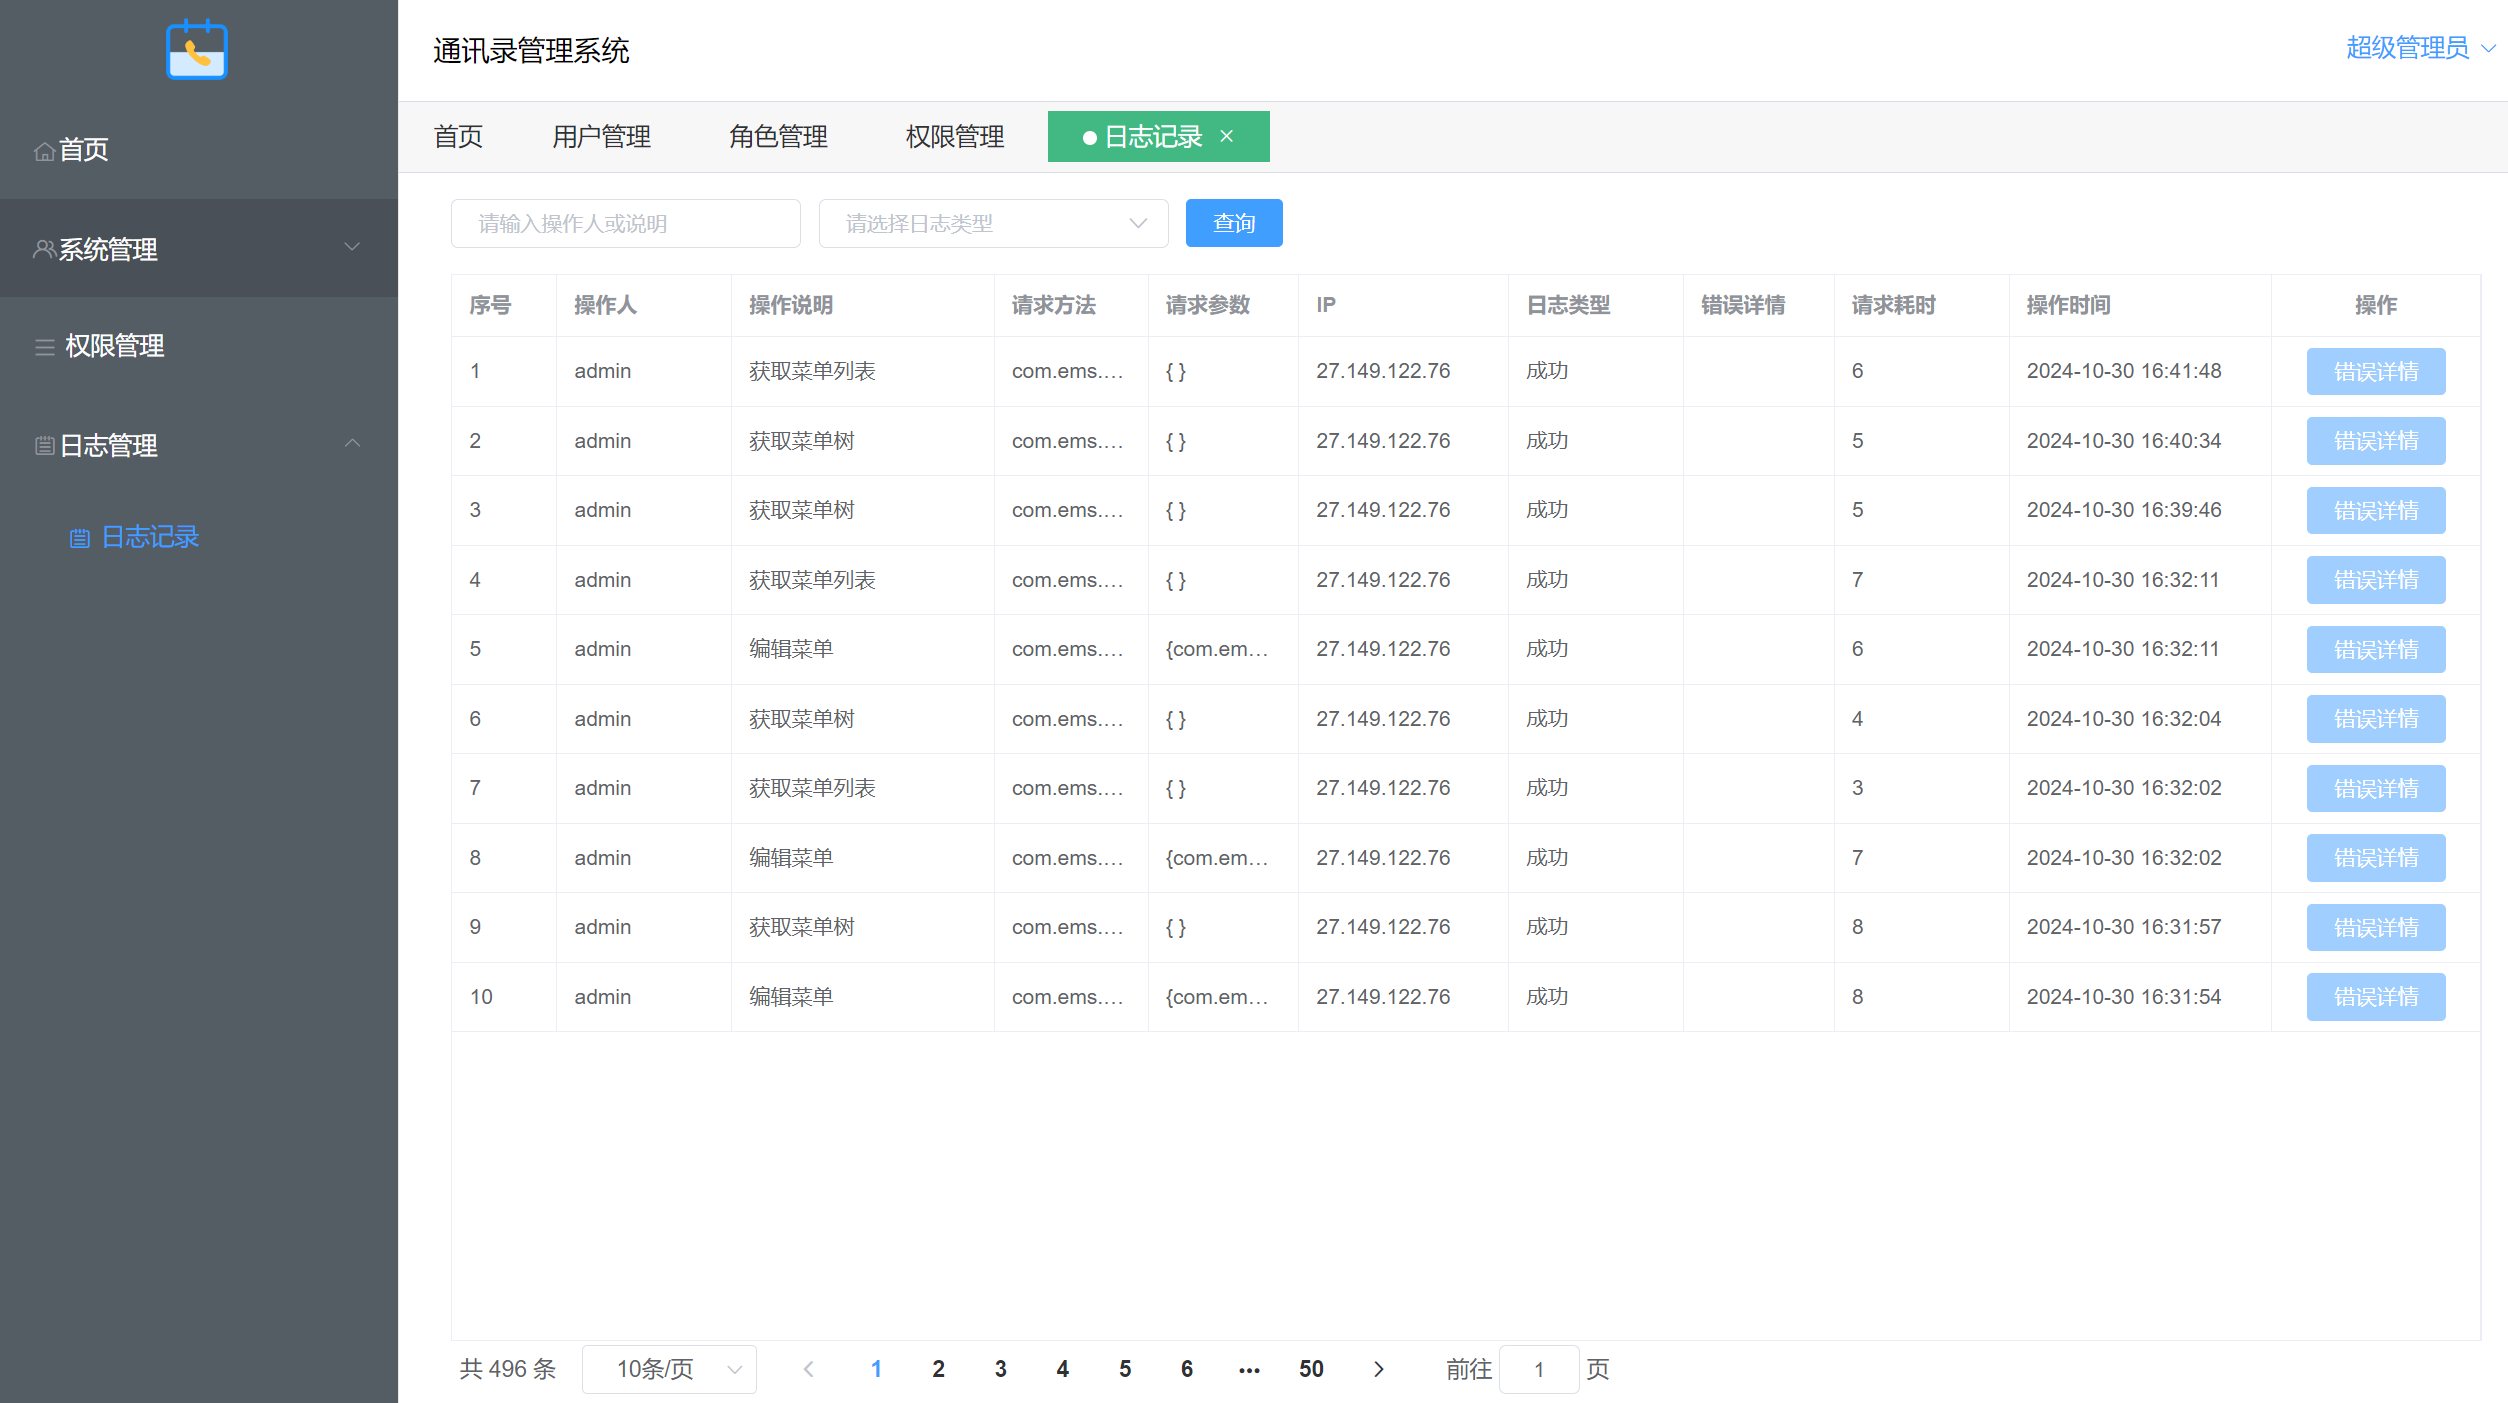
Permission management has been set up for all three branch systems inside, allowing for menu, page, and button management through editing

Log management has been set up, allowing for the retrieval of specific operation records within the system
I have developed an efficient contact information management platform that adopts the popular front-end and back-end separation architecture. The system can retrieve and display contact data from the database, and users can perform operations such as adding, editing, or deleting this information through the web interface. This contact management system aims to simplify the information management process and improve efficiency.
In the process of building an address book application, I have planned the following core functional components:
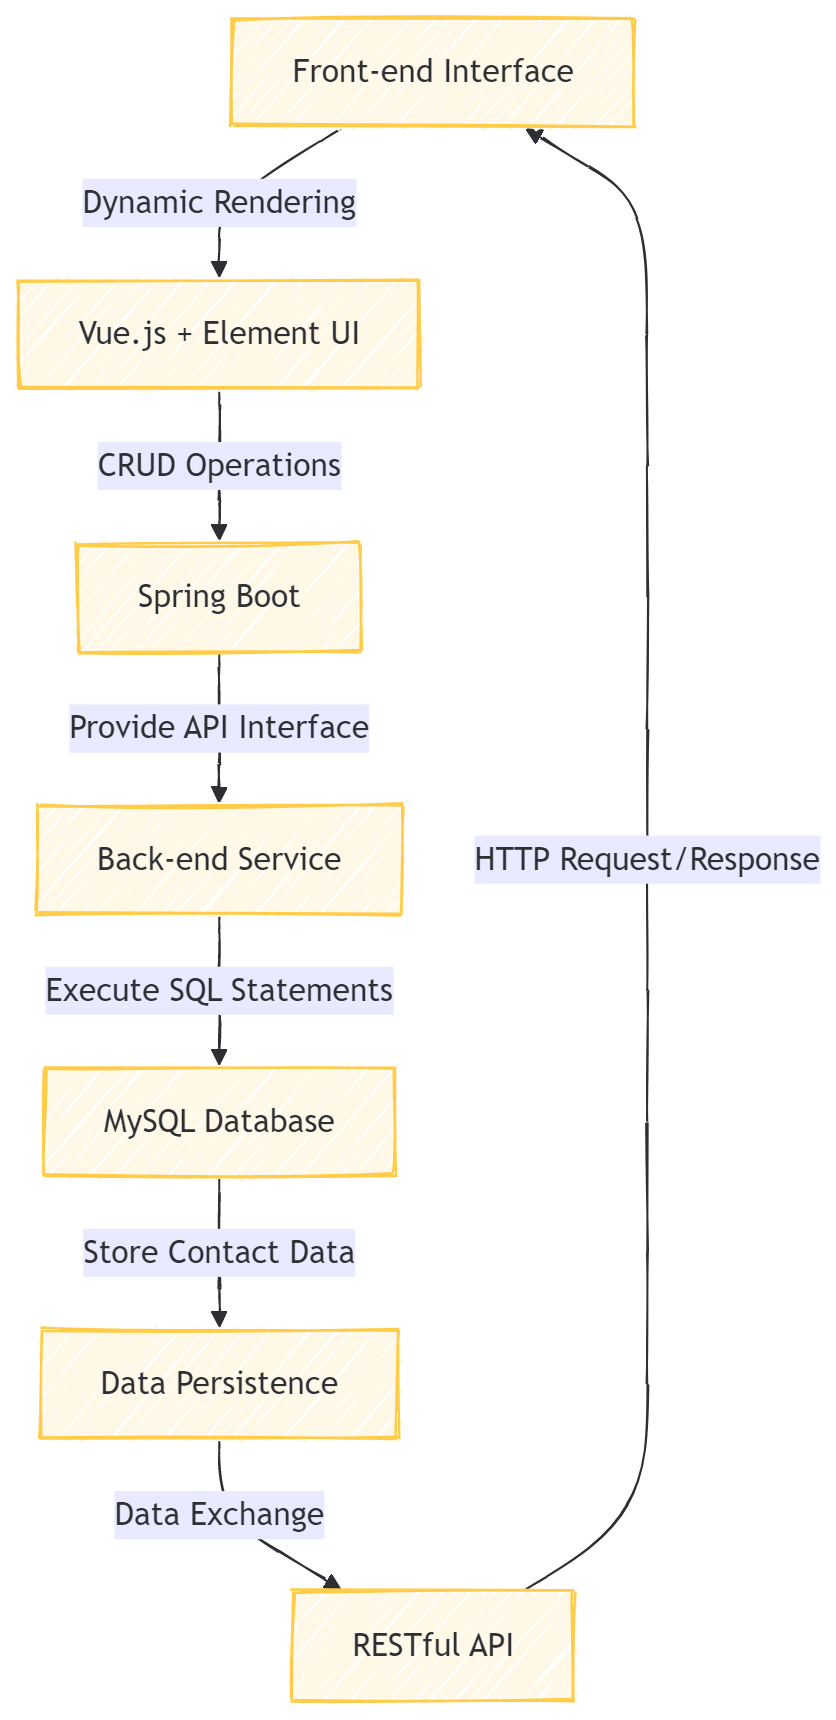
The system adopts a design pattern of front-end and back-end separation. The front-end interface uses Vue.js and Element UI framework to achieve dynamic rendering, while the back-end is based on Spring Boot framework, responsible for providing API interfaces for data access to ensure the reliability of data interaction.
The system interacts directly with the database by executing SQL statements, implementing CRUD operations (create, retrieve, update, delete) to optimize data processing flow.
Contact data is stored in a MySQL database, which not only ensures data security and consistency, but also supports long-term stable operation of the system.
The front-end communicates with the back-end through RESTful APIs, using standard HTTP request methods for data requests and responses, enhancing the scalability of the system and the stability of data exchange.
Detailed configuration of the development environment, including installation of Java Development Kit (JDK), Spring Boot framework, and MySQL database management system. Ensure all necessary software versions are compatible and configure environment variables. Create a MySQL database instance on a local or cloud server and design a suitable database schema to store contact information, including the creation of a contact table that should include fields such as name, phone number, etc.
Front end: The front-end application uses Vue.js and Element UI to build a user interface, providing forms for entering new contact information. Before the user submits the form, the front-end performs data validation, such as checking whether required fields have been filled in and whether the email format is correct. After verification, the front-end uses the Axios library to send POST requests to the back-end API, carrying contact data. After successful addition, the frontend should retrieve the latest contact list from the backend and update the display.
Backend: The backend service implements a POST/user interface to handle HTTP requests from the frontend. The interface receives contact data in JSON format and persists the data to a MySQL database through Spring Boot's Data Access Object (Repository). The backend should also verify the integrity and consistency of the data to ensure that there are no duplicate contact information.
Front end: The front end provides a delete button next to each line of contact information, and when clicked, a confirmation dialog box pops up using the Element UI. After the user confirms the deletion, the front-end collects the contact IDs to be deleted and calls the back-end deletion interface. After successful deletion, the frontend removes the corresponding contact entry from the list.
Backend: The backend provides DELETE/user/{id} interfaces for deleting individual contacts, as well as POST/user/del/batch interfaces for batch deletion of contacts. The interface performs database deletion operations based on the received ID or ID list.
Front end: The front end provides users with an interface for editing contact information, displaying detailed information of the current contact and allowing users to modify it. After the user completes the modification, the front-end collects new data and sends a PUT request to the back-end through Axios. After the update is successful, the front-end page should display the updated contact information.
Backend: The backend implements the PUT/user interface to receive updated contact information. The backend searches for the corresponding record and updates the information based on the ID provided in the request.
Front end: The front end provides a search box. After the user inputs search criteria, the front end calls the search interface of the back end and displays the search results in a list.
Backend: The backend implements the GET/user/page interface, receives search keywords and other paging parameters, performs database queries, and returns a list of matching contacts. The backend should implement paging logic for performance optimization when returning large amounts of data.
Front end: The front end implements a pagination control at the bottom of the contact list, displaying the current page number and total page number. When the user clicks on the page number or uses the page turning button, the front-end calls the back-end interface to request data for the corresponding page and update the list display.
Backend: In addition to supporting search, the GET/user/page interface of the backend should also receive page number and number of records per page parameters to return specific page data requested by the user.
1:Building front-end applications: Run the npm run build command in the local development environment to build Vue applications.
2:Packaging applications: Ensure that Vue applications are packaged as static files, typically located in the dist directory.
3:Upload static files: Use FTP, SCP, or other file transfer methods to upload static files to the static resource directory of the cloud server.
4:Configure web server: Ensure that a web server (such as Nginx, Apache, NFS, etc.) is configured on the cloud server and correctly points to the static resource directory.
5:Accessing the application: Configure the Vue application's entry file (usually index. html) on the web server and access the application through the domain name or IP address.
1:Build backend application: Run the mvn package or mvn spring boot: build command in the local development environment to build the backend Spring Boot application.
2:Package application: Ensure that the backend application is packaged as an executable JAR file (JAR) or WAR file, depending on your deployment environment.
3:Upload application: Use FTP, SCP, or other file transfer methods to upload the packaged application to the cloud server.
4:Deploy application: Deploy Spring Boot application on cloud server. If it is a JAR file, you may need to use the Java - jar command to run it; If it is a WAR file, it may need to be deployed to an application server that supports Java, such as Tomcat.
5:Configure database: Ensure that the MySQL database is correctly set up on the cloud server, and that the database configuration in the application.exe or applicationy.yml files of the Spring Boot application matches the database on the cloud server.
6:Start the application: Start the Spring Boot application and ensure that all services are running properly.
During the process of building this project, I encountered the following issues:
1: Front end separation architecture: Communication between the front-end and back-end is experiencing delays or asynchronous issues. After consulting with my teaching assistants and teachers, I have decided to use WebSocket or Server Sent Events (SSE) for real-time communication
2: Front end and back-end data exchange: Data tampering occurred during transmission. In the end, I used JSON format to transmit data, ensuring data integrity, and HTTPS to ensure data transmission security.
3: Possible environment configuration and packaging issues when deploying to cloud servers. Subsequently, seek the help of professionals to gradually check the documentation of the cloud service provider to ensure proper configuration.
The operational logic diagram of the address book management system is shown below
Defined a routing whitelist to determine which routes can be accessed without logging in.
Created routing guard to perform checks and operations before routing hops, such as checking if the user is logged in and if the user menu needs to be loaded.
The loadMenus function is defined to retrieve a list of user menus from the backend API and dynamically add routes based on the menus.
Defined the hashRoute function to check if a route exists in the system.
Defined the addRoute function to add the obtained route to the Vue router.
This code is used to handle routing related logic in front-end applications, including permission checks, dynamic loading of routes, and state management before route jumps.
import Vue from "vue";
import VueRouter from "vue-router";
import Layout from '../layout/index'
import Home from '../views/Home'

const originalPush = VueRouter.prototype.push

VueRouter.prototype.push = function push(location){
    return originalPush.call(this, location).catch(err => err)
}
Vue.use(VueRouter)

export const routerMap = [
    {
        path: '/login',
        name: 'login',
        component: () => import('../login')
    },
    {
        path: '/401',
        name: '401',
        component: () => import('../views/error/401')
    },
    {
        path: '/404',
        name: '404',
        component: () => import('../views/error/404')
    },
    {
        path: '/Layout',
        name: 'Layout',
        component: Layout,
        children: [
            {
                path: '/home',
                name: '首页',
                component: Home
            }
        ]
    }
]

//  创建路由
const routers = new VueRouter({
    mode: 'hash',
    routes: routerMap
})

export default routers
import router from "./routers";
import store from "../store";
import {queryAllMenu} from "../api/menu/sysMenu";
import {errorMsg} from "../utils/message";


const whiteList = ['/login', '/401', '/404']


router.beforeEach((to, from, next) => {
    console.log('请求路由:' + to.path)

    if (store.state.token){

        if (to.path === '/'){
            router.go(-1)
        }
        if (to.path === '/login'){
            next({path: '/Layout'})
        } else {
            if (!store.state.isLoadMenu){
                loadMenus(next, to)

            } else
                if (!hashRoute(to)){

                    addRoute()
                    if (hashRoute(to)){
                        next(to.fullPath)
                    } else {
                        next({path: '/404'})
                    }
                } else {
                    next()
                }
            }
        }
    } else {
        if (whiteList.indexOf(to.path) !== -1){
            next()
        } else {
            next({path: '/login'})
        }
    }
})

/**
 * @param next
 * @param to
 */
export function loadMenus(next, to){
    queryAllMenu().then(res => {
        if (res.success){
            if (res.data.length > 0){
                //  将所有菜单缓存到store中
                store.dispatch('routerAction', res.data)
                //  修改拉取菜单状态
                store.dispatch('loadMenuAction', true)
                //  中断当前导航,执行新的导航
                next({...to, replace: true})
            }
        } else {
            errorMsg(res.msg)
        }
    })
}

/**
 * 判断路由是否已存在
 * @param to
 */
export function hashRoute(to){
    let find = router.getRoutes().find(item => item.path === to.path)
    return !!find
}

/**
 * 将拉取的路由添加到系统路由中
 */
export function addRoute(){
    let routers = store.state.routers
    if (routers && routers.length > 0){
        console.info(routers)
        routers.forEach(item => {
            if (item.path){
                router.addRoute('Layout', {
                    path: item.path,
                    name: item.name,
                    component: item.component != null ? () => import(`@/views/${item.component}`) : null
                })
            }
        })
    }
}
This code is a basic HTML template used to build a webpage. It contains some basic HTML structures and metadata, as well as specific configurations and placeholders for dynamic filling during the build process.
<!DOCTYPE html>
<html lang="">
  <head>
    <meta charset="utf-8">
    <meta http-equiv="X-UA-Compatible" content="IE=edge">
    <meta name="viewport" content="width=device-width,initial-scale=1.0">
    <link rel="icon" href="<%= BASE_URL %>favicon.ico">
    <title>通讯录管理系统</title>
  </head>
  <body style="margin: 0">
    <noscript>
      <strong>We're sorry but <%= htmlWebpackPlugin.options.title %> doesn't work properly without JavaScript enabled. Please enable it to continue.</strong>
    </noscript>
    <div id="app"></div>
    <!-- built files will be auto injected -->
  </body>
</html>
.login{
    height: calc(100vh);
    background-image: url("../image/background.jpg");
    display: flex;
    justify-content: center;
    align-items: center;
    background-size: 100% 100%;
}

.form{
    width: 300px;
    height: 300px;
    text-align: center;
    background: white;
    padding: 50px;
}

.button{
    width: 100%;
}
/*button*/

/*table*/
.el-table{
    height: calc(100vh - 210px);
    max-height: calc(100vh - 210px);
}
/*tabs*/
.el-tabs__item{
    border-left: none!important;
}
/*input*/

/*select*/
.el-select{
    width: 100%;
}
/*dialog*/
.el-dialog__body{
    min-height: 300px;
    max-height: 500px;
    overflow-y: auto;
    padding-right: 50px;
}

.el-dialog__footer{
    text-align: center;
}

/*search*/
.searchDiv{
    padding-bottom: 15px;
}
.searchInput{
    width: 200px;
    margin-right: 10px;
}
This code is a series of functions that use Axios for HTTP requests, which are used to interact with backend APIs and implement functions such as user authentication, menu management, role management, user management, and log viewing. Each function returns an AxiosPPromise, which means they can be used for asynchronous operations, such as handling asynchronous data retrieval in front-end frameworks like Vue.js.
//  登录
export function login(data){
    return request({
        url: '/api/auth/login',
        method: 'post',
        data
    })
}
//  获取验证码
export function getVerifyCode(params){
    return request({
        url: '/api/auth/code',
        method: 'get',
        params
    })
}
/**
 * 拉取当前用户的所有菜单
 * @returns {AxiosPromise}
 */
export function queryAllMenu(){
    return request({
        url: '/api/sys/menu/all',
        method: 'get'
    })
}
/**
 * 获取当前登录用户菜单树
 * @returns {AxiosPromise}
 */
export function getMenuTree(){
    return request({
        url: '/api/sys/menu/tree',
        method: 'get'
    })
}
/**
 * 获取菜单列表
 * @param params
 * @returns {AxiosPromise}
 */
export function getMenuTable(params){
    return request({
        url: '/api/sys/menu/table',
        method: 'get',
        params
    })
}
/**
 * 编辑菜单
 * @param data
 * @returns {AxiosPromise}
 */
export function editMenu(data){
    return request({
        url: '/api/sys/menu/edit',
        method: 'post',
        data
    })
}
/
**
 * 根据ID删除菜单
 * @param params
 * @returns {AxiosPromise}
 */
export function delMenu(params){
    return request({
        url: '/api/sys/menu/del',
        method: 'delete',
        params
    })


}


export function getPermission(){
    return request({
        url: '/api/sys/menu/permission',
        method: 'get'
    })
}
/**
 * 获取角色列表
 * @param params
 * @returns {AxiosPromise}
 */
export function getRoleList(params){
    return request({
        url: '/api/sys/role/table',
        method: 'get',
        params
    })
}
/**
 * 编辑角色
 * @param data
 * @returns {AxiosPromise}
 */
export function editRole(data){
    return request({
        url: '/api/sys/role/edit',
        method: 'post',
        data
    })
}
/**
 * 角色授权
 * @param data
 * @returns {AxiosPromise}
 */
export function authorizeRole(data){
    return request({
        url: '/api/sys/role/menu/edit',
        method: 'post',
        data
    })
}
/**
 * 删除角色
 * @param params
 * @returns {AxiosPromise}
 */
export function delRole(params){
    return request({
        url: '/api/sys/role/del',
        method: 'delete',
        params
    })
}
/**
 * 获取角色已授权菜单
 * @param params
 * @returns {AxiosPromise}
 */
export function getMenusByRoleId(params){
    return request({
        url: '/api/sys/role/menu/list',
        method: 'get',
        params
    })
}
/**
 * 获取用户列表
 * @param params
 * @returns {AxiosPromise}
 */
export function getUserList(params){
    return request({
        url: '/api/sys/user/table',
        method: 'get',
        params
    })
}
/**
 * 编辑用户
 * @param data
 * @returns {AxiosPromise}
 */
export function editUser(data){
    return request({
        url: '/api/sys/user/edit',
        method: 'post',
        data
    })
}
/**
 * 删除用户
 * @param params
 * @returns {AxiosPromise}
 */
export function delUser(params){
    return request({
        url: '/api/sys/user/del',
        method: 'delete',
        params
    })
}
/**
 * 启用/停用用户
 * @param data
 * @returns {AxiosPromise}
 */
export function enabledUser(data){
    return request({
        url: '/api/sys/user/enabled',
        method: 'put',
        data
    })
}
/**
 * 修改用户密码
 * @param data
 * @returns {AxiosPromise}
 */
export function updatePwd(data){
    return request({
        url: '/api/sys/user/password',
        method: 'put',
        data
    })
}
/**
 * 获取日志列表
 * @param params
 * @returns {AxiosPromise}
 */
export function getLogList(params){
    return request({
        url: '/api/sys/log/list',
        method: 'get',
        params
    })
}
This code is a Spring Boot backend controller used to handle user authentication related requests and perform various functions of the address book system. It processes HTTP requests from the frontend and interacts with the database to perform CRUD operations on user data.
@RequestMapping("/auth")
public class LoginController extends ResultUtil {

    private final SysUserService userService;

    private final SysRoleService roleService;

    private final AuthenticationManagerBuilder authenticationManagerBuilder;

    private final CacheConfig cacheConfig;

    @Log("用户登录")
    @PostMapping("/login")
    public ResponseEntity<Object> login(@RequestBody UserDto userDto, HttpServletRequest request){
        try {
            //  校验验证码
            if (StringUtil.isBlank(userDto.getCode()) || !checkCode(userDto.getUuid(), userDto.getCode())){
                return fail(false, "验证码错误");
            }
            //  根据用户名查询用户是否存在
            SysUser user = userService.findByName(userDto.getUsername());
            if (user == null){
                return fail(false, "用户名或密码错误");
            }
            //  判断密码是否正确
            UsernamePasswordAuthenticationToken authenticationToken =
                    new UsernamePasswordAuthenticationToken(userDto.getUsername(), userDto.getPassword());
            Authentication authentication = authenticationManagerBuilder.getObject().authenticate(authenticationToken);
            //  将认证信息设置到SpringSecurity上下文中
            SecurityContextHolder.getContext().setAuthentication(authentication);
            //  获取当前用户角色
            List<String> roles = getRolesByUserId(user.getId());
            //  生成token
            String token = JwtUtil.generateToken(user.getUsername(), roles, false);
            //  生成refresh_token
            String refreshToken = JwtUtil.getRefreshToken(user.getUsername());

            //  用户信息
            userDto.setEmail(user.getEmail());
            userDto.setNickName(user.getNickName());
            userDto.setRoles(roles);
            //  隐藏密码
            userDto.setPassword("******");

            return success(true, new JwtUser(token, refreshToken, userDto));
        } catch (Exception e) {

            return fail(false, "登录失败");
        }
    }

    /**
    * @Description: 用户注册
    * @Param: [userDto]
    * @return: org.springframework.http.ResponseEntity<java.lang.Object>
    * @Author: starao
    * @Date: 2021/11/27
    */
    @Log("用户注册")
    @PostMapping("/register")
    public ResponseEntity<Object> registerUser(@RequestBody UserDto userDto){
        try {
            userService.editUser(userDto);
            return success(true, "注册成功");
        } catch (Exception e) {
            return fail(false, "注册失败");
        }
    }

    /**
    * @Description: 通过refreshToken得到新的token
    * @Param: [request]
    * @return: org.springframework.http.ResponseEntity<java.lang.Object>
    * @Author: starao
    * @Date: 2022/10/5
    */
    @PutMapping("/refresh")
    public ResponseEntity<Object> refreshToken(HttpServletRequest request){
        try {
            //  通过请求头获取refreshToken
            String refreshToken = request.getHeader(SecurityConstants.TOKEN_HEADER);
            // 如果refreshToken存在
            if (StringUtil.isNotBlank(refreshToken)){
                //  去掉头部,得到原始refreshToken
                refreshToken = refreshToken.replaceFirst(SecurityConstants.TOKEN_PREFIX, "");
                //  解析refreshToken,得到用户名
                Claims claims = JwtUtil.getRefreshTokenBody(refreshToken);
                System.out.println(claims.getSubject());
                //  如果refreshToken还在有效期内
                if (claims.get("exp", Long.class) > 0){
                    //  获取当前用户信息
                    SysUser user = userService.findByName(claims.getSubject());
                    //  获取当前用户角色
                    List<String> roles = getRolesByUserId(user.getId());
                    //  重新获取token
                    String token = JwtUtil.generateToken(user.getUsername(), roles, false);
                    return success(true, token);
                }
            }
        } catch (Exception e) {
            return fail(false, "登录超时");
        }
        return fail(false, "请重新登录");
    }

    /**
     * @Description: 获取验证码
     * @Param: []
     * @return: org.springframework.http.ResponseEntity<java.lang.Object>
     * @Author: starao
     * @Date: 2022/1/18
     */
    @GetMapping("/code")
    public ResponseEntity<Object> getVerifyCode(){
        try {
            // 获取运算的结果
            Captcha captcha = new ArithmeticCaptcha(VerifyCodeConstants.width, VerifyCodeConstants.height);
            String uuid = UUID.randomUUID().toString().replace("-", "");
            //当验证码类型为 arithmetic时且长度 >= 2 时,captcha.text()的结果有几率为浮点型
            String captchaValue = captcha.text();
            if (captchaValue.contains(".")) {
                captchaValue = captchaValue.split("\\.")[0];
            }
            // 缓存验证码信息,时间1分钟
            cacheConfig.put(uuid, captchaValue, 1);
            // 验证码信息
            Map<String, Object> imgResult = new HashMap<String, Object>(2) {{
                put("img", captcha.toBase64());
                put("uuid", uuid);
            }};
            return ResponseEntity.ok(imgResult);
        } catch (Exception e) {
            return fail(false, "获取验证码失败");
        }
    }

    /**
    * @Description: 获取当前用户角色列表
    * @Param: [userId]
    * @return: java.util.List<java.lang.String>
    * @Author: starao
    * @Date: 2022/10/5
    */
    private List<String> getRolesByUserId(Long userId){
        //  获取当前用户角色对象
        List<SysRole> sysRoles = roleService.getRoleByUserId(userId);
        //  角色
        List<String> roles = new ArrayList<>();
        sysRoles.forEach( sysRole -> {
            roles.add(sysRole.getRoleCode());
        });
        return roles;
    }

    /**
    * @Description: 验证码校验
    * @Param: [uuid, code]
    * @return: boolean
    * @Author: starao
    * @Date: 2023/7/9
    */
    private boolean checkCode(String uuid, String code){
        boolean b = false;
        if (cacheConfig.get(uuid) != null && cacheConfig.get(uuid).equals(code)){
            b = true;
            cacheConfig.invalidate(uuid);
        }
        return b;
    }
}
/**
 * @program: ems-admin-boot
 * @description: this is a class
 * @author: starao
 * @create: 2021-11-27 17:00
 **/
@RestController
@RequiredArgsConstructor
@RequestMapping("/sys")
public class SysLogController extends ResultUtil {

    private final SysLogService logService;

    /**
    * @Description: 查询日志列表
    * @Param: [queryDto, logType]
    * @return: org.springframework.http.ResponseEntity<java.lang.Object>
    * @Author: starao
    * @Date: 2021/11/27
    */
    @GetMapping("/log/list")
    public ResponseEntity<Object> getLogList(QueryDto queryDto, String logType){
        try {
            return success(true, logService.getLogList(queryDto, logType));
        } catch (Exception e) {
            return fail(false, "获取日志失败");
        }
    }
}
package com.ems.system.controller;

import com.ems.common.exception.BadRequestException;
import com.ems.common.utils.ResultUtil;
import com.ems.common.utils.SecurityUtil;
import com.ems.common.utils.StringUtil;
import com.ems.logs.annotation.Log;
import com.ems.system.entity.SysMenu;
import com.ems.system.service.SysMenuService;
import lombok.RequiredArgsConstructor;
import org.springframework.http.ResponseEntity;
import org.springframework.web.bind.annotation.*;

import java.util.List;

/**
 * @program: ems-admin-boot
 * @description: this is a class
 * @author: starao
 * @create: 2021-11-27 17:01
 **/
@RestController
@RequiredArgsConstructor
@RequestMapping("/sys")
public class SysMenuController extends ResultUtil {

    private final SysMenuService menuService;

    /**
    * @Description: 获取菜单树
    * @Param: []
    * @return: org.springframework.http.ResponseEntity<java.lang.Object>
    * @Author: starao
    * @Date: 2021/11/27
    */
    @Log("获取菜单树")
    @GetMapping("/menu/tree")
    public ResponseEntity<Object> getMenuTree(){
        try {
            List<String> roles = SecurityUtil.getCurrentRoles();
            return success(true, menuService.getMenuTree(roles));
        } catch (BadRequestException e) {
            return fail(false, e.getMsg());
        }
    }

    /**
    * @Description: 获取权限列表
    * @Param: []
    * @return: org.springframework.http.ResponseEntity<java.lang.Object>
    * @Author: starao
    * @Date: 2022/10/6
    */
    @Log(value = "获取权限列表")
    @GetMapping("/menu/permission")
    public ResponseEntity<Object> getPermission(){
        try {
            return success(true, menuService.getPermission());
        } catch (BadRequestException e) {
            return fail(false, e.getMsg());
        }
    }

    /**
    * @Description: 查询当前用户所有权限菜单
    * @Param: []
    * @return: org.springframework.http.ResponseEntity<java.lang.Object>
    * @Author: starao
    * @Date: 2021/11/27
    */
    @GetMapping("/menu/all")
    public ResponseEntity<Object> queryAllMenus(){
        try {
            List<String> roles = SecurityUtil.getCurrentRoles();
            return success(true, menuService.queryAllMenus(roles));
        } catch (BadRequestException e) {
            return fail(false, e.getMsg());
        }
    }

    /**
    * @Description: 获取菜单列表
    * @Param: [blurry]
    * @return: org.springframework.http.ResponseEntity<java.lang.Object>
    * @Author: starao
    * @Date: 2021/12/11
    */
    @Log("获取菜单列表")
    @GetMapping("/menu/table")
    public ResponseEntity<Object> getMenuTable(String blurry){
        try {
            return success(true, menuService.getMenuTable(blurry));
        } catch (BadRequestException e) {
            return fail(false, e.getMsg());
        }
    }

    /**
    * @Description: 编辑菜单
    * @Param: [sysMenu]
    * @return: org.springframework.http.ResponseEntity<java.lang.Object>
    * @Author: starao
    * @Date: 2021/11/27
    */
    @Log("编辑菜单")
    @PostMapping("/menu/edit")
    public ResponseEntity<Object> editMenu(@RequestBody SysMenu sysMenu){
        try {
            String str = StringUtil.getEditType(sysMenu.getId());
            menuService.editMenu(sysMenu);
            return success(true, str);
        } catch (BadRequestException e) {
            return fail(false, e.getMsg());
        }
    }

    /**
    * @Description: 删除菜单
    * @Param: [id]
    * @return: org.springframework.http.ResponseEntity<java.lang.Object>
    * @Author: starao
    * @Date: 2021/11/27
    */
    @Log("删除菜单")
    @DeleteMapping("/menu/del")
    public ResponseEntity<Object> delMenu(Long id){
        try {
            menuService.delMenu(id);
            return success(true, "删除成功");
        } catch (BadRequestException e) {
            return fail(false, e.getMsg());
        }
    }
}
/**
    * @Description: 获取角色列表
    * @Param: [blurry]
    * @return: org.springframework.http.ResponseEntity<java.lang.Object>
    * @Author: starao
    * @Date: 2021/11/27
    */
    @Log("获取角色列表")
    @GetMapping("/role/table")
    public ResponseEntity<Object> getRoleList(String blurry){
        try {
            return success(true, roleService.getRoleList(blurry));
        } catch (Exception e) {
            return fail(false,"获取角色失败");
        }
    }

    /**
    * @Description: 编辑角色
    * @Param: [role]
    * @return: org.springframework.http.ResponseEntity<java.lang.Object>
    * @Author: starao
    * @Date: 2021/11/27
    */
    @Log("编辑角色")
    @PostMapping("/role/edit")
    @PreAuthorize("hasRole('ROLE_ADMIN')")
    public ResponseEntity<Object> editRole(@RequestBody SysRole role){
        String str = StringUtil.getEditType(role.getId());
        try {
            roleService.editRole(role);
            return success(true, str);
        } catch (Exception e) {
            return fail(false, "编辑角色失败");
        }
    }

    /**
    * @Description: 删除角色
    * @Param: [id]
    * @return: org.springframework.http.ResponseEntity<java.lang.Object>
    * @Author: starao
    * @Date: 2021/11/27
    */
    @Log("删除角色")
    @DeleteMapping("/role/del")
    public ResponseEntity<Object> delRole(Long id){
        try {
            roleService.delRole(id);
            return success(true, "删除成功");
        } catch (Exception e) {
            return fail(false, "删除角色失败");
        }
    }

    /**
    * @Description: 角色选择框列表
    * @Param: [userId]
    * @return: org.springframework.http.ResponseEntity<java.lang.Object>
    * @Author: starao
    * @Date: 2021/11/27
    */
    @Log("获取角色选择框列表")
    @GetMapping("/role/select")
    public ResponseEntity<Object> getAllRoleForXm(Long userId){
        try {
            return success(true, roleService.getAllRoleForXm(userId));
        } catch (Exception e) {
            return fail(false, "获取角色失败");
        }
    }
}
In this assignment, I have gained multiple skill improvements, especially in the implementation of separating front-end and back-end development. Through this practice, I have realized the importance of efficient communication between the front-end and back-end, familiarized myself with their interaction methods, and improved my information retrieval capabilities. I am able to more effectively search for and integrate relevant technical resources to solve various challenges in development.
In terms of backend development, I have gained a preliminary understanding of the Java language and mastered the basic application of the Spring Boot framework. Through learning, I have learned how to create RESTful APIs to handle common CRUD operations and manage data interactions, which enables me to effectively ensure the normal operation of server-side functionality.
During the front-end development process, I systematically studied Vue.js and its related ecosystem, especially the application of the Element UI component library. These knowledge not only helped me deepen my understanding of Vue.js structures, but also enabled me to flexibly apply them in practical projects. Specifically, I have implemented multiple functions such as creating pop-up forms, designing page layouts, implementing sidebar functionality, organizing form layouts, displaying data in tables, and adding pagination functionality, significantly improving the user experience.
In addition, I also learned the deployment process of cloud servers, which enables users to access the system online and ensures the stability of the system in actual environments. This series of learning and practice not only enhanced my technical skills, but also gave me a more comprehensive understanding of front-end and back-end separation architecture, laying a solid foundation for future project development. In short, this assignment has comprehensively improved my development skills and pointed out the direction for my further exploration in the field of software development.
Finally, thank you for watching and humbly accept all criticism and corrections