


5,380
社区成员
 发帖
发帖 与我相关
与我相关 我的任务
我的任务
 分享
分享在人工智能与边缘计算深度融合的浪潮下,边缘端的高效智能处理成为推动各行业智能化升级的关键。高通骁龙 QCS8550 作为物联网领域的旗舰级处理器,凭借先进的 4 纳米工艺制程,展现出令人瞩目的性能实力。其拥有强大的计算能力,边缘 AI 处理性能高达 48TOPS,搭载的 Qualcomm Kryo 中央处理器计算能力较前代提升 1.5 倍,Qualcomm Adreno GPU 性能更是前代的三倍,还支持硬件加速光线追踪技术,能高效处理多种视频格式与分辨率,为复杂智能应用提供坚实硬件基础。
YOLO11-obb 分类模型在目标检测领域意义重大,专注于定向目标的分类任务,能精准识别图像或视频中具有方向性的目标实例并进行分类。在智能监控中,可准确区分不同朝向的车辆、行人等;在无人机应用里,能精准识别地面上不同朝向的建筑物、设施、农作物等目标并进行分类,助力无人机在测绘、巡检、农业监测等任务中高效作业,为各领域提供更精准的目标信息。
本次对高通 QCS8550 部署 YOLO11-obb 分类模型及性能测试的研究,旨在充分发挥 QCS8550 的硬件性能,高效运行 YOLO11-obb 模型,为相关领域应用落地提供技术支撑与实践参考。
Qualcomm Dragonwing™ QCM8550 | Qualcomm
模型优化平台 (AIMO) 用户指南 | APLUX Doc Center
|
模型 尺寸640*640 |
CPU |
NPU QNN2.31 | NPU QNN2.31 | |||
| FP32 | FP16 | INT8 | ||||
| YOLO11n-obb | 259.45 ms | 3.85 FPS | 4.55 ms | 219.78 FPS | 1.77 ms | 564.97 FPS |
| YOLO11s-obb | 567.87 ms | 1.76 FPS | 6.75 ms | 148.15 FPS | 2.76 ms | 362.32 FPS |
| YOLO11m-obb | 1319.5 ms | 0.76 FPS | 17.29 ms | 57.84 FPS | 5.18 ms | 193.05 FPS |
| YOLO11l-obb | 1638.63 ms | 0.61 FPS | 21.32 ms | 46.90 FPS | 6.56 ms | 152.44 FPS |
| YOLO11x-obb | 3209.81 ms | 0.31 FPS | 48.52 ms | 20.61 FPS | 13.86 ms | 72.15 FPS |
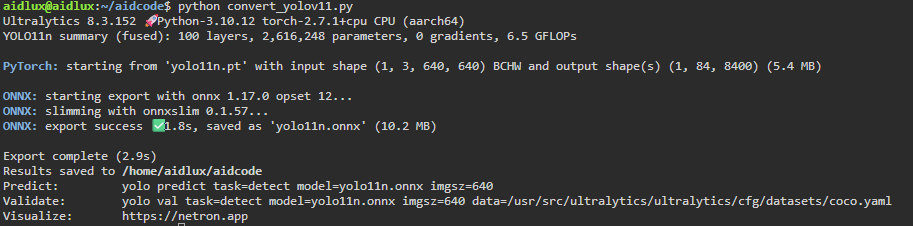
点击链接可以下载YOLO11-obb系列模型的pt格式,其他模型尺寸可以通过AIMO转换模型,并修改下面参考代码中的model_size测试即可
python3.10 -m pip install --upgrade pip
pip -V
aidlux@aidlux:~/aidcode$ pip -V
pip 25.1.1 from /home/aidlux/.local/lib/python3.10/site-packages/pip (python 3.10)
pip install ultralytics onnx
方法 1:临时添加环境变量(立即生效)
在终端中执行以下命令,将 ~/.local/bin 添加到当前会话的环境变量中
export PATH="$PATH:$HOME/.local/bin"
yolo --version,若输出版本号(如 0.0.2),则说明命令已生效。方法 2:永久添加环境变量(长期有效)
echo 'export PATH="$PATH:$HOME/.local/bin"' >> ~/.bashrc
source ~/.bashrc  # 使修改立即生效
验证:执行 yolo --version,若输出版本号(如 0.0.2),则说明命令已生效。
测试环境中安装yolo版本为8.3.152
![]()
提示:如果遇到用户组权限问题,可以忽悠,因为yolo命令会另外构建临时文件,也可以执行下面命令更改用户组,执行后下面的警告会消失:
sudo chown -R aidlux:aidlux ~/.config/
sudo chown -R aidlux:aidlux ~/.config/Ultralytics
可能遇见的报错如下:
WARNING ⚠️ user config directory '/home/aidlux/.config/Ultralytics' is not writeable, defaulting to '/tmp' or CWD.Alternatively you can define a YOLO_CONFIG_DIR environment variable for this path.
新建一个python文件,命名自定义即可,用于模型转换以及导出:
from ultralytics import YOLO

# 加载同级目录下的.pt模型文件
model = YOLO('yolo11n-obb.pt')  # 替换为实际模型文件名

# 导出ONNX配置参数
export_params = {
    'format': 'onnx',
    'opset': 12,          # 推荐算子集版本
    'simplify': True,     # 启用模型简化
    'dynamic': False,     # 固定输入尺寸
    'imgsz': 640,         # 标准输入尺寸
    'half': False         # 保持FP32精度
}

# 执行转换并保存到同级目录
model.export(**export_params)
执行该程序完成将pt模型导出为onnx模型。
提示:Yolo11s-obb,Yolo11m-obb,Yolo11l-obb,Yolo11x-obb替换代码中Yolo11n即可;
Step1:选择模型优化,模型格式选择onnx格式上传模型

Step2:选择芯片型号以及目标框架,这里我们选择QCS8550+Qnn2.31

Step3:点击查看模型,使用Netron查看模型结构,进行输入输出的填写
使用Netron工具查看onnx模型结构,选择剪枝位置。

参考上图中红色框部分填写,其他不变,注意开启自动量化功能,AIMO更多操作查看使用说明或参考AIMO平台
/model.23/Mul_5_output_0
/model.23/Sigmoid_1_output_0
/model.23/Mul_output_0

Step4:接下来进行提交即可,转换完成后将目标模型文件下载,解压缩后其中的.bin.aidem文件即为模型文件

检查aidlux环境中的aidlite版本是否与我们转换模型时选择的Qnn版本一致,终端执行:
sudo aid-pkg installed
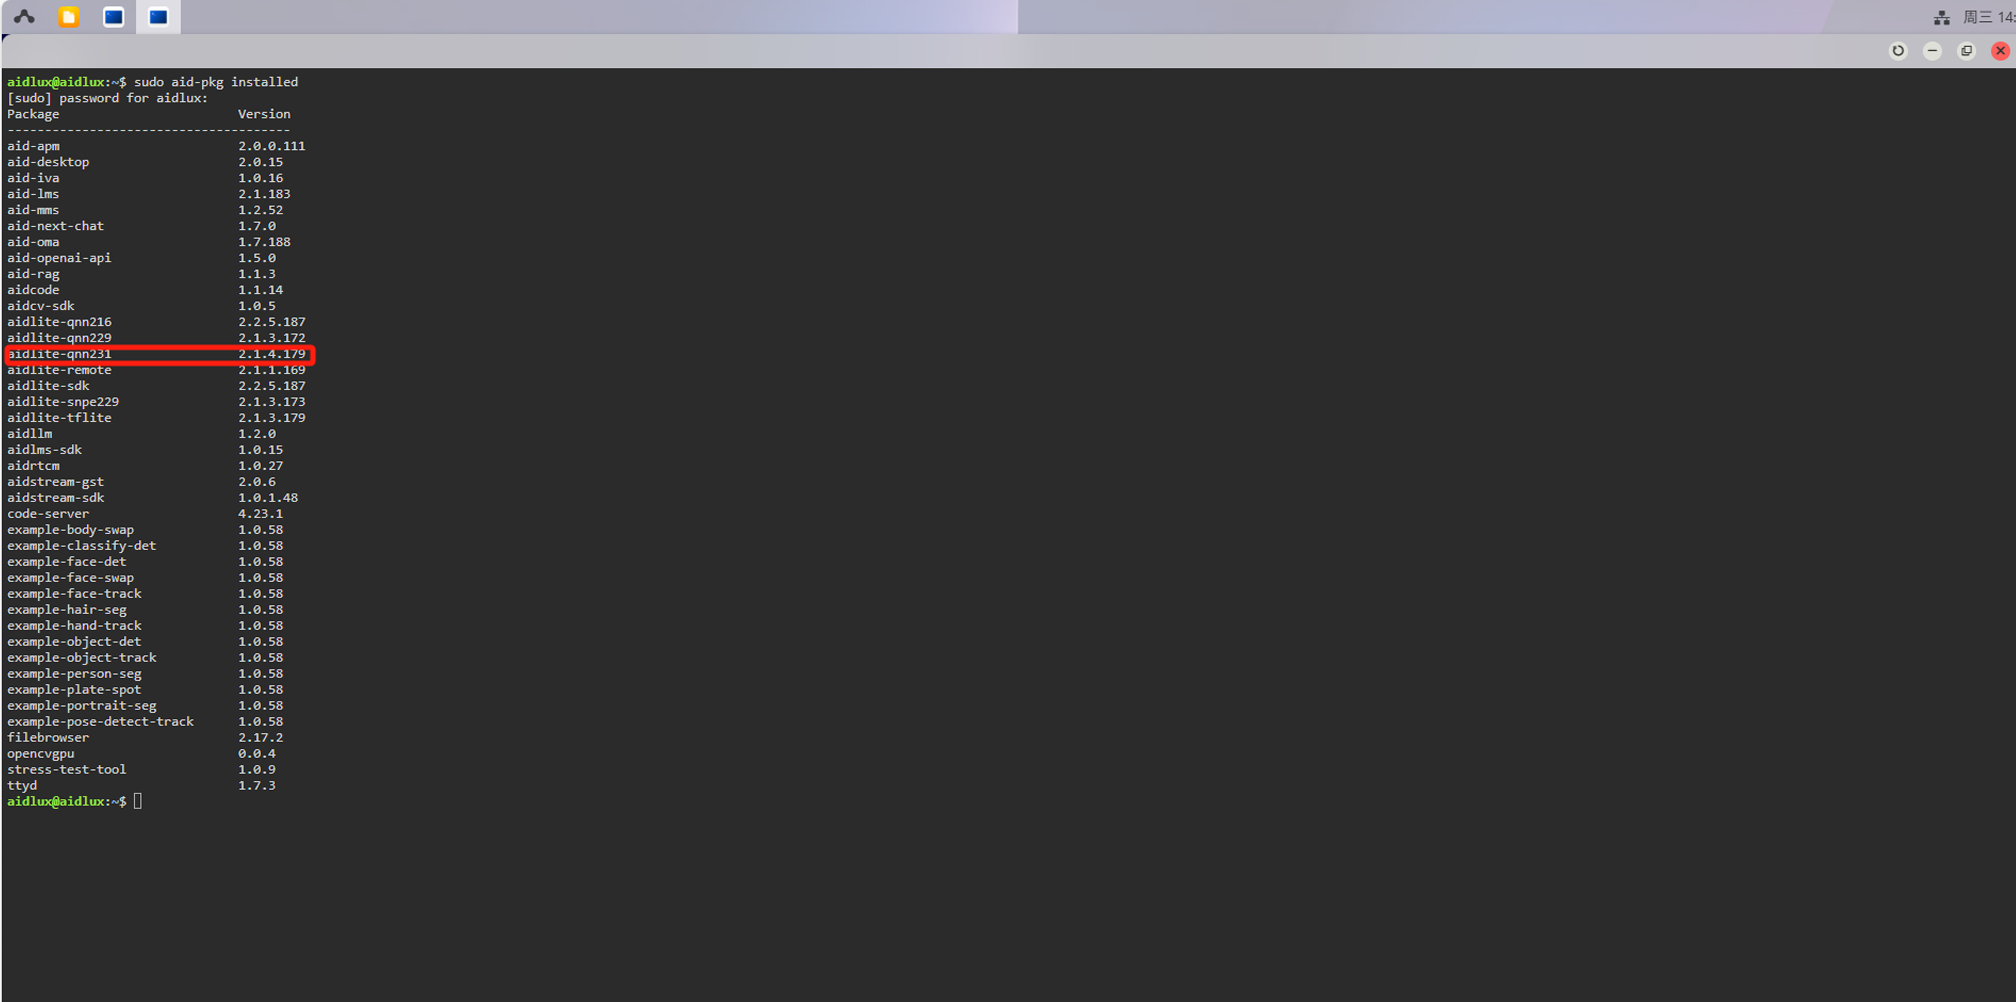
如果没有aidlite-qnn231,需要安装:
sudo aid-pkg update
sudo aid-pkg install aidlite-sdk

# Install the latest version of AidLite (latest QNN version)
sudo aid-pkg install aidlite
💡注意
Linux环境下,安装指定QNN版本的AidLite SDK:sudo aid-pkg install aidlite-{QNN Version}
例如:安装QNN2.31版本的AidLite SDK —— sudo aid-pkg install aidlite-qnn231
import os
import cv2
import numpy as np
import onnxruntime as ort
import logging
import aidlite
import time
import argparse

"""
YOLO11 旋转目标检测OBB
1、ONNX模型推理、可视化
2、ONNX输出格式: x_center, y_center, width, height, class1_confidence, ..., classN_confidence, angle
3、支持不同尺寸图片输入、支持旋转NMS过滤重复框、支持ProbIoU旋转IOU计算
"""

def letterbox(img, new_shape=(640, 640), color=(0, 0, 0), auto=False, scale_fill=False, scale_up=False, stride=32):
    """
    将图像调整为指定尺寸,同时保持长宽比,添加填充以适应目标输入形状。
    :param img: 输入图像
    :param new_shape: 目标尺寸
    :param color: 填充颜色
    :param auto: 是否自动调整填充为步幅的整数倍
    :param scale_fill: 是否强制缩放以完全填充目标尺寸
    :param scale_up: 是否允许放大图像
    :param stride: 步幅,用于自动调整填充
    :return: 调整后的图像、缩放比例、填充尺寸(dw, dh)
    """
    # 获取原始图像尺寸
    shape = img.shape[:2]

    # 处理目标尺寸参数,如果是整数则转换为元组
    if isinstance(new_shape, int):
        new_shape = (new_shape, new_shape)

    # 计算缩放比例,确保不超过原始尺寸(如果不允许放大)
    r = min(new_shape[0] / shape[0], new_shape[1] / shape[1])
    if not scale_up:
        r = min(r, 1.0)

    # 计算调整后的尺寸和填充量
    ratio = r, r
    new_unpad = int(round(shape[1] * r)), int(round(shape[0] * r))
    dw, dh = new_shape[1] - new_unpad[0], new_shape[0] - new_unpad[1]

    # 根据参数调整填充方式
    if auto:
        dw, dh = np.mod(dw, stride), np.mod(dh, stride)
    elif scale_fill:
        dw, dh = 0.0, 0.0
        new_unpad = (new_shape[1], new_shape[0])
        ratio = new_shape[1] / shape[1], new_shape[0] / shape[0]

    # 将填充量均分在图像两侧
    dw /= 2
    dh /= 2

    # 调整图像尺寸
    if shape[::-1] != new_unpad:
        img = cv2.resize(img, new_unpad, interpolation=cv2.INTER_LINEAR)

    # 计算填充的上下左右边界
    top, bottom = int(round(dh - 0.1)), int(round(dh + 0.1))
    left, right = int(round(dw - 0.1)), int(round(dw + 0.1))

    # 添加填充并返回结果
    img = cv2.copyMakeBorder(img, top, bottom, left, right, cv2.BORDER_CONSTANT, value=color)
    return img, ratio, (dw, dh)

def _get_covariance_matrix(obb):
    """
    计算旋转边界框的协方差矩阵。
    :param obb: 旋转边界框 (Oriented Bounding Box),包含中心坐标、宽、高和旋转角度
    :return: 协方差矩阵的三个元素 a, b, c
    """
    # 提取边界框的宽、高和角度
    widths = obb[..., 2] / 2
    heights = obb[..., 3] / 2
    angles = obb[..., 4]

    # 计算角度的余弦和正弦值
    cos_angle = np.cos(angles)
    sin_angle = np.sin(angles)

    # 计算协方差矩阵的三个元素
    a = (widths * cos_angle)**2 + (heights * sin_angle)**2
    b = (widths * sin_angle)**2 + (heights * cos_angle)**2
    c = widths * cos_angle * heights * sin_angle

    return a, b, c

def batch_probiou(obb1, obb2, eps=1e-7):
    """
    计算旋转边界框之间的 ProbIoU。
    :param obb1: 第一个旋转边界框集合
    :param obb2: 第二个旋转边界框集合
    :param eps: 防止除零的极小值
    :return: 两个旋转边界框之间的 ProbIoU
    """
    # 提取两个边界框集合的中心坐标
    x1, y1 = obb1[..., 0], obb1[..., 1]
    x2, y2 = obb2[..., 0], obb2[..., 1]

    # 计算两个边界框集合的协方差矩阵元素
    a1, b1, c1 = _get_covariance_matrix(obb1)
    a2, b2, c2 = _get_covariance_matrix(obb2)

    # 计算ProbIoU的各项
    t1 = ((a1[:, None] + a2) * (y1[:, None] - y2)**2 + (b1[:, None] + b2) * (x1[:, None] - x2)**2) / (
            (a1[:, None] + a2) * (b1[:, None] + b2) - (c1[:, None] + c2)**2 + eps) * 0.25
    t2 = ((c1[:, None] + c2) * (x2 - x1[:, None]) * (y1[:, None] - y2)) / (
            (a1[:, None] + a2) * (b1[:, None] + b2) - (c1[:, None] + c2)**2 + eps) * 0.5
    t3 = np.log(((a1[:, None] + a2) * (b1[:, None] + b2) - (c1[:, None] + c2)**2) /
                (4 * np.sqrt((a1 * b1 - c1**2)[:, None] * (a2 * b2 - c2**2)) + eps) + eps) * 0.5

    # 计算Bhattacharyya距离和Hellinger距离,最终得到ProbIoU
    bd = np.clip(t1 + t2 + t3, eps, 100.0)
    hd = np.sqrt(1.0 - np.exp(-bd) + eps)
    return 1 - hd

def rotated_nms_with_probiou(boxes, scores, iou_threshold=0.5):
    """
    使用 ProbIoU 执行旋转边界框的非极大值抑制(NMS)。
    :param boxes: 旋转边界框的集合
    :param scores: 每个边界框的置信度得分
    :param iou_threshold: IoU 阈值,用于确定是否抑制框
    :return: 保留的边界框索引列表
    """
    # 根据置信度得分降序排序
    order = scores.argsort()[::-1]
    keep = []

    # 执行NMS算法
    while len(order) > 0:
        # 选择置信度最高的边界框
        i = order[0]
        keep.append(i)

        # 如果只剩下一个边界框,退出循环
        if len(order) == 1:
            break

        # 计算当前边界框与其余边界框的ProbIoU
        remaining_boxes = boxes[order[1:]]
        iou_values = batch_probiou(boxes[i:i+1], remaining_boxes).squeeze(0)

        # 保留IoU小于阈值的边界框
        mask = iou_values < iou_threshold
        order = order[1:][mask]

    return keep

def run_inference(session, image_bytes, imgsz=(640, 640),invoke_nums=100):
    """
    对输入图像进行预处理,然后使用ONNX模型执行推理。
    :param session: ONNX运行会话对象
    :param image_bytes: 输入图像的字节数据
    :param imgsz: 模型输入的尺寸
    :return: 推理结果、缩放比例、填充尺寸
    """
    # 解码图像字节数据
    im0 = cv2.imdecode(np.frombuffer(image_bytes, np.uint8), cv2.IMREAD_COLOR)
    if im0 is None:
        raise ValueError("无法从image_bytes解码图像")

    # 调整图像尺寸以适应模型输入
    img, ratio, (dw, dh) = letterbox(im0, new_shape=imgsz)
    print(f">> img1 : {img.shape}")
    print(f">> (dw, dh) : {dw} {dh}")

    # 图像归一化处理
    img = (img/255.).astype(np.float32)

    # 设置模型输入
    session.set_input_tensor(0, img)

    # 多次执行推理以获取性能数据
    invoke_time=[]
    for i in range(invoke_nums):
        t1=time.time()
        if session.invoke() != 0:
            raise RuntimeError("Inference failed!")
        cost_time = (time.time()-t1)*1000
        invoke_time.append(cost_time)

    # 计算并打印推理时间统计信息
    max_invoke_time = max(invoke_time)
    min_invoke_time = min(invoke_time)
    mean_invoke_time = sum(invoke_time)/invoke_nums
    var_invoketime=np.var(invoke_time)
    print("====================================")
    print(f"QNN invoke {invoke_nums} times:\n --mean_invoke_time is {mean_invoke_time} \n --max_invoke_time is {max_invoke_time} \n --min_invoke_time is {min_invoke_time} \n --var_invoketime is {var_invoketime}")
    print("====================================")

    # 获取模型输出并整理
    output_shapes = [[1, 1, 8400], [1,15,8400], [1,4,8400]]
    pred_cls = session.get_output_tensor(0).astype(np.float32).reshape(output_shapes[0])
    pred_obj = session.get_output_tensor(1).astype(np.float32).reshape(output_shapes[1])
    pred_loc = session.get_output_tensor(2).astype(np.float32).reshape(output_shapes[2])

    # 合并输出为单个结果数组
    result = np.concatenate([pred_loc,pred_obj,pred_cls], axis=1)

    return result, ratio, (dw, dh)

def parse_onnx_output(output, ratio, dwdh, conf_threshold=0.5, iou_threshold=0.5):
    """
    解析ONNX模型的输出,提取旋转边界框坐标、置信度和类别信息,并应用旋转NMS。
    :param output: ONNX模型的输出,包含预测的边界框信息
    :param ratio: 缩放比例,用于将坐标还原到原始尺度
    :param dwdh: 填充的宽高,用于调整边界框的中心点坐标
    :param conf_threshold: 置信度阈值,过滤低于该阈值的检测框
    :param iou_threshold: IoU 阈值,用于旋转边界框的非极大值抑制(NMS)
    :return: 符合条件的旋转边界框的检测结果
    """
    boxes, scores, classes, detections = [], [], [], []

    # 获取检测的边界框数量和类别数量
    num_detections = output.shape[2]
    num_classes = output.shape[1] - 6

    # 逐个解析每个检测结果
    for i in range(num_detections):
        detection = output[0, :, i]

        # 提取边界框的中心坐标、宽高和旋转角度
        x_center, y_center, width, height = detection[0], detection[1], detection[2], detection[3]
        angle = detection[-1]

        # 处理类别置信度
        if num_classes > 0:
            class_confidences = detection[4:4 + num_classes]
            if class_confidences.size == 0:
                continue
            class_id = np.argmax(class_confidences)
            confidence = class_confidences[class_id]
        else:
            confidence = detection[4]
            class_id = 0

        # 过滤掉低置信度的检测结果
        if confidence > conf_threshold:
            # 还原边界框坐标到原始图像尺寸
            x_center = (x_center - dwdh[0]) / ratio[0]
            y_center = (y_center - dwdh[1]) / ratio[1]
            width /= ratio[0]
            height /= ratio[1]

            # 保存边界框信息
            boxes.append([x_center, y_center, width, height, angle])
            scores.append(confidence)
            classes.append(class_id)

    # 如果没有检测到符合条件的边界框,返回空列表
    if not boxes:
        return []

    # 转换为NumPy数组以便处理
    boxes = np.array(boxes)
    scores = np.array(scores)
    classes = np.array(classes)

    # 应用旋转NMS过滤重叠的边界框
    keep_indices = rotated_nms_with_probiou(boxes, scores, iou_threshold=iou_threshold)

    # 构建最终检测结果
    for idx in keep_indices:
        x_center, y_center, width, height, angle = boxes[idx]
        confidence = scores[idx]
        class_id = classes[idx]

        # 计算旋转边界框的四个角点坐标
        obb_corners = calculate_obb_corners(x_center, y_center, width, height, angle)

        # 保存最终检测结果
        detections.append({
            "position": obb_corners,
            "confidence": float(confidence),
            "class_id": int(class_id),
            "angle": float(angle)
        })

    return detections

def calculate_obb_corners(x_center, y_center, width, height, angle):
    """
    根据旋转角度计算旋转边界框的四个角点。
    :param x_center: 边界框中心的 x 坐标
    :param y_center: 边界框中心的 y 坐标
    :param width: 边界框的宽度
    :param height: 边界框的高度
    :param angle: 旋转角度
    :return: 旋转边界框的四个角点坐标
    """
    # 计算旋转角度的余弦和正弦值
    cos_angle = np.cos(angle)
    sin_angle = np.sin(angle)

    # 计算宽度和高度的一半
    dx = width / 2
    dy = height / 2

    # 计算旋转边界框的四个角点坐标
    corners = [
        (int(x_center + cos_angle * dx - sin_angle * dy), int(y_center + sin_angle * dx + cos_angle * dy)),
        (int(x_center - cos_angle * dx - sin_angle * dy), int(y_center - sin_angle * dx + cos_angle * dy)),
        (int(x_center - cos_angle * dx + sin_angle * dy), int(y_center - sin_angle * dx - cos_angle * dy)),
        (int(x_center + cos_angle * dx + sin_angle * dy), int(y_center + sin_angle * dx - cos_angle * dy)),
    ]

    return corners

def save_detections(image, detections, output_path):
    """
    在图像上绘制旋转边界框检测结果并保存。
    :param image: 原始图像 (BGR格式,OpenCV读取)
    :param detections: 检测结果列表,每个元素包含 'position'(角点坐标), 'confidence', 'class_id'
    :param output_path: 结果图像保存路径
    """
    print("save_detections run ")

    # 类别ID到类别名称的映射
    class_names = {
        0: 'plane', 1: 'ship', 2: 'storage tank', 3: 'baseball diamond',
        4: 'tennis court', 5: 'basketball court', 6: 'ground track field',
        7: 'harbor', 8: 'bridge', 9: 'large vehicle', 10: 'small vehicle',
        11: 'helicopter', 12: 'roundabout', 13: 'soccer ball field', 14: 'swimming pool'
    }

    # 在图像上绘制每个检测结果
    for det in detections:
        corners = det['position']  # 四个角点 [(x1,y1), (x2,y2), (x3,y3), (x4,y4)]
        confidence = det['confidence']
        class_id = det['class_id']

        # 绘制旋转矩形边框
        for j in range(4):
            pt1 = tuple(map(int, corners[j]))
            pt2 = tuple(map(int, corners[(j + 1) % 4]))
            cv2.line(image, pt1, pt2, (0, 0, 255), 2)

        # 获取类别名
        class_name = class_names.get(class_id, f'class_{class_id}')

        # 在第一个角点上方绘制类别和置信度文本
        text = f'{class_name}: {confidence:.2f}'
        text_pos = (int(corners[0][0]), int(corners[0][1]) - 10)
        cv2.putText(image, text, text_pos, cv2.FONT_HERSHEY_SIMPLEX, 0.6, (255, 255, 255), 2)

    # 保存图像
    cv2.imwrite(output_path, image)

def process_images_in_folder(folder_path,  output_folder, conf_threshold, iou_threshold, imgsz,args):
    """
    批量处理文件夹中的图像,执行推理、解析和可视化,保存结果。
    :param folder_path: 输入图像文件夹路径
    :param model_weights: ONNX模型权重文件路径
    :param output_folder: 输出结果文件夹路径
    :param conf_threshold: 置信度阈值
    :param iou_threshold: IoU 阈值,用于旋转NMS
    :param imgsz: 模型输入大小
    """
    # 创建并配置推理引擎
    config = aidlite.Config.create_instance()
    if config is None:
        raise RuntimeError("Create config failed!")

    # 设置推理引擎类型和加速方式
    config.implement_type = aidlite.ImplementType.TYPE_LOCAL
    if args.model_type.lower() == "qnn":
        config.framework_type = aidlite.FrameworkType.TYPE_QNN231
    elif args.model_type.lower() in ("snpe2", "snpe"):
        config.framework_type = aidlite.FrameworkType.TYPE_SNPE2
    config.accelerate_type = aidlite.AccelerateType.TYPE_DSP
    config.is_quantify_model = 1

    # 加载模型
    session = aidlite.Model.create_instance(args.target_model)
    if session is None:
        raise RuntimeError("Create model failed!")
    session = aidlite.InterpreterBuilder.build_interpretper_from_model_and_config(session, config)

    if session is None \
            or session.init() != 0 \
            or session.load_model() != 0:
        raise RuntimeError("Interpreter init/load failed!")
    print("Model loaded successfully!")

    # 创建输出文件夹
    if not os.path.exists(output_folder):
        os.makedirs(output_folder)

    # 处理文件夹中的每张图像
    for filename in os.listdir(folder_path):
        if filename.endswith(('.jpg', '.png', '.jpeg')):
            image_path = os.path.join(folder_path, filename)
            with open(image_path, 'rb') as f:
                image_bytes = f.read()
            print("image_path:", image_path)

            # 执行推理
            raw_output, ratio, dwdh = run_inference(session=session, image_bytes=image_bytes, imgsz=imgsz)

            # 解析模型输出
            detections = parse_onnx_output(raw_output, ratio, dwdh, conf_threshold=conf_threshold, iou_threshold=iou_threshold)

            # 解码图像并保存检测结果
            im0 = cv2.imdecode(np.frombuffer(image_bytes, np.uint8), cv2.IMREAD_COLOR)
            output_path = os.path.join(output_folder, filename)
            save_detections(im0, detections, output_path)

def parser_args():
    """
    解析命令行参数
    """
    parser = argparse.ArgumentParser("YOLOv11n‑OBB image inference")
    parser.add_argument("--target_model", type=str, default='yolov11s_obb/cutoff_yolo11s-obb_qcs8550_fp16.qnn231.ctx.bin',
                        help="Path to .ctx/.bin quantized model")
    parser.add_argument("--model_type", type=str, default="QNN",
                        help="Backend type: QNN or SNPE2")
    return parser.parse_args()

# 主函数:加载参数
if __name__ == "__main__":
    # 解析命令行参数
    args = parser_args()

    # 设置输入输出路径和参数
    folder_path = r"data"  # 输入图像文件夹路径
    output_folder = "results"  # 输出结果文件夹
    conf_threshold = 0.5  # 置信度阈值
    iou_threshold = 0.5  # IoU阈值,用于旋转NMS
    imgsz = (640, 640)  # 模型输入大小

    # 执行批量处理
    process_images_in_folder(folder_path, output_folder, conf_threshold, iou_threshold, imgsz,args)


